Pulling the motor

Thread Tools
 
Search this Thread
 
Old December 26th, 2013, 04:24 PM
  #721  
Registered User
 
Lars's Avatar
 
Join Date: Jul 2009
Location: Dewey AZ
Posts: 314
when you do the turkey tray make SURE the tray dimples are seated in the head! its ok if its a little off or a snug fit twist it or whatever but before you set the intake, them dimples have to be seated.


as for your exhaust don't expect the perfict sound, you didn't fill the crossovers and weld up the center devider.


the last time I used a turkey tray I did a dry run and torqued the intake down to about 25 lbs and marked it with a scratchall to locate the ports. took it all apart to check the lineup of everything. then gooped all up and torqued everything down to 35 lbs. have an hour of uninterrupted time set aside for the intake install. and tell your fam you cant be interrupted. good luck.
Lars is offline  
Old December 26th, 2013, 06:26 PM
  #722  
Registered User
Thread Starter
 
Macadoo's Avatar
 
Join Date: Aug 2013
Location: Central Illinois
Posts: 3,900
I was thinking of using the VHT Aluminum color rather than black but do you think that will discolor quickly with the heat?
Macadoo is offline  
Old December 26th, 2013, 06:32 PM
  #723  
Registered User
Thread Starter
 
Macadoo's Avatar
 
Join Date: Aug 2013
Location: Central Illinois
Posts: 3,900
Originally Posted by Lars
when you do the turkey tray make SURE the tray dimples are seated in the head! its ok if its a little off or a snug fit twist it or whatever but before you set the intake, them dimples have to be seated.


as for your exhaust don't expect the perfict sound, you didn't fill the crossovers and weld up the center devider.


the last time I used a turkey tray I did a dry run and torqued the intake down to about 25 lbs and marked it with a scratchall to locate the ports. took it all apart to check the lineup of everything. then gooped all up and torqued everything down to 35 lbs. have an hour of uninterrupted time set aside for the intake install. and tell your fam you cant be interrupted. good luck.
I did the same thing today. Dry fit with the tray, torqued but only to about 15 lbs, and marked the placement. By dimples I assume you mean the flanged locator holes? Yeah, it took a little time but I did a lot of gentle bending until the tray just snaps into place with all four flanges seated in the four corner holes. I'm thinking a second pair of hands might be helpful with this. But it depends on the hands I suppose, lol.
Macadoo is offline  
Old December 26th, 2013, 06:49 PM
  #724  
Chevy budget Olds powered
 
coppercutlass's Avatar
 
Join Date: Jul 2011
Location: Elgin, Illinois
Posts: 8,632
If you think it's hard to do on a stand . I have done them twice in the car.
coppercutlass is offline  
Old December 26th, 2013, 07:05 PM
  #725  
Registered User
Thread Starter
 
Macadoo's Avatar
 
Join Date: Aug 2013
Location: Central Illinois
Posts: 3,900
I feel like a doofus thinking I could do all the stuff I've done with the motor still in the car. This was so much easier and actually kind of fun. With it in the car I would have been a grump every time I worked on it.
Macadoo is offline  
Old December 26th, 2013, 07:13 PM
  #726  
Chevy budget Olds powered
 
coppercutlass's Avatar
 
Join Date: Jul 2011
Location: Elgin, Illinois
Posts: 8,632
Btw I would go black paint on the headers. It's hard to keep the silver clean and it isn't a slick surface like ceramic coating. Another thing on a side note. I have never installed shorty headers. But with full length headers I always have to leave the oil filter adpter off until I install the pass. side header , Then with the dr. side I have to leave the header hanging off the front bolt and wedge the starter in. I made this easy by buying a modern style weather pack connector to easily disconnect the starter and the main power cable I used a junction block terminal which I mounted on the fender well and all I do is unbolt it and I have no wires to worry about taking care of under the car. Find out what the install procedure is for shorty headers. What cab be installed before or has to afterwards.
coppercutlass is offline  
Old December 26th, 2013, 07:43 PM
  #727  
Registered User
Thread Starter
 
Macadoo's Avatar
 
Join Date: Aug 2013
Location: Central Illinois
Posts: 3,900
Thanks Copper, I'll have a look at all that. I actually think i may just go with black stove paint. I'm reading mixed reviews on the VHT.
Macadoo is offline  
Old December 26th, 2013, 07:49 PM
  #728  
Chevy budget Olds powered
 
coppercutlass's Avatar
 
Join Date: Jul 2011
Location: Elgin, Illinois
Posts: 8,632
The vht has worked well for me just my experience. But I use the flat black stuff. Also I got a fovor to ask ya. can you just throw 2 bolts on to the cyl. head and take a pic of both sides and a front view. Im thinking of doing headers for my dad's olds powered 77 Pontiac Bonneville . I want to see how far they come down and how far off to the sides they hang. I have heard I can use A body full length headers on the b body which I have a spare set but I would like to get a visual of how much they hug the block.
coppercutlass is offline  
Old December 26th, 2013, 07:54 PM
  #729  
Registered User
Thread Starter
 
Macadoo's Avatar
 
Join Date: Aug 2013
Location: Central Illinois
Posts: 3,900
Can I do it in the morning? I'd like to let the block paint set overnight. Otherwise, not a problem. But I think I'd go with the Sandersons rather than these Hedmans.
Macadoo is offline  
Old December 26th, 2013, 07:58 PM
  #730  
Chevy budget Olds powered
 
coppercutlass's Avatar
 
Join Date: Jul 2011
Location: Elgin, Illinois
Posts: 8,632
yeah take your time. I still have to do a rear gear swap on it. Just replacde the steering column last weekend ., but the manifolds are choking up that motor pretty bad. It's one of the engines that used to be in my 72 . I don't like the sandersons. Too bulky. Im going to try to fit these full length headers I have but if they don't fit I'd like to get a visual on your block with your headers that way I can kinda picture where it would sit on his frame.
coppercutlass is offline  
Old December 26th, 2013, 08:15 PM
  #731  
Registered User
Thread Starter
 
Macadoo's Avatar
 
Join Date: Aug 2013
Location: Central Illinois
Posts: 3,900
I have one side. Stand by....
Macadoo is offline  
Old December 26th, 2013, 08:20 PM
  #732  
Registered User
Thread Starter
 
Macadoo's Avatar
 
Join Date: Aug 2013
Location: Central Illinois
Posts: 3,900
PM sent with pics. I got the passenger side but I'd have to message the driver's side over the dip stick tube. I hope it helps some.
Macadoo is offline  
Old December 26th, 2013, 08:24 PM
  #733  
Chevy budget Olds powered
 
coppercutlass's Avatar
 
Join Date: Jul 2011
Location: Elgin, Illinois
Posts: 8,632
Thanks for the pic. It might be easier to install the header with the dipstick off.
coppercutlass is offline  
Old December 26th, 2013, 08:33 PM
  #734  
Registered User
Thread Starter
 
Macadoo's Avatar
 
Join Date: Aug 2013
Location: Central Illinois
Posts: 3,900
Maybe so. I'll take a look tomorrow. Goodnight Copper.
Macadoo is offline  
Old December 27th, 2013, 09:11 AM
  #735  
Hookers under Hood
 
76olds's Avatar
 
Join Date: Nov 2013
Location: Ontario, Canada
Posts: 3,543
Mac... I bought a new dipstick, I have heard that the original will be in the way, also as per the install directions in the box. I'm going to pour a little "Jack" on mine to help get it out. Is it too late to send yours to be coated ? I believe I have the same ones as you ??
76olds is offline  
Old December 27th, 2013, 02:50 PM
  #736  
Registered User
Thread Starter
 
Macadoo's Avatar
 
Join Date: Aug 2013
Location: Central Illinois
Posts: 3,900
Originally Posted by 76olds
Mac... I bought a new dipstick, I have heard that the original will be in the way, also as per the install directions in the box. I'm going to pour a little "Jack" on mine to help get it out. Is it too late to send yours to be coated ? I believe I have the same ones as you ??
I didn't have too much trouble sliding it over the dipstick but I'm finding out that the holes weren't drilled correctly, they don't all line up . I'm going to have to open one of them up a little...but not much. Are you going to use gaskets?
Copper, this is why I haven't gotten you pictures of the driver's side yet. Sorry bud.
Macadoo is offline  
Old December 27th, 2013, 05:08 PM
  #737  
Registered User
Thread Starter
 
Macadoo's Avatar
 
Join Date: Aug 2013
Location: Central Illinois
Posts: 3,900
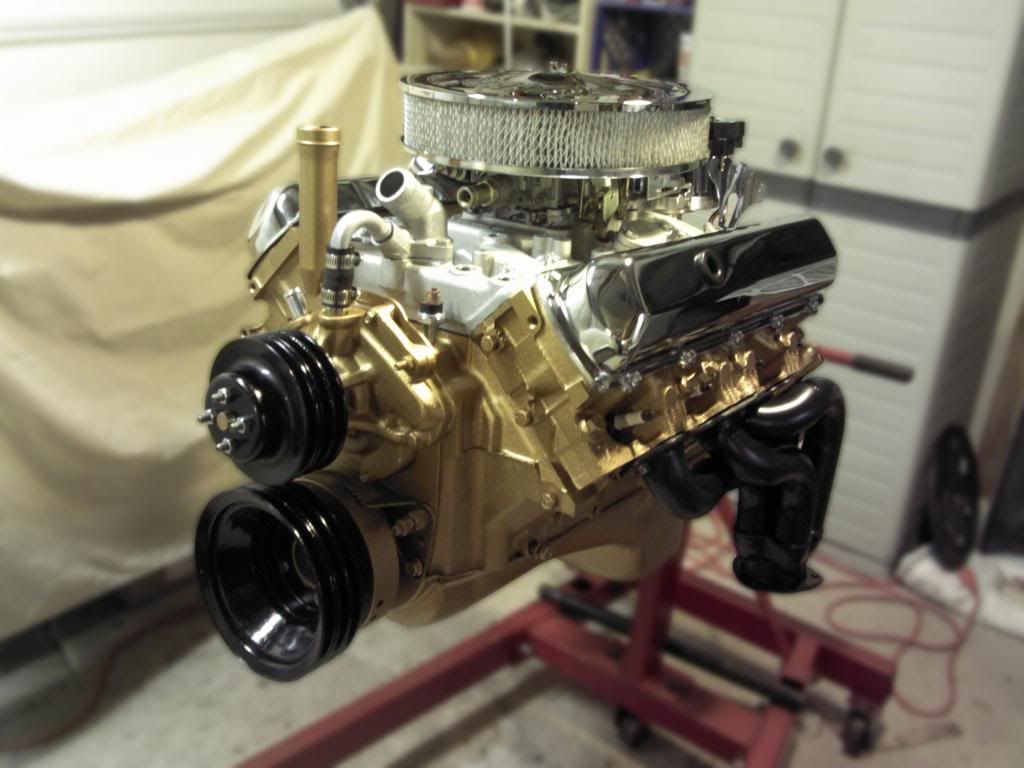
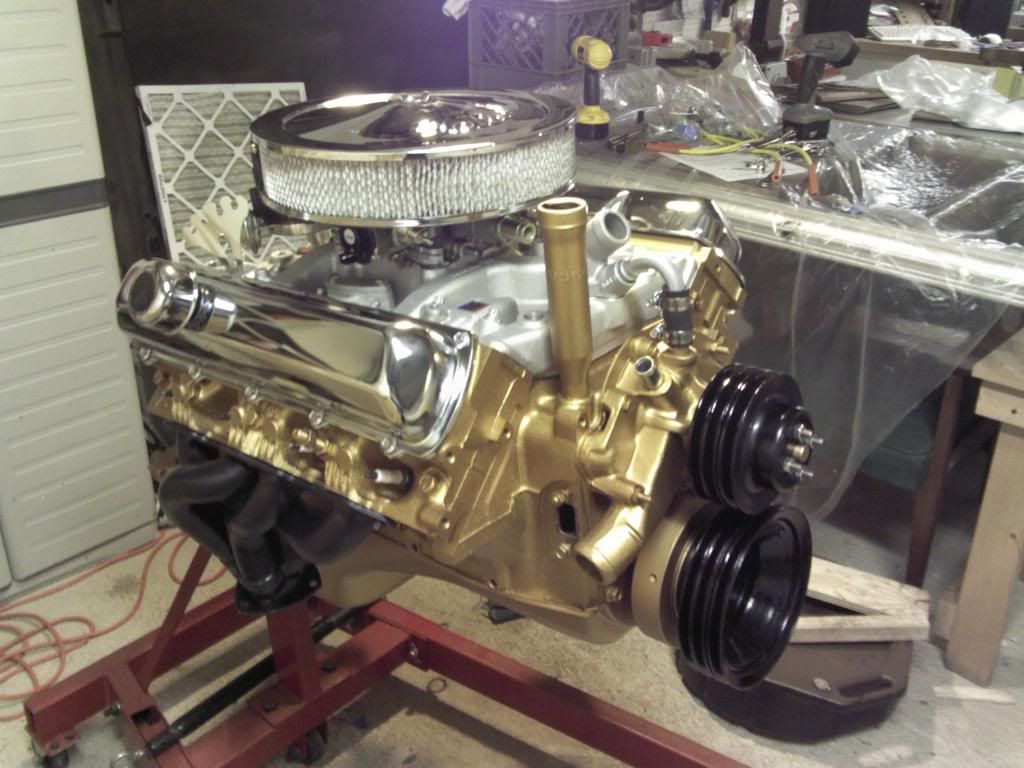
How'm I doing?

[IMG][/IMG]

[IMG][/IMG]
Macadoo is offline  
Old December 27th, 2013, 06:19 PM
  #738  
Justin
 
oldstata's Avatar
 
Join Date: Mar 2012
Location: utah
Posts: 3,448
That looks great Mac !!!

When you going to start mine
oldstata is offline  
Old December 27th, 2013, 06:20 PM
  #739  
Hookers under Hood
 
76olds's Avatar
 
Join Date: Nov 2013
Location: Ontario, Canada
Posts: 3,543
Wow that looks awesome !!! Great job I wish mine still looked that good .
76olds is offline  
Old December 27th, 2013, 06:23 PM
  #740  
Hookers under Hood
 
76olds's Avatar
 
Join Date: Nov 2013
Location: Ontario, Canada
Posts: 3,543
Originally Posted by Macadoo
I didn't have too much trouble sliding it over the dipstick but I'm finding out that the holes weren't drilled correctly, they don't all line up . I'm going to have to open one of them up a little...but not much. Are you going to use gaskets?
Copper, this is why I haven't gotten you pictures of the driver's side yet. Sorry bud.

Yes I bought the Remflex graphite gaskets, actually copper said they were awesome. Hmmm.. the two center holes on mine are slotted out a little, are yours? Is it the 2 outer holes not lining up ? Have you thought about a 1" carb spacer ?

Last edited by 76olds; December 27th, 2013 at 06:32 PM.
76olds is offline  
Old December 27th, 2013, 06:44 PM
  #741  
Hookers under Hood
 
76olds's Avatar
 
Join Date: Nov 2013
Location: Ontario, Canada
Posts: 3,543
I'm going to take your advice on getting a second set of hands when I do mine this time. Geez myself here being 47 yrs old now everytime I take my nuts out to put my bolt in, my nuts fall to the floor and I'd hate to loose em, So I figure I'll ask my wife to hold onto my nuts till I get my bolt in.
76olds is offline  
Old December 27th, 2013, 06:48 PM
  #742  
Registered User
Thread Starter
 
Macadoo's Avatar
 
Join Date: Aug 2013
Location: Central Illinois
Posts: 3,900
Originally Posted by 76olds
Yes I bought the Remflex graphite gaskets, actually copper said they were awesome. Hmmm.. the two center holes on mine are slotted out a little, are yours? Is it the 2 outer holes not lining up ? Have you thought about a 1" carb spacer ?
Yeah, it's the two outer holes. They're not way off but enough to make snugging the bolts all the way to the block impossible.
I'm getting a spacer but more for the insulating properties.
Macadoo is offline  
Old December 27th, 2013, 06:50 PM
  #743  
Registered User
Thread Starter
 
Macadoo's Avatar
 
Join Date: Aug 2013
Location: Central Illinois
Posts: 3,900
Originally Posted by oldstata
That looks great Mac !!!

When you going to start mine
Thanks oldstata! I'll build your motor if you do my body work and paint
Macadoo is offline  
Old December 27th, 2013, 06:50 PM
  #744  
Administrator
 
oldcutlass's Avatar
 
Join Date: Oct 2009
Location: Poteau, Ok
Posts: 40,795
Hmmmm, when I play golf, I get my wife to kiss my ***** for good luck.
oldcutlass is online now  
Old December 27th, 2013, 06:54 PM
  #745  
Justin
 
oldstata's Avatar
 
Join Date: Mar 2012
Location: utah
Posts: 3,448
Originally Posted by Macadoo
Thanks oldstata! I'll build your motor if you do my body work and paint
Lol but have you seen my body work I use front fenders on the rear quarters . But I can paint alittle tiger stripping and orange peel no problem
oldstata is offline  
Old December 27th, 2013, 07:15 PM
  #746  
Registered User
 
Lars's Avatar
 
Join Date: Jul 2009
Location: Dewey AZ
Posts: 314
Originally Posted by 76olds
I'm going to take your advice on getting a second set of hands when I do mine this time. Geez myself here being 47 yrs old now everytime I take my nuts out to put my bolt in, my nuts fall to the floor and I'd hate to loose em, So I figure I'll ask my wife to hold onto my nuts till I get my bolt in.


lmao... you can take the "automotive influence" out of this statement and it still makes sense
Lars is offline  
Old December 27th, 2013, 07:35 PM
  #747  
Registered User
Thread Starter
 
Macadoo's Avatar
 
Join Date: Aug 2013
Location: Central Illinois
Posts: 3,900
Originally Posted by 76olds
Yes I bought the Remflex graphite gaskets, actually copper said they were awesome. Hmmm.. the two center holes on mine are slotted out a little, are yours? Is it the 2 outer holes not lining up ? Have you thought about a 1" carb spacer ?
Got a part number and supplier for those gaskets?
Macadoo is offline  
Old December 27th, 2013, 10:01 PM
  #748  
Hookers under Hood
 
76olds's Avatar
 
Join Date: Nov 2013
Location: Ontario, Canada
Posts: 3,543
Part # RF-11-001 I bought them at performance improvements up here in Toronto $46.99


Eric
76olds is offline  
Old December 27th, 2013, 11:22 PM
  #749  
Hookers under Hood
 
76olds's Avatar
 
Join Date: Nov 2013
Location: Ontario, Canada
Posts: 3,543
Originally Posted by oldcutlass
Hmmmm, when I play golf, I get my wife to kiss my ***** for good luck.


Lmao ... Geez I'm just going to have to try that , Maybe I'll get lucky and be on in less than 5 attempts . I'll just have to keep em out of the ball washer
76olds is offline  
Old December 28th, 2013, 03:20 PM
  #750  
Registered User
Thread Starter
 
Macadoo's Avatar
 
Join Date: Aug 2013
Location: Central Illinois
Posts: 3,900
Originally Posted by 76olds
Part # RF-11-001 I bought them at performance improvements up here in Toronto $46.99


Eric
Thanks Eric
Macadoo is offline  
Old December 28th, 2013, 05:41 PM
  #751  
Registered User
 
Professur's Avatar
 
Join Date: Jul 2013
Location: Mo-Ray-Al, K-Bec.
Posts: 1,815
Originally Posted by Macadoo
How'm I doing?

[IMG][/IMG]

[IMG][/IMG]
Yep .. you suck
Professur is offline  
Old December 28th, 2013, 06:16 PM
  #752  
Registered User
 
kitfoxdave's Avatar
 
Join Date: Nov 2010
Location: treasure coast FL
Posts: 698
Sho looks purty!
I wish you would have practiced on my engine ....
;-)
kitfoxdave is offline  
Old December 28th, 2013, 08:00 PM
  #753  
Registered User
Thread Starter
 
Macadoo's Avatar
 
Join Date: Aug 2013
Location: Central Illinois
Posts: 3,900
Lol, thanks fellas
Macadoo is offline  
Old December 28th, 2013, 08:03 PM
  #754  
Registered User
Thread Starter
 
Macadoo's Avatar
 
Join Date: Aug 2013
Location: Central Illinois
Posts: 3,900
Originally Posted by Professur
Yep .. you suck
Guess I won't quit my day job
Macadoo is offline  
Old December 30th, 2013, 03:01 PM
  #755  
Hookers under Hood
 
76olds's Avatar
 
Join Date: Nov 2013
Location: Ontario, Canada
Posts: 3,543
Hey Mac I just picked up another 350 if you don't quit your day job are you open for nightshift ?
76olds is offline  
Old December 30th, 2013, 05:36 PM
  #756  
Registered User
Thread Starter
 
Macadoo's Avatar
 
Join Date: Aug 2013
Location: Central Illinois
Posts: 3,900
Originally Posted by 76olds
Hey Mac I just picked up another 350 if you don't quit your day job are you open for nightshift ?
I think you're on your own there Eric. My vacation is about over and I have a feeling this semester is going to be a day and night job. It's cool though, I got the classes I wanted

What year did you pick up? Doing a complete rebuild?
Macadoo is offline  
Old December 30th, 2013, 06:06 PM
  #757  
Justin
 
oldstata's Avatar
 
Join Date: Mar 2012
Location: utah
Posts: 3,448
Well Mac when is the install date ?
oldstata is offline  
Old December 31st, 2013, 02:38 PM
  #758  
Registered User
Thread Starter
 
Macadoo's Avatar
 
Join Date: Aug 2013
Location: Central Illinois
Posts: 3,900
Originally Posted by oldstata
Well Mac when is the install date ?
As much as I'd like to do it TOMORROW(!), I'm afraid it's a ways off. I want to do all the under-hood detailing before I drop it back in. The engine wasn't the only thing covered in black ooze
I also want to check the front seal on the trans and I HAVE to do breaks, probably with new lines. I think the front end work can wait until after the install though, so that's good. I had her up to 65 on the interstate bringing her home and although the suspension seemed a little soft, the steering was nice and tight. Oh yeah, shocks and springs too.
Happy new year everyone!
Macadoo is offline  
Old January 1st, 2014, 09:41 AM
  #759  
Justin
 
oldstata's Avatar
 
Join Date: Mar 2012
Location: utah
Posts: 3,448
Happy New Years Mac hope its a great one

Mac this thread has been inspiring so much that my kids and I finally tore into the big block lol
oldstata is offline  
Old January 1st, 2014, 11:52 AM
  #760  
Hookers under Hood
 
76olds's Avatar
 
Join Date: Nov 2013
Location: Ontario, Canada
Posts: 3,543
Enjoy your new classes I hope you have an awesome New Year. The 350 is out of a 73 cutlass its a blue block thou not gold. Not sure what I'm going to do with it yet I'm picking it up next week. It has 112k miles on it but for $75. I'll have fun taking it apart and see what I can do with it. I will get some pics and #s off of it and ask the guys here what I could do with it .
76olds is offline  


Quick Reply: Pulling the motor


All times are GMT -7. The time now is 06:05 AM.