Pulling the motor


 January 11th, 2014, 02:10 PM
#843
Registered User
Thread Starter
Join Date: Aug 2013
Location: Central Illinois
Posts: 3,900
Copper, sorry this took so long. As you can see the driver's side header doesn't hug the block as much as the left (which I'm sure you already know). I didn't have any issues with the oil filter adapter and it doesn't look like I will with the starter either.
[IMG]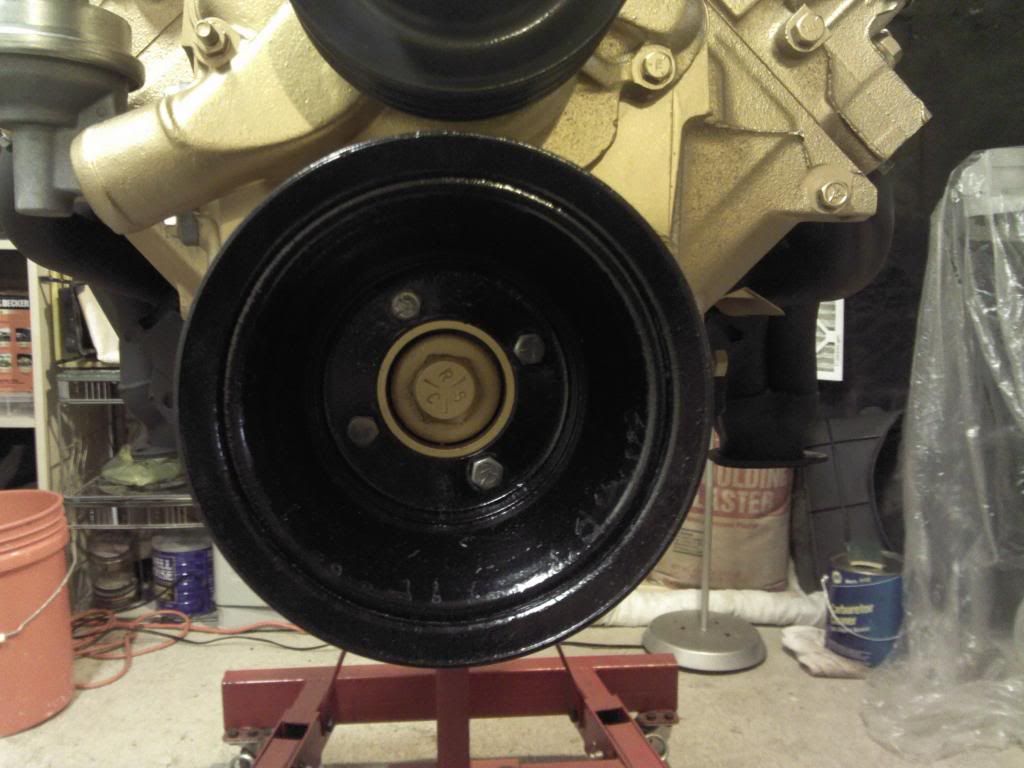 [/IMG]
[IMG]
 [/IMG]
 January 11th, 2014, 02:17 PM
#845
Registered User
Thread Starter
Join Date: Aug 2013
Location: Central Illinois
Posts: 3,900
I'm a little concerned about these valve covers leaking. I'm not trying to look a gift horse in the mouth but Maggie did get the cheap chinesium covers and I've read they don't seal very well. I pulled them to double check my rocker arm torque and both rubber gasket mating surfaces were covered in the red assembly lube (only on the lower part of the gasket where gravity was pulling the assembly lube). None had actually leaked out but it did get around the screws. I used copper adhesive to hold the gaskets to the covers but not to the black. I left that side of the gasket dry.
[IMG] [/IMG]
[IMG]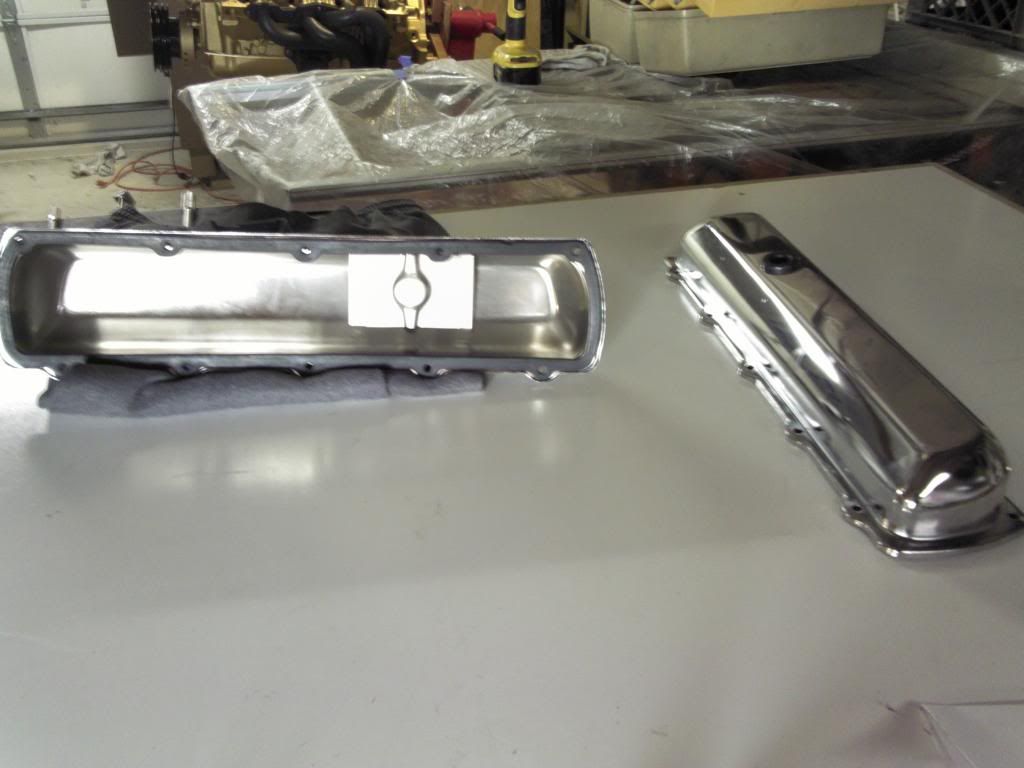 [/IMG]
[IMG]
 [/IMG]
[IMG]
 [/IMG]
January 11th, 2014, 02:26 PM
[/IMG]
January 11th, 2014, 02:26 PM
#846
Hookers under Hood
Join Date: Nov 2013
Location: Ontario, Canada
Posts: 3,543
I like them as well. They will blend in nice with a flat black lower engine bay , the gold block will POP nicely in there.
January 11th, 2014, 06:12 PM
#849
Justin
Join Date: Mar 2012
Location: utah
Posts: 3,448
I'm a little concerned about these valve covers leaking. I'm not trying to look a gift horse in the mouth but Maggie did get the cheap chinesium covers and I've read they don't seal very well. I pulled them to double check my rocker arm torque and both rubber gasket mating surfaces were covered in the red assembly lube (only on the lower part of the gasket where gravity was pulling the assembly lube). None had actually leaked out but it did get around the screws. I used copper adhesive to hold the gaskets to the covers but not to the black. I left that side of the gasket dry.
[IMG][/IMG]
[IMG][/IMG]
[IMG]
[/IMG][IMG]
[/IMG]
January 11th, 2014, 09:29 PM
#850
Registered User
Thread Starter
Join Date: Aug 2013
Location: Central Illinois
Posts: 3,900
Good news on the valve covers, thanks guys.
I didn't realize installing with the headers will be a problem. Will I still get the needed "crush" if I remove them and re-use? I made mine a bit tighter than Copper's.
I didn't realize installing with the headers will be a problem. Will I still get the needed "crush" if I remove them and re-use? I made mine a bit tighter than Copper's.
January 12th, 2014, 04:28 AM
#851
Hookers under Hood
Join Date: Nov 2013
Location: Ontario, Canada
Posts: 3,543
I would be kinda worried about removing the gaskets myself, you would want to seat them back in the same spot given the crush affect. But copper would know best !! I would get my handy dandy tape measure out and check I would think the shortys would drop down thru ok although I have loads of space in my 76. Nothing wrong with those covers they look just as good as other brands I had them on a 78 chebby monte carlo no problems. Just a bit of w/d 40 over the winter so as they don't rust and pit a bit.
January 12th, 2014, 09:41 AM
#853
Registered User
Thread Starter
Join Date: Aug 2013
Location: Central Illinois
Posts: 3,900
I want to simplify the re-install as much as possible so I'll go ahead and pull them off. It will give me a chance to clean the paint from the mating surface and measure the crush. If nothing else I'll just get another set. I don't mind making mistakes, I just don't like expensive ones. 
January 12th, 2014, 10:02 AM
#854
Hookers under Hood
Join Date: Nov 2013
Location: Ontario, Canada
Posts: 3,543
I wouldn't have thought to put them on after install either, I would have given you the heads up had I known. I think for the price of them I would just buy another set and not take any chances of hair-line cracks after removal. That may just be me sweating the small stuff thou.
January 12th, 2014, 04:34 PM
#855
You will be fine re using them. If they leak they can be replaced with out removing the header. I have re used header gaskets more than once no issues. the flat out header gaskets that are on my current 355. I installed new on my 307 last summer. I re used them when I installed the 355 no leaks , then I took my headers out when I dropped the trans and re used then yet again still no leaks. no torque wrench I just let the arm decide how tight I want the header bolts.
January 14th, 2014, 06:07 PM
#857
Hookers under Hood
Join Date: Nov 2013
Location: Ontario, Canada
Posts: 3,543
[QUOTE=Macadoo;640599]Thanks fellas. I'm having shop withdrawals 
Forget about Walmart the symptoms will only get worse, a good kick in the a$$ got me shopin for rear gears. Laid the posi out on the bed "poof" traction!! no more withdrawals.
Forget about Walmart the symptoms will only get worse, a good kick in the a$$ got me shopin for rear gears. Laid the posi out on the bed "poof" traction!! no more withdrawals.
January 18th, 2014, 04:38 PM
#858
Registered User
Thread Starter
Join Date: Aug 2013
Location: Central Illinois
Posts: 3,900
Had a little time in the shop today so I polished the valve cover screws. I had previously painted them with a faux chrome but it looked fake/cheap. Wire wheeled the old paint off, a little tripoli and buffing with a clean wheel and presto. I think they look pretty good now.
It's easy to see the difference. I was only about halfway done in the photo. The upper half are after the wire wheel.
[IMG]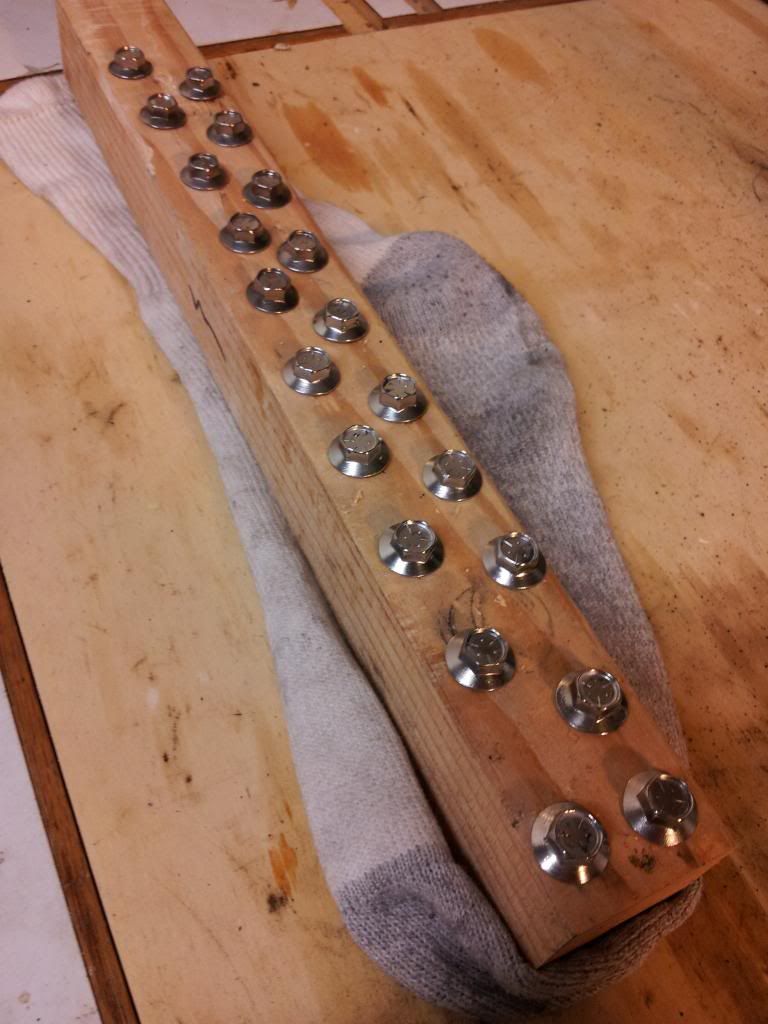 [/IMG]
The screws that came with the chrome covers are those long wingnut kinda' things. I didn't like the look and they wouldn't exactly work with the accessory brackets.
It's easy to see the difference. I was only about halfway done in the photo. The upper half are after the wire wheel.
[IMG]
 [/IMG]
The screws that came with the chrome covers are those long wingnut kinda' things. I didn't like the look and they wouldn't exactly work with the accessory brackets.
January 18th, 2014, 04:46 PM
#859
Hookers under Hood
Join Date: Nov 2013
Location: Ontario, Canada
Posts: 3,543
They look awesome, much better and cleaner then those long wingnut things sticking up imo anyway. I actually painted mine with my wifes nail polish and they still look great. pick your own color too !!
January 18th, 2014, 09:44 PM
#861
Registered User
Thread Starter
Join Date: Aug 2013
Location: Central Illinois
Posts: 3,900
That goes without saying at this point. Truth is, right now all I get is an hour here and an hour there. So it's little jobs to help me keep my sanity.
76, do they make an Olds gold nail polish? Might come in handy.
76, do they make an Olds gold nail polish? Might come in handy.
January 20th, 2014, 08:27 AM
#863
Registered User
Thread Starter
Join Date: Aug 2013
Location: Central Illinois
Posts: 3,900
I have an order of operations question. When it comes time to prime the system, how much time can I have between priming and first fire? If I understand correctly, I want the valve covers off when I prime, so I can see the oil getting to the rockers. But then I'll have accessory brackets to get on after the valve covers and the accessory belts, etc. So maybe prime and watch rockers, button it up and prime again right before firing? I think I just answered my own question. Thanks for listening 
January 20th, 2014, 08:33 AM
#864
Administrator
Join Date: Oct 2009
Location: Poteau, Ok
Posts: 40,795
Once it's been primed just assemble enough to get it running. Once you have verified all is ok, put the rest of it together. Priming usually feeds oil to all the required areas and it would be fine to even start it the following day. Just make sure when your priming all the rockers have oil flow. It may take some time be patient.
January 20th, 2014, 11:00 AM
#866
I usually prime it right before I fire it up. I tape off the dist. Hole assemble everything , top off fluids and the prime the system once all systems are go. Last time it took me a solid 10 minutes to get oil out the push rods. I used an air drill. You can easily kill and electric one. If you stab in your dist. Correctly it should fire up pretty fast. I don't know if you prime the carb like a holley but I use a holley and I fill the bowls through the vent tubes so I instantly have fuel.
January 20th, 2014, 11:15 AM
#867
Registered User
Thread Starter
Join Date: Aug 2013
Location: Central Illinois
Posts: 3,900
That's a good question, how does one prime a q-jet? I'll have to get fuel all the way from the tank too, since I blew out the hard lines and replaced all the rubber.
Ten minutes for priming? Geesh!
Ten minutes for priming? Geesh!
January 20th, 2014, 03:16 PM
#868
Out of Line, Everytime😉
Join Date: Dec 2006
Location: Melville, Saskatchewan
Posts: 9,010
Get a bottle like a chemical spray bottle and fill it with gas or a can of carb cleaner. Fill the bowl with gas through the vent. It will take hardly any time to prime the lines when the engine is running.
January 20th, 2014, 04:27 PM
#869
Connoisseur d'Junque
Join Date: Sep 2010
Location: The Hudson Valley
Posts: 21,183
+1. You can fill the float bowl through the little vent tube that is sticking up between the barrels.
It only takes a few seconds at 2,000 RPM for the fuel pump to pull fuel from the tank, if that long.
Or, you can do what I did last time, and just pour a few ounces of gas down each barrel and wing it over.
If all is well, that should give you enough revolutions to fill the float bowl and keep 'er goin'.
- Eric
February 15th, 2014, 01:40 PM
#872
Registered User
Thread Starter
Join Date: Aug 2013
Location: Central Illinois
Posts: 3,900
Work on the Cutlass has come to a complete standstill. This winter has definitely put a crimp in my plan. We're still getting sub-zero temps here and I had to shut down the heat in the shop until the weather warms up a little.
Just wanted to update the thread. I haven't given up, just taking an unplanned break. Still hoping to have her on the road sometime this summer.
I'm sure I'm not the only one battling the winter. Eric, I heard you got a little snow up your way.
Just wanted to update the thread. I haven't given up, just taking an unplanned break. Still hoping to have her on the road sometime this summer.
I'm sure I'm not the only one battling the winter. Eric, I heard you got a little snow up your way.
February 15th, 2014, 01:42 PM
#873
Im working in the basement. I set up a "bondo sanding room" lol. Its a room all sealed up away from the area of the basement I build my engines and transmissions in. I don't want dust there lol. Don't know if you saw my project thread but I been doing this in the basement except for the welding and media blasting. This winter sucks.
https://classicoldsmobile.com/forums...-old-girl.html
https://classicoldsmobile.com/forums...-old-girl.html
Last edited by coppercutlass; February 15th, 2014 at 01:45 PM.
February 15th, 2014, 02:02 PM
#874
Registered User

Join Date: Dec 2011
Posts: 7,286
February 15th, 2014, 02:06 PM
#875
Registered User
Thread Starter
Join Date: Aug 2013
Location: Central Illinois
Posts: 3,900
Im working in the basement. I set up a "bondo sanding room" lol. Its a room all sealed up away from the area of the basement I build my engines and transmissions in. I don't want dust there lol. Don't know if you saw my project thread but I been doing this in the basement except for the welding and media blasting. This winter sucks.
https://classicoldsmobile.com/forums...-old-girl.html
https://classicoldsmobile.com/forums...-old-girl.html
It's not just the weather, Spring semester is my busiest. I'm good, wood furnace is awesome, I just miss the shop, ya know?
February 15th, 2014, 03:31 PM
#878
Connoisseur d'Junque
Join Date: Sep 2010
Location: The Hudson Valley
Posts: 21,183
Not that much, Mac, pretty much the usual. It does tend to snow in the winter.
I pulled out a couple of heads I picked up a while ago and checked them out, planning to install them in the spring.
Mostly I'm getting everything together to do a bunch of things to my wife's Jeep next month, as soon as the temperature goes above freezing in the daytime - have to put it up on blocks, drop the exhaust system, and do a bunch of nasty stuff. It should be a two day job, so I'm giving myself a week.
- Eric
February 16th, 2014, 01:29 PM
#879
Hookers under Hood
Join Date: Nov 2013
Location: Ontario, Canada
Posts: 3,543
[QUOTE=Octania;655069]Yeah, the WIFE's nail polish
Sure
Uh huh
Hey now nuff of that, keep bringing this up and my wife will find out. That's theft under in my house. Not to mention the clear coat I used.... dam good acrylic enamel saver.
Sure
Uh huh
Hey now nuff of that, keep bringing this up and my wife will find out. That's theft under in my house. Not to mention the clear coat I used.... dam good acrylic enamel saver.
February 16th, 2014, 06:07 PM
#880
Senior Moment Member

Join Date: Jan 2007
Posts: 2,913
[QUOTE=76olds;655528]I just use my own. Better selection anyway.


