
Pulling the motor
 December 7th, 2013, 09:18 AM
#561
Connoisseur d'Junque
Join Date: Sep 2010
Location: The Hudson Valley
Posts: 21,183
That's not too bad. About double the cost of a set of Fel-Pros.
Some of the fancy racing gaskets are much more.
I'd be interested in knowing how things go when you get them.
- Eric
Some of the fancy racing gaskets are much more.
I'd be interested in knowing how things go when you get them.
- Eric
 December 7th, 2013, 09:55 AM
#562
71 cutlass convertible
Join Date: Sep 2008
Location: Trappe, MD
Posts: 2,061
Wow I just finished ready this thread. (very slow day at work and dial-up connection too) Makes me glad my moter was done before I got it. But I will get to do a thread on replacing rear quarters. Good luck and keep it up
Larry
Larry
December 7th, 2013, 11:19 AM
#563
Building and engine ain't too bad lshlsh2 . If you need some guidance with your quarters feel free to pm me . I'm a body man by trade. I also have to agree with aric 105 for shims ain't bad at all . I knew he sold em just not how much.
December 7th, 2013, 11:33 AM
#565
Registered User
Thread Starter
Join Date: Aug 2013
Location: Central Illinois
Posts: 3,900
 December 7th, 2013, 11:42 AM
#566
Registered User
Thread Starter
Join Date: Aug 2013
Location: Central Illinois
Posts: 3,900
Oil pan's on and I think it went pretty well. Shop got up to 65 and I had the rtv sitting in the window/sun. I had a slight freak out moment when I laid the pan on and it was about a quarter inch above the surface but it turned out to be the rubber end seals weren't all the way in. I went ahead with the cork gaskets and rtv on all surfaces, including both sides of the end seals. Just a few pics...
[IMG]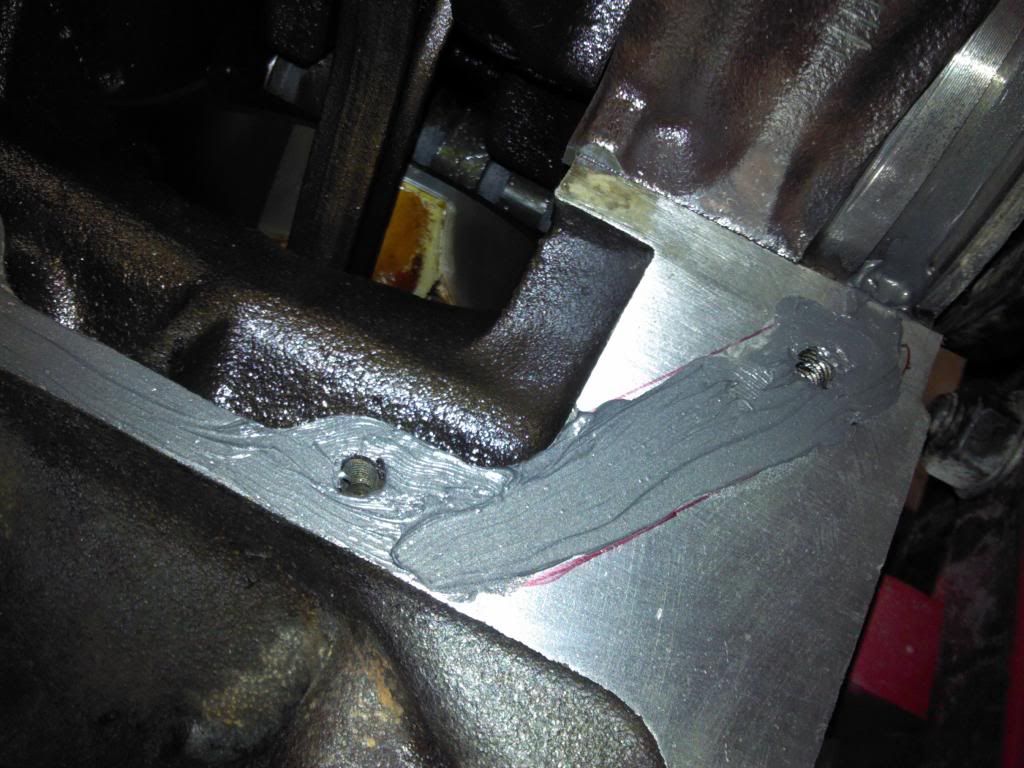 [/IMG]
[IMG]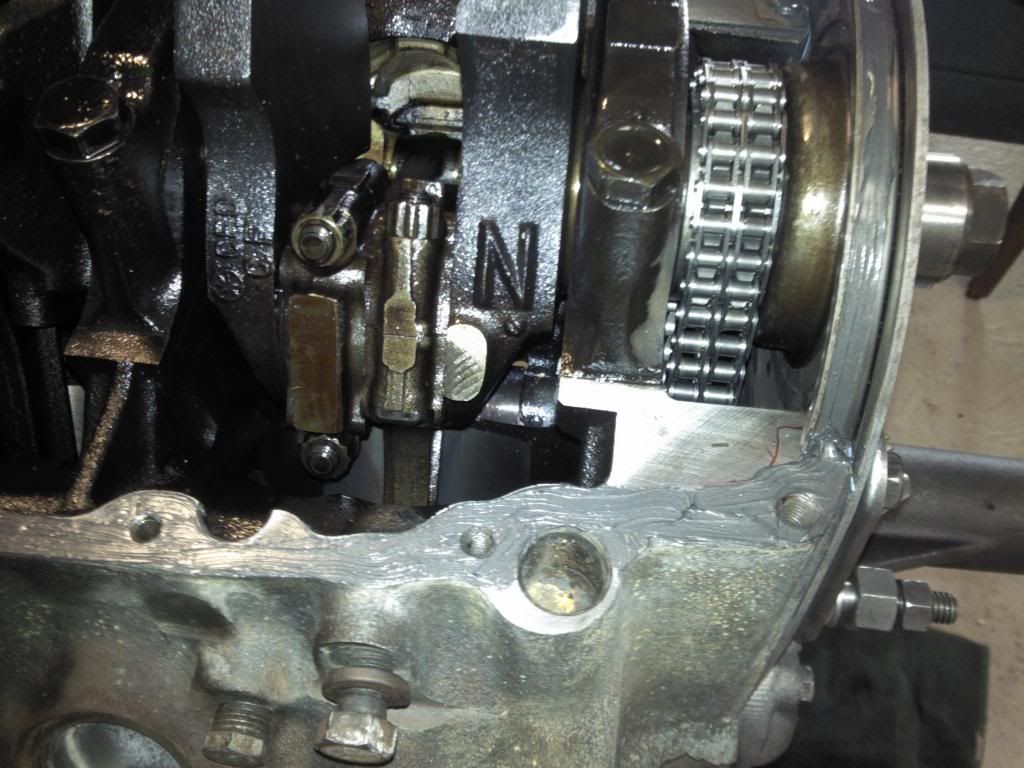 [/IMG]
[IMG]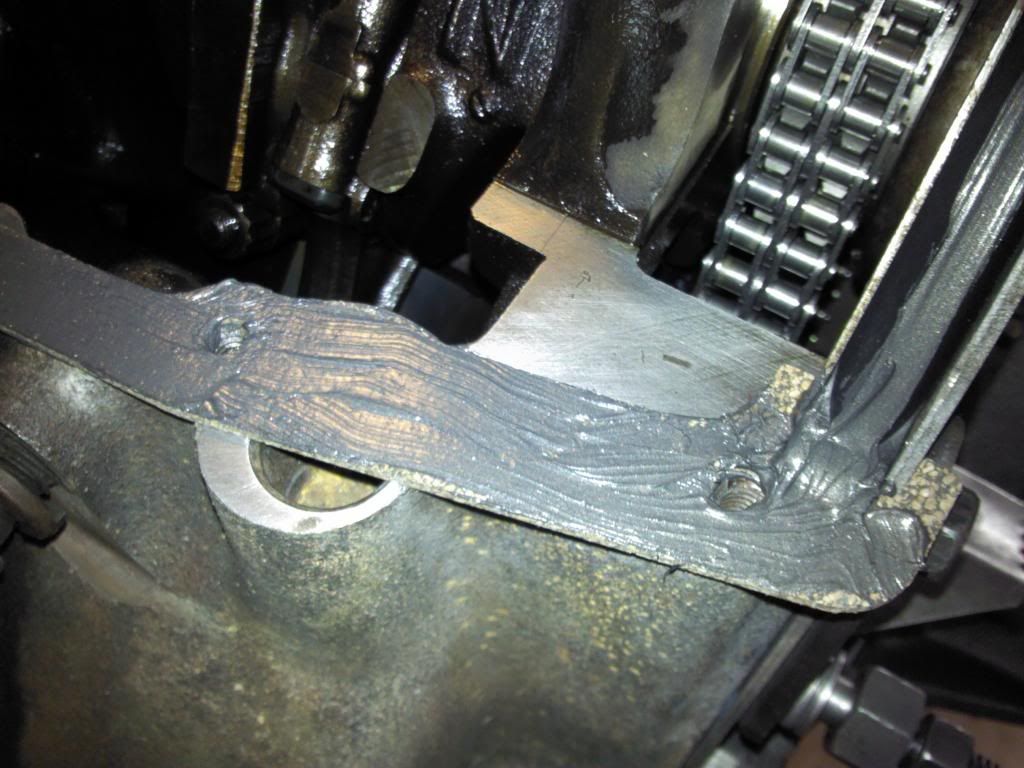 [/IMG]
Starting to look like a motor again
[IMG] [/IMG]
[IMG]
 [/IMG]
[IMG]
 [/IMG]
[IMG]
 [/IMG]
Starting to look like a motor again
[IMG]
 [/IMG]
December 7th, 2013, 11:47 AM
[/IMG]
December 7th, 2013, 11:47 AM
#567
Registered User
Thread Starter
Join Date: Aug 2013
Location: Central Illinois
Posts: 3,900
Eric, Smitty said to bolt the heads on with dry gaskets but I had read that it's best spray them with the copper adhesive. Opinions? I'm tempted to listen to Smitty. I know the factory didn't use anything.
December 7th, 2013, 04:46 PM
#568
Connoisseur d'Junque
Join Date: Sep 2010
Location: The Hudson Valley
Posts: 21,183
Yeah, I'm sure the factory didn't. It just seems wrong, though.
I'd be inclined to use a very thin layer of spray copper or something similar.
I'm curious to hear what others who have done this have used.
Engine looks nice! That's one fancy RTV job there. I was never very good at coloring within the lines as a kid.
- Eric
I'd be inclined to use a very thin layer of spray copper or something similar.
I'm curious to hear what others who have done this have used.
Engine looks nice! That's one fancy RTV job there. I was never very good at coloring within the lines as a kid.
- Eric
December 7th, 2013, 09:10 PM
#570
Registered User
Thread Starter
Join Date: Aug 2013
Location: Central Illinois
Posts: 3,900
Yeah, I'm sure the factory didn't. It just seems wrong, though.
I'd be inclined to use a very thin layer of spray copper or something similar.
I'm curious to hear what others who have done this have used.
Engine looks nice! That's one fancy RTV job there. I was never very good at coloring within the lines as a kid.
- Eric
I'd be inclined to use a very thin layer of spray copper or something similar.
I'm curious to hear what others who have done this have used.
Engine looks nice! That's one fancy RTV job there. I was never very good at coloring within the lines as a kid.
- Eric
 December 7th, 2013, 09:11 PM
#571
Registered User
Thread Starter
Join Date: Aug 2013
Location: Central Illinois
Posts: 3,900
 December 8th, 2013, 05:23 AM
#573
By copper paint I mean the permatex stuff copper sealent. But you can use a metallic gold or silver or that cheap chrome spray paint for sealant. From what I have read it essentially does the same crap .
December 8th, 2013, 08:17 AM
#579
Connoisseur d'Junque
Join Date: Sep 2010
Location: The Hudson Valley
Posts: 21,183
Yeah, I don't know much about surface machining, but I believe that the factory used a fast-and-dirty "broaching" technique to make those surfaces, while a machine shop would mill them. Differences in the microscopic makeup if the factory and current techniques might affect sealing one way or another.
I'd be interested to hear more about this from someone who knows.
- Eric
I'd be interested to hear more about this from someone who knows.
- Eric
December 9th, 2013, 01:47 PM
#581
Registered User
Thread Starter
Join Date: Aug 2013
Location: Central Illinois
Posts: 3,900
I was looking for intake bolts for my new Edel Performer and I learned that the Edel part number is 8514. However, when I search for that part number I get different looking bolts. Some are chrome, some are not, and different lengths and different number of bolts. Jeez...
Can I use my old cast iron manifold bolts? They clean up and polish real nice but without some kind of sealant (which i don't know of anything clear that withstand the heat) they will surely rust.
Can I use my old cast iron manifold bolts? They clean up and polish real nice but without some kind of sealant (which i don't know of anything clear that withstand the heat) they will surely rust.
Last edited by Macadoo; December 9th, 2013 at 02:08 PM.
December 9th, 2013, 02:00 PM
#582
Registered User
Thread Starter
Join Date: Aug 2013
Location: Central Illinois
Posts: 3,900
Here's Summit's kit. Only ten bolts. Am I missing something?
http://www.summitracing.com/parts/edl-8514/overview/
http://www.summitracing.com/parts/edl-8514/overview/
December 9th, 2013, 02:09 PM
#583
72 Olds CS
Join Date: Jun 2011
Posts: 6,657
IDK what manifold you have but my RPM required 2 very small head bolts to clear the intake runners on the passenger side. besides those two bolts you coul use the original intake bolts.
see the pic on this page it shows the small headed bolts and rec the same PN as you have listed
oh yeah on summits pic it says this
Image is a representation of this item.
Actual item may vary.
see the pic on this page it shows the small headed bolts and rec the same PN as you have listed
oh yeah on summits pic it says this
Image is a representation of this item.
Actual item may vary.
December 9th, 2013, 07:38 PM
#587
Registered User
Thread Starter
Join Date: Aug 2013
Location: Central Illinois
Posts: 3,900
From a week or so after I brought her home....
"Either way, I'll do as Oldcutlass suggests, plus brakes, maybe an HEI (is that worth it?) and dual exhaust. And then I'll see how she runs and sounds. Will replacing that rear seal be pricey? Not sure I feel like messing with unbolting the transmission."
Sigh....I was so young then.
"Either way, I'll do as Oldcutlass suggests, plus brakes, maybe an HEI (is that worth it?) and dual exhaust. And then I'll see how she runs and sounds. Will replacing that rear seal be pricey? Not sure I feel like messing with unbolting the transmission."
Sigh....I was so young then.
December 9th, 2013, 07:41 PM
#588
Justin
Join Date: Mar 2012
Location: utah
Posts: 3,448
From a week or so after I brought her home....
"Either way, I'll do as Oldcutlass suggests, plus brakes, maybe an HEI (is that worth it?) and dual exhaust. And then I'll see how she runs and sounds. Will replacing that rear seal be pricey? Not sure I feel like messing with unbolting the transmission."
Sigh....I was so young then.
"Either way, I'll do as Oldcutlass suggests, plus brakes, maybe an HEI (is that worth it?) and dual exhaust. And then I'll see how she runs and sounds. Will replacing that rear seal be pricey? Not sure I feel like messing with unbolting the transmission."
Sigh....I was so young then.
December 9th, 2013, 08:21 PM
#590
Justin
Join Date: Mar 2012
Location: utah
Posts: 3,448
December 10th, 2013, 03:05 PM
#591
Registered User
Thread Starter
Join Date: Aug 2013
Location: Central Illinois
Posts: 3,900
Too bad we're so far apart, between the two of us we could build a helluva car. I'm tempted to head out your way though, you have some dark skies out there. Good for my telescope:
http://studio407.net/telescope.htm
http://studio407.net/telescope.htm
December 10th, 2013, 03:24 PM
#592
Registered User
Join Date: Jul 2013
Location: Mo-Ray-Al, K-Bec.
Posts: 1,815
Be warned ... thoughts like that are like a tumour ... they grow all by themselves until they take over. I wound up in Atlanta twice, Nashville once and the detroit area 3 times because of it. I don't even want to consider how much gas I've burned doing it.
December 10th, 2013, 06:13 PM
#593
Registered User
Thread Starter
Join Date: Aug 2013
Location: Central Illinois
Posts: 3,900
Meeting up with folks on CO? Pretty cool if you ask me. But I don't get out much.
December 10th, 2013, 06:47 PM
#594
Justin
Join Date: Mar 2012
Location: utah
Posts: 3,448
I have a few olds guys I talk to even tho there not part of the form
So yeah if your ever out this way or if I am out your way why not meet up and chat about cars
December 11th, 2013, 03:17 PM
#595
Registered User
Thread Starter
Join Date: Aug 2013
Location: Central Illinois
Posts: 3,900
December 14th, 2013, 02:04 PM
#596
Registered User
Thread Starter
Join Date: Aug 2013
Location: Central Illinois
Posts: 3,900
MAW version 2.1
Any advantages or disadvantages to going ahead and rebuilding the front end while the motor is out? Seems more accessible.
I haven't actually tested the tie rod ends or ball joints yet but I will. Could be a few years old, could be forty years old. Any kits available?
6 inches of snow last night. No big deal.
December 14th, 2013, 02:12 PM
#597
Registered User

Join Date: Dec 2012
Posts: 162
I wouldn't mess with the ball joints while the engine is out, you might find it hard to get the upper ball joint stud back in the spindle. You have to jack up the lower control arm to compress the spring enough to attach the spindle. Without the engine the car is too light.
December 14th, 2013, 02:27 PM
#598
Justin
Join Date: Mar 2012
Location: utah
Posts: 3,448
i wouldn't mess with the ball joints while the engine is out, you might find it hard to get the upper ball joint stud back in the spindle. You have to jack up the lower control arm to compress the spring enough to attach the spindle. Without the engine the car is too light.
x2
December 14th, 2013, 03:03 PM
#599
Administrator
Join Date: Oct 2009
Location: Poteau, Ok
Posts: 41,065
If you look at the upper ball joint if there are still rivets on them, then they are original. The rest of the parts are hard to tell by looking at them. I would make sure the parts are worn first by checking the amount of play in them. The major wear items in the front end are the rubber bushings on the upper and lower control arms.
 December 14th, 2013, 03:30 PM
#600
Registered User

Join Date: Aug 2011
Posts: 3,350
If you do choose to pull control arms etc. and replace the bushings (good idea unless they are fresh) do not tighten any bolts that hold the position of a bushing until all of the weight of the car is on the ground and you have bounced it up and down several times. PUT A NOTE on the windshield to remember to tighten them. If the bushings are tightened first without the weight, they will have torsion applied to them constantly when the car is completed and at rest destroying them in short order.
When choosing new bushings, linkage and joints, use very high quality components it has a lot of effect on how long they last.
If the parts are tight you may want to replace the boots only and keep the "old time quality" original parts.
When choosing new bushings, linkage and joints, use very high quality components it has a lot of effect on how long they last.
If the parts are tight you may want to replace the boots only and keep the "old time quality" original parts.
Last edited by Sugar Bear; December 14th, 2013 at 03:33 PM.


