Pulling the motor

 November 10th, 2013, 06:18 AM
#322
Registered User
Thread Starter
Join Date: Aug 2013
Location: Central Illinois
Posts: 3,900
cylinder bores
I'm still struggling with whether or not to rebuild the short-block. I cleaned the carbon form the ring at the top of the bore and the ridge is so thin, as in barely there. And in places I don't feel one at all (although that's a small percentage of area). There is some discoloration of course but nothing that seems alarming. I realize the picture doesn't help you "see" how small the ridge really is...but we like pics, yes?
[IMG]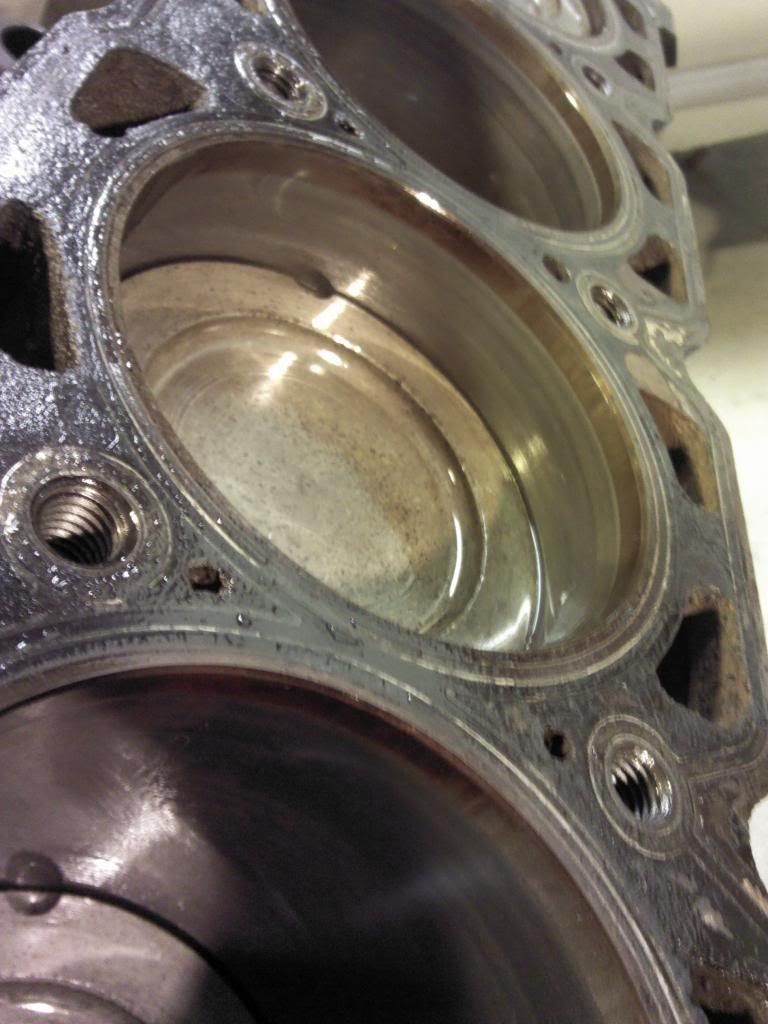 [/IMG]
I went ahead and wiped off the thin layer or carbon from the piston tops using carb cleaner. And just for good measure I turned the block upside down and sprayed the carb cleaner around each piston, to flush out anything I got up inside there. And then I oiled everything. My one mistake was that I still need to clean the head gasket surfaces so I'll probably be doing the flushing again
[IMG]
 [/IMG]
I went ahead and wiped off the thin layer or carbon from the piston tops using carb cleaner. And just for good measure I turned the block upside down and sprayed the carb cleaner around each piston, to flush out anything I got up inside there. And then I oiled everything. My one mistake was that I still need to clean the head gasket surfaces so I'll probably be doing the flushing again
November 10th, 2013, 06:56 AM
#323
A re ring kit I think is in the 300 ball park figure. Then you can buy a 3 stone hone just to put a nice crosshatch pattern into the cyl. Then with some shoe laces you can polish the journals with some 400 grit crocus cloth. I wouldn't worry about sending the engine out to freshen it up. If everything is in good shape and nothing is alarming I think it's something you can tackle with out sending it to the macine shop aside from maybe hot tanking and cam bearing replacement.
November 10th, 2013, 07:45 AM
#324
Connoisseur d'Junque
Join Date: Sep 2010
Location: The Hudson Valley
Posts: 21,183
Okay, we're at Page 9 of this saga, and I had honestly forgotten how this story started, so I've reviewed it, and have pasted highlights below.
You pulled this 8.5:1 compression 350 out of a '71 Cutlass with 52,000 miles on the clock because it leaked and you felt that the 120 to 160 psi span of compressions (unchanged with addition of oil) was too wide for you.
You found an engine that was exceptionally clean inside, with a less-than-paper-thin cylinder ridge, and disintegrated cam sprocket nylon teeth, and are planning to send out the heads to have the valves ground and to install a new cam, timing set, and gaskets.
You are now wondering whether to mess with the block further, or just to let it be.
As far as I can tell, you have no intentions of racing it, and no aspirations to high power output.
67CutlassFreak keeps telling you to do a total rebuild.
From everything I can see, it looks to me like you have an excellent, well maintained, low mileage engine, with very little wear.
My personal advice would be to not mess with it further.
There is no reason to believe that there is anything wrong with the bearings or the rings; you have good oil pressure and it doesn't blow smoke.
What I would recommend is that you decide what type of head gaskets you will be installing, get their thickness (probably about 0.046"), measure the thickness of your old steel shim head gaskets (probably about 0.016"), and have the machine shop remove the difference (probably about 0.030"), or possibly a wee bit more, from your heads.
If you don't do this, your compression will drop from somewhere between 8 and 8.5 (the original spec is usually a bit optimistic compared to actual measurements) down to about 7.5 to 8, which will affect performance.
Other than that, I think you're good to go.
- Eric
As for the "why" I pulled it: The poor thing is bleeding to death, leaking from everywhere, oil pan, valve covers, rear seal ( I think) and I got inconsistent compression readings so i think I'm having some valve issues.
So I'll replace all the gaskets and seals, pull the heads and at least lap the valves and replace the springs and seals, and I had CutlassEFI grind me a cam to match the performer intake and the planned dual exhaust.
And I picked up an HEI distributor just for good measure.
Plus, I want to clean it and paint it. and I'll yank off the exhaust manifolds and clean them up too.
I still think your making a big mistake by not tearing the engine all the way down and sending the block out to be hot tanked. After you've come this far the rest is really pretty simple. Wouldn't you really like to be able to tell everyone what the specs are on your engine? When they ask you what kind of clearance are you running on the rods and mains, how will you feel answering- "I DON'T KNOW?" Trust me you want to know.
I talked the the machine shop about rebuilding my short block. If everything checked out it sounded to be about 1k + parts. A little rich for my blood.
On the other hand, they would hot tank the block, hone the cylinders, install cam bearings, and resurface for about $150 + the price of the bearings. That would leave me with rings, rod bearings, and main bearings? Would I need to replace the piston pins? Could I have them take a little more off the block and heads to gain a little more compression without springing for new pistons? But then I'd have to have the new performer intake milled as well if I'm thinking of the correct geometry.
When I got home I wiped down the ridge at the top of one of the cylinders, taking off the carbon and there is a ridge, but just barely. I would estimate maybe half the thickness of regular notebook paper.
You found an engine that was exceptionally clean inside, with a less-than-paper-thin cylinder ridge, and disintegrated cam sprocket nylon teeth, and are planning to send out the heads to have the valves ground and to install a new cam, timing set, and gaskets.
You are now wondering whether to mess with the block further, or just to let it be.
As far as I can tell, you have no intentions of racing it, and no aspirations to high power output.
67CutlassFreak keeps telling you to do a total rebuild.
From everything I can see, it looks to me like you have an excellent, well maintained, low mileage engine, with very little wear.
My personal advice would be to not mess with it further.
There is no reason to believe that there is anything wrong with the bearings or the rings; you have good oil pressure and it doesn't blow smoke.
What I would recommend is that you decide what type of head gaskets you will be installing, get their thickness (probably about 0.046"), measure the thickness of your old steel shim head gaskets (probably about 0.016"), and have the machine shop remove the difference (probably about 0.030"), or possibly a wee bit more, from your heads.
If you don't do this, your compression will drop from somewhere between 8 and 8.5 (the original spec is usually a bit optimistic compared to actual measurements) down to about 7.5 to 8, which will affect performance.
Other than that, I think you're good to go.
- Eric
November 10th, 2013, 07:46 AM
#325
Registered User
Thread Starter
Join Date: Aug 2013
Location: Central Illinois
Posts: 3,900
Thanks Copper, you're advice is always enlightening. But I've made a decision.
Eric kind of hit it on the head (pun intended, lol) when he mentioned the low compression pistons. I'm going to stop with the head work and all the new parts I already have, button her back up and install back in the car. I'll pick up another motor and build it into the engine I want while enjoying what I have. You always seem to have something laying around. Maybe this Spring you'll have a short block with high compression pistons you don't need
Eric kind of hit it on the head (pun intended, lol) when he mentioned the low compression pistons. I'm going to stop with the head work and all the new parts I already have, button her back up and install back in the car. I'll pick up another motor and build it into the engine I want while enjoying what I have. You always seem to have something laying around. Maybe this Spring you'll have a short block with high compression pistons you don't need
November 10th, 2013, 07:52 AM
#326
I always have stuff specially during swap meet season. I pick up all kinds of stuff that I can either use or sell. There is nothing wrong with buttoning it up . You know what you want from your engine and for your goals I thing your fine. I just thought I would toss the freshening the short block info in there.
November 10th, 2013, 07:54 AM
#327
Registered User
Thread Starter
Join Date: Aug 2013
Location: Central Illinois
Posts: 3,900
Whoa, geez Eric, putting all that together was a lot of work. Thanks man. And thanks for the tip about the gasket thickness. I had read that on here some time ago but forgot about it. I have the gaskets and will take them to the shop so they can make the proper measurements.
It's true, I was getting a little overwhelmed with all the opinions but finally figured out what I want to do. I've never owned a real power-house car, Although I've driven a couple, and think it's not a bad idea to start small/medium. Once I feel how this engine runs, I'll decide if I want more. I doubt racing is in my future, other than being a bystander. I did used to work the pit for my bro-in-law though when he ran his pro-street. Those were good times. But I imagine being behind the wheel is a tad different :-)
It's true, I was getting a little overwhelmed with all the opinions but finally figured out what I want to do. I've never owned a real power-house car, Although I've driven a couple, and think it's not a bad idea to start small/medium. Once I feel how this engine runs, I'll decide if I want more. I doubt racing is in my future, other than being a bystander. I did used to work the pit for my bro-in-law though when he ran his pro-street. Those were good times. But I imagine being behind the wheel is a tad different :-)
Last edited by Macadoo; November 10th, 2013 at 12:09 PM.
November 10th, 2013, 07:57 AM
#328
Registered User
Thread Starter
Join Date: Aug 2013
Location: Central Illinois
Posts: 3,900
I always have stuff specially during swap meet season. I pick up all kinds of stuff that I can either use or sell. There is nothing wrong with buttoning it up . You know what you want from your engine and for your goals I thing your fine. I just thought I would toss the freshening the short block info in there.
When is swap meet season?
November 10th, 2013, 08:04 AM
#329
Connoisseur d'Junque
Join Date: Sep 2010
Location: The Hudson Valley
Posts: 21,183
I'd say holding the fuel pump nozzle is the thing you would most notice.
At the 14-16mpg you'll probably get in this thing, it's not the greatest feeling, but change that to 8-10mpg, and the car spends a whole lot more time in the garage.
- Eric
At the 14-16mpg you'll probably get in this thing, it's not the greatest feeling, but change that to 8-10mpg, and the car spends a whole lot more time in the garage.
- Eric
November 10th, 2013, 08:09 AM
#330
Im actually getting 10 mpg with a dp holley would be more with a vac secodnaries carb. I also do a lot of beating the crap out of my car so mpg isn't the only thing hurting your wallet. Busted parts are too.
Macadoo swap meet season is what I call winter. It's too cold to work in the garage so I buy parts and sell and trade stuff to keep my car addiction in check .
Macadoo swap meet season is what I call winter. It's too cold to work in the garage so I buy parts and sell and trade stuff to keep my car addiction in check .
November 10th, 2013, 08:09 AM
#331
Registered User
Thread Starter
Join Date: Aug 2013
Location: Central Illinois
Posts: 3,900
8-10...so, like my truck? No thanks.
November 10th, 2013, 08:10 AM
#332
Registered User
Thread Starter
Join Date: Aug 2013
Location: Central Illinois
Posts: 3,900
Im actually getting 10 mpg with a dp holley would be more with a vac secodnaries carb. I also do a lot of beating the crap out of my car so mpg isn't the only thing hurting your wallet. Busted parts are too.
Macadoo swap meet season is what I call winter. It's too cold to work in the garage so I buy parts and sell and trade stuff to keep my car addiction in check .
Macadoo swap meet season is what I call winter. It's too cold to work in the garage so I buy parts and sell and trade stuff to keep my car addiction in check .
November 10th, 2013, 08:24 AM
#333
Old(s) Fart
Join Date: Mar 2007
Location: Northern VA
Posts: 47,714
If you check out this chart I posted on ROP-
http://realoldspower.prophpbb.com/topic2710-20.html
you will see they installed #7 heads in 1971 & 1972. The 1971 versions did not have hardened seats, but the 1972 versions did.
http://realoldspower.prophpbb.com/topic2710-20.html
you will see they installed #7 heads in 1971 & 1972. The 1971 versions did not have hardened seats, but the 1972 versions did.
As noted, for an occasionally-driven car, it doesn't matter, and frankly, if you have the valves cut on these heads, the hardened area is pretty much cut away anyway. These are not steel inserts but simply a small induction hardened area in the casting.

 November 10th, 2013, 01:01 PM
#337
Justin
Join Date: Mar 2012
Location: utah
Posts: 3,448
November 10th, 2013, 01:37 PM
#338
Oldstata my fiance has come to like it. Specially around christmas when money is tight it always has helped to pay bills. Right before I bought my house I needed extra money I sold a lot and I mean a lot of really good parts I had collected and we bought a nice tv and surround sound and kitchen ware with it. Even If I intend to use a part which is how I approach any part I buy if there is a need for it and I need cash it's for sale lol.
November 10th, 2013, 02:42 PM
#340
Registered User
Join Date: Apr 2010
Posts: 978
Okay, we're at Page 9 of this saga, and I had honestly forgotten how this story started, so I've reviewed it, and have pasted highlights below.
You pulled this 8.5:1 compression 350 out of a '71 Cutlass with 52,000 miles on the clock because it leaked and you felt that the 120 to 160 psi span of compressions (unchanged with addition of oil) was too wide for you.
You found an engine that was exceptionally clean inside, with a less-than-paper-thin cylinder ridge, and disintegrated cam sprocket nylon teeth, and are planning to send out the heads to have the valves ground and to install a new cam, timing set, and gaskets.
You are now wondering whether to mess with the block further, or just to let it be.
As far as I can tell, you have no intentions of racing it, and no aspirations to high power output.
***67CutlassFreak keeps telling you to do a total rebuild.
From everything I can see, it looks to me like you have an excellent, well maintained, low mileage engine, with very little wear.
My personal advice would be to not mess with it further.
There is no reason to believe that there is anything wrong with the bearings or the rings; you have good oil pressure and it doesn't blow smoke.
What I would recommend is that you decide what type of head gaskets you will be installing, get their thickness (probably about 0.046"), measure the thickness of your old steel shim head gaskets (probably about 0.016"), and have the machine shop remove the difference (probably about 0.030"), or possibly a wee bit more, from your heads.
If you don't do this, your compression will drop from somewhere between 8 and 8.5 (the original spec is usually a bit optimistic compared to actual measurements) down to about 7.5 to 8, which will affect performance.
Other than that, I think you're good to go.
- Eric
November 10th, 2013, 02:44 PM
#341
Justin
Join Date: Mar 2012
Location: utah
Posts: 3,448
Oldstata my fiance has come to like it. Specially around christmas when money is tight it always has helped to pay bills. Right before I bought my house I needed extra money I sold a lot and I mean a lot of really good parts I had collected and we bought a nice tv and surround sound and kitchen ware with it. Even If I intend to use a part which is how I approach any part I buy if there is a need for it and I need cash it's for sale lol.
Hey check out the wall if shame I think those rotors will find a new home
November 10th, 2013, 03:48 PM
#342
Connoisseur d'Junque
Join Date: Sep 2010
Location: The Hudson Valley
Posts: 21,183
You could probably take an extra 0.020" off as well, and still not change anything, but I forget the rule of thumb number for how far you can go without worrying about intake surfaces and pushrod lengths.
I agree that it's a good idea to pull at least some, if not all, of the caps and get a look at the bearings.
If his ridge really is thinner than a sheet of paper, he should be able to get the pistons out without having to ream the ridge, so that's one less thing to go horribly wrong.
- Eric
November 10th, 2013, 03:53 PM
#343
Registered User
Thread Starter
Join Date: Aug 2013
Location: Central Illinois
Posts: 3,900
Freak, no worries man. I appreciate all the input...from everyone. Just like this...
"I think you may have a hard time installing the rear main seal without lifting the crank. I really don't see why you wouldn't want to remove the caps, just to check the bearings. You can torque them right back on."
Are you saying I could pull the crank without removing the pistons? Or at least prop it up some to change that seal? I was under the impression, (maybe something a friend said 30 years ago), that one should never pull the caps without replacing the bearings.
Oldstata, I kept those rotors for a while but eventually tossed them on a local iron pile. What's the wall of shame?
November 10th, 2013, 03:57 PM
#344
Justin
Join Date: Mar 2012
Location: utah
Posts: 3,448
November 10th, 2013, 04:00 PM
#345
Connoisseur d'Junque
Join Date: Sep 2010
Location: The Hudson Valley
Posts: 21,183
It's okay to pull the caps and reuse the old bearings, especially if they look great.
It's also okay to change them while you're at it.
The crank can usually be removed with the pistons in the engine, but it is not a job for the weak-hearted, or rather, reinstalling it isn't. The crank can just kind of squeak by with the pistons in, but just barely, and at the risk of scratching the journals with the rod bolts.
I have changed the rear main without removing any rod caps - you just have to loosen the main caps, and you can get the back of the crank up about a sixteenth of an inch, which is enough to squeak the old seal out and a new one in, but I don't recommend it if there are other options.
- Eric
November 10th, 2013, 05:14 PM
#346
Registered User
Thread Starter
Join Date: Aug 2013
Location: Central Illinois
Posts: 3,900
I suppose if I cover the rod bolts with fuel line or something then the crank wont squeak by?
I'll see if I can get that seal out without removing the crank. If I really can't then I might be looking at a different ball game. I certainly didn't come this far to have the engine leak oil. What about, if it comes to it, removing the caps on both the crank and rods and pushing the pistons up to the top of the bores? I think it's a bad idea to hand me a ridge reamer.
I'll see if I can get that seal out without removing the crank. If I really can't then I might be looking at a different ball game. I certainly didn't come this far to have the engine leak oil. What about, if it comes to it, removing the caps on both the crank and rods and pushing the pistons up to the top of the bores? I think it's a bad idea to hand me a ridge reamer.
November 10th, 2013, 05:42 PM
#347
morgan
Join Date: Mar 2011
Location: CT
Posts: 1,925
Mac i would pull the main and rod caos and check your bearings i'm involved in a teardown myself and am disapointed with what i found on some rod bearings and i need to do some measurements, but at any rate i wouldnt of found if i didnt take it apart you have come this far so it would make sense to double check bearings maybe plastigage,if doing the rods its better to use sacraficial nuts for the testing
November 10th, 2013, 05:54 PM
#348
Registered User
Thread Starter
Join Date: Aug 2013
Location: Central Illinois
Posts: 3,900
Oh hey Pogo, I was wondering how yours was going. Sorry to hear you have some bad bearings.
I get what your saying but I really don't want to put any more money into this engine. I may look for something with a little more compression. However, if I get the main caps off and things look sketchy, I may have to reevaluate. And the timing isn't great. I'm heading into the final stretch of the semester so I'm a bit stressed and tight on time. I get a few days at Thanksgiving and may wait to make the decision until then. After I decompress a little, ya know?
I am curious what you mean by sacrificial nuts. I mean I think I get it but can you be more specific? Do they need to be actual rod bolt nuts?
November 10th, 2013, 06:13 PM
#349
Connoisseur d'Junque
Join Date: Sep 2010
Location: The Hudson Valley
Posts: 21,183
It won't cost anything to pull the caps and look at the bearings, and if you're careful and behave well, it should all go together fine.
It's very reasonable to Plastigage each journal, and won't take too long.
As for the pistons, if the ridge is as you describe, I'd bet that you'll have no problem getting them past.
- Eric
It's very reasonable to Plastigage each journal, and won't take too long.
As for the pistons, if the ridge is as you describe, I'd bet that you'll have no problem getting them past.
- Eric
November 10th, 2013, 06:51 PM
#351
Connoisseur d'Junque
Join Date: Sep 2010
Location: The Hudson Valley
Posts: 21,183
Wellllllll... It's like this...
It seems as though the consensus in the Olds world is that these motors like about 0.003" at the mains (more if you're racing), but the manual says more like 0.0020-0.0025".
If they're anywhere around 3, you should be good, but I'd recommend talking to some of the more experienced engine builders around here, such as Mark, who sold you the cam.
- Eric
November 11th, 2013, 07:07 AM
#353
Registered User
Join Date: Jul 2013
Location: Mo-Ray-Al, K-Bec.
Posts: 1,815
It's okay to pull the caps and reuse the old bearings, especially if they look great.
It's also okay to change them while you're at it.
The crank can usually be removed with the pistons in the engine, but it is not a job for the weak-hearted, or rather, reinstalling it isn't. The crank can just kind of squeak by with the pistons in, but just barely, and at the risk of scratching the journals with the rod bolts.
I have changed the rear main without removing any rod caps - you just have to loosen the main caps, and you can get the back of the crank up about a sixteenth of an inch, which is enough to squeak the old seal out and a new one in, but I don't recommend it if there are other options.
- Eric
It's also okay to change them while you're at it.
The crank can usually be removed with the pistons in the engine, but it is not a job for the weak-hearted, or rather, reinstalling it isn't. The crank can just kind of squeak by with the pistons in, but just barely, and at the risk of scratching the journals with the rod bolts.
I have changed the rear main without removing any rod caps - you just have to loosen the main caps, and you can get the back of the crank up about a sixteenth of an inch, which is enough to squeak the old seal out and a new one in, but I don't recommend it if there are other options.
- Eric
Some short sections of rubber tubing over the bolt threads before you flex yer muscles will keep everything safe.
November 11th, 2013, 09:46 AM
#354
Registered User
Thread Starter
Join Date: Aug 2013
Location: Central Illinois
Posts: 3,900
So I was goofing around on Craigslist and found a set of these, new in the box, 8 of them, for an incredibly reasonable price. I don't suppose they would fit my 71 CS 350? It says for the W-31 "with outside air induction" but I thought I might get lucky.
http://www.summitracing.com/search/y...yword=L2320F30
If I can't use them I'll pass them along to the group. They're a good price.
They are .030 over in case I need to bore the block.
http://www.summitracing.com/search/y...yword=L2320F30
If I can't use them I'll pass them along to the group. They're a good price.
They are .030 over in case I need to bore the block.
Last edited by Macadoo; November 11th, 2013 at 09:56 AM.
November 11th, 2013, 10:18 AM
#355
Registered User
Join Date: Jul 2010
Location: Montreal, QC
Posts: 2,175
Aren't those just flat-top pistons?
I wonder what your compression would end up being if you used a thicker head gasket, didnt mill your heads, and installed these pistons...
0.046" (new head gasket) - 0.016'' (old head gasket) is around 0.030...
From what i gather a standard bore is 4.057 so...
4.057 * 30thou is = 0.38781 cubic inches which means you'd be increasing your combustion chamber by around 6.36cc
whats the dish in 1971/1972 pistons? something around 6cc? then you'd be golden.
Last edited by Tony72Cutlass'S'; November 11th, 2013 at 10:23 AM.
November 11th, 2013, 10:36 AM
#356
Depending on the cam you got .,too much compression can lead to preignition . Just make sure you talk to mark about something like bumping up compression with your cam grind and make sure you can achieve a safe compression ratio with what you are gettin.
November 11th, 2013, 10:38 AM
#357
Registered User
Thread Starter
Join Date: Aug 2013
Location: Central Illinois
Posts: 3,900
I read that the 71 #7 heads are supposed to have 64cc chambers but that they can be closer to 70cc. Makes it kind of hard to do the math. I don't really want more compression than maybe 9 or a little more. I'll talk to my head-guy once more people chime in here.


