Pulling the motor

 October 22nd, 2013, 05:37 PM
#202
Registered User
Thread Starter
Join Date: Aug 2013
Location: Central Illinois
Posts: 3,900
The compression test was okay but a little inconsistent. 160 high to 120 low. No appreciable change after adding oil. Hence I'm thinking valves. I'm still not convinced it's only 52k miles after seeing inside the exhaust ports but I'm certainly no expert.
I have a C-type spring compressor...if I can find it. I haven't done this in years. I like plan A 1/2. Disassemble the heads, clean the valves (I have a drill press and a couple of bench grinders with wire wheels), lap the valves, take in heads to have them cleaned and tested (If I frock it up, I'll pay the higher labor charge, it's only fair). Reassemble myself.
Like I said, I'm no expert but the exhaust ports seem pretty grimy. Can the machine shop also check the guides? That's something I would like to know and don't trust myself to check.
October 22nd, 2013, 05:40 PM
#204
Registered User
Thread Starter
Join Date: Aug 2013
Location: Central Illinois
Posts: 3,900
If the valves are lapped instead of resurfaced it is critical that they are kept in order and put back in the same port they were in originally. The advantage to lapping a valve is that it will let you see if the valve and seat are making good contact i.e., the width of the contact area on both the seat and the valve and where the contact is made in case it is too close to the edge of the valve face (the valve is usually worn too far if this is the case).
Ask the machine shop if they would check the head for straightness and do a vacuum test on the valves after they are lapped. This is quick, inexpensive and lets you know if they are sealing properly. They put a rubber disc over the chamber area with the valves in and closed, apply vacuum and see if it holds.
Did you do a compression test before pulling it apart?
Compliments on getting the exhaust manifold bolts out without breaking them!!!
 October 22nd, 2013, 07:26 PM
#206
Registered User

Join Date: Aug 2011
Posts: 3,032
The machine shop can check the guides with the springs removed but need the springs installed to do the vacuum test. They can measure the guide wear but would likely just move the valve slightly off the seat moving/rocking the valve stem back and forth in the guide and be able to get a good idea of the guide condition. Remember that excessive movement in a guide can also be due to a worn valve stem.
If any guides are replaced, the valves and seats with new guides should be refaced not just lapped. If you do need a lot of guide work you may consider having a complete valve job done at the machine shop.
If any guides are replaced, the valves and seats with new guides should be refaced not just lapped. If you do need a lot of guide work you may consider having a complete valve job done at the machine shop.
October 23rd, 2013, 03:42 PM
#207
Registered User
Thread Starter
Join Date: Aug 2013
Location: Central Illinois
Posts: 3,900
Just out of curiosity, should there be any movement of the valve stem in the guide? What I mean is; if I pull the springs, slide the valve about half way down and can feel even the tiniest lateral movement, does that mean i need new guides?
October 23rd, 2013, 09:29 PM
#208
Registered User
Join Date: Aug 2011
Posts: 3,032
Yes there should be some movement, but very little. This is where a machinist would know just by looking or measuring how much movement is excessive. You could compare the tightest guide to the most worn one to compare. The exhaust guides will probably be the most worn due to the heat.
How many miles are on the motor, was it clean inside and did it use any oil? If it is not a high miler or an oil burner and did not have sludge, the guides are probably not excessively worn.
How many miles are on the motor, was it clean inside and did it use any oil? If it is not a high miler or an oil burner and did not have sludge, the guides are probably not excessively worn.
October 24th, 2013, 07:09 AM
#209
Connoisseur d'Junque
Join Date: Sep 2010
Location: The Hudson Valley
Posts: 21,183
There is a specification for this, which usually involves pulling the valves out a very small amount and measuring their side-to-side deflection with a dial indicator.
I'm not sure what it is for Olds, but probably a few thousandths is reasonable, with 0.008" being too much, and 0.002" being too optimistic.
- Eric
I'm not sure what it is for Olds, but probably a few thousandths is reasonable, with 0.008" being too much, and 0.002" being too optimistic.
- Eric
October 25th, 2013, 08:48 AM
#211
Registered User
Thread Starter
Join Date: Aug 2013
Location: Central Illinois
Posts: 3,900
Worked a 13 hour day yesterday but it bought me the day off. I got the other manifold off this morning without too much trouble. Had to break out the heat for the middle bolt. You're right, the Map/Oxy doesn't get all that hot but it worked.
One of the exhaust ports and accompanying valve stems looks wet when all the others look dry. Maybe a bad stem seal?
I've also been working on the broken manifold to exhaust pipe bolts but they're being a little more stubborn. I've got some time before the manifolds go back on though. I'll keep spraying them over the next couple of weeks.
October 25th, 2013, 08:58 AM
#212
Connoisseur d'Junque
Join Date: Sep 2010
Location: The Hudson Valley
Posts: 21,183
Those manifold-pipe bolts will need heat and lots if it.
That's likely all that will work.
Keep pouring the heat into the tabs with that torch, like for 5-10 minutes per bolt, until they're a dull red, and they'll turn out.
Afterward, chase the threads.
- Eric
That's likely all that will work.
Keep pouring the heat into the tabs with that torch, like for 5-10 minutes per bolt, until they're a dull red, and they'll turn out.
Afterward, chase the threads.
- Eric
October 25th, 2013, 10:49 AM
#214
Registered User
Thread Starter
Join Date: Aug 2013
Location: Central Illinois
Posts: 3,900
Thanks for the advice fellas. I have a heavy duty vice, flopping isn't the problem. I'm not up for a battle today so I'm moving on to things more fun....removing the oil pan and front cover. I'll keep spraying the bolts but I may use them as an excuse. "Honey, those bolts just won't budge. I may have to go with those shorty headers after all." 
Last edited by Macadoo; October 25th, 2013 at 01:41 PM.
October 25th, 2013, 01:49 PM
#215
Registered User
Thread Starter
Join Date: Aug 2013
Location: Central Illinois
Posts: 3,900
Smile, you're on missing-teeth camera!
[IMG]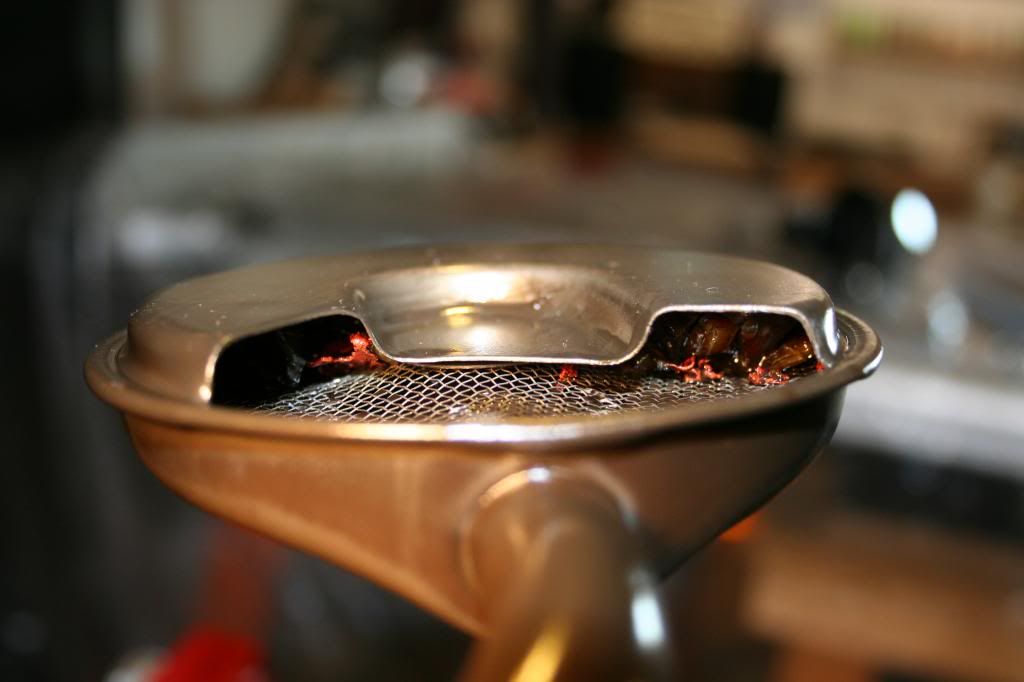 [/IMG]
Do these engines bend valves when the chain jumps? I don't have the front cover off yet so I don't know for sure that it jumped. The chain seems loose but not floppy. Good thing I have a new timing set in my cabinet.
And that orange stuff looks very much like the silicone that was behind the water pump. Is that likely? There was "clean" antifreeze in the little pockets of the block, just inside and under the oil pan mating surface. I thought maybe that happened when I turned the motor upside-down on the stand. The oil was a little dirty but not foamy at all.
And uhh.....how do I clean this out?
[IMG]
 [/IMG]
Do these engines bend valves when the chain jumps? I don't have the front cover off yet so I don't know for sure that it jumped. The chain seems loose but not floppy. Good thing I have a new timing set in my cabinet.
And that orange stuff looks very much like the silicone that was behind the water pump.
Is that likely? There was "clean" antifreeze in the little pockets of the block, just inside and under the oil pan mating surface. I thought maybe that happened when I turned the motor upside-down on the stand. The oil was a little dirty but not foamy at all.And uhh.....how do I clean this out?
 October 25th, 2013, 04:31 PM
#221
Registered User
Thread Starter
Join Date: Aug 2013
Location: Central Illinois
Posts: 3,900
October 25th, 2013, 07:18 PM
#222
Registered User
Join Date: Apr 2010
Posts: 978
Nice job
I just found this thread and I have to commend you for your efforts. That does look like silicone in your oil pick up, but it didn't come from the water pump. Someone along the way got carried away with it's use. Maybe oil pan, intake, or timing cover? When you pull your valves, look very carefully at the seat area. Does it look straight or concave? Sometimes it helps to hold two valves together from opposite directions. Can you see light between the seat area on the valves? If so, you should plan on doing a valve job. I recently picked up a valve grinding machine and two nice seat grinders. I live just over the boarder into Wisconsin so you would have a pretty good drive to get them to me. I would charge $100 to do your valve job plus any parts. I can replace guides, but not seats. I would still recommend having them hot tanked, checked for cracks, and resurfaced. My machinist charged me $120 for the last set I brought him, disassembled. If you decide to take them to a local machine shop, make sure they have a valve stem height gauge for Oldsmobile's. If they don't know what your talking about, get the hell out of there. It is crucial to get the height correct, unless your going to upgrade to an adjustable valve train. Just so you know, I believe your engine came with a rope style rear main oil seal. Those things are a pain in the ***. They do make neoprene replacements, which I would highly recommend. The bad news is, your crankshaft is going to have to come out. You need to be extremely careful when removing the pistons not to damage the crank from the rod bolts. You really should use a ridge reamer on the cylinder bores. If you like doing your own engine building, invest in some good measuring tools and check everything very thoroughly. You should blue print your engine while you have it apart. I could give you a spec sheet if you need one. You should also learn as much as you can about what makes the Olds motor different from all others, and why certain things need to be done differently to make them live. Go to You Tube, and look for a series of engine building videos from Bill Travato-
You may also want to pick up a copy of his book. Sorry for the novel, I thought some of this information might be helpful to you. Once again my hat's off to you for diving in on this thing especially without air tools. Finally I want to give you an idea of what it could cost you to do a full high performance build. Look here-
https://classicoldsmobile.com/forums...ort-block.html
https://classicoldsmobile.com/forums...ort-block.html
Last edited by 67 Cutlass Freak; October 25th, 2013 at 07:19 PM. Reason: coppied wrong
October 26th, 2013, 06:33 AM
#223
Registered User
Thread Starter
Join Date: Aug 2013
Location: Central Illinois
Posts: 3,900
Thanks for the recognition and vote of confidence Freak. I've pretty much decided to take the heads in and have the work done. I appreciate the offer and it's a good price but my truck gets about 12 mpg so it would cost me more to drive up.
I think for now I'll be leaving the short block alone, other than that rear main seal. I'm hoping to not have to remove the crank to pull that rope. I've been doing a lot of reading and it sounds like it can be very easy or very difficult. Luck of the draw I suppose.
I'll also have a better idea of the condition of the rings once I get the heads off and can see how much of a ridge I have in the cylinder. But a wet test didn't change my compression readings so I think they're in pretty good shape. Worst case scenario would be to button her back up and run it and buy a short block to work on in the mean time.
Thanks for the tip on the valve length. That I would not have known.
November 1st, 2013, 12:37 PM
#224
Registered User
Thread Starter
Join Date: Aug 2013
Location: Central Illinois
Posts: 3,900
Huh?
I don't think I get it. The teeth on my cam gear look fine. Or are they supposed to be capped with nylon teeth?
[IMG]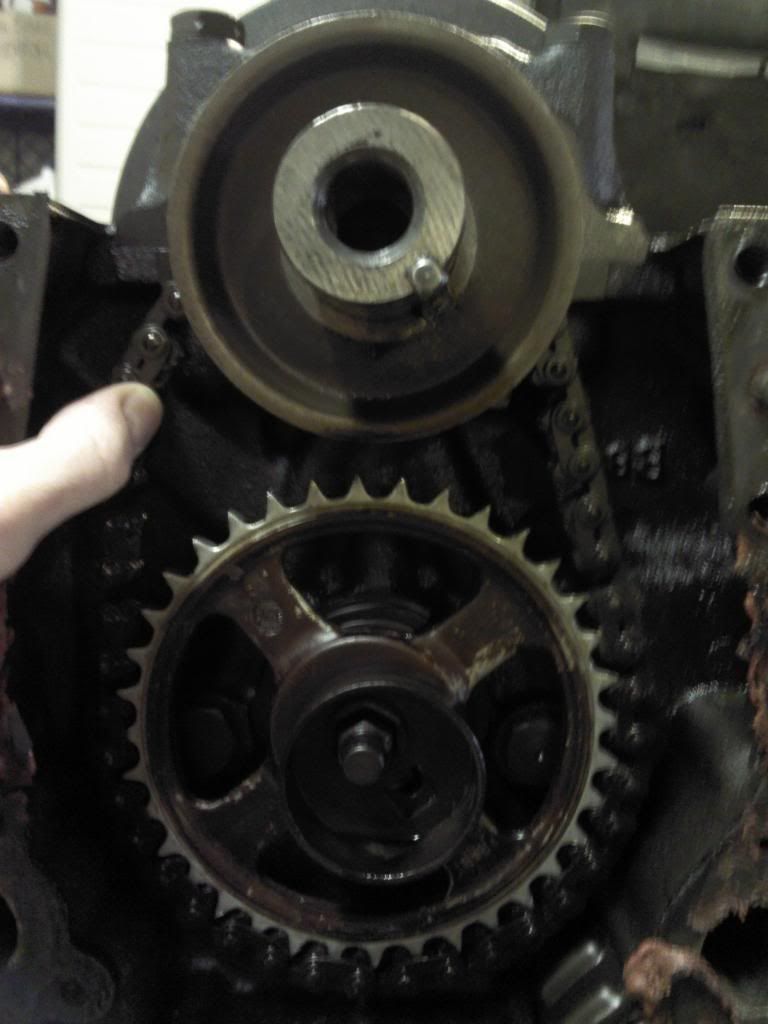 [/IMG]
If not, then what is all this in my pickup screen?
[IMG][/IMG]
That chain is just a wee bit loose though, yeah?
[IMG]
 [/IMG]
If not, then what is all this in my pickup screen?
[IMG]
[/IMG]That chain is just a wee bit loose though, yeah?
November 2nd, 2013, 09:21 AM
#227
Registered User
Thread Starter
Join Date: Aug 2013
Location: Central Illinois
Posts: 3,900
Hey guys, my inexperience is showing yet again. I bought an Edelbrock timing set, True Rolling Timing Chain set #7813, and the sprockets are bigger than the stock sprockets. Both the cam and crank are bigger so I should assume the geometry will be correct, right? Also, It's a thicker set than stock, a double roller (?). Will that cause any issues with the fuel pump eccentric and the oil slinger? I'll get pic here in a sec...
November 2nd, 2013, 09:30 AM
#228
Registered User
Thread Starter
Join Date: Aug 2013
Location: Central Illinois
Posts: 3,900
Also, any tips on removing the crank gear? The harmonic balancer puller set I rented came with a three arm puller. Can I use that?
The old sprocket is the dirty one, to point out the obvious. Now that I'm looking at the photo, the center area of the new sprocket looks to be the same thickness as the old one. I'll measure....
The new cam sprocket looks to be about 1/16 inch thicker.
[IMG]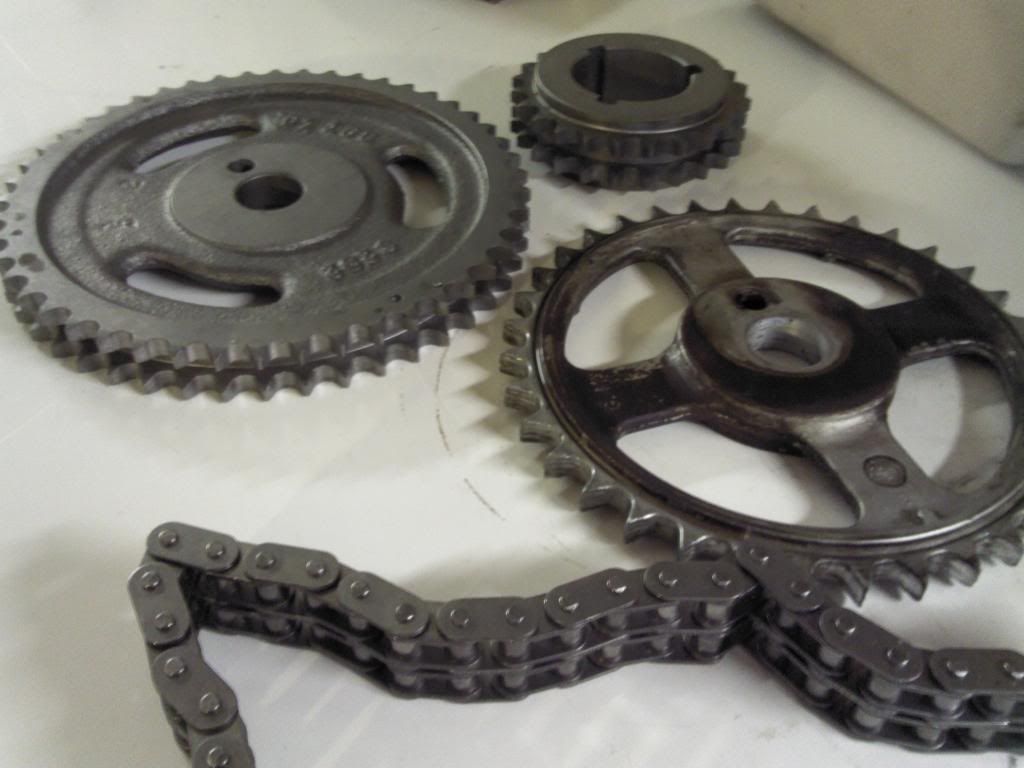 [/IMG]
The old sprocket is the dirty one, to point out the obvious. Now that I'm looking at the photo, the center area of the new sprocket looks to be the same thickness as the old one. I'll measure....
The new cam sprocket looks to be about 1/16 inch thicker.
[IMG]
 [/IMG]
Last edited by Macadoo; November 2nd, 2013 at 09:34 AM.
November 2nd, 2013, 11:57 AM
#231
Registered User
Join Date: Aug 2012
Location: Ventura California
Posts: 30
great thread guys. Im planning on pulling out my sb next week, this will be my first time doing this so im trying to prepare myself for it. since im only taking out the engine have any of you used those engine lift plates to pull it out..you kno the ones that bolt on the intake manifold?
November 2nd, 2013, 01:00 PM
#232
Macadoo try two pry bars and wiggling it out so to speak that's usually what I do. Or I have also used a slide hammer with a axle removal adapter for fwd cars ., all it took was a few very light and I mean light taps with the 10 lb slide hammer and out it came.
November 2nd, 2013, 01:19 PM
#233
Registered User
Thread Starter
Join Date: Aug 2013
Location: Central Illinois
Posts: 3,900
Hey Copper, yeah I saw a youtube vid of a fella doing just that. Seemed to come off pretty easy. I hadn't thought about the pry bars though. Both at the same time or one side, then the other?
805 Cutlass, as a newb myself I'd be glad to answer any questions. But first off I can tell you this; once my motor was hanging a few feet ABOVE my engine bay, I was very glad I opted for the sling and not the intake plate.
805 Cutlass, as a newb myself I'd be glad to answer any questions. But first off I can tell you this; once my motor was hanging a few feet ABOVE my engine bay, I was very glad I opted for the sling and not the intake plate.
November 2nd, 2013, 01:23 PM
#234
Registered User
Thread Starter
Join Date: Aug 2013
Location: Central Illinois
Posts: 3,900
Making some progress finally. I'll admit, after seeing 71supreme's thread about excess carbon in the lifter valley I was a little worried.
https://classicoldsmobile.com/forums...-build-up.html
But it turns out mine is nice and clean.
[IMG]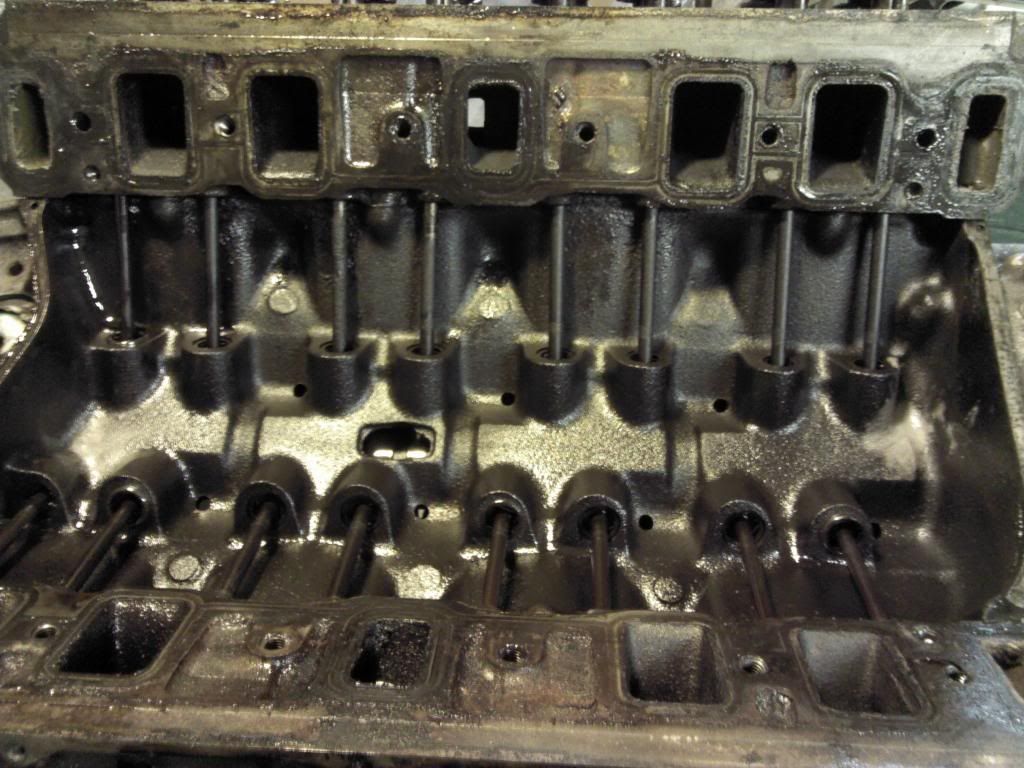 [/IMG]
Making some headway. I asked around and got some good leads on machine shops for the head work but I probably won't get those off this weekend. Hopefully next.
https://classicoldsmobile.com/forums...-build-up.html
But it turns out mine is nice and clean.
[IMG]
 [/IMG]
Making some headway. I asked around and got some good leads on machine shops for the head work but I probably won't get those off this weekend. Hopefully next.
November 2nd, 2013, 01:29 PM
#235
Administrator
Join Date: Oct 2009
Location: Poteau, Ok
Posts: 40,597
great thread guys. Im planning on pulling out my sb next week, this will be my first time doing this so im trying to prepare myself for it. since im only taking out the engine have any of you used those engine lift plates to pull it out..you kno the ones that bolt on the intake manifold?
I use a plate 90% of the time when pulling engines only or with the trans attached.
November 2nd, 2013, 07:33 PM
#239
Registered User
Thread Starter
Join Date: Aug 2013
Location: Central Illinois
Posts: 3,900
Eric, I have to draw the MAW line somewhere. I think I'll stop with the head work for now. If it comes to it, I can yank it back out and have the block worked on later.
Thanks Copper, I'll give it try.
Thanks Copper, I'll give it try.
November 2nd, 2013, 07:42 PM
#240
Justin
Join Date: Mar 2012
Location: utah
Posts: 3,447
Great job so far are you doing a cam while it's out and heads off ?
I don't like lifting a motor with the carb mounted. Plate if it has a aluminum intake, just my opinion then again. I just use a chain from the front of one head to the rear of the opus it side
I don't like lifting a motor with the carb mounted. Plate if it has a aluminum intake, just my opinion then again. I just use a chain from the front of one head to the rear of the opus it side


