Pulling the motor

 November 8th, 2013, 05:34 AM
#283
Registered User
Join Date: Jul 2013
Location: Mo-Ray-Al, K-Bec.
Posts: 1,815
 November 8th, 2013, 06:11 AM
#286
Prof. I'm sorry but that is not a good way to prelube and engine that is fresh. You needs to prelube the engine with a drill before firing it up untill oil comes out the pushrods. Very crucial that this is done then the cam break in. Procedure.
November 8th, 2013, 06:35 AM
#287
Registered User
Thread Starter
Join Date: Aug 2013
Location: Central Illinois
Posts: 3,900
Thanks oldcutass. While we're on the subject of first starts (even though that's a few months off) it sounds like a high-anxiety time. Cam break-in is crucial...but what if it doesn't want to start? I'll have a lot of untested components, including an HEI ignition, a newly rebuilt carburator with electric choke (I know how to hook it up), and a new alternator. What's the procedure exactly? Prime the oil system, fill the float bowl with fuel, charge the battery, set [static?] timing? And if it starts, keep it revved above 2k rpm? And if my rod doesn't have a tac?
November 8th, 2013, 06:47 AM
#288
If you install everything correct it should start within a few turns. It takes a few to get fuel to the carb. If you don't have a tach buy a cheap dwell meter it goes up tp 2 k or a timing light with a tach in it or tach probe from ahrbor freight. The cam can turn over a few times it's when you do a lot of dry crancing that you smear off the assembly lube. Usually my engines fire up with in a few crancks but I have a holley and I pre fill the fuel bowls for a quick start.
November 8th, 2013, 06:56 AM
#289
Administrator
Join Date: Oct 2009
Location: Poteau, Ok
Posts: 40,795
Mac, I know a lot will disagree, but IMHO don't worry unnecessarily on the minor cranking to get the engine to fire. The cam lube will take care of that. In the old days, we would just drive the car for cam break in. Take a leisurely drive on the highway and keep the car at varying speeds from 50-60 mph for the first 50-100 miles with no heavy acceleration.
November 8th, 2013, 07:09 AM
#290
Oldcutlass I don't disagree but there are a few things that can go wrong during break in. Leaks, steam pockets un coling system, wiring bugs, driveability issues. In a perfect world and maybe some here ca do it that way but I know I my swap meet 355 build I had a leaking endrail and some carb tuning to do. A friend of mine broke a cam in his chebby that way. It was fine but a lot of little things can go wrong and having it stationary imo proves to be cheaper than a tow bill.
November 8th, 2013, 09:42 AM
#291
Registered User
Thread Starter
Join Date: Aug 2013
Location: Central Illinois
Posts: 3,900
Mac, I know a lot will disagree, but IMHO don't worry unnecessarily on the minor cranking to get the engine to fire. The cam lube will take care of that. In the old days, we would just drive the car for cam break in. Take a leisurely drive on the highway and keep the car at varying speeds from 50-60 mph for the first 50-100 miles with no heavy acceleration.
 But...but...but....
Lol, just kidding. I understand the break-in procedures.
November 8th, 2013, 11:30 AM
#295
Registered User
Thread Starter
Join Date: Aug 2013
Location: Central Illinois
Posts: 3,900
I wasn't sure if I could push them through but some channel locks and Deep Creep gotter' done. I have the cam out too. Anything I should look for or clean before sliding the new cam in?
November 8th, 2013, 06:49 PM
#296
Connoisseur d'Junque
Join Date: Sep 2010
Location: The Hudson Valley
Posts: 21,183
Personally, I've never had a problem pulling lifters with a lifter tool, like one of these:


They generally come out with a couple of good yanks.
As for starting, don't worry about it.
These engines want to run, and as long as you put it together right, it should start almost instantly as soon as you crank it.
Then just set your idle screw to 2,000 RPM and let 'er rip, while watching the gauges and the engine for any problems.
One thing i would recommend is that you take a good clear picture of your timing set before you button it up, in case you have second thoughts later on and think maybe you set it wrong. Looking at the picture is a lot easier than taking the motor apart to see
- Eric
November 8th, 2013, 06:52 PM
#297
Justin
Join Date: Mar 2012
Location: utah
Posts: 3,448
November 8th, 2013, 07:26 PM
#298
Registered User
Join Date: Apr 2010
Posts: 978
I wasn't sure if I could push them through but some channel locks and Deep Creep gotter' done. I have the cam out too. Anything I should look for or clean before sliding the new cam in? ][/QUOTE]
Throw the lifters in the trash. Always use new lifters with a new cam. You should have the machine shop clean the block, install new cam bearings and freeze plugs. Cleanliness is crucial in assembly. If your going to go that far you may also want to consider some oiling system modifications that can help your Olds live a long and happy life. There's a lot of simple things you can do with a die grinder like opening up the oil return hole at the front of the engine from the lifter valley, or enlarging the oil return holes in the heads or match porting the oil pump to the rear main cap. Milan has some very serious modifications, not for the novice. I believe he's close to central Illinois. He's a real good guy, and very knowledgeable on Olds. Here's a thread on HPO he wrote about oil system mods-
http://highperformanceolds.com/phpbb....php?f=1&t=202
November 8th, 2013, 07:42 PM
#299
Registered User

Join Date: Aug 2011
Posts: 3,194
The slide hammer type lifter tools recommended would work well. I have seen ones that use alot of force via threads to pull the lifter. If that much force is needed the lifter bore could be damaged while being pulled through as a result of a mushroomed bottom on the lifter.
A method to avoid this when doing a cam and lifters only without pulling the pan, is to pull the stubborn lifter up enough so that it does not fall and perhaps nylon tie it (idea of a CO member) and remove the camshaft. Next slide a cardboard tube or the box the cam came in cut lengthwise into the place of the cam and push the lifter down into the tube. The tube just prevents the lifter from dropping into the pan.
A method to avoid this when doing a cam and lifters only without pulling the pan, is to pull the stubborn lifter up enough so that it does not fall and perhaps nylon tie it (idea of a CO member) and remove the camshaft. Next slide a cardboard tube or the box the cam came in cut lengthwise into the place of the cam and push the lifter down into the tube. The tube just prevents the lifter from dropping into the pan.
November 8th, 2013, 08:07 PM
#300
Registered User
Thread Starter
Join Date: Aug 2013
Location: Central Illinois
Posts: 3,900
Look Ma! No heads! 
[IMG]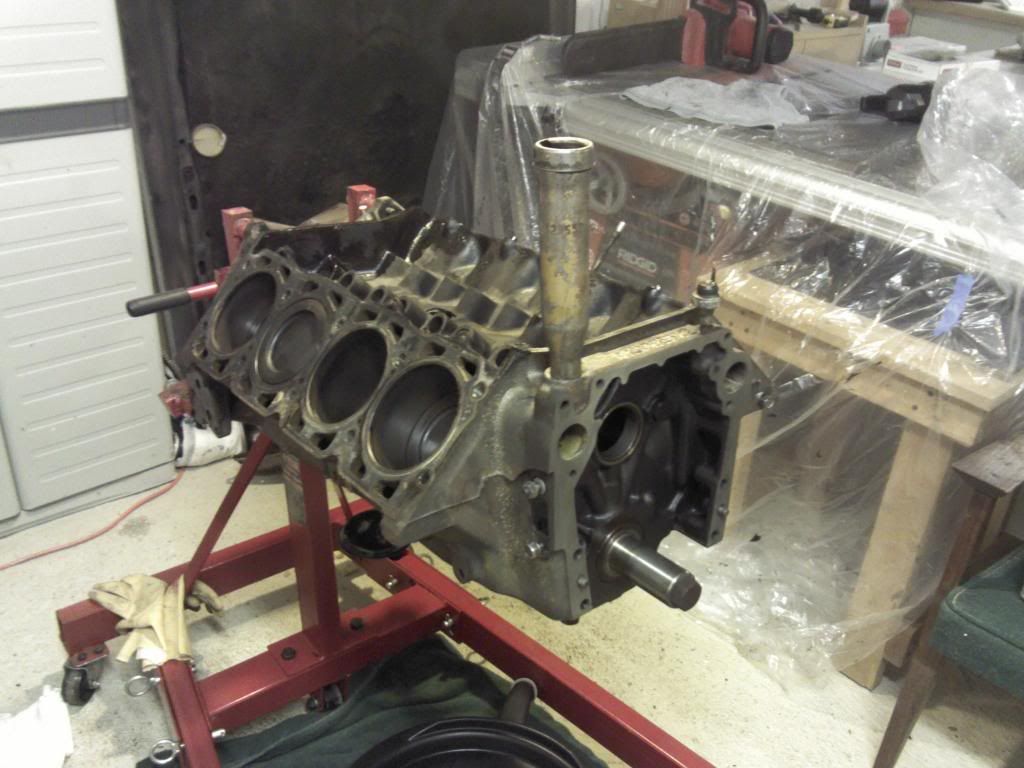 [/IMG]
The cam journals look pretty good, like I know what I'm looking for. No scoring that I can see. The lobes are worn a little. The water jacket is a little crummy though, with one of the passages into the heads completely blocked, although not with a thick layer, just a thin film. It does look to me like there was a head gasket leak at one time. Just kinda' sludgy, like antifreeze mixed with oil. But I can't be sure. The oil in the crankcase didn't look like it though. Maybe it was stop-leak. The radiator was leaking a little before I pulled it.
The cylinder walls look great. There's the thinnest ring of carbon around the top but I can barely feel it with my finger.
Eric, I looked for a lifter tool locally but nobody had one and I didn't want to wait. They came out fine, I just didn't realize how tight they would be.
Thanks for the link Freak. I'll give it a read. I have new lifters and springs to go with the new cam.
[IMG]
 [/IMG]
The cam journals look pretty good, like I know what I'm looking for. No scoring that I can see. The lobes are worn a little. The water jacket is a little crummy though, with one of the passages into the heads completely blocked, although not with a thick layer, just a thin film. It does look to me like there was a head gasket leak at one time. Just kinda' sludgy, like antifreeze mixed with oil. But I can't be sure. The oil in the crankcase didn't look like it though. Maybe it was stop-leak. The radiator was leaking a little before I pulled it.
The cylinder walls look great. There's the thinnest ring of carbon around the top but I can barely feel it with my finger.
Eric, I looked for a lifter tool locally but nobody had one and I didn't want to wait. They came out fine, I just didn't realize how tight they would be.
Thanks for the link Freak. I'll give it a read. I have new lifters and springs to go with the new cam.
November 8th, 2013, 08:34 PM
#301
Registered User

Join Date: Dec 2012
Posts: 162
Thanks oldcutass. While we're on the subject of first starts (even though that's a few months off) it sounds like a high-anxiety time. Cam break-in is crucial...but what if it doesn't want to start? I'll have a lot of untested components, including an HEI ignition, a newly rebuilt carburator with electric choke (I know how to hook it up), and a new alternator. What's the procedure exactly? Prime the oil system, fill the float bowl with fuel, charge the battery, set [static?] timing? And if it starts, keep it revved above 2k rpm? And if my rod doesn't have a tac?
November 8th, 2013, 08:51 PM
#303
Registered User
Thread Starter
Join Date: Aug 2013
Location: Central Illinois
Posts: 3,900
Personally, I've never had a problem pulling lifters with a lifter tool, like one of these:
They generally come out with a couple of good yanks.
As for starting, don't worry about it.
These engines want to run, and as long as you put it together right, it should start almost instantly as soon as you crank it.
Then just set your idle screw to 2,000 RPM and let 'er rip, while watching the gauges and the engine for any problems.
One thing i would recommend is that you take a good clear picture of your timing set before you button it up, in case you have second thoughts later on and think maybe you set it wrong. Looking at the picture is a lot easier than taking the motor apart to see
- Eric
Thanks for the tip Eric. I'm already having second thoughts. I know I set the timing marks pointing at each other before removing the gears and I remember having my finger over the spark plug hole and felt the air pressure. But I wanted to double check tonight and realized I can't. I can, of course, see the #1 piston at the top of the bore but am I thinking of this correctly...with the cam out there is no compression or exhaust stroke? The crank gear is keyed so I can put the gear on, point it at the cam, put the cam in and line the mark up with the crank, and I'm good to go, yes?
November 8th, 2013, 09:27 PM
#304
Registered User
Join Date: Aug 2011
Posts: 3,194
Mac, If the cam and cam gear are not in yet it cannot be out of time because as you said there is not an exhaust/compression stroke. Just line the marks up properly when installing the chain and take the picture, it is an excellent suggestion. You could even post the picture if you want a member to check it. Keep up the good work!!!
Your work is impressive, glad to hear that there is only minimal ridge on the cylinder walls.
Your work is impressive, glad to hear that there is only minimal ridge on the cylinder walls.
November 9th, 2013, 05:21 AM
#305
Registered User
Thread Starter
Join Date: Aug 2013
Location: Central Illinois
Posts: 3,900
Impressive? Lol, let's hold off on that judgement until after it fires up and doesn't explode. Thanks for verifying my thoughts on the gears Sugar Bear, it gives me emotional security
November 9th, 2013, 06:03 AM
#306
Connoisseur d'Junque
Join Date: Sep 2010
Location: The Hudson Valley
Posts: 21,183
I'm assuming from the side view that those are low compression pistons - what cut mark is on their front edges?
- Eric
November 9th, 2013, 06:27 AM
#307
Registered User
Thread Starter
Join Date: Aug 2013
Location: Central Illinois
Posts: 3,900
Gently remove the carbon with a solvent like GumOut and something hard, but non-abrasive, and see how much of a ridge there is in the metal. That'll tell you how worn the engine really is.
I'm assuming from the side view that those are low compression pistons - what cut mark is on their front edges?
- Eric
I'm assuming from the side view that those are low compression pistons - what cut mark is on their front edges?
- Eric
I noticed the pistons have a depression on the fronts, like someone took out a chunk with their thumbnail. Is that what you're asking? And are we heading for a great big MAW with the question?

I'll get a close-up pic of the pistons in a little while. I have to take the wife to breakfast. And if I'm correct, I think the Bob Evans is right down the street from the machine shop where I'm dropping my heads. Go figure
Last edited by Macadoo; November 9th, 2013 at 06:30 AM.
November 9th, 2013, 06:49 AM
#309
Connoisseur d'Junque
Join Date: Sep 2010
Location: The Hudson Valley
Posts: 21,183
Piece of wood, wire brush, nylon dish scrubber...
Is it half-round or V-shaped.
Sounds half-round, which is low-compression, as expected.
Wouldn't it be nice if they were high compression...
- Eric
Sounds half-round, which is low-compression, as expected.
Wouldn't it be nice if they were high compression...
- Eric
November 9th, 2013, 08:08 AM
#311
Registered User
Join Date: Jul 2009
Location: Dewey AZ
Posts: 314
a green dish scrubie works well for removing carbon crap from the cylinders. I just read throu all 8 pages of your project and I am impressed when a novice "goes for it". your doing fine. one concern I have is about your exhaust wants, if your going through the trouble of headers on your project you should address some head issues that have not been mentioned. The exhaust center devider is not flush with the face of the head, most people have this welded or braised by a shop, the other option is make a clip that will flush the chambers.

I made this out of a chunk of 3/8 flat stock. once "fit" the header itself will hold it in place.
the other was mentioned, crossover fill, you could fill the crossovers separating the 2 ports and then drill a 3/8 hohe to ONE exhaust port to keep the egr working. All this is not mandatory, it will sound and perform better if all this is done. Even if your going to run stock manifolds I would fill the crossovers

do what you want, too may cooks spoil the broth, its your car
. your doing fine. one concern I have is about your exhaust wants, if your going through the trouble of headers on your project you should address some head issues that have not been mentioned. The exhaust center devider is not flush with the face of the head, most people have this welded or braised by a shop, the other option is make a clip that will flush the chambers.I made this out of a chunk of 3/8 flat stock. once "fit" the header itself will hold it in place.
the other was mentioned, crossover fill, you could fill the crossovers separating the 2 ports and then drill a 3/8 hohe to ONE exhaust port to keep the egr working. All this is not mandatory, it will sound and perform better if all this is done. Even if your going to run stock manifolds I would fill the crossovers
do what you want, too may cooks spoil the broth, its your car


 November 9th, 2013, 09:25 AM
#313
Registered User
Join Date: Jul 2009
Location: Dewey AZ
Posts: 314
on another note I see you purchased a cam and springs from MR. EFI, good choice! I would concider have the machine shop assemble or measure your valve springs installed hight for proper spring seat preassure, you said you have a 71 motor, should be 7 heads uneven spring pockets, rotators and non rotators. i'm not a fan of the edelbrock chaine unless it was recommended buy your cam guy.
November 9th, 2013, 10:04 AM
#314
Registered User
Thread Starter
Join Date: Aug 2013
Location: Central Illinois
Posts: 3,900
I talked the the machine shop about rebuilding my short block. If everything checked out it sounded to be about 1k + parts. A little rich for my blood. I'll give it some thought. On the other hand, they would hot tank the block, hone the cylinders, install cam bearings, and resurface for about $150 + the price of the bearings. That would leave me with rings, rod bearings, and main bearings? Would I need to replace the piston pins? Could I have them take a little more off the block and heads to gain a little more compression without springing for new pistons? But then I'd have to have the new performer intake milled as well if I'm thinking of the correct geometry.
I dunno' man, I need time to think. When I got home I wiped down the ridge at the top of one of the cylinders, taking off the carbon and there is a ridge, but just barely. I would estimate maybe half the thickness of regular notebook paper.
Lars, nice to meet you and thanks for chiming in. What bugs you about the edel timing set? It seems robust. And yeah, I took the new springs to the machine shop for install.
November 9th, 2013, 10:08 AM
#315
Registered User
Thread Starter
Join Date: Aug 2013
Location: Central Illinois
Posts: 3,900
November 9th, 2013, 05:23 PM
#317
Registered User
Join Date: Apr 2010
Posts: 978
http://realoldspower.prophpbb.com/topic2710-20.html
you will see they installed #7 heads in 1971 & 1972. The 1971 versions did not have hardened seats, but the 1972 versions did.
November 9th, 2013, 08:40 PM
#319
Connoisseur d'Junque
Join Date: Sep 2010
Location: The Hudson Valley
Posts: 21,183
Don't worry about it. For the vast majority of people, it's irrelevant.
Unless you're planning on doing a lot of full-throttle track runs, or a lot of towing, hardened seats should never be an issue.
- Eric
Unless you're planning on doing a lot of full-throttle track runs, or a lot of towing, hardened seats should never be an issue.
- Eric
November 9th, 2013, 09:18 PM
#320
Registered User
Join Date: Jul 2009
Location: Dewey AZ
Posts: 314


