
Spring Comprssor Toil Front Coil

Thread Starter
70 Cutlass SX
Joined: Apr 2011
Posts: 1,042
From: Bermuda
Spring Comprssor Toil Front Coil
For a 1970 Cutlass, is this the best tool to use for compressing front coils?
http://www.summitracing.com/int/part...0554/overview/
http://www.summitracing.com/int/part...0554/overview/
Connoisseur d'Junque
Joined: Sep 2010
Posts: 21,183
From: The Hudson Valley
Yes, that one looks right, though in operation, the hooks all go the opposite way.
You have to use an inside compressor, because there's no room for an outside compressor, like you use with MacPherson struts.
It is also possible, and quite possibly easier, to do it with a carefully-wielded floor jack.
- Eric
You have to use an inside compressor, because there's no room for an outside compressor, like you use with MacPherson struts.
It is also possible, and quite possibly easier, to do it with a carefully-wielded floor jack.
- Eric
Just an Olds Guy
Joined: Jul 2008
Posts: 24,528
From: Edmonton, AB. And "I am Can 'eh' jun - eh"
If you're replacing the front springs (not sure why since you just did the resto on your car) it's far easier to undo the front suspension and let the lower control arm down all the way. The coil will be easier to remove without any tension on it. Comes out easy, goes back in just as easy.
Registered User
Joined: Jan 2008
Posts: 3,515
From: South River, New Jersey
that's it
That is what I used as well (tool shown) and I just liked a little safety factor instead of the floor jack method as well as I didn't have the motor in either and there wasn't enough weight with the frame etc , my hooks are not the same size one is shorter which corresponds to the angle on the coils
Registered User
Joined: Feb 2013
Posts: 15,411
From: Phoenix, AZ
AGREED! That thing is way too much work for removing the front coils.
Yep, this is how I did mine. Just be sure to lift the car up as high as you can since the control arm will come WAY down before the spring releases. For the safety conscious folks, put a chain through the center of the spring and out the shock hole in the lower control arm, just in case the spring tries to escape.
If you're replacing the front springs (not sure why since you just did the resto on your car) it's far easier to undo the front suspension and let the lower control arm down all the way. The coil will be easier to remove without any tension on it. Comes out easy, goes back in just as easy.
Registered User
Joined: Jan 2008
Posts: 904
That tool, in my opinion and actual experience is great, I skip using one of the hook ends, run the threaded rod up through the bottom of the spring and then the threaded rod gets fed through the upper shock mounting hole, you are basically compressing the spring right up into the upper pocket. With a little practice I have been able to consistently install one side in under an hour. If it helps I can post a picture tomorrow as my son and I are putting new coils in his 65 chevelle.
Ben
Joined: Mar 2009
Posts: 1,851
From: Snohomish, WA
That tool, in my opinion and actual experience is great, I skip using one of the hook ends, run the threaded rod up through the bottom of the spring and then the threaded rod gets fed through the upper shock mounting hole, you are basically compressing the spring right up into the upper pocket. With a little practice I have been able to consistently install one side in under an hour. If it helps I can post a picture tomorrow as my son and I are putting new coils in his 65 chevelle.
For removing them, i don't bother with the compressor, jsut use the floor jack method, and a ball joint separator tool like this:
http://pitstopusa.com/c-133199-tools...separator.html
goes between the balljoint studs and expands outward- tap on the spindle where the BJ goes through and it will pop right out. easy easy.
Just an Olds Guy
Joined: Jul 2008
Posts: 24,528
From: Edmonton, AB. And "I am Can 'eh' jun - eh"
Might work well for you guys but it was a real PITA for me. It also scratched up the surface of the springs a lot. Had to re-paint them again before installing.
Just a thought Peter, if you're putting in HD springs on your vert, they are shorter than the regular springs and don't require as much drop on the control arm.
Just a thought Peter, if you're putting in HD springs on your vert, they are shorter than the regular springs and don't require as much drop on the control arm.
Registered User
Joined: Oct 2009
Posts: 1,226
From: Central IN
Same here ....as posted here:
https://classicoldsmobile.com/forums...tml#post228384
https://classicoldsmobile.com/forums...tml#post228384
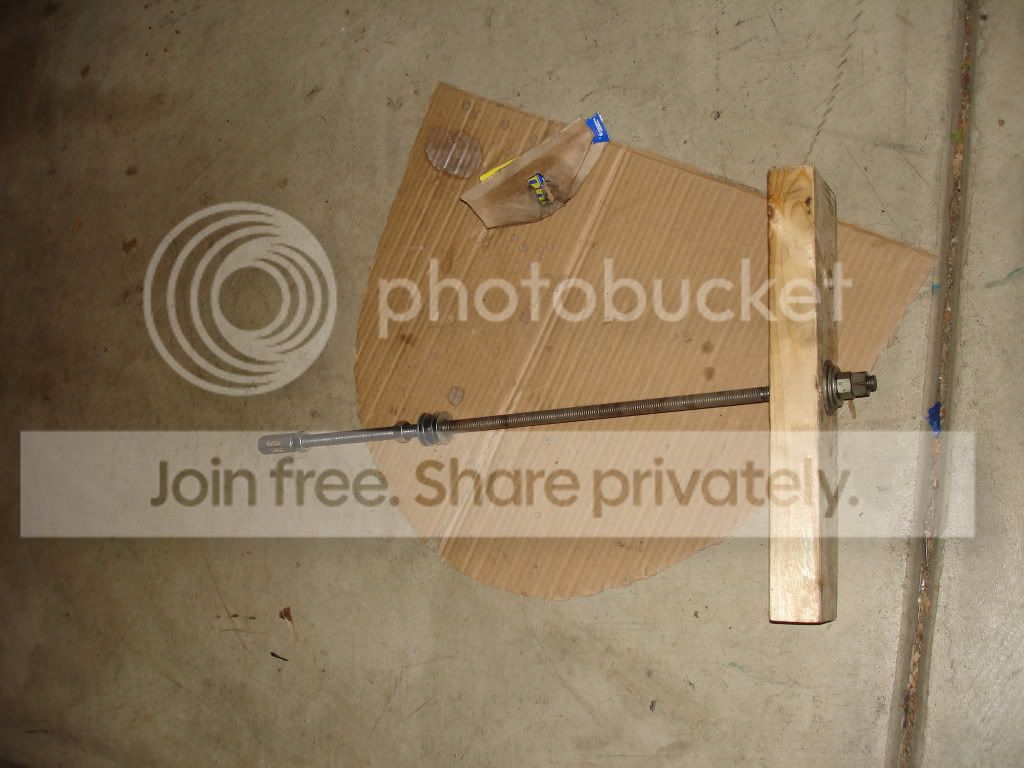
This turned out to be a colossal waste of time. After spending hours messing with it and getting no where, I gave up and resorted back to my own trusty high-tech custom tool....

click for big...
...It's just a 2ft piece of 1/2" all-thread (rated @ 3200lbs) with various nuts/washers. Note the optional anti scuffing device for protecting the upper shock mount paint (cleverly disguised as a piece of Moog box...). The coupling at the top gets locked by the nut so I can spin the wrench up above the top arm/mounts.

Registered User
Joined: Apr 2012
Posts: 1,606
From: Bradenton, FL
+1 on this guy...I use 2 pieces of steel top and bottom and 2 looong grade 8 bolts. Trying to slip that thing in the middle and getting the hooks to work has always been a pain for me. Mr Gasket used to sell a kit for Mustangs but I haven't found it in the Summit catalog in quite some time so I had to make my own...which is simple...2 6 inch pieces of steel, 3 holes in each, and some long bolts. Easier than wrestling with that thing.
Registered User
Joined: Feb 2008
Posts: 11,798
From: Plano, TX
As already said, much easier easier to drop the control arm than to fight with that silly compressor!
Start here with the initial disassemble:
https://classicoldsmobile.com/forums...tml#post287763
To go right to the coil spring fun, go here:
https://classicoldsmobile.com/forums...tml#post290155
Start here with the initial disassemble:
https://classicoldsmobile.com/forums...tml#post287763
To go right to the coil spring fun, go here:
https://classicoldsmobile.com/forums...tml#post290155
Old(s) Fart
Joined: Mar 2007
Posts: 50,803
From: Northern VA
I have since scored one of the Kent-Moore tools that is essentially all-thread up the center of the spring, but I haven't had the chance to try it yet.
Thread Starter
70 Cutlass SX
Joined: Apr 2011
Posts: 1,042
From: Bermuda
Allan - the reason I am dong this is because I have a pretty bad tilt- see my recent post:
https://classicoldsmobile.com/forums...lass-tilt.html
If I do need to replace the coils I am not going HD. I like the smooth ride.
I asked the guys who did my restoration and they use this tool:
http://www.autozone.com/autozone/acc...ier=555573_0_0_
which is $50. Not a bad trade for a bottle of good wine.
Rob - I must have read your thread 3 times over the past 6 months - it is saved as a favourite link!
Boese - please put some photos up showing the use of the tool!
Registered User
Joined: Jan 2008
Posts: 904
Wrap the spring compressor arms with duct tape- no scratches!
Might work well for you guys but it was a real PITA for me. It also scratched up the surface of the springs a lot. Had to re-paint them again before installing.
Just a thought Peter, if you're putting in HD springs on your vert, they are shorter than the regular springs and don't require as much drop on the control arm.
Just a thought Peter, if you're putting in HD springs on your vert, they are shorter than the regular springs and don't require as much drop on the control arm.
Registered User
Joined: Feb 2013
Posts: 15,411
From: Phoenix, AZ
I didn't post before, but mine retained excellent ride quality after replacing the worn out 40 year originals with the springs I posted in your other thread. They are essentially FE2 springs that were used on 442s and special order FE suspension vehicles. My car sits the same height as it did with the old worn out springs and my impression is the ride quality is fantastic - firm but still comfortable.

Registered User
Joined: May 2010
Posts: 542
From: Mich.
In ref., to the spring compressor type that has the lower plate that contacts the bottom of the lower arm and has the rod that uses the upper shock mount hole - I see some of the tools and made units use a 1/2" Dia, rod, and seen reference to some useing a 5/8" threaded rod. A quick measure of that hole with shock in etc to just a getn idea of hole size, and it look like a 5/8 rod may work, but...Has anyone had any issues wit binding with a 5/8" Dia, rod having enough clearance to the upper shock mount hole when the lower arm is fully dropped? thanks
Last edited by Del70; Dec 16, 2022 at 10:14 AM.

Thread
Thread Starter
Forum
Replies
Last Post


