
68 Cutlass S restore...


Registered User
Joined: Dec 2009
Posts: 39
From: Ventura, CA
dash repair
I just did some rust repair on my 68 vista''s dash. I bought a dash repair panel from National Parts Depot for a 68-72 chevelle. I just cut it down to the lower windshield mounting surface and grafted to the dash. It seem to give an easier solution than using scrap metal.
Thread Starter
Registered User
Joined: Oct 2009
Posts: 1,226
From: Central IN
Ahhh, that's good to know.
What I've heard/learned:
TPP part # BP5542T (Cutlass) & #BP4724E (ElCam/Chev) may be the same piece for $79.
NPD has part # C-10230-103A (I think you used this) for a '68-72' ElCam (listed in cat @ 79.95 but when you AddToCart its 89.95 )
)
Chevelle.com has #WRP6802 for $89
Various other Chevelle places have it for $70-$90.
I think they are all the same piece from the same mfgr.
There's been a lot of talk about how that piece is NOT an Olds part (despite what The Parts Place claims) and some people have said that it doesn't work very well.
I wondered if it would work better on a '68 (as opposed to '70-'72's or others. ) Cutlass. I've seen some (Chevy) sites list it as '68-'69 instead of '68-'72'.
Maybe its better for '68's Although ....the cowl/dash area is supposed to be the same across the years.
Once the car is back from media, we'll see just how bad it is....
What I've heard/learned:
TPP part # BP5542T (Cutlass) & #BP4724E (ElCam/Chev) may be the same piece for $79.
NPD has part # C-10230-103A (I think you used this) for a '68-72' ElCam (listed in cat @ 79.95 but when you AddToCart its 89.95
)Chevelle.com has #WRP6802 for $89
Various other Chevelle places have it for $70-$90.
I think they are all the same piece from the same mfgr.
There's been a lot of talk about how that piece is NOT an Olds part (despite what The Parts Place claims) and some people have said that it doesn't work very well.
I wondered if it would work better on a '68 (as opposed to '70-'72's or others. ) Cutlass. I've seen some (Chevy) sites list it as '68-'69 instead of '68-'72'.
Maybe its better for '68's
Although ....the cowl/dash area is supposed to be the same across the years.Once the car is back from media, we'll see just how bad it is....

Registered User
Joined: Apr 2008
Posts: 1,052
From: Phoenix, AZ
The Parts Place piece doesn't work at all. It simply doesn't fit. I wouldn't even bother buying it, as you'll end up spending as much money shipping it (to you then the return) as the part cost.
You can patch it using a real Chevelle dash. However, it depends what sections you're using. All I know is, that piece from the Parts Place wasn't even close. I have no idea how it would work.
You can patch it using a real Chevelle dash. However, it depends what sections you're using. All I know is, that piece from the Parts Place wasn't even close. I have no idea how it would work.
Registered User
Joined: Dec 2009
Posts: 39
From: Ventura, CA
Here's a few pictures. I ended up trimming 50% of the part (chevelle features)
Notches had to be cut where the windshield props located. After the panel was in I welded in patches with reliefs like on the Olds part cut off material from the donor panel. I chose to do this last in order to prevent distortion of the panel I was trying to fit.
it looks like yours has more rust and may need more patching on the top of the dash. One thing about the donor panel is that at the top of it there is a 1/2"
horizontal surface (I trimmed off) which may be useful.
Al
Thread Starter
Registered User
Joined: Oct 2009
Posts: 1,226
From: Central IN
The Parts Place piece doesn't work at all. It simply doesn't fit. I wouldn't even bother buying it, as you'll end up spending as much money shipping it (to you then the return) as the part cost.
You can patch it using a real Chevelle dash. However, it depends what sections you're using. All I know is, that piece from the Parts Place wasn't even close. I have no idea how it would work.
You can patch it using a real Chevelle dash. However, it depends what sections you're using. All I know is, that piece from the Parts Place wasn't even close. I have no idea how it would work.
Thread Starter
Registered User
Joined: Oct 2009
Posts: 1,226
From: Central IN
Alrighty...update!
Body shell & all other sheetmetal have been sent to media blasting at IDS Blast Finishing . ETA for return ~ 2 weeks. Here's some crappy pics of the body just before it left...(my cam sucks at times...)


I got the chassis back home yesterday! (single-handidly: using my appreciated neighbor's trailer...)..! Things came to a standstill in ~ the last 3-4 weeks due to the holiday/family/work & me rearranging my garage....and the fact that it didn't get above 20F until 2 days ago...
Went from this...

To this...

Now I get to strip the chassis. Plan is to pull it all apart, blast the major parts, paint or replace as needed (i.e. bushings, bearings, 3.3-3.4-ish posi ), add goodies like FE2 suspension (complete w/arm mount to frame braces), quicker steering box, hopefully at least semi correct front discs, etc... & have it back to rolling status over the next 5-6 weeks.....
Thread Starter
Registered User
Joined: Oct 2009
Posts: 1,226
From: Central IN
OK....
Naked Frame !

Disassembly notes....
- Found these when I pulled the steering box...

Yikes...Looks like only one bolt had meat left on it. The broken one snapped with me just starting to turn it with a 1/2" ratchet. Weird because that area of the frame wasn't particularly rusty....
- Ball joints are a serious PITA. I wailed on the left side for 2 hours. Tried sledging (with a 4lb hand sledge) the knuckle, pickle fork, heat, etc.. & gave up for the day. Next day I really beat it. After 7-8 major whacks, the top one popped. I beat the lower to the point of destroying a pickle fork (OK..so it was a cheap Harbor Freight chinesium one) & deforming the knuckle & but it still wouldn't pop. I gave up and pulled the whole LCA w/ spindle still attached. I'll cut off the ball joint later. After all of that, the top & bottom right side ones both popped on the 3rd easy whack. Go figure..
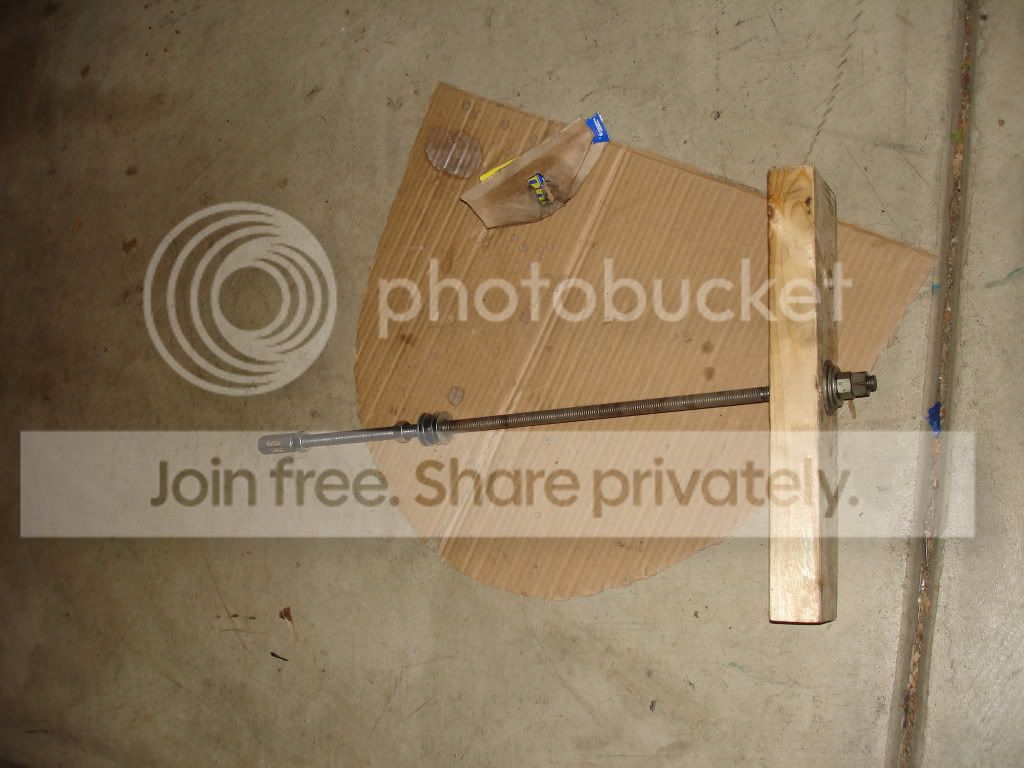
- Since there's no real weight on the frame I was worried about using the floor jack method for ball joint/spring removal since there's no weoght for spring compression. I made a simple spring retainer/compressor using a piece of 3/8" allthread, a coupler, some washers, and an eyehook (all rated @ >1200lbs). I ran the rod thru the top shock hole and used one of the rear arm bolts across the bottom thru the eye. This let me compress the spring just enough to take pressure off when removing the spindle. Worked like a charm...
- I must've scraped/brushed/chipped off 30Lbs of goop/dirt/crap off the front half of the chassis alone.
- The naked frame is suprisingly light ! I'll bet the frame itself only wieghs around 200-250 lbs and most of that is at the front. I had my 6yo son lift the rear up in the air just so he could tell his friends that he 'picked up a car!'
More to come...!
Naked Frame !

Disassembly notes....
- Found these when I pulled the steering box...

Yikes...Looks like only one bolt had meat left on it. The broken one snapped with me just starting to turn it with a 1/2" ratchet. Weird because that area of the frame wasn't particularly rusty....
- Ball joints are a serious PITA. I wailed on the left side for 2 hours. Tried sledging (with a 4lb hand sledge) the knuckle, pickle fork, heat, etc.. & gave up for the day. Next day I really beat it. After 7-8 major whacks, the top one popped. I beat the lower to the point of destroying a pickle fork (OK..so it was a cheap Harbor Freight chinesium one) & deforming the knuckle & but it still wouldn't pop. I gave up and pulled the whole LCA w/ spindle still attached. I'll cut off the ball joint later. After all of that, the top & bottom right side ones both popped on the 3rd easy whack. Go figure..
- Since there's no real weight on the frame I was worried about using the floor jack method for ball joint/spring removal since there's no weoght for spring compression. I made a simple spring retainer/compressor using a piece of 3/8" allthread, a coupler, some washers, and an eyehook (all rated @ >1200lbs). I ran the rod thru the top shock hole and used one of the rear arm bolts across the bottom thru the eye. This let me compress the spring just enough to take pressure off when removing the spindle. Worked like a charm...
- I must've scraped/brushed/chipped off 30Lbs of goop/dirt/crap off the front half of the chassis alone.
- The naked frame is suprisingly light ! I'll bet the frame itself only wieghs around 200-250 lbs and most of that is at the front. I had my 6yo son lift the rear up in the air just so he could tell his friends that he 'picked up a car!'
More to come...!
Thread Starter
Registered User
Joined: Oct 2009
Posts: 1,226
From: Central IN
Don't worry...parts/pieces/etc are already piling up on & around the bench...!
Quick update....
Took the frame & a dozen or so suspension, etc pieces to the blaster. Picked up the clean sheet metal and brought it back to the body shop.

This was an adventure. Watching the shell swaying and bobbing for 1.5 hours as I crept all the way across town. The body cart wheel was broken at the blaster's. If you look closely, you'll see that the block I used to prop it up had almost popped out by the time I got to the shop.
 .....Near disaster...
Also, the bill for the body went up quite a bit due to them spending so much time cleaning that 'northern car' undercoating off...But that stuff did its job. Most of the underside is perfect. There's a couple of thin/rough spots in the front floor area, but that was expected.
But now its safe & sound.....turning comfortably on the body shop's rotisseri...(My guy cam phoned this one to me...

...& that bigazz can of Bondo and a hammer makes me nervous..
)I'll get over there & get more detailed & closeup pics this week...

Thread Starter
Registered User
Joined: Oct 2009
Posts: 1,226
From: Central IN
Long freaky plater story....
I took my bumpers (1 front, 1 rear cutout, & 1 rear Cutlass) to a local plater recommended by another shop (with the warning that "You gotta keep an eye on him..he does good work & bad.."). Its a small outfit located in a ramshackle house in a not-so-nice part of the city (read: A CCW permit is prolly a good idea..) with an eccentric owner (too many fumes ?!). I called & talked to the owner about what I had. He told me to bring them in and they could do it. So I headed over to drop them off....
The place is a falling down house in a muddy lot that had some finished pieces laying around various rooms, but was packed with much more junk like grimy old bicycles, boxes, papers, car parts, furniture, etc, strewn everywhere about waist high in what was left of rooms/hallways/etc...
A worker came out and helped me take the bumpers to what was once a porch area and told me that the boss wasn't there, and the bumpers looked fine, and when the boss got back he'd look them over and call me...probably later that day or the next.
A week went by without word so I called and got the answering machine and eventually the office lady. Office is a loose term. It was once the dining room (?) and now had piles of papers & junk, a small TV and a desk. She said the boss would call me.
I was crossing town so I figured I'd stop by and see what's up.
Mistake.
When I got there the plywood main door had an unlocked padlock holding it shut so I thought maybe they all went to lunch. But, I heard sound coming from the back area of the house so I went on in thinking 'How could they get out if it was locked from the outside??. I called 'Hello' 'Hey' 'Yo' etc a few times and started heading torward the back where the sounds were.
As I made it deeper into the house, it got darker. All of the windows were boarded up and there was only the occasional small shaft of light leaking around a board. Each turn revealed another room or hallway piled with more stuff that looked like it had been there decades. It reminded me of a horror movie. I half expected to find a desicated corpse rocking in a rocking chair or someone chained to a wall. It was almost pitch black at times and I was following the path worn in the floor.
As I got further back the sound of hissing and someone pounding on metal got louder. I think I made it back to what was once the garage. It was really dark but I could see exposed framing and tarps here and there as walls. I came around a corner and could make out a huge low tank with hoist/chains over it & barrels around. The fumes were really strong in here and it was really hot. In the far corner 2 guys were stooped over something by a dim lightbulb. I said 'Hey'. One looked up, quickly stepped to me, and asked what I wanted.
He quickly led me back out to my bumpers and said the boss would call me....so I left.
The next day I got a call from the office lady. She said to come get my bumpers and that they were sorry, but they couldn't help me.
I picked them up today and the people there, while friendly, seemed a bit tense. As near as I can tell I violated some unwritten code by entering the inner sanctum and witnessing the Secret Rites of The Platers. I am therefore now banished.
Now I gotta find a another plater.....


Thread Starter
Registered User
Joined: Oct 2009
Posts: 1,226
From: Central IN
And, on that note...
I ended up sending them to Keystone/Northstar back in March. There's a local LKQ/Keystone office nearby and they said they looked OK & quoted me a very nice price for all 3 bumpers. I've heard good, bad, indifferent things about Keystone, but I gambled...I did get a call about 4 weeks after dropoff from a shop foreman at the plant (MI ? MN ?) who asked a few questions, but sounded pretty upbeat about the finished product....we'll see what happens
ETA for return ~ 4 weeks from now.

Thread Starter
Registered User
Joined: Oct 2009
Posts: 1,226
From: Central IN
Went to LKQ today...was a partial success.
All 3 bumpers looked very good to me. They did a very nice job of straightening / repairing / refinishing / etc... Prolly about as good as you're going to get considering the condition of my originals. The cutout I gave them had been visciously hammered & crappily rechromed previously. Now, there are very subtle, very minor surface level issues here & there, but I doubt they'd be noticable once they're on the car unless you laid on the ground and stared at them.
Good news / bad news...
The front is perfect to my eyes.


clicky for big...
The rears both had about a 1" dark spot by one of the lower bolt holes. Looked kinda like a torch burn. One (the cutout) also had some very tiny sharp hair like things around the 'burn' mark. Damn shame. Other than the marks, they're beautiful.
I took the front. The LKQ guy kept the 2 rears. He said he'll check upstream and see what to do. I gotta say he was extremely professional & courteous.
Last edited by Indy_68_S; May 6, 2010 at 06:31 PM. Reason: pic move
Thread Starter
Registered User
Joined: Oct 2009
Posts: 1,226
From: Central IN
The Keystone guy sent the 2 rears back on May 5th.
Today they called and said they were ready for pickup...
We're getting closer....
The cutout bumper is now good. It looks amazing compared to the hammered, battered, & bent thing they started with AND its now really coated on the backside too.


And now more bad news...the Cutlass bumper (non-cutout) again had 'burn' marks by the lower bolt holes. Not as bad as before, but still noticable, LKQ guy apologized profusely and said they'd try it again.
.....and...


Registered User
Joined: Feb 2009
Posts: 11,881
From: Brazil Indiana
LKQ? i did not know they did this work? this is the place in Avon , right. are they reasonable with the price? i have some 3 wheeler parts and a couple small Oldsmobile parts i would like to have done. i have heard of a place in Indianapolis something like you were talking about in post 56. i hear they do good work but to be careful with them. i think i will just steer clear of them.
Thread Starter
Registered User
Joined: Oct 2009
Posts: 1,226
From: Central IN
LKQ? i did not know they did this work? this is the place in Avon , right. are they reasonable with the price? i have some 3 wheeler parts and a couple small Oldsmobile parts i would like to have done. i have heard of a place in Indianapolis something like you were talking about in post 56. i hear they do good work but to be careful with them. i think i will just steer clear of them.
I gambled , gave it a shot (after the story above), and so far, its paid off. Price was verrryy reasonable. So low that I first thought the total price was the price for one bumper. And, they have been extremely easy to work with in spite of the quality issues. I'd recommend them for older bumpers, but I don't think they do small parts. Just bumpers. My bumpers just rode the LKQ truck up to the bumper plant and back.
Keystone
849 Whitaker Rd ste 190
Plainfield, IN 46168
317-895-0852
If you want, PM me for the contact info of the guy I'm working with. He's been fantastic.
As for the place in post #56...name is B......s. They may do good work. I'll never know since I was banished !
Official Tire Kicker
Joined: Feb 2008
Posts: 576
From: Sasebo, Japan.
Looks like you are making great progress! That's a lot of work on the body! I did a frame off on mine and it took about 18-19 months but I didn't do as much metal replacement. Here is a link to a thread that has some of the pictures of my car while I was working on it but not all of them.
https://classicoldsmobile.com/forums...r-new-guy.html
https://classicoldsmobile.com/forums...r-new-guy.html

Thread Starter
Registered User
Joined: Oct 2009
Posts: 1,226
From: Central IN
A magician says to a guy' "Hit me as hard as you can with this hammer,"
Guy : "Seriously?"
Magician : "Yes, seriously."
Guy hauls off and whacks the magician.
Magician is rushed to the hospital and ends up in a coma.
5 months later he awakens, and says " Tada!"
But I digress....
Got absolutely buried with work starting in May..
Then my basement flooded (where I was storing a bunch of the car parts.. heater box now has barnacles and my seat frames are a bit orange now)
Then my main PC died (friggen Seagate 500GB Baracudas .. 2 died a week apart..grrrr)
Then I got more work (prolly shouldn't complain)
And throw in the usual kids' sports, family functions, et al and I didn't get to even touch the car from June until last week...
But, finally made some progress...
From this....

...to this...

clicky for big...
And a few more...


I cheated with the rear brake assemblies. I got the prebuilt ones from I...Tube along with the hard lines. The brake assemblies were a bit pricy, but my old ones were so rusty/spent that I'd have to get new everything anyway and then put it all together, and I got everything shipped free...courtesy of my brother-in-law that lives near the company, picked them up, and came down this summer !
I lubed all control arm bushings, bolts, & mating surfaces. I tightened, then backed off all of the control arm bolts a full turn or so. I'll tighten permanently once there's weight on them.
Softlines and other misc pieces came from RightStuff.
Bushings are all std Moog rubber
Bolts/nuts etc.. from AMK
W27 cover from Supercars (had a discount) & bolts are refinished originals...not the stainless ones sent with cover
Control arm braces were a ratty pair I got years ago for $10
Lower control arms boxed with plate kit (guy who welded them mimic'd factory welds ...yay!)
Arms are painted with Eastwood Chassis black primer & Extreme satin (like frame) so the should hold up OK
Gear oil cap is stuck in vent hole to remind me to get a new vent tube as I can't find the original that I cleaned up and stashed somewhere months ago....
More to come....
Thread Starter
Registered User
Joined: Oct 2009
Posts: 1,226
From: Central IN
OK...some more progress....
Got the arms, spindles, & springs on....

This was overly time consuming. Taking it apart was much easier because I didn't have to worry about nicely painted parts! I could just beat it apart with a BFH. I thought I'd try a 'real' spring compressor so I got a loaner from the local VatoZone. One of these...

This turned out to be a colossal waste of time. After spending hours messing with it and getting no where, I gave up and resorted back to my own trusty high-tech custom tool....

...It's just a 2ft piece of 1/2" all-thread (rated @ 3200lbs) with various nuts/washers. Note the optional anti scuffing device for protecting the upper shock mount paint (cleverly disguised as a piece of Moog box...). The coupling at the top gets locked by the nut so I can spin the wrench up above the top arm/mounts.
With liberal greasing on all moving tool parts, it worked perfectly, except....When I'd pull the arm up to its mounting points vertically, it was still an inch or so outboard of its mounts horizontally. Seems like the springs kinda point out from the center. (Springs are clocked correctly) When compressed, its really hard to push the arm toward the center of the car and insert a bolt. I ended up rigging up some ratchet straps from the bottom of the spring to 2 points on the opposite frame and pulling the arm into place.
First spring/arms/spindle took a couple hours (not including the time wasted on the other tool) due to a few attempts (Note: Do not fip upper arm out of the way and compress spring- you can't flip it back due to tool sticking up - do'h)....2nd spring/arms/spindle took 30 mins.
You'll also notice there are drums on the rear now. These came with the kit from ILT. I decided to hose the insides with brake cleaner to get any oil off prior to installing. Unfortunately, they were painted with some sort of kid's watercolor paint. The paint started washing off/streaking everywhere. So I hosed 'em/scrubbed them clean and repainted with VHT Cast Iron. Eventually I'll paint the faces with VHT satin black.
And.....
Got the arms, spindles, & springs on....

This was overly time consuming. Taking it apart was much easier because I didn't have to worry about nicely painted parts! I could just beat it apart with a BFH. I thought I'd try a 'real' spring compressor so I got a loaner from the local VatoZone. One of these...
This turned out to be a colossal waste of time. After spending hours messing with it and getting no where, I gave up and resorted back to my own trusty high-tech custom tool....
...It's just a 2ft piece of 1/2" all-thread (rated @ 3200lbs) with various nuts/washers. Note the optional anti scuffing device for protecting the upper shock mount paint (cleverly disguised as a piece of Moog box...). The coupling at the top gets locked by the nut so I can spin the wrench up above the top arm/mounts.
With liberal greasing on all moving tool parts, it worked perfectly, except....When I'd pull the arm up to its mounting points vertically, it was still an inch or so outboard of its mounts horizontally. Seems like the springs kinda point out from the center. (Springs are clocked correctly) When compressed, its really hard to push the arm toward the center of the car and insert a bolt. I ended up rigging up some ratchet straps from the bottom of the spring to 2 points on the opposite frame and pulling the arm into place.
First spring/arms/spindle took a couple hours (not including the time wasted on the other tool) due to a few attempts (Note: Do not fip upper arm out of the way and compress spring- you can't flip it back due to tool sticking up - do'h)....2nd spring/arms/spindle took 30 mins.
You'll also notice there are drums on the rear now. These came with the kit from ILT. I decided to hose the insides with brake cleaner to get any oil off prior to installing. Unfortunately, they were painted with some sort of kid's watercolor paint. The paint started washing off/streaking everywhere. So I hosed 'em/scrubbed them clean and repainted with VHT Cast Iron. Eventually I'll paint the faces with VHT satin black.
And.....
Registered User
Joined: Feb 2009
Posts: 11,881
From: Brazil Indiana
i found an internal spring compressor at a local parts store that fit good but it broke on me. talk about almost peeing my pants. i ended up doing the same thing you did with the all thread and ratchet straps.
it look good.
it look good.
Thread Starter
Registered User
Joined: Oct 2009
Posts: 1,226
From: Central IN
... I did a little more with the fuel & brake lines.

Note my proudly refurbed brake dist block! I'm a maniac with a beer and a Dremel buffing wheel!
When they say 'pre-formed' / 'pre-bent' brakelines, they mean its a rough approximation of the original bends. Looks like I need to find a set of tubing bender pliers and tune them up a bit.
I got new clips from RightStuff, but the small brakeline ones look cheap & wrong. For the front cross line I re-used my old ones. I thought they were toast, but the thick layer of greasy crud on them actually protected them. Once cleaned off, they looked good as new. (They look kinda rusty in the pics, but my cam does that...along with making the frame look chrome shiny & filthy).
The originals are just a single little clip with a gray oxide finish.

The new ones are the 4 silver fold-over ones at ~ 9 o'clock in this pic....

Also in this pic you can see...
- Those 'oh-so-special' correctly colored green hose clamps. Like $6 a piece from <insert restoration parts company here>..or.....25 cents a piece at Lowes.
- My refurbed brake/fuel line clamps (by rear control arm) with the correct black rubber coating. Wire wheel, spray cad paint, rubber tool handle dip.
- The correct '68 4 piston caliper brackets. Originals, not re-pops. I blasted then wire wheel'd & had gold cad'd for a few bucks at a local hotrod shop (who must've just got a new vac-pak machine because they bag everything now....).
- The assorted front brake line/flexline brackets. The four pieces in the center (with the L & R's) are the flexline mounts on the spindle. I've seen claims that there was/is a special hard-to-find bracket for the disc brake cars, but these came off the disc brake setup I got and are identical to my old drum brake brackets.
More as it happens.....
Thread Starter
Registered User
Joined: Oct 2009
Posts: 1,226
From: Central IN
I'm glad you're OK ! I get really nervous around front springs. Heavy things don't bother me too much. If they go, they usually go down. Springs under a 1000lbs of tension ? Who know's where its going.....Prolly not anywhere good....!


