
Pulling the motor
 October 20th, 2013, 08:56 AM
#161
What if he cuts the head off then heats the stud and uses the candle wax trick with vice grips. Soaking them and heating the stud actual stud will probably be the best bet. Also I belive you can buy a little oxy acetalyne kit in the form of 2 small tanks like propane tanks I bought one when I got in a pinch with my brake job for 60 bucks and it worked well for the stripped bolts.
Last edited by coppercutlass; October 20th, 2013 at 08:59 AM.
 October 20th, 2013, 09:01 AM
#162
Administrator
Join Date: Oct 2009
Location: Poteau, Ok
Posts: 41,065
Eric, had to look, your right, there is access.
Copper the problem with heating the stud is it causes it to expand and become tighter. If you heat the metal around the stud, all but the stud expands and it loosens.
Copper the problem with heating the stud is it causes it to expand and become tighter. If you heat the metal around the stud, all but the stud expands and it loosens.
Last edited by oldcutlass; October 20th, 2013 at 09:03 AM.
 October 20th, 2013, 09:15 AM
#163
Registered User
Join Date: Jul 2013
Location: Mo-Ray-Al, K-Bec.
Posts: 1,815
Actually, when you heat the stud, it tries to expand in all directions ... but is constrained by the block, so it can only expand along it's length. Then when it cools .. naturally it wants to cool in all directions too ... leaving it a tiny bit longer and skinnier.
October 20th, 2013, 09:22 AM
#164
I understand that but the heat should also be able to expand the olt hole to some extent. I have extracted many stuck studs and broken bolts like how I mentioned minus the wax with little to no issue. The heat should also make the stud flexible so when you turn it it should break free. I'm used to using acetalyne torches. So if it's stuck get it cherry red and. Take it out. At the point then it's glowing it's maluable and will comform or distort so although it may expand it should be soft enough to free up. When the metal is that hot it losses strength and becomes soft. If any of you has done heat forging that's how you shape the metal. You shape it when it's soft. When the metal is soft it should break free from rust even if it expanded . Also when you used a tourch chances are you will hit the area around it as torches get very hot and depending you your flame tip you hit the area around the stud too.
Last edited by coppercutlass; October 21st, 2013 at 06:30 PM.
October 20th, 2013, 09:33 AM
#165
Registered User

Join Date: Dec 2011
Posts: 7,286
"IMHO heat is not going to help until the manifolds are removed. All you will be heating up is the manifold and the bolt causing it to expand. Go ahead and get an impact wrench and have at it."
=================
That explains a lot of the things I have run across. Maybe skill sets vary, but I have never had a problem directing the tip of the torch flame to the exact part that I want to get heated the most and the fastest. Then I can direct compressed air, or even the oxygen from the [extinguished] torch onto the inner part [the bolt in this case] in order to cool it quickly and shrink it accordingly.
If you must use an impact, remember that they do have settings less than 100% full tilt, so you can impact the fastener with moderate force, in both directions, to help the heat and lube work. Patience helps, as heat transfer and lube transfer are time related phenomena.
October 20th, 2013, 09:42 AM
#166
Registered User
Thread Starter
Join Date: Aug 2013
Location: Central Illinois
Posts: 3,900
So are we saying heat INSTEAD of penetrating fluid? I'm not in a hurry, it may be a couple of weeks before I can get at those manifolds. May as well spray them every day in the mean time. Maybe give them a good tap, too.
Seems like the jury is still out as to whether to heat the bolt or the metal around it. Copper, I get what you're saying. I've done some forging. Oldcutlass, it DOES seem to make the most sense to heat and expand the surrounding metal. Has anyone ever tried heating the surrounding metal and then placing an ice cube on the bolt head right before removal? I doubt the ice would last more than a few seconds but it might be enough to shrink the bolt a little if it got too much heat transferred from the head.
Seems like the jury is still out as to whether to heat the bolt or the metal around it. Copper, I get what you're saying. I've done some forging. Oldcutlass, it DOES seem to make the most sense to heat and expand the surrounding metal. Has anyone ever tried heating the surrounding metal and then placing an ice cube on the bolt head right before removal? I doubt the ice would last more than a few seconds but it might be enough to shrink the bolt a little if it got too much heat transferred from the head.
Last edited by Macadoo; October 20th, 2013 at 09:56 AM.
October 20th, 2013, 09:50 AM
#167
Connoisseur d'Junque
Join Date: Sep 2010
Location: The Hudson Valley
Posts: 21,183
I'd spray them and tap them every day, then be ready with the heat when you want to take them apart.
There is a decent chance that they'll just come out with a good tug, with just penetrating oil and no heat at all, too.
- Eric
There is a decent chance that they'll just come out with a good tug, with just penetrating oil and no heat at all, too.
- Eric
October 20th, 2013, 09:51 AM
#168
Giving them a good tap goes a long way. Hit them with an impact at worse you will break the bolts and then you have to heat the stud or area around whatever technique you feel will work and pull it out with vice grips etc etc.
X2 with eric .
X2 with eric .
October 20th, 2013, 09:53 AM
#169
Justin
Join Date: Mar 2012
Location: utah
Posts: 3,448
I think you need to try soaking them try and break them loose if they feel funny or like it's going to break back off and try heat.
Either way you try you can break a bolt by pushing it when it's not ready not enough heat is usually my case
Either way you try you can break a bolt by pushing it when it's not ready not enough heat is usually my case
October 20th, 2013, 05:52 PM
#171
Registered User
Thread Starter
Join Date: Aug 2013
Location: Central Illinois
Posts: 3,900
What if he cuts the head off then heats the stud and uses the candle wax trick with vice grips. Soaking them and heating the stud actual stud will probably be the best bet. Also I belive you can buy a little oxy acetalyne kit in the form of 2 small tanks like propane tanks I bought one when I got in a pinch with my brake job for 60 bucks and it worked well for the stripped bolts.
October 20th, 2013, 06:46 PM
#177
morgan
Join Date: Mar 2011
Location: CT
Posts: 1,925
I myself would also try the pen. oil a few days with a tap here and there and then the heat once it breaks free a little turn em back clockwise a bit then back counter...then if that doesnt work move to plan b...whatever you do give it your best good luck!
October 21st, 2013, 03:38 PM
#178
Registered User
Thread Starter
Join Date: Aug 2013
Location: Central Illinois
Posts: 3,900
I tried them tonight (one side only), just for kicks and giggles, and to my surprise three came right out. No heat, just a couple days of deep creep and some tapping. I'll take this as a good sign. Question though, the middle bolt seems to be smaller than the others (which are 9/16ths). 13 mm is close but still a little big. Anyone know off hand what size this is? It's the same on both sides.
October 21st, 2013, 04:08 PM
#179
morgan
Join Date: Mar 2011
Location: CT
Posts: 1,925
I tried them tonight (one side only), just for kicks and giggles, and to my surprise three came right out. No heat, just a couple days of deep creep and some tapping. I'll take this as a good sign. Question though, the middle bolt seems to be smaller than the others (which are 9/16ths). 13 mm is close but still a little big. Anyone know off hand what size this is? It's the same on both sides.
October 21st, 2013, 04:50 PM
#180
Registered User
Thread Starter
Join Date: Aug 2013
Location: Central Illinois
Posts: 3,900
I don't know man...I mean I know it happens, but these are visually different. The socket barely makes a purchase before slipping. I'll check the manual and see if it says anything.

 October 21st, 2013, 07:03 PM
#183
Connoisseur d'Junque
Join Date: Sep 2010
Location: The Hudson Valley
Posts: 21,183
Exhaust manifold bolt heads will often lose half a size due to rust over the years.
That's what metric tools are for.
Just find a metric 6-point socket that almost fits over it, hammer it on, and you're golden.
They all started life the same size.
- Eric
That's what metric tools are for.
Just find a metric 6-point socket that almost fits over it, hammer it on, and you're golden.
They all started life the same size.
- Eric
October 21st, 2013, 07:23 PM
#187
I thought you where talking about using the china wrench like eric was saying to use a metric one and hammering it. I have had some cheap wrenches just snap or strip the bolt because they stretched. But I like the heat Idea never did that before.
October 22nd, 2013, 01:21 PM
#189
Registered User
Thread Starter
Join Date: Aug 2013
Location: Central Illinois
Posts: 3,900
Yeah, I tried metric. Still not tight enough. Although I might be able to hammer on a 12mm. Should I heat the bolt head first or just hammer away? And I almost hate to ask but...er...getting the bolt out of the socket so I can use it on the other side? Drift pin through the hole I suppose.
October 22nd, 2013, 01:27 PM
#190
Registered User
Join Date: Jul 2013
Location: Mo-Ray-Al, K-Bec.
Posts: 1,815
That's why I suggested the chicom option. Straight into the trash afterwards. For a good one ... once you've got it moving, you can knock it off and just turn the bolt out the rest of the way with a small pipe wrench.
 October 22nd, 2013, 01:29 PM
#192
Registered User
Thread Starter
Join Date: Aug 2013
Location: Central Illinois
Posts: 3,900
October 22nd, 2013, 02:15 PM
#193
Registered User
Thread Starter
Join Date: Aug 2013
Location: Central Illinois
Posts: 3,900
Okay, so I whaled on that middle bolt with a hammer (a small ball-peen) until the head mushroomed enough to fit the socket. It came off with a good strong tug. Again, no heat. But I started spraying these things when i first decided to pull the motor so it's been a couple weeks. The bolts are coming out with the threads nice and oily, from the penetrating fluid I would guess.
So I'm looking into the exhaust ports at what I assume are the exhaust valves. They don't look too pretty. Covered with scale. Is this bad or normal?
[IMG]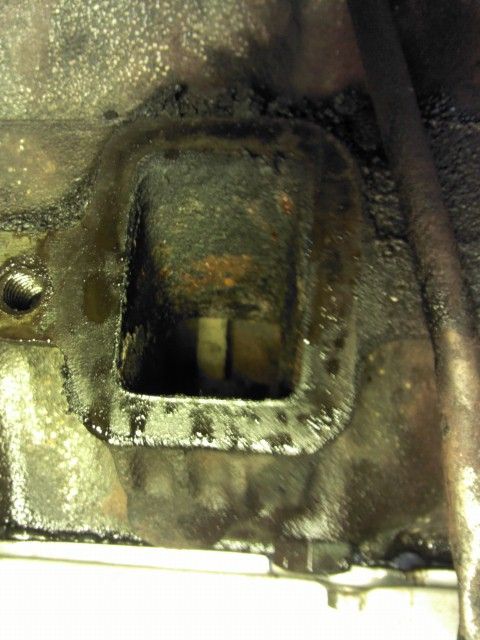 [/IMG]
So I'm looking into the exhaust ports at what I assume are the exhaust valves. They don't look too pretty. Covered with scale. Is this bad or normal?
[IMG]
 [/IMG]
October 22nd, 2013, 02:47 PM
[/IMG]
October 22nd, 2013, 02:47 PM
#195
Registered User
Thread Starter
Join Date: Aug 2013
Location: Central Illinois
Posts: 3,900
Starting to consider your cheap jobber head work. Would it be even cheaper if I pull all the springs and valves before taking them in? And can you tell me, Oldcutlass, what cheap involves and how it's different that expensive? If I understand correctly, these heads have hardened valve seats, which I assume is a good thing, but does that mean I don't need the seats worked on?
BTW, I bought new cam-matched springs from Mark when i bought the cam so i won't need those.
BTW, I bought new cam-matched springs from Mark when i bought the cam so i won't need those.
October 22nd, 2013, 03:19 PM
#196
Administrator
Join Date: Oct 2009
Location: Poteau, Ok
Posts: 41,065
You need a valve spring compressor to compress the springs and get the keepers off. Next slide the valves out and you can spay them with oven cleaner just as you did with your block. If you have a drill press you can chuck them up and polish with fine emory cloth.
Plan A - Once you lap the valves to the seats, then you can install your new seals and springs, your done.
Plan B - Or you can carry them down to a machine shop with your new springs and let them do it. They will clean the heads, lightly mill sealing surfaces, install new guides, check and or replace valves, install seals, and your springs. Usually $3-400.00.
I would be willing to bet as your engine is low miles, you can away with plan A.
Don't forget this:
Last edited by oldcutlass; October 22nd, 2013 at 03:54 PM.
October 22nd, 2013, 04:09 PM
#197
Connoisseur d'Junque
Join Date: Sep 2010
Location: The Hudson Valley
Posts: 21,183
I would agree with Plan A.
If you're not doing any high-performance modifications that would require ported or decked heads, and the mileage is low (meaning that the guides aren't worn), then all you need to do is clean them up and lap them.
Emery cloth makes me nervous, personally, because it can remove metal.
I've cleaned off crusty valves by chucking a big wire brush attachment up in the drill press and wire-brushing the bejeezus out of them.
- Eric
October 22nd, 2013, 04:52 PM
#199
Registered User

Join Date: Aug 2011
Posts: 3,350
If the valves are lapped instead of resurfaced it is critical that they are kept in order and put back in the same port they were in originally. The advantage to lapping a valve is that it will let you see if the valve and seat are making good contact i.e., the width of the contact area on both the seat and the valve and where the contact is made in case it is too close to the edge of the valve face (the valve is usually worn too far if this is the case).
Ask the machine shop if they would check the head for straightness and do a vacuum test on the valves after they are lapped. This is quick, inexpensive and lets you know if they are sealing properly. They put a rubber disc over the chamber area with the valves in and closed, apply vacuum and see if it holds.
Did you do a compression test before pulling it apart?
Compliments on getting the exhaust manifold bolts out without breaking them!!!


