
Interior makeover

Thread Starter
Registered User
Joined: Feb 2008
Posts: 11,798
From: Plano, TX
Interior makeover
After a refreshing vacation and getting back in the swing of things at home, it is now time for Lady’s Interior makeover! In other words, she will be getting a complete new $2000 outfit - seats, carpet, and underlayment.
I opted to get all the materials through Legendary Auto Interiors, as I heard great things about them and I wanted the best I could get. The fabric quality is very good and it has ~almost~ a leather-like feel!
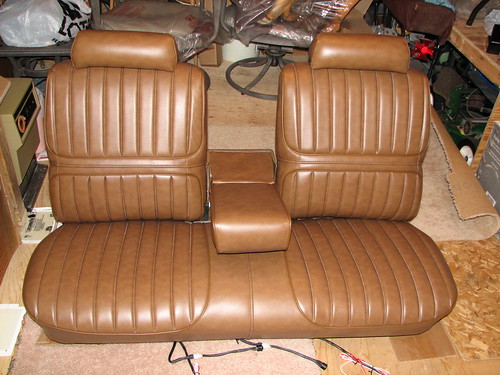
This front cover set is for the A65 Sport Bench Seat in (Dark) Saddle. This center-armrest seat was only available in the Supreme in 1972.
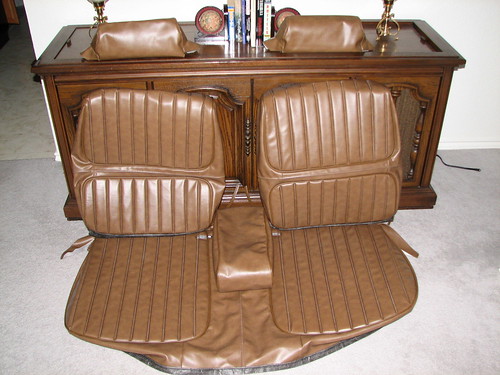
Here is the underside of the front seat set.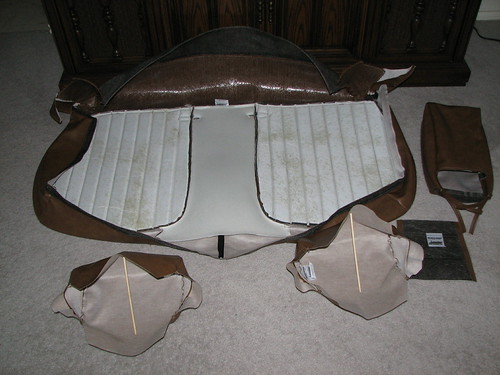
What you cannot easily see is the quality of the stitching. These are very well made and should last another 35 years!
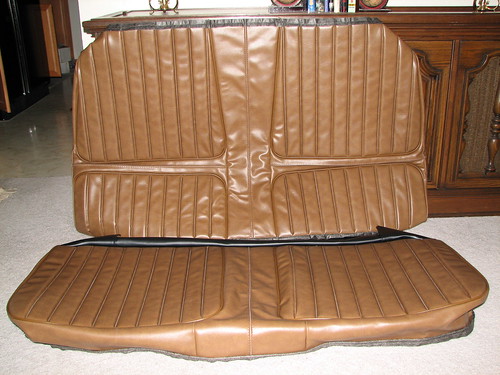
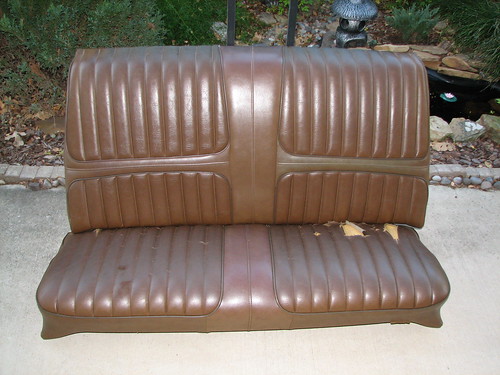
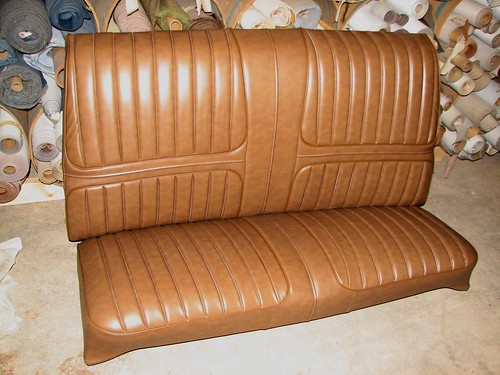
Here is the rear set…
Disassembly began the day before Halloween 2008. Here is the “before” picture: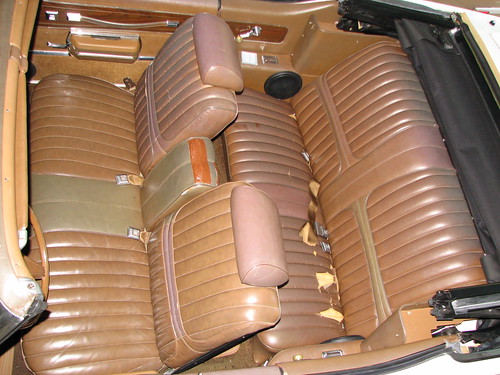
Note the discoloration of the various seat surfaces, aside from the brown duct tape on the armrest… The passenger front seat back is severely faded, supporting my conclusion the car was stored outdoors with that side exposed to the elements.
All the fabric was hard and worn, and the top padding layer compacted. The rear seat was torn in many places and the foam underneath all was deteriorated and was getting forced through the springs. Needless to say, these were very uncomfortable and I about sat on the floor.
Sill plates, kick panels, and seat belts were removed next.
These seat belts will be cleaned up well; they are a nasty mess just like the back ones were.

The four bolts holding the front seat came out easily and the bench was removed. The back seat came out afterwards. Here is the interior with no seats: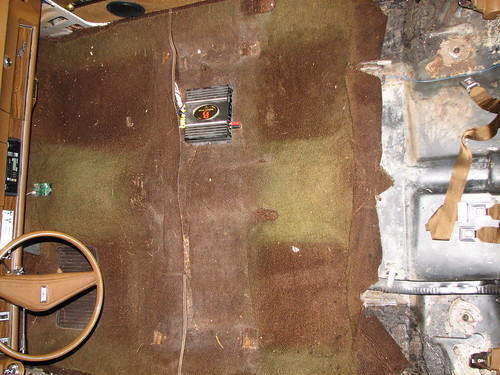
Note the severe fading of the top layer of skuzzy cheap carpet (the original is underneath this) and the genuine “Powerbass” 2-channel amp that will get replaced with a quality 4-channel unit.
In the this stage I found over a dollar’s worth of loose change, some lady's brown satin pants (hmmm….), and lots of strange tree debris.
Pulling the carpet will be a dirty job, as the original carpet disintegrates when stressed.
These seats and all the materials are ready to be sent to the upholstery shop, which will be “Yoboy Enterprises” in Nevada, TX by Lake Lavon.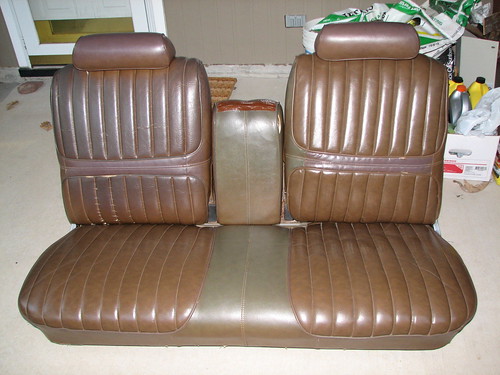
Okay, so the name does not impress me, but the history and experience behind the small company did.
Billy, who runs the place, is the son of the former owners of Blair’s Auto trim in Garland. They had redone my neighbor’s big boat long ago. When Billy’s parents retired and closed shop, Billy opened his small shop and continued his 32+ years of auto trim experience. He is a great guy – patient, understanding of my requirements, and is very polite, unlike anyone in any industry I have dealt with. He will also install seat heaters for me at a very fair price. This will be nice for cool weather cruising with the top down!
On November 3rd, the seats and all the new upholstery and parts were dropped off at Yoboy. Because I wanted his best job, I let him take longer to do it, which he estimates at 2 weeks. If longer, that is okay, too. That will give me enough time to replace the carpet, amplifier, and run wiring for the seat heaters and also heavier amp wiring.
Since I wanted the whole interior to match as best possible, I ordered the top boot, door panels, and rear armrest covers. The latter two items will be installed later on...
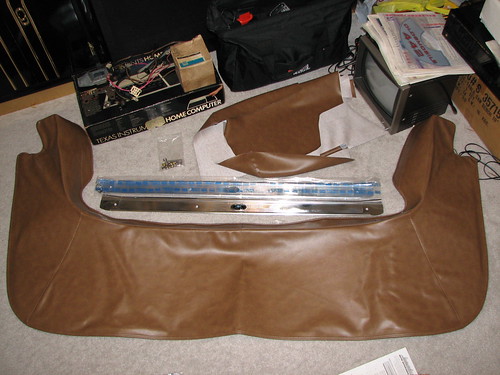
Here is the new 80/20 carpet, that has occupied my kitchen floor for over a month now.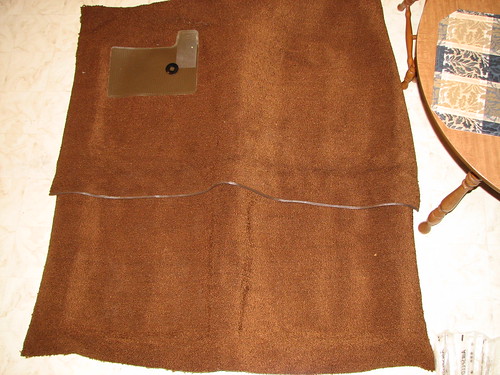
Underneath is the thick jute padding, pre-bonded to the carpet’s backside. Although ordered from Legendary, it actually came from ACC, Auto Custom Carpet. For some reason, it was much cheaper to buy through Legendary..........
I opted to get all the materials through Legendary Auto Interiors, as I heard great things about them and I wanted the best I could get. The fabric quality is very good and it has ~almost~ a leather-like feel!
This front cover set is for the A65 Sport Bench Seat in (Dark) Saddle. This center-armrest seat was only available in the Supreme in 1972.
Here is the underside of the front seat set.
What you cannot easily see is the quality of the stitching. These are very well made and should last another 35 years!
Here is the rear set…
Disassembly began the day before Halloween 2008. Here is the “before” picture:
Note the discoloration of the various seat surfaces, aside from the brown duct tape on the armrest… The passenger front seat back is severely faded, supporting my conclusion the car was stored outdoors with that side exposed to the elements.
All the fabric was hard and worn, and the top padding layer compacted. The rear seat was torn in many places and the foam underneath all was deteriorated and was getting forced through the springs. Needless to say, these were very uncomfortable and I about sat on the floor.
Sill plates, kick panels, and seat belts were removed next.
These seat belts will be cleaned up well; they are a nasty mess just like the back ones were.
The four bolts holding the front seat came out easily and the bench was removed. The back seat came out afterwards. Here is the interior with no seats:
Note the severe fading of the top layer of skuzzy cheap carpet (the original is underneath this) and the genuine “Powerbass” 2-channel amp that will get replaced with a quality 4-channel unit.
In the this stage I found over a dollar’s worth of loose change, some lady's brown satin pants (hmmm….), and lots of strange tree debris.
Pulling the carpet will be a dirty job, as the original carpet disintegrates when stressed.
These seats and all the materials are ready to be sent to the upholstery shop, which will be “Yoboy Enterprises” in Nevada, TX by Lake Lavon.
Okay, so the name does not impress me, but the history and experience behind the small company did.
Billy, who runs the place, is the son of the former owners of Blair’s Auto trim in Garland. They had redone my neighbor’s big boat long ago. When Billy’s parents retired and closed shop, Billy opened his small shop and continued his 32+ years of auto trim experience. He is a great guy – patient, understanding of my requirements, and is very polite, unlike anyone in any industry I have dealt with. He will also install seat heaters for me at a very fair price. This will be nice for cool weather cruising with the top down!
On November 3rd, the seats and all the new upholstery and parts were dropped off at Yoboy. Because I wanted his best job, I let him take longer to do it, which he estimates at 2 weeks. If longer, that is okay, too. That will give me enough time to replace the carpet, amplifier, and run wiring for the seat heaters and also heavier amp wiring.
Since I wanted the whole interior to match as best possible, I ordered the top boot, door panels, and rear armrest covers. The latter two items will be installed later on...
Here is the new 80/20 carpet, that has occupied my kitchen floor for over a month now.
Underneath is the thick jute padding, pre-bonded to the carpet’s backside. Although ordered from Legendary, it actually came from ACC, Auto Custom Carpet. For some reason, it was much cheaper to buy through Legendary..........
Last edited by Lady72nRob71; Nov 7, 2008 at 11:40 AM.

Registered User
Joined: Jun 2008
Posts: 117
From: Emmaus PA
 You'll be extremely happy with the legendary products. I purchased an entire interior for a 70 Challenger(OOOPS) from them. Bought in 1991, sold the car in 2001 and everything looked like the day it was installed. Very high quality...worth any little extra you may pay for it!!! BTW I will be ordering the same color for my 72 S but with buckets. Please post some pics for inspiration for me.
Thread Starter
Registered User
Joined: Feb 2008
Posts: 11,798
From: Plano, TX
Seat foam firmness??
I am very happy with the raw materials so far. No loose stitching at the seam ends, thick vinyl, color accuracy, and similarity to the original.
So far, the only difference I noticed is that the new center armrest does
not have the center seam, but that makes it look better.
--My ONLY concern at this point is the foam firmness of the new foam that will be installed.
He had 3 levels of firmness - soft yellow foam, blue medium, and black firm.
I chose the black firm, but now I am thinking it may be too hard.
Anyone have any experience with foam choices? I do have minor back problems and weigh 170lbs... I may need to go there and try them out again.
The factory used the soft stuff.
James, thanks for the dishwasher tip... I do not use it for dishes, so I will toss the belts in along with the old vinyl floor mats.
There will certainly be 'after' pics when i get them in a week or two.
Billy said he would try to get some pics of the progress too!
Registered User
Joined: Jun 2008
Posts: 117
From: Emmaus PA
Re: Seat Foam Firmness
The firm foam that you picked initially would be the best choice. I am a carpet installer for almost 30 yrs. and the rule has always been to use a good firm underlayment. Once again, the extra cost will pay off in the long run. If the firmness is an issue, inquire about the density per square inch of each of the three. Ask what your installer would suggest if you haven't already. Maybe even a phone call or e-mail to Legendary and ask their opinion. Also, just because it "feels" firmer doesn't mean it's a better product. It may actually be a cheaper product with more plasticisers added to give it that "feel". Once again, ask your installer what he would put in his own ride. If you are impressed with his work, his judgement should be pretty good. Just my $0.02...Gery.
Once again, the extra cost will pay off in the long run. If the firmness is an issue, inquire about the density per square inch of each of the three. Ask what your installer would suggest if you haven't already. Maybe even a phone call or e-mail to Legendary and ask their opinion. Also, just because it "feels" firmer doesn't mean it's a better product. It may actually be a cheaper product with more plasticisers added to give it that "feel". Once again, ask your installer what he would put in his own ride. If you are impressed with his work, his judgement should be pretty good. Just my $0.02...Gery.
Thread Starter
Registered User
Joined: Feb 2008
Posts: 11,798
From: Plano, TX
The firm foam that you picked initially would be the best choice....... If the firmness is an issue, inquire about the density per square inch of each of the three. Ask what your installer would suggest if you haven't already. Maybe even a phone call or e-mail to Legendary and ask their opinion.
Keep in mind these are just generic slabs of foam we are using, as no custom foam kits were available for the A65 bench seat. (Through my research).
Carl, you made a good point about the foil heat shielding stuff. The two mufflers right under the seat are not helping any in the summer...
I did get the heavy tar paper stuff and the carpet has the jute on the back. That makes a good sound deadener but does not reduce heat as much as I would like. What did you get and where?
Last edited by Lady72nRob71; Nov 9, 2008 at 04:37 PM.
Moderator
Joined: Jul 2007
Posts: 18,196
From: Edmond, OK
along with the old vinyl floor mats

I also tried to treat the vinyl with mink oil after cleaning them. It seemed to enrich the vinyl a little, but if I had to do it over again I wouldn't. Mostly it just made them slippery and after washing them again it took all of the mink oil off.
You could always buy reproduction floor mats from Fusick. The bad part is that they only come in black.

Thread Starter
Registered User
Joined: Feb 2008
Posts: 11,798
From: Plano, TX
Floor mats
I have seen "repro" mats at other places in many colors in vinyl and carpet, but I am not sure if carpet ones were available from the dealer or factory then....
Does anyone have some pictures of some true original mats?
I do like the carpet ones though!
Thread Starter
Registered User
Joined: Feb 2008
Posts: 11,798
From: Plano, TX
Over the weekend, this nasty old carpet was extracted. The bottom original carpet and jute were badly deteriorated as can be seen here. It got wet inside far too many times!
This is the front set...
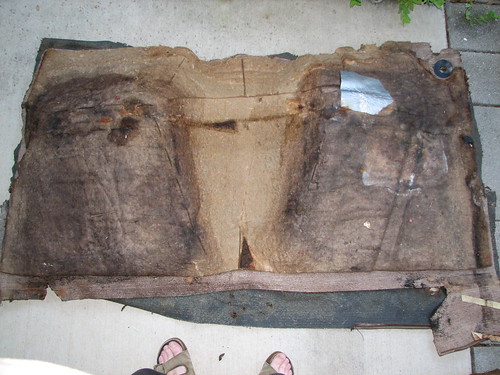
Here is the rear set. Notice where the right top cylinder leaked...
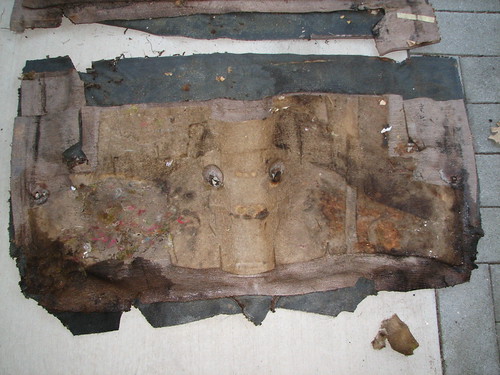
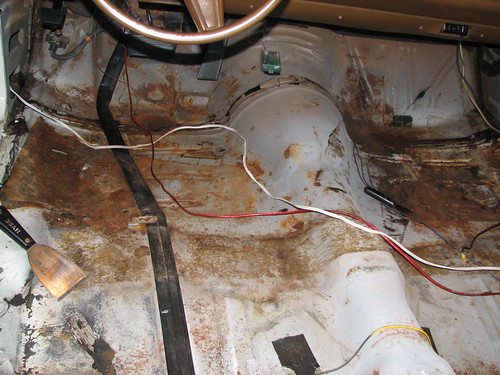
After the carpet was removed, the floor looked like this and some rust was present:
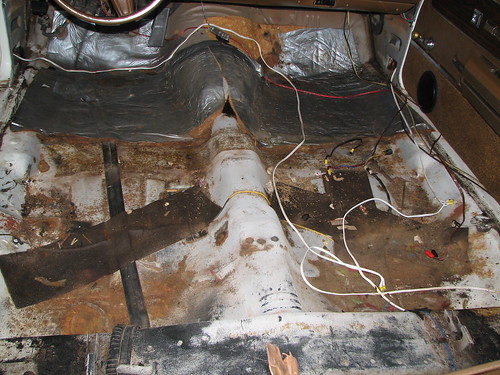
What’s even worse are these A/C insulators which have the silver plastic film that locked in moisture towards the floor. Also note the sloppy installation from the factory – it was supposed to go around the dimmer switch and not overlap on the tranny tunnel!
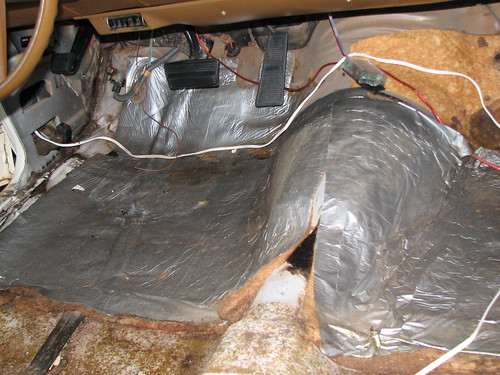
The AC insulators came out somewhat intact but here is the remaining mess…
Underneath was a time capsule of stuff. See if you can you find the following:
Crayon, pen, .30-06 rifle shell, GM service claim card, button, candy wrapper, cigarette butt, acorn, radio shaft nut... The seatbelt switch wiring will be reconnected also.
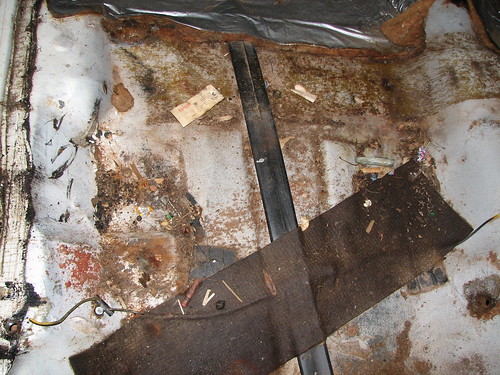
The build sheet was found stuck to the black tar splotches just below the button…
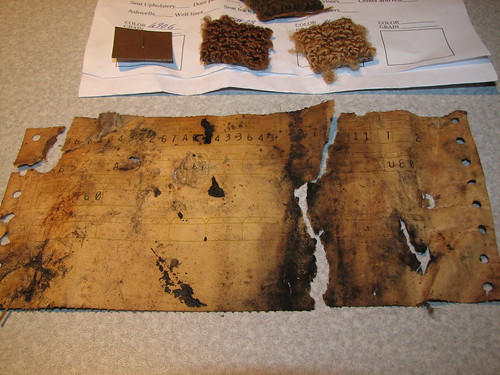
See https://classicoldsmobile.com/forums/interior-upholstery/8145-1972-supreme-saddle-carpet-colors-build-sheet-found.html for further info.
After hours of vacuuming and scrubbing with wire brushes, the loose crap was off. Of course, ALL of the old dried out seam sealer came out as well and will need to be replaced. All of these wires will be routed better also.
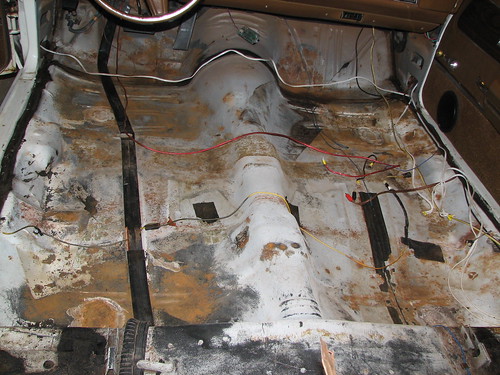
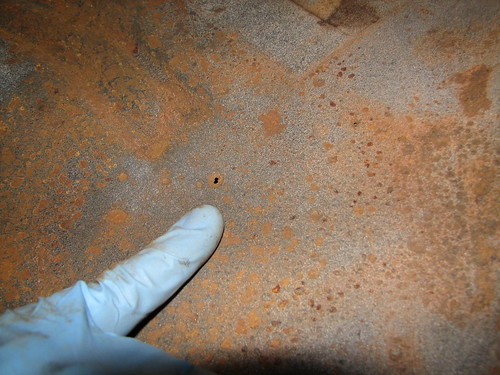
Luckily the rust was not too bad, but there were some isolated pin holes that were still surrounded by thick strong metal. These will need patching and POR15 will be applied afterwards to the entire rusted areas.
This is the front set...
Here is the rear set. Notice where the right top cylinder leaked...
After the carpet was removed, the floor looked like this and some rust was present:
What’s even worse are these A/C insulators which have the silver plastic film that locked in moisture towards the floor. Also note the sloppy installation from the factory – it was supposed to go around the dimmer switch and not overlap on the tranny tunnel!
The AC insulators came out somewhat intact but here is the remaining mess…
Underneath was a time capsule of stuff. See if you can you find the following:
Crayon, pen, .30-06 rifle shell, GM service claim card, button, candy wrapper, cigarette butt, acorn, radio shaft nut... The seatbelt switch wiring will be reconnected also.
The build sheet was found stuck to the black tar splotches just below the button…
See https://classicoldsmobile.com/forums/interior-upholstery/8145-1972-supreme-saddle-carpet-colors-build-sheet-found.html for further info.
After hours of vacuuming and scrubbing with wire brushes, the loose crap was off. Of course, ALL of the old dried out seam sealer came out as well and will need to be replaced. All of these wires will be routed better also.
Luckily the rust was not too bad, but there were some isolated pin holes that were still surrounded by thick strong metal. These will need patching and POR15 will be applied afterwards to the entire rusted areas.
Last edited by Lady72nRob71; Nov 11, 2008 at 11:29 AM.
Thread Starter
Registered User
Joined: Feb 2008
Posts: 11,798
From: Plano, TX
Rust and bare metal - white POR15??
I scrubbed it down good last night with soap and water - it looks even better now.
The rust that is there is worst on the driver's side front- more pinholes than in other places and I can flex the metal slightly with arm pressure.
I scraped off the sealant around the four oval body plugs to remove small amounts of rust from under those, too.
Luckily, the rust had formed from the top side and the plugs are still well-sealed. I guess either the top leaked before or the windows were left down in the rain too often.
Also, when the tar strips and AC insulators were pulled out, lots of the original paint came off too, leaving large areas of clean bare metal. Brushing to clean removed more of the paint.
I am thinking of using POR15 on the entire floor pan. I have some clear but I thought they made white also, didn't they? White would look nice IMHO... But who will be looking under there anyway? (Hopefully not me again!)
Thread Starter
Registered User
Joined: Feb 2008
Posts: 11,798
From: Plano, TX
Anyone have a spare lower seatbelt cover for sale???
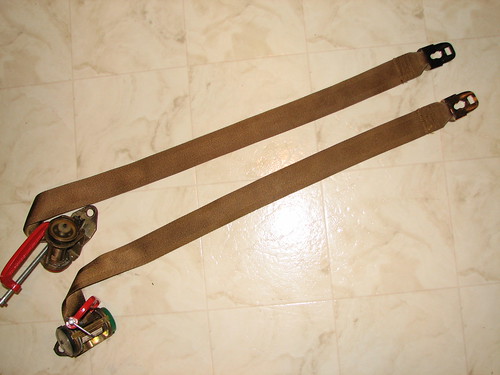
The seatbelts and associated parts were scrubbed up with hot water and liquid tide. After a good soaking, these belts came out looking like new, aside from one spot caused by some of the seam sealer used at the bolt area. However, this will not be visible after installation.
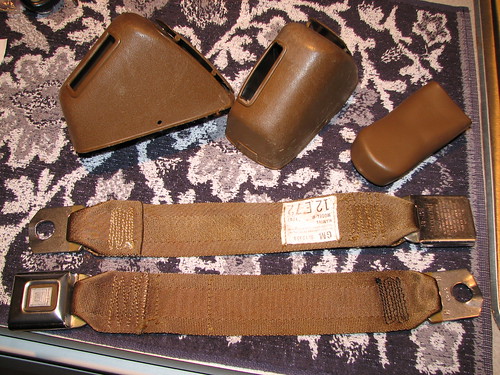
The only gripe so far is that one of the lower belt bolt covers is missing (upper right in the above picture) and I have not seen repros of them. Anyone have a spare? (Saddle preferably…)
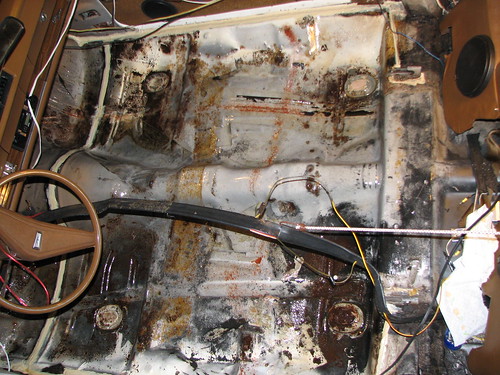
Here is the clean floorpan after having been washed out with soap and water.
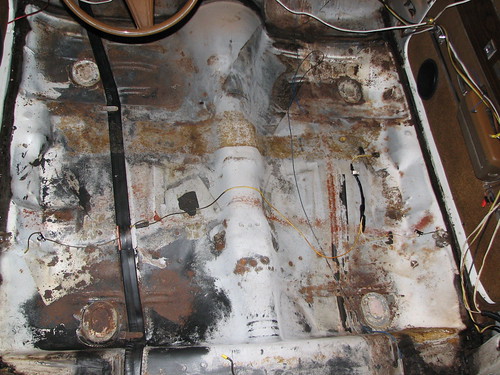
A garden hose and a shop-vac would have worked best, but I did it in the garage with a spray bottle of detergent & water and another bottle of clean water. A stiff brush to scrub, a sponge to soak up the dirty water, a bucket of clean water to rinse the sponge, and a half roll of Viva paper towels to dry. Afterwards I cut away the sealer around the four oval body plugs, as rust was present underneath. Luckily, the rust ended before reaching the plug openings. These were cleaned up next. The rust all formed from the top, working its way down. Either the top had leaked once or a previous owner left the windows down too many times in the rain…
After thoroughly dry, the floor was vacuumed once again.
I then noticed how dirty the lower valience on the dash was, so I pulled it to clean up over the weekend.
Today the perimeter sheetmetal seams will be resealed with 3M body seam sealer.
Tomorrow the entire floor pan will be painted with POR15 clear to protect against any future moisture.
The only gripe so far is that one of the lower belt bolt covers is missing (upper right in the above picture) and I have not seen repros of them. Anyone have a spare? (Saddle preferably…)
Here is the clean floorpan after having been washed out with soap and water.
A garden hose and a shop-vac would have worked best, but I did it in the garage with a spray bottle of detergent & water and another bottle of clean water. A stiff brush to scrub, a sponge to soak up the dirty water, a bucket of clean water to rinse the sponge, and a half roll of Viva paper towels to dry. Afterwards I cut away the sealer around the four oval body plugs, as rust was present underneath. Luckily, the rust ended before reaching the plug openings. These were cleaned up next. The rust all formed from the top, working its way down. Either the top had leaked once or a previous owner left the windows down too many times in the rain…
After thoroughly dry, the floor was vacuumed once again.
I then noticed how dirty the lower valience on the dash was, so I pulled it to clean up over the weekend.
Today the perimeter sheetmetal seams will be resealed with 3M body seam sealer.
Tomorrow the entire floor pan will be painted with POR15 clear to protect against any future moisture.
Moderator
Joined: Jun 2008
Posts: 18,058
From: Atlanta, Georgia
I've got one/some somewhere PM me your address and I send it to you, but you're gonna have to dye it, I believe it Exhorist pea Green
Bye the bye, the seat belts came out nice
Bye the bye, the seat belts came out nice
Last edited by Jamesbo; Nov 13, 2008 at 11:46 AM.
Thread Starter
Registered User
Joined: Feb 2008
Posts: 11,798
From: Plano, TX
I think it is a bit wider, but I am not sure by how much. I will see if I can get a rough measurement when I get home.
How much taller is your hump? I would be more worried about the way it is molded at the floorpan... Perhaps if you remove the jute from the top of the hump section you would gain an inch maybe...
Last edited by Lady72nRob71; Nov 14, 2008 at 05:35 AM.
Thread Starter
Registered User
Joined: Feb 2008
Posts: 11,798
From: Plano, TX
Registered
Joined: Jul 2006
Posts: 4,430
From: Northeast Ohio
Nice job Rob!
The cars get the floor rust way worse than that around here from snow and salt being tracked in then melting, yours is pretty nice.
Don't get that Por-15 on your hands or it will take weeks to wear off, don't ask me how I know.
Allan
The cars get the floor rust way worse than that around here from snow and salt being tracked in then melting, yours is pretty nice.
Don't get that Por-15 on your hands or it will take weeks to wear off, don't ask me how I know.
Allan
Thread Starter
Registered User
Joined: Feb 2008
Posts: 11,798
From: Plano, TX
I do know that it takes even LONGER for POR15 to come off your arms and legs... 3 weeks from what I remember. Been there done that.
")
Of course doing the floor should be easier and cleaner than doing inside doors and quarters... I did not get ANY of the seam sealant on myself, so I am proud of that...
Dan,
Thank you. I am hoping this will be able help the next one who decides to take on an interior restoration. While everything may sound like an easy task, the reality always inserts a few unexpected surprises, not often pleasant ones.
James said a mouthful about the "devil in the details", as the little details always takes the most time and cause the most trouble! It took me 2 hours just to clean up the lower dash valience with the small A/C vents...
Richard,
From the center of the tranny hump to the edge of the new carpet is 33". Therefore I will have to trim off about 3" from each side. I am not sure if your year would be much different... If you want to borrow my carpet for the weekend to see how it will fit, just let me know!
Last edited by Lady72nRob71; Nov 14, 2008 at 05:42 AM.
car guy
Joined: Apr 2008
Posts: 5,675
From: Dallas TX
Richard,
From the center of the tranny hump to the edge of the new carpet is 33". Therefore I will have to trim off about 3" from each side. I am not sure if your year would be much different... If you want to borrow my carpet for the weekend to see how it will fit, just let me know!
From the center of the tranny hump to the edge of the new carpet is 33". Therefore I will have to trim off about 3" from each side. I am not sure if your year would be much different... If you want to borrow my carpet for the weekend to see how it will fit, just let me know!
Thread Starter
Registered User
Joined: Feb 2008
Posts: 11,798
From: Plano, TX
The saga continues...
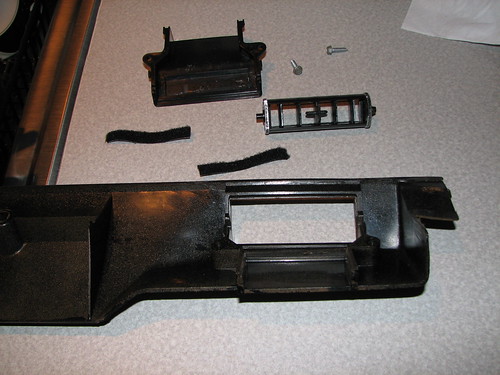
After cleaning the floor, I looked up and noticed how dirty the lower valiance on the dash (and its two small A/C vents) was, so I pulled it off to clean it up. It was quite nasty: 
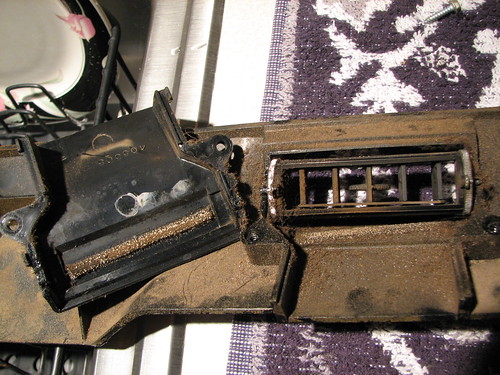
Afterwards it looked like new. It was reassembled inside as the POR15 was drying. The fuzzy seals at the vent were replaced with the fuzzy side of thick Velcro. Ahhhh, the little time consuming details……
I had to resist the idea of pulling the entire dash out for cleaning “since everything else was apart”…
The next day, the perimeter body seams were resealed with 3M Ultrapro 08300 body seam sealer. Although the 08505 is more widely available, 3M has had complaints of the odor lingering inside cars for up to a month after installation. The 08300 was later recommended by 3M to use inside.
POR it on!! Friday before another cold front, I applied POR15 to the floorpan by PORing it out of the tiny cans and brushing with a 3" disposable brush…

The dry cold air was against me as it caused the POR to dry slowly (opposite of ‘normal’ paint), putting over 2.5 hours between coats. Since I could not access the right door in the garage, I had to paint in half sections, which slowed me down also. As a result I was painting from 430 to 1030!
Here is the end result of seam sealer and POR15 clear:
As the POR15 was curing over the weekend, I cleaned, lubricated, and adjusted the seatbelt retractor units. Again, a soaking & scrubbing with liquid tide and water made these costly parts look like new.
(The C-clamps held them “un-tracted” while they dried.
They now pull the belts in all the way easily, ratchet correctly, and look like new.
The switches function and will be reconnected to the buzzer circuit.
The metal brackets were rusty, so they were brushed, cleaned, and POR15ed.
In response to my missing lower seatbelt cover, the very kind JAMESBO from this forum sent me two pea-green covers to dye. I was amazed with the ease of doing this and the quality of my job - I impressed myself!!
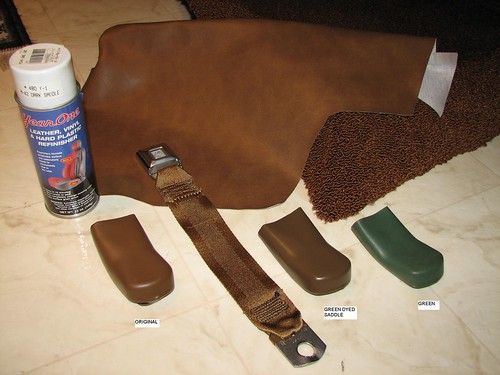
The key things are getting the parts very clean, following the instructions, patience, and a quality dye/paint.
After cleaning and drying, I taped the cover to a 2x3 chunk which held the part opened up and secure.
This paint required 3 LIGHT coats & I had to wait 10 minutes between coats...
I sprayed on the first coat of paint, just enough to cover the part. Now JAMESBO did me right by wrapping the parts in the comic section of the newspaper. There were two pages, each took me 10 minutes to read… After getting a few chuckles and applying the next two coats, the part looked great.
HOWEVER, this Dark Saddle spray from Year One is darker than the original and has a green tint. (It is not the original green color showing through!) The original seatbelt and new upholstery & carpet are in the background for color comparisons. Since the belt covers will be out of direct sight, it does not matter much.
I am not sure if I want to use this on my new armrests though!
Afterwards it looked like new. It was reassembled inside as the POR15 was drying. The fuzzy seals at the vent were replaced with the fuzzy side of thick Velcro. Ahhhh, the little time consuming details……
I had to resist the idea of pulling the entire dash out for cleaning “since everything else was apart”…
The next day, the perimeter body seams were resealed with 3M Ultrapro 08300 body seam sealer. Although the 08505 is more widely available, 3M has had complaints of the odor lingering inside cars for up to a month after installation. The 08300 was later recommended by 3M to use inside.
POR it on!! Friday before another cold front, I applied POR15 to the floorpan by PORing it out of the tiny cans and brushing with a 3" disposable brush…
The dry cold air was against me as it caused the POR to dry slowly (opposite of ‘normal’ paint), putting over 2.5 hours between coats. Since I could not access the right door in the garage, I had to paint in half sections, which slowed me down also. As a result I was painting from 430 to 1030!
Here is the end result of seam sealer and POR15 clear:
As the POR15 was curing over the weekend, I cleaned, lubricated, and adjusted the seatbelt retractor units. Again, a soaking & scrubbing with liquid tide and water made these costly parts look like new.
(The C-clamps held them “un-tracted” while they dried.
They now pull the belts in all the way easily, ratchet correctly, and look like new.
The switches function and will be reconnected to the buzzer circuit.
The metal brackets were rusty, so they were brushed, cleaned, and POR15ed.
In response to my missing lower seatbelt cover, the very kind JAMESBO from this forum sent me two pea-green covers to dye.
I was amazed with the ease of doing this and the quality of my job - I impressed myself!! The key things are getting the parts very clean, following the instructions, patience, and a quality dye/paint.
After cleaning and drying, I taped the cover to a 2x3 chunk which held the part opened up and secure.
This paint required 3 LIGHT coats & I had to wait 10 minutes between coats...
I sprayed on the first coat of paint, just enough to cover the part. Now JAMESBO did me right by wrapping the parts in the comic section of the newspaper. There were two pages, each took me 10 minutes to read… After getting a few chuckles and applying the next two coats, the part looked great.
HOWEVER, this Dark Saddle spray from Year One is darker than the original and has a green tint. (It is not the original green color showing through!) The original seatbelt and new upholstery & carpet are in the background for color comparisons. Since the belt covers will be out of direct sight, it does not matter much.
I am not sure if I want to use this on my new armrests though!
Last edited by Lady72nRob71; Nov 20, 2008 at 08:30 AM.
Moderator
Joined: Jun 2008
Posts: 18,058
From: Atlanta, Georgia
Glad they worked out fer ya.
It's alot like remodling a house, Redo one thing and everyhting around it looks like poop on a white rabbit so just just keep fixing.
Nice job and great picks make for a impressive, infomative thread.
Thanks
It's alot like remodling a house, Redo one thing and everyhting around it looks like poop on a white rabbit so just just keep fixing.
Nice job and great picks make for a impressive, infomative thread.
Thanks

Registered User
Joined: Apr 2008
Posts: 1,052
From: Phoenix, AZ
Looking good Rob. I was wondering what you did with the pinholes in the floor? Did you simply apply the POR over them and it sealed them up, or did you use something else?
Have the same issue in my trunk and don't really want to replace the floor at the moment.
Have the same issue in my trunk and don't really want to replace the floor at the moment.
Thread Starter
Registered User
Joined: Feb 2008
Posts: 11,798
From: Plano, TX
The hard work is paying off, although a bit slowly...I found only 7 small pinholes on the floor by putting a bright light in the floorpan and crawling underneath looking for constellations.
I cleaned the underside and stuck masking tape under them. The POR15 filled the holes, dried, and made the holes no more!
For a couple other bigger holes like where the old amp was mounted, I filled them with PORPATCH, thick POR15 in a toothpaste tube. The 3M seam sealer would have worked, too.
If you have many holes and the surrounding metal is weak, then more drastic repairs may be necessary...
Perhaps post a picture of your trunk interior and let's see what it looks like.
Registered User
Joined: Apr 2008
Posts: 1,052
From: Phoenix, AZ
Thanks Rob. I will do so when I'm back home in Phoenix for Thanksgiving (where my car is at the moment). That's right--the PORPATCH. I read about that a long time ago and couldn't remember the name of it. I'll probably use that. Trunk paint is fairly thick, so it shouldn't really show.
Thread Starter
Registered User
Joined: Feb 2008
Posts: 11,798
From: Plano, TX
Happy birthday to me!!
A day before "my day", I visited the trim shop to see the progress on my seats and to have the lumbar supports selected and fitted to my back.
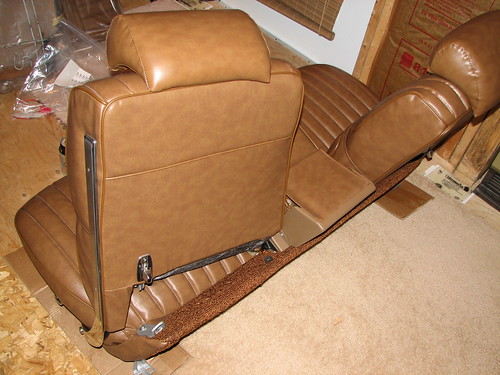
I was delighted to see the back seat done, and it looks marvelous�
The armrest was in the process, along with the front seat.
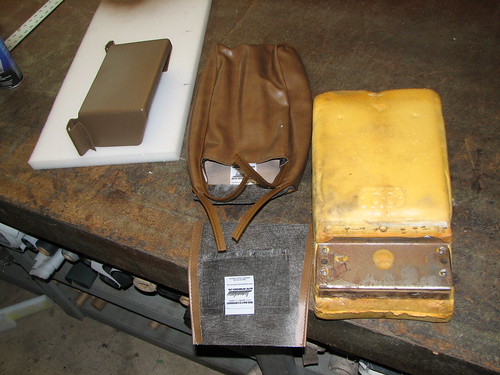
Much of my seat foam was reusable (like this armrest and the front leanback foam) but some new foam was added to certain areas to firm it up a little. The bottom foam for the front seat was shot and worn and the springs were cutting through due to deteriorated burlap underneath.
Here is the front seat in progress, sandblasted and painted:
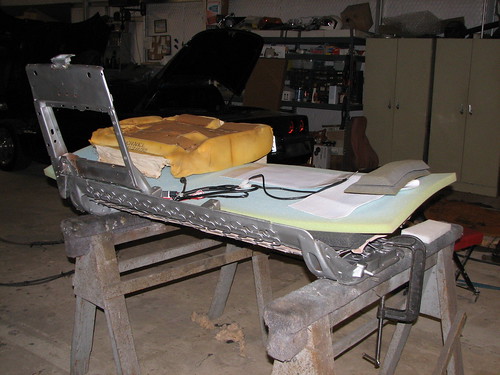
I could not decide between the black firm foam and the medium-soft blue foam, so we compromised� We put 1� of blue over 1� of black. This relieves pressure points while providing some support as well. It passed my "sit-down" test...
Firm foam side bolsters were added to help keep us in place around corners and Roadwires seat heaters will be installed on driver and passenger positions (one set visible on top of the front seat). I still have to decide how it will be wired.
I will revisit the shop Tuesday or Wednesday to try out the lumbar supports one last time with the bottom done and the cover over the leanback section...
I was delighted to see the back seat done, and it looks marvelous�
The armrest was in the process, along with the front seat.
Much of my seat foam was reusable (like this armrest and the front leanback foam) but some new foam was added to certain areas to firm it up a little. The bottom foam for the front seat was shot and worn and the springs were cutting through due to deteriorated burlap underneath.
Here is the front seat in progress, sandblasted and painted:
I could not decide between the black firm foam and the medium-soft blue foam, so we compromised� We put 1� of blue over 1� of black. This relieves pressure points while providing some support as well. It passed my "sit-down" test...
Firm foam side bolsters were added to help keep us in place around corners and Roadwires seat heaters will be installed on driver and passenger positions (one set visible on top of the front seat). I still have to decide how it will be wired.
I will revisit the shop Tuesday or Wednesday to try out the lumbar supports one last time with the bottom done and the cover over the leanback section...
Registered
Joined: Jul 2006
Posts: 4,430
From: Northeast Ohio
Looking good, they do some nice work there.
I have to ask why the seat heaters? I thought Texas was warm?
To me anything above 30 degrees is balmy in the winter and you can work outside in shirtsleeves if the wind isn't blowing too hard.
Allan
P.S. Happy Birthday
When's the party? Remember that you have to bring enough treats for the whole class.
Thread Starter
Registered User
Joined: Feb 2008
Posts: 11,798
From: Plano, TX
Thread Starter
Registered User
Joined: Feb 2008
Posts: 11,798
From: Plano, TX
Looking good, they do some nice work there.
I have to ask why the seat heaters? I thought Texas was warm?
To me anything above 30 degrees is balmy in the winter and you can work outside in shirtsleeves if the wind isn't blowing too hard.
Allan
P.S. Happy Birthday
When's the party? Remember that you have to bring enough treats for the whole class.
I have to ask why the seat heaters? I thought Texas was warm?
To me anything above 30 degrees is balmy in the winter and you can work outside in shirtsleeves if the wind isn't blowing too hard.
Allan
P.S. Happy Birthday
When's the party? Remember that you have to bring enough treats for the whole class.
There was no big party Saturday, just a few ladies took me to lunch and dinner (One new GF and the EX; different times of course...)
Got a good dinner last night from one set of neighbors and homemade bread pudding from the others. We are all one big family.
Seat heaters will be nice in TX also so we can go topless at cooler temps also. Almost every GF I ever found complains about the cold, so this should keep their butts warm and happy. Vinyl and leather can feel cold even when the air is not, so this should help out.
Also, I plan to drive this car all over the US, mostly in the fall to cooler places, so extra heat would be nice.
And since there is no labor to install the heaters, MIGHTASWELL !!
Thread Starter
Registered User
Joined: Feb 2008
Posts: 11,798
From: Plano, TX
Late updates!
I revisited the upholstery shop on last Tuesday to try out the lumbar supports one last time with the bottom complete and the cover over the leanback section. It fit me well and the seat felt great! Everything was going along very well, albeit a bit slowly.
However the headrest covers were not made like the factory ones. They had no piping and the bottoms had to be sewn up by hand. The exposed seams were also buckled at the edges. Billy did not like them but he told me he would do his best with them. I did not really like them either but was willing to let him do his best on them.
I also gave him the rear armrests and hydraulic cylinder covers so he could replace the fabric covers that I had also got at Legendary. Might as well, while it is all apart! I could have done this myself, but I felt more confident in him doing it.
The next couple days were spent rerouting, wrapping, and organizing the gobs of wires going to and from the new 4-channel amplifier that will reside under the passenger seat. I replaced the existing 10 gauge power feed with a 6 gauge and soldered it up to the fuseholder at the battery. The old 10 gauge wire was reallocated for the seat heater feed.
I also fixed up one mistake I did before painting the floorpan with POR15. Before application, I should have installed junk bolts into the bolt holes in the floor for the seats and seatbelts, to prevent the threads from filling with POR15.
Bolts would not even start in them, so I decided to procure a 40 pc tap and die set from Harbor Freight for a whopping 13 bucks. Precision made in China from only the finest chinesium, the taps cleaned the threads out with no problem. (However I would not trust them to tap new threads in engine blocks though�)
During Thanksgiving week during a cold spell, I did some underdash wiring to prepare for future power windows.
Originally, a relay is used to enable the power windows only when the key is in the IGN position. The main power feed comes from the hot accessory circuit breaker on the fuse box. I had to add this, but I used the ACCY side of the ignition switch instead.
While I was planning this, I decided to take advantage of the �Retained Accessory Power� control of the alarm system I installed last year. This would be cool, because even after I shut the engine off and yank the key, I would still be able to close the windows (and even listen to the radio) until I opened the door, just like I can on my �97 Cadillac.
Here is the relay setup, bolted into some already-drilled holes up by the fuse block:
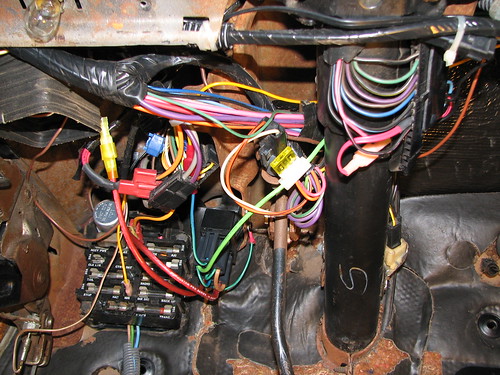
Now to have the RAP work right, I had to separate the door switch inputs from the dome light control circuit. Luckily, the �72 has a split LH door switch. The alarm door switch input will now come from the key warning side of the door switch. To my surprise, the RH door switch was ALSO a split switch, so I ran a wire to it and connected those two switches together. All works well now�
Since most everything inside was apart (again), that fantasy of power windows returned.
I decided to finally go through with it, even if it kills me�
See the POWER WINDOW CONVERSION thread https://classicoldsmobile.com/forums...onversion.html for details on this installation.
However the headrest covers were not made like the factory ones. They had no piping and the bottoms had to be sewn up by hand. The exposed seams were also buckled at the edges. Billy did not like them but he told me he would do his best with them. I did not really like them either but was willing to let him do his best on them.
I also gave him the rear armrests and hydraulic cylinder covers so he could replace the fabric covers that I had also got at Legendary. Might as well, while it is all apart! I could have done this myself, but I felt more confident in him doing it.
The next couple days were spent rerouting, wrapping, and organizing the gobs of wires going to and from the new 4-channel amplifier that will reside under the passenger seat. I replaced the existing 10 gauge power feed with a 6 gauge and soldered it up to the fuseholder at the battery. The old 10 gauge wire was reallocated for the seat heater feed.
I also fixed up one mistake I did before painting the floorpan with POR15. Before application, I should have installed junk bolts into the bolt holes in the floor for the seats and seatbelts, to prevent the threads from filling with POR15.
Bolts would not even start in them, so I decided to procure a 40 pc tap and die set from Harbor Freight for a whopping 13 bucks. Precision made in China from only the finest chinesium, the taps cleaned the threads out with no problem. (However I would not trust them to tap new threads in engine blocks though�)
During Thanksgiving week during a cold spell, I did some underdash wiring to prepare for future power windows.
Originally, a relay is used to enable the power windows only when the key is in the IGN position. The main power feed comes from the hot accessory circuit breaker on the fuse box. I had to add this, but I used the ACCY side of the ignition switch instead.
While I was planning this, I decided to take advantage of the �Retained Accessory Power� control of the alarm system I installed last year. This would be cool, because even after I shut the engine off and yank the key, I would still be able to close the windows (and even listen to the radio) until I opened the door, just like I can on my �97 Cadillac.
Here is the relay setup, bolted into some already-drilled holes up by the fuse block:
Now to have the RAP work right, I had to separate the door switch inputs from the dome light control circuit. Luckily, the �72 has a split LH door switch. The alarm door switch input will now come from the key warning side of the door switch. To my surprise, the RH door switch was ALSO a split switch, so I ran a wire to it and connected those two switches together. All works well now�
Since most everything inside was apart (again), that fantasy of power windows returned.
I decided to finally go through with it, even if it kills me�
See the POWER WINDOW CONVERSION thread https://classicoldsmobile.com/forums...onversion.html for details on this installation.
Thread Starter
Registered User
Joined: Feb 2008
Posts: 11,798
From: Plano, TX
The past Friday, I went to the upholstery shop pick up my seats and quarter panels.
Now understand that I am very difficult to please when I am paying somebody to do a service for me.
For the first time in a long while, I was MORE THAN PLEASED!! These seats and panels looked showroom fresh, or maybe even better!
Here is the front seat:
The completed rear seat is pictured earlier and I did not want to unwrap it yet after getting it home.
If anyone in the Dallas TX area needs a fine upholstery job, I highly recommend Yoboy Enterprises http://www.yoboyinc.com/. They are located a few miles north of Wylie in Nevada, TX. Call 972 494 2627 and just ask for Billy Blair. Now since he does quality work, you will not get a rush job. Allocate 2 weeks minimum. My seats took just over 4 weeks, but he did a lot for me and I told him to take his time. The seats will not be reinstalled for at least a few more weeks…
---- As a reference, here is the work done and the cost:
I supplied all the covering material from Legendary for the seats and all four pieces of the convertible quarter armrest panels. Billy stripped the seats to the frame and sandblasted the frames. Metal parts were painted and the plastic panel behind the armrest was refinished.
Most foam was reused, as mine was in pretty good shape, except the front bottom. It was all new. The other old foam was backed up with some new, to get everything firm. Billy custom fitted side bolsters and lumbar supports and added seat heaters. Price for basic restoration of seats only was 475 labor, 35 for foam. Quarter panels were 75 labor for all and the seat heaters were 100 each and I did both sides of the front seat only. Total was 785.
After getting the seats home, I hooked a power supply to each of the seat heaters to verify operation. Each draws 4A on high and 1.5 on low. Since the seat cover has about �” of padding in it, it takes longer to warm up than my Caddy. However, it will still get hot enough to have you switching to low after about 7 minutes… I sat there for quite a while in my cold workshop drinking a beer in celebration; it was hard to shut it off and get up!
The side bolsters on the seat bottom and the extra lumbar support in the backs felt firm and very supportive. Needless to say, it was very comfy. That really made my day – I’m VERY happy!!


