
Interior makeover

Thread Starter
Registered User
Joined: Feb 2008
Posts: 11,798
From: Plano, TX
The interior in a whole is doing just wonderful. Only problems I have are the door pulls. I had used a substandard trim cement and the heat from the first drive made them all come apart.

I got some 3M 8090 to use on them, but i recently remembered I had to pull the whole door panels to get the straps off.
Geez...
Thread Starter
Registered User
Joined: Feb 2008
Posts: 11,798
From: Plano, TX
Hey Rob!
Hope you're having a great holiday!
I was looking over your thread, i was wondering if you could lend me a tip on installing my carpet, mainly, how do i line up the two carpets and the heel pad?? It seems that the vinyl line on the front carpet is about 6'' in front of the seat belt buckle on the floor??
Also, did you have to do a lot of trimming?? I ordered a PUI Carpet a year ago and it seems i have ALOT of excess...
Thanks!
Holiday was a bit lonely and stressful. Ladyfriend had been very sick for the past 10 days and I have not seen her since. She stayed with some friends and would not tell me where, as she did not want me to worry.

Just today she is feeling better, which was good news.
Your carpet should be molded and just drop in! Drop in the rear half, then the front. Should look like this afterward...

I had to trim about 3-4" from the sides and 2" from the front firewall side. Just do an inch at a time so you do not cut too much like I did...
I'm indecisive. Or am I..
Joined: Dec 2011
Posts: 686
From: Port Coquitlam BC
That is exciting stuff. After all, paint and body is great but the interior is where the captain and crew spend their time. I will be ordering a complete interior set for my '65 so I am happy to hear that Legendary is as good as they seem.
Registered User
Joined: Jul 2010
Posts: 2,175
From: Montreal, QC
Thanks Tony...
Holiday was a bit lonely and stressful. Ladyfriend had been very sick for the past 10 days and I have not seen her since. She stayed with some friends and would not tell me where, as she did not want me to worry.
Just today she is feeling better, which was good news.
Your carpet should be molded and just drop in! Drop in the rear half, then the front. Should look like this afterward...
I had to trim about 3-4" from the sides and 2" from the front firewall side. Just do an inch at a time so you do not cut too much like I did...
For the carpet, mine was Definitely moulded (maybe not to my hopeful specifications.) It seems that the carpet goes WAY above the gas pedal pivot. Where is the carpet supposed to finish? I don't want to crush the gas pedal over the carpet and create a hazard..
Do you have a picture of how you cut the carpet under your dash area??
Cheers,
Tony
Thread Starter
Registered User
Joined: Feb 2008
Posts: 11,798
From: Plano, TX
 She felt a lot better after then. Best day I have spent with her in a long time...
For the carpet, mine was Definitely moulded (maybe not to my hopeful specifications.) It seems that the carpet goes WAY above the gas pedal pivot. Where is the carpet supposed to finish? I don't want to crush the gas pedal over the carpet and create a hazard..
Do you have a picture of how you cut the carpet under your dash area??
Do you have a picture of how you cut the carpet under your dash area??
The pics below are high-res shots of the carpet detail. Note the carpet goes UNDER the firewall mat, starting after the brake pedal and along the heater box. About 1" goes up under the mat under the heater box.


I almost feel obligated to show my passenders the spiffy engine bay each time before we go for a ride...
Yes, Legendary all the way!
If you are asking me, I had to cut my own hole. After the carpet was in where I wanted it, i cut an X so that the switch can poke through. That way, if I wanted to move it, I could and not have a hole int he wrong place! When everything was postioned and done, I cut away the 4 flaps the X made and then popped the grommet in.
Thread Starter
Registered User
Joined: Feb 2008
Posts: 11,798
From: Plano, TX
It�s NEVER done!
We all know a finished project is never done, as there is always room for improvement.
After finishing up the heater box restoration https://classicoldsmobile.com/forums...tml#post362172 I decided it is time for another option!
One thing I disliked about the rally-pac is that there is no volt or amp meter. I wanted to add one but also wanted to keep it stealthy, like Lady’s other added options like seat heaters and garage door controller.
I had always wanted one of these for the Harley, so I thought I would get another for Lady!
https://www.denniskirk.com/show-chro...prd/407804.sku
It displays voltage, as well as inside and outside temperature and clock display. It also has an indicator for near-freezing and sub-freezing temps.
I did not want to use the clock as I already had one in the rally pac. Also, when wired properly, this unit consumes about 6mA with key off, so I wanted to eliminate that. It was wired to where it only comes on when key is on.
The one bad thing about this unit is that the existing green LED backlights were way too dim, even in total darkness. I opened it up and did some tests… Only 1.5mA were flowing through the LEDs, so I soldered on a 500 Ohm limiting resistor in place of the existing 2k Ohm, which boosted current to about 8mA. I do not know what exact LED was used, but if they burn up, I will just replace them with new ones that will handle more current and be brighter. All of you non-engineers can ignore all this tech talk...")
While I was modding that one, I modded the one for the bike, also.
I changed the green LEDs to yellows to match the speedometer. Also, these got set to 20mA (with a 180 Ohm resistor) as they could handle more current.
Note the pot on the roght that is used as an adjustment for voltage calibration...

Mounting location for lady’s gauge was the tough part, but I ended up hot-gluing it to the aftermarket console to keep the non-stock stuff in one place and keep it non-permanent.
I soldered on a connector on both sides so the console and gauge can be easily removed for judged shows. The console side connector was soldered to a PCB scrap that was easily glued up under the console.
Outside temp sensor was mounted just behind the grille and wiring ran through the horn and headlight corrugated tubing. It poked neatly through the firewall grommet for the cruise plumbing. So that wiring is all but invisible.
Power wiring to the gauge was fed through a small slit in carpet and pulled up under the dash, where it was connected into a custom harness that was made and installed long ago just for extra options…

Wiring from the outside sensor was routed under the carpet, was pulled back in return and added into the connector.
In the end, it looks okay and is out of the way.

It is well visible at night, despite the darkness of this fast-shuttered shot…

The one on the bike looks great with the new color!

Now I always know what the alternator is doing, and what the temp is outside!
After finishing up the heater box restoration https://classicoldsmobile.com/forums...tml#post362172 I decided it is time for another option!
One thing I disliked about the rally-pac is that there is no volt or amp meter. I wanted to add one but also wanted to keep it stealthy, like Lady’s other added options like seat heaters and garage door controller.
I had always wanted one of these for the Harley, so I thought I would get another for Lady!
https://www.denniskirk.com/show-chro...prd/407804.sku
It displays voltage, as well as inside and outside temperature and clock display. It also has an indicator for near-freezing and sub-freezing temps.
I did not want to use the clock as I already had one in the rally pac. Also, when wired properly, this unit consumes about 6mA with key off, so I wanted to eliminate that. It was wired to where it only comes on when key is on.
The one bad thing about this unit is that the existing green LED backlights were way too dim, even in total darkness. I opened it up and did some tests… Only 1.5mA were flowing through the LEDs, so I soldered on a 500 Ohm limiting resistor in place of the existing 2k Ohm, which boosted current to about 8mA. I do not know what exact LED was used, but if they burn up, I will just replace them with new ones that will handle more current and be brighter. All of you non-engineers can ignore all this tech talk...
While I was modding that one, I modded the one for the bike, also.
I changed the green LEDs to yellows to match the speedometer. Also, these got set to 20mA (with a 180 Ohm resistor) as they could handle more current.
Note the pot on the roght that is used as an adjustment for voltage calibration...
Mounting location for lady’s gauge was the tough part, but I ended up hot-gluing it to the aftermarket console to keep the non-stock stuff in one place and keep it non-permanent.
I soldered on a connector on both sides so the console and gauge can be easily removed for judged shows. The console side connector was soldered to a PCB scrap that was easily glued up under the console.
Outside temp sensor was mounted just behind the grille and wiring ran through the horn and headlight corrugated tubing. It poked neatly through the firewall grommet for the cruise plumbing. So that wiring is all but invisible.
Power wiring to the gauge was fed through a small slit in carpet and pulled up under the dash, where it was connected into a custom harness that was made and installed long ago just for extra options…
Wiring from the outside sensor was routed under the carpet, was pulled back in return and added into the connector.
In the end, it looks okay and is out of the way.
It is well visible at night, despite the darkness of this fast-shuttered shot…
The one on the bike looks great with the new color!
Now I always know what the alternator is doing, and what the temp is outside!
Registered User
Joined: Dec 2005
Posts: 511
Hey Rob, this goes back to when you assembled your front door panels. I examined all of the related posts on pressing the new panels onto the old rails with the C-clamp. Tried that with my rear panels. Straightened the points as well as I could. They pressed into the cardboard, but not all the way through enough to hold on. I think I will end up pop riveting them on. Plus I can't get the C-clamp on the forward section of the panel anyway, as it's too wide. Maybe your points were sharper and longer, and bit in better. Your posts have been very helpful to me as I try to finish this 5 year project. Thanks for all the pictures, Chumley
Thread Starter
Registered User
Joined: Feb 2008
Posts: 11,798
From: Plano, TX
Thanks for the complement! I am pretty sure they are very different. Legendary does not carry the covers for the Delta but SMS Upholstery in Oregon should be able to custom make it for you - they have almost all the old patterns. It will be costly and will take a while for them to make it.
Hey Rob, this goes back to when you assembled your front door panels. I examined all of the related posts on pressing the new panels onto the old rails with the C-clamp. Tried that with my rear panels. Straightened the points as well as I could. They pressed into the cardboard, but not all the way through enough to hold on. I think I will end up pop riveting them on. Plus I can't get the C-clamp on the forward section of the panel anyway, as it's too wide. Maybe your points were sharper and longer, and bit in better. Your posts have been very helpful to me as I try to finish this 5 year project. Thanks for all the pictures, Chumley
SOunds like you just need a bigger C-clamp - one with a deeper throat!
I think I used a 6 or 8 incher.
I also used contact cement between the wood and the metal. If it worked for me so well, I am sure it can work for you.
Always glad to be able to help!
Registered User
Joined: Jun 2009
Posts: 19
From: Bavaria West-Germany
Once while surfing the net i read a slogan " Do it once and do it right "
The best example for this is your car .
Next week i have a meeting with the saddler or upholsterer to see some pattern for the seats .
Thanks Markus
The best example for this is your car .
Next week i have a meeting with the saddler or upholsterer to see some pattern for the seats .
Thanks Markus
Thread Starter
Registered User
Joined: Feb 2008
Posts: 11,798
From: Plano, TX

That is actually my sole belief in life. Why do a crappy job and have to it over and over, where you can spend a little more and do it once and not have to do it again. Now if its a real easy job, well I might make a slightly lesser exception...
Just an Olds Guy
Joined: Jul 2008
Posts: 24,528
From: Edmonton, AB. And "I am Can 'eh' jun - eh"

Registered User
Joined: Jun 2013
Posts: 42
From: Conyers, Georgia
My first reply..
Just finished you thread, that was great. start to finish. I learned a lot. I'm just starting the interior of a '70 convert. you thought me one thing, well two really. First if it doesn't fit send it back and 2nd, take my time. Get it right the first time. Thank you. Kibby70
Thread Starter
Registered User
Joined: Feb 2008
Posts: 11,798
From: Plano, TX
Just finished you thread, that was great. start to finish. I learned a lot. I'm just starting the interior of a '70 convert. you thought me one thing, well two really. First if it doesn't fit send it back and 2nd, take my time. Get it right the first time. Thank you. Kibby70
If you want your car it to look its best, go with Legendary. I doubt anyone else would have stood behind their products that well, because they make them! I had to point out an assembly / engineering issue on the rear qtr panels. They had to reprogram their machines to get it right and hopefully this helped other '72 owners, too.
Start a thread of your interior work. I would be happy to just watch and eat popcorn, rather than do the work this time!
Registered User
Joined: Jun 2013
Posts: 492
Hello Rob,
I linked onto this thread and was drawn in by the meticulous descriptions and attention to detail. Personally I would let the next owner concern himself if he cares to with moving speakers to the kick panels. Your's in the door have a much much better enclosure to work with and you probably even noticed improvement with the dynamat that you put in. Convertibles are hard vehicles to produce bass frequencies in unless you have speakers where you have them and get the benefit of having the door cavity as an enclosure. You do great work and it's been a pleasure reading through this thread. - Steven
I linked onto this thread and was drawn in by the meticulous descriptions and attention to detail. Personally I would let the next owner concern himself if he cares to with moving speakers to the kick panels. Your's in the door have a much much better enclosure to work with and you probably even noticed improvement with the dynamat that you put in. Convertibles are hard vehicles to produce bass frequencies in unless you have speakers where you have them and get the benefit of having the door cavity as an enclosure. You do great work and it's been a pleasure reading through this thread. - Steven
Thread Starter
Registered User
Joined: Feb 2008
Posts: 11,798
From: Plano, TX
Hello Rob,
I linked onto this thread and was drawn in by the meticulous descriptions and attention to detail. Personally I would let the next owner concern himself if he cares to with moving speakers to the kick panels. Your's in the door have a much much better enclosure to work with and you probably even noticed improvement with the dynamat that you put in. Convertibles are hard vehicles to produce bass frequencies in unless you have speakers where you have them and get the benefit of having the door cavity as an enclosure. You do great work and it's been a pleasure reading through this thread. - Steven
I linked onto this thread and was drawn in by the meticulous descriptions and attention to detail. Personally I would let the next owner concern himself if he cares to with moving speakers to the kick panels. Your's in the door have a much much better enclosure to work with and you probably even noticed improvement with the dynamat that you put in. Convertibles are hard vehicles to produce bass frequencies in unless you have speakers where you have them and get the benefit of having the door cavity as an enclosure. You do great work and it's been a pleasure reading through this thread. - Steven
Thanks for the complements!
Lady already had the speaker holes cut, so i did not feel bad about continuing to use them. I would never have done that to a virgin car.
The ones in the door are 5" and do not produce much bass, but better than 4" in kicks. I did use some non polarized caps in series with the front speakers to cross them over at about 100hz, since anything under that could not be well heard.
The 6.5's in the rear armrests sound very well, even for inexpensive Pyles. The dynamat worked well here.
The 6x9's in the far back are more like subs, as most of the mids and all the highs are just muffled (especially with the top down).
With a good 50x4 amp, I can rock out with the top down at any speed, to add to the fun in the sun!
Registered User
Joined: Jun 2013
Posts: 492
I used Morel 5 1/4"s (component set with angled 1" Tweet) in my kick panels. I had to cut some steel behind the kick to make them fit for depth. I didn't cut the door like I did for 6 1/2's in a 1968 Z28 when I was in High School. Youthful enthusiasm I guess. I'll be doing the complete interior on my Cutlass this coming Summer. Nice to see how you did yours, and a lot of useful information in this thread. - Steven
Registered User
Joined: May 2014
Posts: 294
From: Bass capital of Texas , Lake Fork
Thread Starter
Registered User
Joined: Feb 2008
Posts: 11,798
From: Plano, TX
Registered User
Joined: Jan 2009
Posts: 5,556
From: Harrison, Michigan
Just read this thread from the beginning, as usual a great job, Rob. You have helped me before with your underhood and a/c threads. Now I am following you with a interior job on my 71 Supreme convertible. I also have the split bench w/ armrest. I plan to go with Legendary also. I plan to go with their assembled door panels. I hope that they may come with the door pulls but if not I will follow what you did with yours. I noticed your old rear panels had the top metal panel removed, Is that the piece they want back to make the new panels? (I haven't called Legendary yet.) Did you have the rear convertible top cylinder covers redone or did you buy them from legendary? If you had your shop recover them did you get the material from Legendary? Same question about the rear armrests. Thanks so much for your excellent threads and advice. Greg
Registered User
Joined: Nov 2011
Posts: 487
From: Melville, NY
Great thread!
I also planned to go the Legendary route but after calling them for a price quote, they came in at *DOUBLE* the cost of others for two bucket seat covers (even with the holiday sale price).
I didn't think there was that much of a price difference but unfortunately my budget just doesn't allow and I can't really justify paying double for Legendary materials. Hope I don't regret it, but no other choice really...
Thread Starter
Registered User
Joined: Feb 2008
Posts: 11,798
From: Plano, TX
Just read this thread from the beginning, as usual a great job, Rob. You have helped me before with your underhood and a/c threads. Now I am following you with a interior job on my 71 Supreme convertible. I also have the split bench w/ armrest. I plan to go with Legendary also. I plan to go with their assembled door panels. I hope that they may come with the door pulls but if not I will follow what you did with yours. I noticed your old rear panels had the top metal panel removed, Is that the piece they want back to make the new panels? (I haven't called Legendary yet.) Did you have the rear convertible top cylinder covers redone or did you buy them from legendary? If you had your shop recover them did you get the material from Legendary? Same question about the rear armrests. Thanks so much for your excellent threads and advice. Greg
Yes, you will need the top rails from your old rear panels (mine were plastic, not metal.) You can install them or Legendary can do them if you send them to them. They just used an industrial stapler and cement.
My metal rear armrests/piston covers just needed to be recovered. I got the new fitted fabric covers from Legendary and my trim guy replaced them - came out great! I could have done them, but I did not want to risk messing anything up since i was new to the upholstery world.
Lemme know if any other questions come up!
From what I have heard, PUI is not too bad for the price so that might fit your budget better.

Registered User
Joined: Jul 2018
Posts: 13
After a refreshing vacation and getting back in the swing of things at home, it is now time for Lady�s Interior makeover! In other words, she will be getting a complete new $2000 outfit - seats, carpet, and underlayment.
I opted to get all the materials through Legendary Auto Interiors, as I heard great things about them and I wanted the best I could get. The fabric quality is very good and it has ~almost~ a leather-like feel!
This front cover set is for the A65 Sport Bench Seat in (Dark) Saddle. This center-armrest seat was only available in the Supreme in 1972.
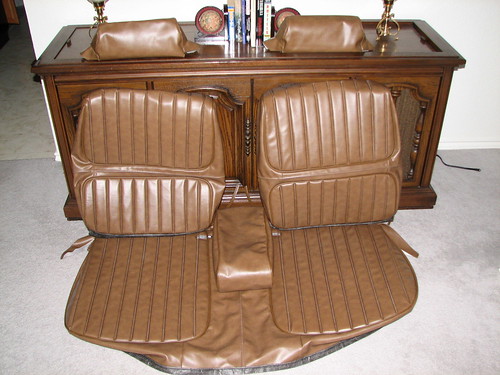
Here is the underside of the front seat set.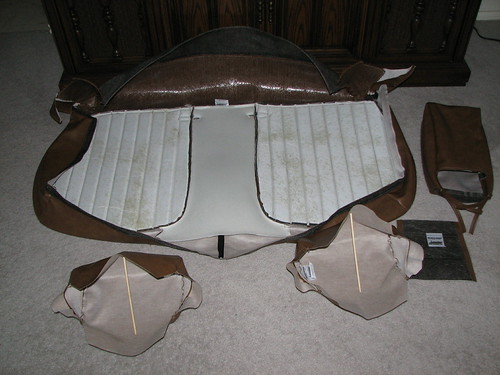
What you cannot easily see is the quality of the stitching. These are very well made and should last another 35 years!
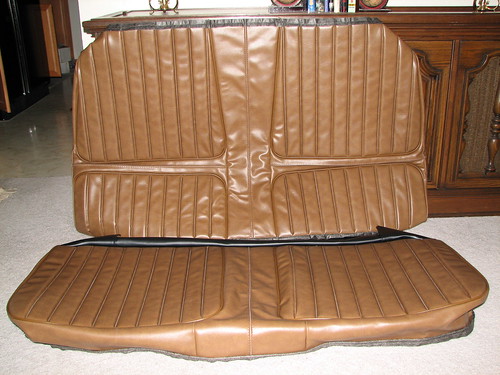
Here is the rear set�
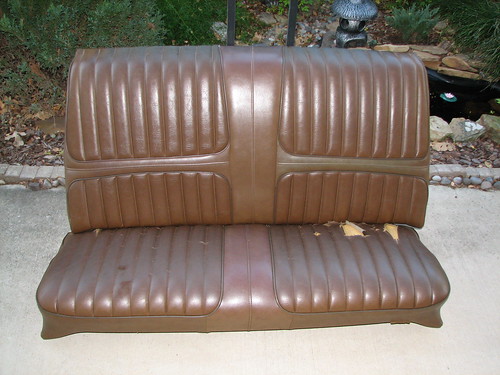
Disassembly began the day before Halloween 2008. Here is the �before� picture: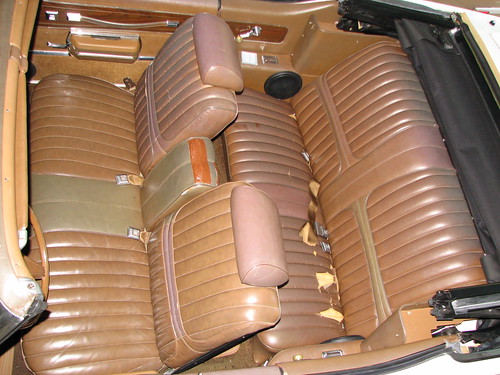
Note the discoloration of the various seat surfaces, aside from the brown duct tape on the armrest� The passenger front seat back is severely faded, supporting my conclusion the car was stored outdoors with that side exposed to the elements.
All the fabric was hard and worn, and the top padding layer compacted. The rear seat was torn in many places and the foam underneath all was deteriorated and was getting forced through the springs. Needless to say, these were very uncomfortable and I about sat on the floor.
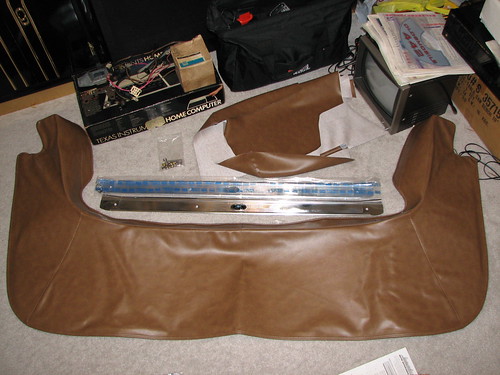
Sill plates, kick panels, and seat belts were removed next.
These seat belts will be cleaned up well; they are a nasty mess just like the back ones were.

The four bolts holding the front seat came out easily and the bench was removed. The back seat came out afterwards. Here is the interior with no seats: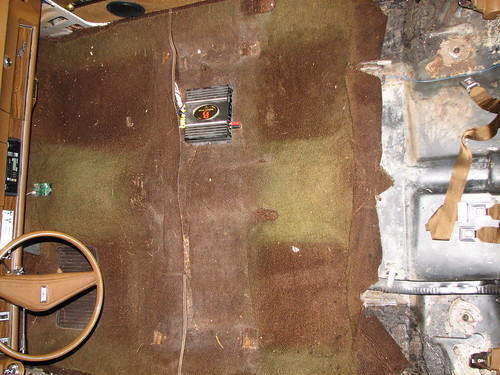
Note the severe fading of the top layer of skuzzy cheap carpet (the original is underneath this) and the genuine �Powerbass� 2-channel amp that will get replaced with a quality 4-channel unit.
In the this stage I found over a dollar�s worth of loose change, some lady's brown satin pants (hmmm�.), and lots of strange tree debris.
Pulling the carpet will be a dirty job, as the original carpet disintegrates when stressed.
These seats and all the materials are ready to be sent to the upholstery shop, which will be �Yoboy Enterprises� in Nevada, TX by Lake Lavon.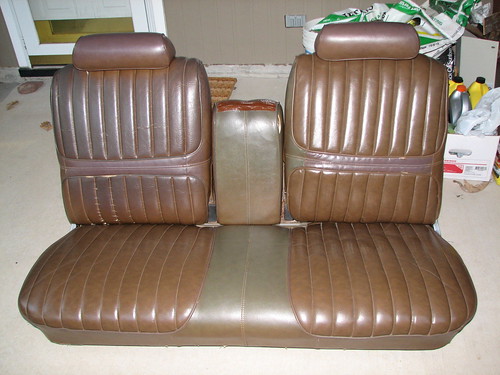
Okay, so the name does not impress me, but the history and experience behind the small company did.
Billy, who runs the place, is the son of the former owners of Blair�s Auto trim in Garland. They had redone my neighbor�s big boat long ago. When Billy�s parents retired and closed shop, Billy opened his small shop and continued his 32+ years of auto trim experience. He is a great guy � patient, understanding of my requirements, and is very polite, unlike anyone in any industry I have dealt with. He will also install seat heaters for me at a very fair price. This will be nice for cool weather cruising with the top down!
On November 3rd, the seats and all the new upholstery and parts were dropped off at Yoboy. Because I wanted his best job, I let him take longer to do it, which he estimates at 2 weeks. If longer, that is okay, too. That will give me enough time to replace the carpet, amplifier, and run wiring for the seat heaters and also heavier amp wiring.
Since I wanted the whole interior to match as best possible, I ordered the top boot, door panels, and rear armrest covers. The latter two items will be installed later on...
Here is the new 80/20 carpet, that has occupied my kitchen floor for over a month now.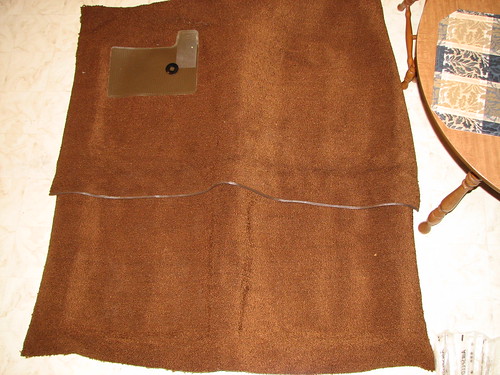
Underneath is the thick jute padding, pre-bonded to the carpet�s backside. Although ordered from Legendary, it actually came from ACC, Auto Custom Carpet. For some reason, it was much cheaper to buy through Legendary..........
I opted to get all the materials through Legendary Auto Interiors, as I heard great things about them and I wanted the best I could get. The fabric quality is very good and it has ~almost~ a leather-like feel!
This front cover set is for the A65 Sport Bench Seat in (Dark) Saddle. This center-armrest seat was only available in the Supreme in 1972.
Here is the underside of the front seat set.
What you cannot easily see is the quality of the stitching. These are very well made and should last another 35 years!
Here is the rear set�
Disassembly began the day before Halloween 2008. Here is the �before� picture:
Note the discoloration of the various seat surfaces, aside from the brown duct tape on the armrest� The passenger front seat back is severely faded, supporting my conclusion the car was stored outdoors with that side exposed to the elements.
All the fabric was hard and worn, and the top padding layer compacted. The rear seat was torn in many places and the foam underneath all was deteriorated and was getting forced through the springs. Needless to say, these were very uncomfortable and I about sat on the floor.
Sill plates, kick panels, and seat belts were removed next.
These seat belts will be cleaned up well; they are a nasty mess just like the back ones were.
The four bolts holding the front seat came out easily and the bench was removed. The back seat came out afterwards. Here is the interior with no seats:
Note the severe fading of the top layer of skuzzy cheap carpet (the original is underneath this) and the genuine �Powerbass� 2-channel amp that will get replaced with a quality 4-channel unit.
In the this stage I found over a dollar�s worth of loose change, some lady's brown satin pants (hmmm�.), and lots of strange tree debris.
Pulling the carpet will be a dirty job, as the original carpet disintegrates when stressed.
These seats and all the materials are ready to be sent to the upholstery shop, which will be �Yoboy Enterprises� in Nevada, TX by Lake Lavon.
Okay, so the name does not impress me, but the history and experience behind the small company did.
Billy, who runs the place, is the son of the former owners of Blair�s Auto trim in Garland. They had redone my neighbor�s big boat long ago. When Billy�s parents retired and closed shop, Billy opened his small shop and continued his 32+ years of auto trim experience. He is a great guy � patient, understanding of my requirements, and is very polite, unlike anyone in any industry I have dealt with. He will also install seat heaters for me at a very fair price. This will be nice for cool weather cruising with the top down!
On November 3rd, the seats and all the new upholstery and parts were dropped off at Yoboy. Because I wanted his best job, I let him take longer to do it, which he estimates at 2 weeks. If longer, that is okay, too. That will give me enough time to replace the carpet, amplifier, and run wiring for the seat heaters and also heavier amp wiring.
Since I wanted the whole interior to match as best possible, I ordered the top boot, door panels, and rear armrest covers. The latter two items will be installed later on...
Here is the new 80/20 carpet, that has occupied my kitchen floor for over a month now.
Underneath is the thick jute padding, pre-bonded to the carpet�s backside. Although ordered from Legendary, it actually came from ACC, Auto Custom Carpet. For some reason, it was much cheaper to buy through Legendary..........

Thread
Thread Starter
Forum
Replies
Last Post
andrewk94
General Discussion
9
Sep 7, 2012 03:34 PM
Lady72nRob71
Interior/Upholstery
15
Dec 8, 2008 10:23 AM


