Interior makeover
 January 29th, 2009, 12:27 PM
#81
Registered User
Thread Starter
Join Date: Feb 2008
Location: Plano, TX
Posts: 11,798


Wanna bet that there were a few cuss words thrown around during this install
I have started to notice that when the people across the alley see me come out, they take their kids inside... I guess "Mechanic" is a bad language for them to learn at their young age...
")
Of course some of the heavy metal music and beer drinking is unsuitable for them, too.
Looks great Rob, I'm jealous! But you know what they say, no pain , no gain

However I cannot say if this is even true yet. At worse it may mean "much pain, no gain". If there is a gain, I do not mind SOME pain...
Why not just get quieter mufflers or turn up the tunes louder?
The tunes will definetely get louder, as I have a 50WRMSx4 amp that is going into her once the carpet is installed. This should drive her 6 speakers nicely.
Last edited by Lady72nRob71; January 29th, 2009 at 12:32 PM.
 January 29th, 2009, 12:46 PM
#82
Registered User

Join Date: Apr 2008
Location: Phoenix, AZ
Posts: 1,052
It's Pontiac's V.O.E. system and you can actually get them at Gardner Exhaust! They were (re)built with help from the original designer. By the way, I love that commercial. I think I'm going to go with some flowmaster 40's. They're a chambered muffler and growl pretty good. And a lot cheaper than the VOE.
Definitely looking good Rob. I too, will be swearing in about 6 more weeks or so (when I head back to AZ to work on my car). Haha.
January 29th, 2009, 01:09 PM
#83
Registered User
Thread Starter
Join Date: Feb 2008
Location: Plano, TX
Posts: 11,798
You mean the HUMBLER!!! http://www.youtube.com/watch?v=KGC3dlzQ8WQ
It's Pontiac's V.O.E. system and you can actually get them at Gardner Exhaust! They were (re)built with help from the original designer.
Definitely looking good Rob. I too, will be swearing in about 6 more weeks or so (when I head back to AZ to work on my car). Haha.
It's Pontiac's V.O.E. system and you can actually get them at Gardner Exhaust! They were (re)built with help from the original designer.
Definitely looking good Rob. I too, will be swearing in about 6 more weeks or so (when I head back to AZ to work on my car). Haha.
Pretty awesome for a pretty penny!

I think it would be worth it though...
That just might be Lady's 2011 addition...
By that time, the exhaust pipes may be singing their own song and need replacement anyway; the rust is horrible on them.
Last edited by Lady72nRob71; January 29th, 2009 at 01:12 PM.
January 29th, 2009, 01:16 PM
#84
Registered User
Join Date: Apr 2008
Location: Phoenix, AZ
Posts: 1,052
I got my antique exhaust makers mixed up. Sorry, it's WALDRON's Exhaust. Not Gardner. Here's the link for future usage. There's a good video clip of it on there.
http://waldronexhaust.com/drivercontrolledexhaust.htm
http://waldronexhaust.com/drivercontrolledexhaust.htm
January 29th, 2009, 02:29 PM
#85
Registered
Join Date: Jul 2006
Location: Northeast Ohio
Posts: 4,430
The Humbler, now you're getting into my territory. My Goat sounds like the V.O.E. open version all the time and has a much lopier idle with a Ram-Air IV cam. It has 12 year old Magnaflows and dual exhaust with repo Ram-Air manifolds, gets quieter at freeway speeds, just a deep Tiger growl. They only had that option on the '70 for a few months before they pulled it.
I had a dark blue '70 Goat like "The Humbler". It had a built 400 with a 4 speed, the thing would scream, just kept burning rubber and fishtailing through every shift.
It was a slightly loud with headers dumping into rusted out Cherry Bombs with no tail pipes.
Where did you get six speakers to fit in a 'vert Rob? My GTO just has the kick panel speakers, I feel inadequate.
The wind blows all the tunes away with the top down.
They only had that option on the '70 for a few months before they pulled it.I had a dark blue '70 Goat like "The Humbler". It had a built 400 with a 4 speed, the thing would scream, just kept burning rubber and fishtailing through every shift.
It was a slightly loud with headers dumping into rusted out Cherry Bombs with no tail pipes.
Where did you get six speakers to fit in a 'vert Rob? My GTO just has the kick panel speakers, I feel inadequate.
The wind blows all the tunes away with the top down.
January 30th, 2009, 05:33 AM
#86
Registered User
Thread Starter
Join Date: Feb 2008
Location: Plano, TX
Posts: 11,798
Tom, Good video on that site; I suspected that would be how it would work. I how have a few years to save up for it!
Allan, I did not think you had a goat - way cool...
The more I look through the goat resto book the more I saw it being much more advanced than the Olds versions. The goats were available with factory DCE (for one year), electronic ignition, reverb amp, and even a cassette player (for one year)!
Lady has a cassette player, but it is an '83 aftermarket jap-job and looks way out of place in the dash...
A previous owner had cut holes in the doors (5.25") and quarter armrests (6.5") for speakers, so i decided to go ahead and still use them. I would never had cut them myself. It was hard enough just to cut the new upholstery and door panels for them! So there are 4. The last 2 are in the rear "triangle" behind the rear seat (6x9"). I sealed it up with dynamat, so hopefully it will sound better. Even with just the door and quarter speakers, the sound was pretty loud and clear with the 35Wx2 amp that came with her.
Last summer, a ladyfriend and I were cruising 65 with the top down and the music up loud... She enjoyed it but was worried that I might not hear the cop's sirens if they start chasing us. (Heck, what's the downside of that??)
The tunes will be even louder and fuller soon!
It seems that only her exhaust note gets blown away the faster I drive. Therefore, I need VOE!
Allan, I did not think you had a goat - way cool...
The more I look through the goat resto book the more I saw it being much more advanced than the Olds versions.
The goats were available with factory DCE (for one year), electronic ignition, reverb amp, and even a cassette player (for one year)! Lady has a cassette player, but it is an '83 aftermarket jap-job and looks way out of place in the dash...
A previous owner had cut holes in the doors (5.25") and quarter armrests (6.5") for speakers, so i decided to go ahead and still use them. I would never had cut them myself. It was hard enough just to cut the new upholstery and door panels for them! So there are 4. The last 2 are in the rear "triangle" behind the rear seat (6x9"). I sealed it up with dynamat, so hopefully it will sound better. Even with just the door and quarter speakers, the sound was pretty loud and clear with the 35Wx2 amp that came with her.
Last summer, a ladyfriend and I were cruising 65 with the top down and the music up loud... She enjoyed it but was worried that I might not hear the cop's sirens if they start chasing us. (Heck, what's the downside of that??)
The tunes will be even louder and fuller soon!
It seems that only her exhaust note gets blown away the faster I drive. Therefore, I need VOE!
Last edited by Lady72nRob71; January 30th, 2009 at 05:42 AM.
February 9th, 2009, 09:28 AM
#87
Registered User
Thread Starter
Join Date: Feb 2008
Location: Plano, TX
Posts: 11,798
A week later when more of the dynamat came in, I began installing the foam Dynaliner in the rear of the car. I only got the �” thick stuff, as if you get too tall, the carpet (with its jute backing) will not fit right. This stuff came in 32x54” sheets and I found it was best to cut it into 27x16” pieces to make it more manageable. I went the extra 10 miles by cutting out channels for the wiring to reduce “bulging” through the carpet. I also wanted to keep all important wiring visible and easily accessible in case service is ever required.
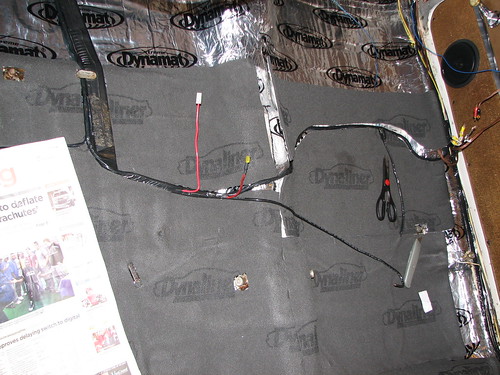
Now working with this is easier than with the extreme. In fact the tackiness was not as good as I hoped for. If you stuck it, it could be removed if needed for adjustment. The only things it stuck really well to were itself and the scissors I used to cut it with… The less tack meant more relief cuts needed to be make for it to lay right against the surface and actually stick. If you do not do this, you will be annoyed later by the sound of it sticking and unsticking with pressure. Lifting your feet off the carpet may sound like lifting them off of a movie theater floor - yuck…
Like the extreme, no scraps were trashed; all were able to be used somewhere.
Here is the back half so far…
Now when the rear section of carpet was test fitted, the fit was not to my liking. Putting your feet down in the floor pan would cause buckling in other places. This ACC carpet had �” recycled cloth jute bonded to it compared to the factory’s �” horse (?) hair jute.
The next day I locally procured a 4x6’ mat of foil-topped 3/8” jute made from recycled blue jeans… I cut pieces to go in the foot wells and any other places that needed “shimming”. After a few hours of trial and error and trimming, I came to a “good” fit. I cut large and had to re-trim a few times, but better too big than too small. I also made the cuts for seat belt bolts, wiring, and the ‘T’ cuts for the seat legs, just like the factory made in my old original carpet.
For the first time in 4 months, the interior was starting to look like that of a car again!
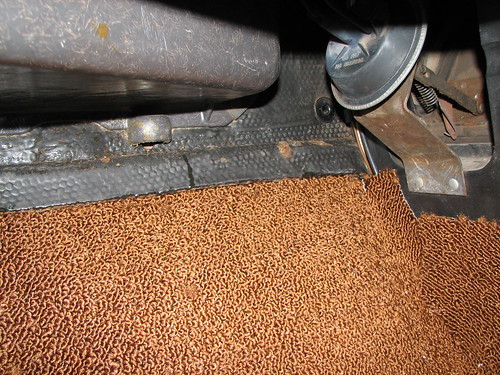
After installing the windlace strips, I noticed the bottom “flaps” (circled in green) were initially curled up and looked tacky.
Being thin plastic, I heated them carefully over the stove (a heatgun would work, too) and bent them down and curled them other way slightly as they cooled. They then sat nice and flat on the carpet.
Now working with this is easier than with the extreme. In fact the tackiness was not as good as I hoped for. If you stuck it, it could be removed if needed for adjustment. The only things it stuck really well to were itself and the scissors I used to cut it with…
The less tack meant more relief cuts needed to be make for it to lay right against the surface and actually stick. If you do not do this, you will be annoyed later by the sound of it sticking and unsticking with pressure. Lifting your feet off the carpet may sound like lifting them off of a movie theater floor - yuck… Like the extreme, no scraps were trashed; all were able to be used somewhere.
Here is the back half so far…
Now when the rear section of carpet was test fitted, the fit was not to my liking. Putting your feet down in the floor pan would cause buckling in other places. This ACC carpet had �” recycled cloth jute bonded to it compared to the factory’s �” horse (?) hair jute.
The next day I locally procured a 4x6’ mat of foil-topped 3/8” jute made from recycled blue jeans… I cut pieces to go in the foot wells and any other places that needed “shimming”. After a few hours of trial and error and trimming, I came to a “good” fit. I cut large and had to re-trim a few times, but better too big than too small. I also made the cuts for seat belt bolts, wiring, and the ‘T’ cuts for the seat legs, just like the factory made in my old original carpet.
For the first time in 4 months, the interior was starting to look like that of a car again!
After installing the windlace strips, I noticed the bottom “flaps” (circled in green) were initially curled up and looked tacky.
Being thin plastic, I heated them carefully over the stove (a heatgun would work, too) and bent them down and curled them other way slightly as they cooled. They then sat nice and flat on the carpet.
February 9th, 2009, 11:52 AM
#88
Registered
Join Date: Jul 2006
Location: Northeast Ohio
Posts: 4,430
It's even prettier now, they should make visible-carpeting.
I had to get some of that duct insulation at home despot to fill in some areas too. I think they form all this carpet it to a sort-of-average worn out floor pan or don't allow or allow too much for that thick original padding when they mold it.
You have to have some original parts in there to maintain the vintage aroma but those new seats probably smell pretty good, mine do. I love the smell of Vinyl outgassing in the morning.
The car could us a little more head room. You sure you don't want to put in a tilt column?
I had to get some of that duct insulation at home despot to fill in some areas too. I think they form all this carpet it to a sort-of-average worn out floor pan or don't allow or allow too much for that thick original padding when they mold it.
You have to have some original parts in there to maintain the vintage aroma but those new seats probably smell pretty good, mine do.
I love the smell of Vinyl outgassing in the morning. The car could us a little more head room. You sure you don't want to put in a tilt column?
February 9th, 2009, 12:04 PM
#89
Moderator
Join Date: Jun 2008
Location: Atlanta, Georgia
Posts: 17,601
February 9th, 2009, 12:34 PM
#90
Registered
Join Date: Jul 2006
Location: Northeast Ohio
Posts: 4,430
 February 9th, 2009, 12:50 PM
#91
Registered User
Thread Starter
Join Date: Feb 2008
Location: Plano, TX
Posts: 11,798
I thought about tilt but then thought "how often would I use it?"
I was happy with the wheel position, at least when i was sitting on the floor in those ratty ol' seats I had...
I have tilt in my Caddy and forget that I do. To me it is a "set and forget" type thing.
My mom always popped her wheel up before getting out for some reason.
I never even thought I had a hard time getting in and out. (Now I may start thinking about it...)
I know your real reason for telling me this -
You guys just want to see that whole dash come out before this thread is done!
February 9th, 2009, 12:55 PM
#92
Registered User
Thread Starter
Join Date: Feb 2008
Location: Plano, TX
Posts: 11,798
 It was very visible on my kitchen floor. In fact, the kitchen looks different with only half the carpet there...
 Those ratty old door panels will be changed in spring. The dash and column (yes, you heard right
) will remain original... I agree, the new seats DO smell nice in my workshop, especially on a warm day. This stuff is very much like the imitation leather used on many lower priced new cars.
February 9th, 2009, 12:57 PM
#93
Moderator
Join Date: Jun 2008
Location: Atlanta, Georgia
Posts: 17,601
February 9th, 2009, 01:10 PM
#94
Registered
Join Date: Jul 2006
Location: Northeast Ohio
Posts: 4,430
Okay Rob, I give, you're on to the conspiracy. We've been caught red-handed but you'll never take me alive.
I will hold myself hostage indefinately and don't try to negotiate for my release.
How about the optional shift lever windshield washer control?
We've been caught red-handed but you'll never take me alive.I will hold myself hostage indefinately and don't try to negotiate for my release.
How about the optional shift lever windshield washer control?
February 9th, 2009, 06:24 PM
#95
Rob,
Just found this post and I have to say, great work! I know how much time and frustration goes into an interior redo. Attention to detail makes all the difference in the world and the extra effort your putting in now will pay off later.
It will be so nice when you finish it you'll probably want to sleep in it!
February 10th, 2009, 04:59 AM
#96
Registered User
Thread Starter
Join Date: Feb 2008
Location: Plano, TX
Posts: 11,798
You know, I really would like that washer control, despite the fact is was discontinued for '72 (according to the assy manual).
I bet finding that shift lever would be a real bear, though...
If you see one for sale, holler at me!
February 10th, 2009, 05:04 AM
#97
Registered User
Thread Starter
Join Date: Feb 2008
Location: Plano, TX
Posts: 11,798
Yes, it has turned into more of a pain than I ever expected, but hopefully I just have to do it once.
Funny you say that i will want to sleep in there...
On Sunday after I finished that back carpet half, I was laying down on the carpet finalizing the wiring. I closed my eyes a for a little bit and thought to myself "I just might want to sleep in here the day it is finished..."
February 10th, 2009, 05:08 AM
#98
Registered User
Thread Starter
Join Date: Feb 2008
Location: Plano, TX
Posts: 11,798
February 10th, 2009, 06:25 AM
#100
Registered
Join Date: Jul 2006
Location: Northeast Ohio
Posts: 4,430
I knew I could hold myself hostage and get away. My other self is on a plane flying to Rio right now, Ha!
I set it and forget it for tilt too, if it's comfortable the way it is why mess with it. I just won't physically fit in the car without being squeezed or I would have left mine alone too.
That lever for the washer must be pretty rare, never have actually seen one live myself. I never knew the tilt shift lever was longer until I got mine and that one would probably be even more rare. It looks like a pretty easy intallation, a lever with a botton on it and a jumper harness for the switch? So you have two washer buttons? I would use it every day.
I want to get an Olds 8-track, much cooler and I have my Deep Purple Machine Head tape all ready for when I do.
My other self is on a plane flying to Rio right now, Ha!I set it and forget it for tilt too, if it's comfortable the way it is why mess with it. I just won't physically fit in the car without being squeezed or I would have left mine alone too.
That lever for the washer must be pretty rare, never have actually seen one live myself. I never knew the tilt shift lever was longer until I got mine and that one would probably be even more rare. It looks like a pretty easy intallation, a lever with a botton on it and a jumper harness for the switch? So you have two washer buttons? I would use it every day.
I want to get an Olds 8-track, much cooler and I have my Deep Purple Machine Head tape all ready for when I do.
Last edited by Bluevista; February 10th, 2009 at 06:27 AM.
February 10th, 2009, 07:56 AM
#101
Registered User
Join Date: Nov 2007
Location: Rathdrum, Idano
Posts: 9,127
When I get my 48 ready I will ship it to you for the floor work. Less work and expense then doing it myself. also less damage to the hands. Good job Rob. You will do mine for the experence correct?
February 10th, 2009, 09:31 AM
#102
Registered User
Thread Starter
Join Date: Feb 2008
Location: Plano, TX
Posts: 11,798
Buy a 5 pack of the extreme, pull off the backings and surround your garage with them sticky side up... I am convinced they would be efficient glue traps for bears...
J/K... I think OPG is now making the 8-track housings but have not seen any mechanisms yet... Just make sure that 455 is tuned and ready to run! I would like some experience of what a 455 can do!
February 11th, 2009, 07:57 PM
#104
Registered
Join Date: Jul 2006
Location: Northeast Ohio
Posts: 4,430
 6'2 and 190 pounds, my legs are too long for the car. I have the tilt column in and it's coo-doo now.
 I don't think they're ever going to repo those 8-track players, but you never know, other divisions used the same basic unit. Even if you have the player it's another 250 bucks for the housing, faceplate and surround, ***** are another 80 bucks. They usually have cracked housings because they're missing the rear brace and the front surrounds always seem to be warped. I see a lot with the plugs cut off for some reason? Did the service units come with no plugs and the technicians use the plugs from the old bad units? Got me.
February 13th, 2009, 10:06 AM
#105
Registered User
Thread Starter
Join Date: Feb 2008
Location: Plano, TX
Posts: 11,798
Many thanks Eddie! It is looking even better now - look below!
That is probably from ex-owners trying to hook them to other equipment. Those units for sale BETTER be guaranteed to not be DOA...No telling how they hooked them up if not into original radios and speakers.
It is looking even better now - look below! Those units for sale BETTER be guaranteed to not be DOA...No telling how they hooked them up if not into original radios and speakers.
February 13th, 2009, 10:09 AM
#106
Registered User
Thread Starter
Join Date: Feb 2008
Location: Plano, TX
Posts: 11,798
The second week in February, I called dealer cost car audio again to find out where my last roll of Dynaliner was. After almost 4months of hassles, their story changed AGAIN and it is now on backorder again! Screw these guys – I got an instant refund (hopefully if their conf. # means anything) and paid an extra $17 and got it locally. I had a good feeling on doing that and now the log-jamb was free! (And just in time for the good weather!) I got the new hard-to-find weatherstrip for my old Ford, too, so now I feel the need to really get busy!
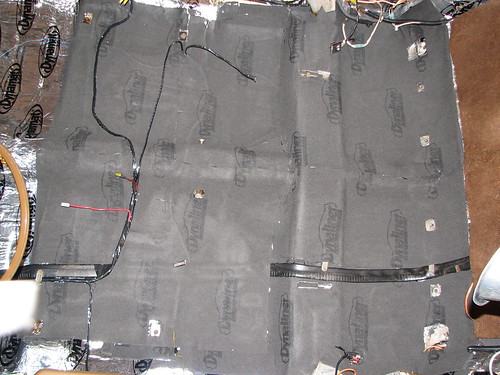
I finalized fitting the front of Lady with the dynaliner. The tranny hump made it a little difficult, so I had to use smaller pieces and cut creatively. I just had to keep myself from rushing, as this is time consuming to put down, contrary to how it is stated in the instructions. I again cut a channel for the main wiring bundle, to reduce carpet bulging. Here it is so far:

Next logical step was to get the rest of the carpet out of my kitchen and into the car! I kicked up some major dust bunnies in the process , but at least I can walk across the floor now! The room seems twice the size now.
Here brings a little disappointment. The fit of this carpet is not the best and the placement of the thin jute on the back was as good as the factory did… The carpet was formed with the tranny tunnel too high. I had to add about an inch of extra jute on the tunnel to take up the slack.
--Richard, if you are reading this, you may be happier than I was, since you modified your tunnel to be higher for your shifter. I also ended up having to add a �” layer of jute to the front floor pans. SO, if you are installing carpet, get a 4x6’ sheet (or two) of the cheap jute for padding and shimming. If you can get it locally, that is better so you can return it easily, should your carpet fit better than my ACC carpet. Maybe Lady’s body is just “different” then all the others; I hear many women saying that same thing when clothes shopping…
Proper carpet fitting took many removal and installations, which was frustrating and time consuming. However, patience is key, along with some rock ‘n’ roll, a couple cold beers, and some breaks to walk around…
Total carpet trimming was about 2” from the left, 3” from the right, and 1” from the front that goes under the dash.
The latter is when stupidity got me, as it gets all of us now and then… I always say to cut smaller if in doubt, since you can always cut off more. Just because I preach it, does not mean I always abide by it. In the next picture, you can see where I whacked too much off the front – the carpet no longer tucks under the firewall insulator.
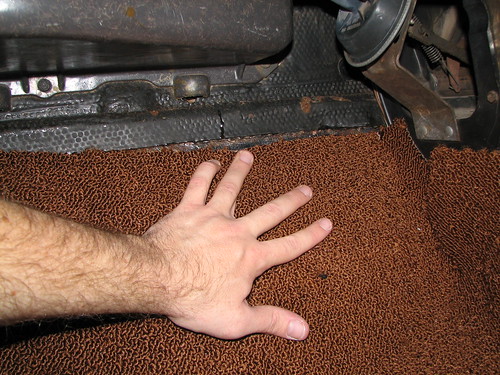
This is not only cosmetic, but it pops out a little if pressure is placed in certain area of the toe area. I was PO’e d to say the least. I could not grow it back, but I thought I could at least glue it back. I found the exact scrap of the piece I cut off and matched up the cut edges. I thought about foil tape or carpet tape to bond them together, but the life of those was questionable. Hmmm… What would have 10 times the tackiness and would last a long, long time?? It took no time for me to remember this stuff:

I laid this strip of Dynamat over the former scrap strip below and adhered it to the rest of the carpet on top, keeping the joint closed as I firmly applied the mat. Once stuck, it would not let go!
I tucked the now-extended carpet under the firewall pad and I was happy – great fit and no lines!
The brown blob in the middle is just fuzz…
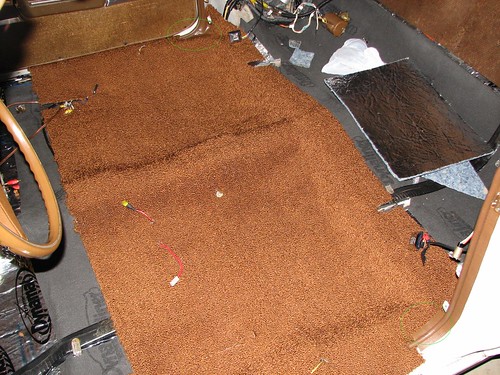
So after a lot more fitting and jute cutting, here is the end result, sans seat belts, amp, & dimmer switch grommet:

After a one too many beers and at the end of the day, I was wore out. A good song came on and I laid back to enjoy it. My neighbor, who liked the song I on, had come over at just the right time, quietly picked up my camera that was on the trunk lid, and got this surprise shot of me “laying down on the job”!
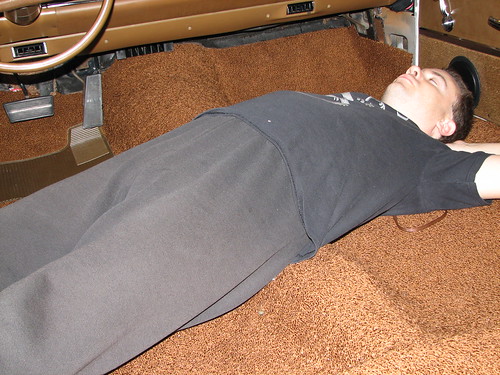
I tell ya, I was not sleeping, I was thinking with my eyes closed! Looks comfy, huh?? Actually, not too bad (for those 5 minutes or so…)
Can you believe I had back surgery 2 years ago?? Not by seeing me like that…
Screw these guys – I got an instant refund (hopefully if their conf. # means anything) and paid an extra $17 and got it locally. I had a good feeling on doing that and now the log-jamb was free! (And just in time for the good weather!) I got the new hard-to-find weatherstrip for my old Ford, too, so now I feel the need to really get busy!I finalized fitting the front of Lady with the dynaliner. The tranny hump made it a little difficult, so I had to use smaller pieces and cut creatively. I just had to keep myself from rushing, as this is time consuming to put down, contrary to how it is stated in the instructions. I again cut a channel for the main wiring bundle, to reduce carpet bulging. Here it is so far:
Next logical step was to get the rest of the carpet out of my kitchen and into the car!
I kicked up some major dust bunnies in the process , but at least I can walk across the floor now! The room seems twice the size now. Here brings a little disappointment.
The fit of this carpet is not the best and the placement of the thin jute on the back was as good as the factory did… The carpet was formed with the tranny tunnel too high. I had to add about an inch of extra jute on the tunnel to take up the slack. --Richard, if you are reading this, you may be happier than I was, since you modified your tunnel to be higher for your shifter. I also ended up having to add a �” layer of jute to the front floor pans. SO, if you are installing carpet, get a 4x6’ sheet (or two) of the cheap jute for padding and shimming. If you can get it locally, that is better so you can return it easily, should your carpet fit better than my ACC carpet. Maybe Lady’s body is just “different” then all the others; I hear many women saying that same thing when clothes shopping…
Proper carpet fitting took many removal and installations, which was frustrating and time consuming. However, patience is key, along with some rock ‘n’ roll, a couple cold beers, and some breaks to walk around…
Total carpet trimming was about 2” from the left, 3” from the right, and 1” from the front that goes under the dash.
The latter is when stupidity got me, as it gets all of us now and then… I always say to cut smaller if in doubt, since you can always cut off more. Just because I preach it, does not mean I always abide by it.
In the next picture, you can see where I whacked too much off the front – the carpet no longer tucks under the firewall insulator. This is not only cosmetic, but it pops out a little if pressure is placed in certain area of the toe area. I was PO’e d to say the least.
I could not grow it back, but I thought I could at least glue it back. I found the exact scrap of the piece I cut off and matched up the cut edges. I thought about foil tape or carpet tape to bond them together, but the life of those was questionable. Hmmm… What would have 10 times the tackiness and would last a long, long time?? It took no time for me to remember this stuff: I laid this strip of Dynamat over the former scrap strip below and adhered it to the rest of the carpet on top, keeping the joint closed as I firmly applied the mat. Once stuck, it would not let go!
I tucked the now-extended carpet under the firewall pad and I was happy – great fit and no lines!
The brown blob in the middle is just fuzz…
So after a lot more fitting and jute cutting, here is the end result, sans seat belts, amp, & dimmer switch grommet:
After a one too many beers and at the end of the day, I was wore out. A good song came on and I laid back to enjoy it. My neighbor, who liked the song I on, had come over at just the right time, quietly picked up my camera that was on the trunk lid, and got this surprise shot of me “laying down on the job”!
I tell ya, I was not sleeping, I was thinking with my eyes closed! Looks comfy, huh??
Actually, not too bad (for those 5 minutes or so…) Can you believe I had back surgery 2 years ago?? Not by seeing me like that…
Last edited by Lady72nRob71; February 13th, 2009 at 10:21 AM.
February 13th, 2009, 10:31 AM
#108
Registered User
Join Date: Jan 2008
Location: South River, New Jersey
Posts: 3,515
Nice Save Rob!!
Nice Save on the carpet rob!! I was thinking about that stuff they use on home carpeting where you use this iron thingy, heats it up and voila no seam, but your Idea worked excellent !!! NICE!!!
The Lady is Looking great!!
The Lady is Looking great!!
February 13th, 2009, 10:55 AM
#109
Registered
Join Date: Jul 2006
Location: Northeast Ohio
Posts: 4,430
Sleeping it off huh? That's what's nice about a wagon. A Vista has a big window to look out too, also has sunvisors and under floor beer cooler in the back.
I told you we all learn from your mistakes. I'll still make the same mistakes but now I know how to fix them.
The same basic technique the carpet intallation dudes use, did you have to get real drunk to think like one?

Looks real good, you could run over a land mine and you wouldn't even hear it, the shrapnel wouldn't get through that floor either.
A liitle off topic but in your avatar the plate says OTRWOMN.
What's an Otterwoman??

Last edited by Bluevista; February 13th, 2009 at 11:00 AM. Reason: ignorance
February 14th, 2009, 08:39 PM
#110
Registered User
Thread Starter
Join Date: Feb 2008
Location: Plano, TX
Posts: 11,798
No blood was shed this time. It seems I rarely hurt myself on big jobs, but more on little stupid stuff. I still cannot believe I almost lost a fingertip by just cutting the insulation off of a stupid crimp terminal...
One thing is noticable on lady now - the doors close with a very deep, solid sound even though I did not put anything in the doors yet!
I asked the previous owner the same thing... He said OTHRWMN was already taken in SC!
Cute critter pic!
Last edited by Lady72nRob71; February 14th, 2009 at 08:45 PM.
February 14th, 2009, 08:51 PM
#111
Registered User
Thread Starter
Join Date: Feb 2008
Location: Plano, TX
Posts: 11,798
The next day was accelerated progress! I finished shimming the edges of the carpet first. The seat belts went in and I did something a little different for sealing the bolts. Instead of gooping the whole bolt and bracket ***�y like the factory did, I used Teflon plumbing tape on the bolt threads. When I get under the car later, I will strip-caulk them also. Much less mess! One thing I did notice, is the that the inner seatbelts should be installed before trimming the outer carpet edges or cutting outer holes for the seatbelt retractors or seat legs. My cuts were off a little, but were easily adjusted.
The dimmer switch grommet was installed, along with the plastic column cover. More shimming was done to reduce panel to carpet gaps. The kick panel insulation was hot-glued to the panels to eliminate messing with smelly, fumey contact cement. The �T� cuts for the seat legs were cut afterwards.
Lastly, the new stereo amplifier was installed. It is a German MB-Quart DCS450 50WRMS x 4 unit that fits back under the passenger seat where the old one was. It is pictured below. Although a six channel would have been better, the space under the seat was limited. I am not seeking any sound contests anyway� I mounted the amp on a thin piece of masonite, to keep the carpet from blocking air vents at the bottom, as recommended by the mfr.
Here is a picture of the completed carpeting job:
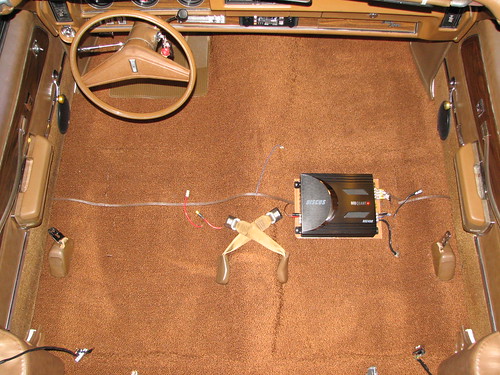
The rear 6x9 speakers were connected to CH3&4 and crossover set as full range.
The front door and rear quarter speakers are currently wired in parallel and connected to CH1&2. Although this amp will happily drive a 2 Ohm load, it may only see them as 3 Ohm since the 5.25� front door speakers already have bass-blocking caps on them. The rear quarter speakers are 6.5� with no caps on them. These four are high-pass-filtered at the amp at about 50Hz. This acts more like a subsonic filter, as these small speakers are incapable of producing deep bass and there is no sense wasting power and creating damaging distortion making them do something they can not.
It took a while to get everything set up and balanced correctly and I can always fine tune it later.
All I need now are rear quarter panels back from legendary and get the seats put in!
To celebrate this milestone, I grabbed a cold beer, put the charger on the battery, and cranked up the Outlaws� �Green grass and High Tides.� How loud one may ask?? All I can say is that my ears were ringing for a few hours afterwards - they put on a very wild guitar performance!!
I finished shimming the edges of the carpet first. The seat belts went in and I did something a little different for sealing the bolts. Instead of gooping the whole bolt and bracket ***�y like the factory did, I used Teflon plumbing tape on the bolt threads. When I get under the car later, I will strip-caulk them also. Much less mess! One thing I did notice, is the that the inner seatbelts should be installed before trimming the outer carpet edges or cutting outer holes for the seatbelt retractors or seat legs. My cuts were off a little, but were easily adjusted. The dimmer switch grommet was installed, along with the plastic column cover. More shimming was done to reduce panel to carpet gaps. The kick panel insulation was hot-glued to the panels to eliminate messing with smelly, fumey contact cement. The �T� cuts for the seat legs were cut afterwards.
Lastly, the new stereo amplifier was installed. It is a German MB-Quart DCS450 50WRMS x 4 unit that fits back under the passenger seat where the old one was. It is pictured below. Although a six channel would have been better, the space under the seat was limited. I am not seeking any sound contests anyway� I mounted the amp on a thin piece of masonite, to keep the carpet from blocking air vents at the bottom, as recommended by the mfr.
Here is a picture of the completed carpeting job:
The rear 6x9 speakers were connected to CH3&4 and crossover set as full range.
The front door and rear quarter speakers are currently wired in parallel and connected to CH1&2. Although this amp will happily drive a 2 Ohm load, it may only see them as 3 Ohm since the 5.25� front door speakers already have bass-blocking caps on them. The rear quarter speakers are 6.5� with no caps on them. These four are high-pass-filtered at the amp at about 50Hz. This acts more like a subsonic filter, as these small speakers are incapable of producing deep bass and there is no sense wasting power and creating damaging distortion making them do something they can not.
It took a while to get everything set up and balanced correctly and I can always fine tune it later.
All I need now are rear quarter panels back from legendary and get the seats put in!
To celebrate this milestone, I grabbed a cold beer, put the charger on the battery, and cranked up the Outlaws� �Green grass and High Tides.� How loud one may ask?? All I can say is that my ears were ringing for a few hours afterwards - they put on a very wild guitar performance!!
February 16th, 2009, 04:33 AM
#113
Registered
Join Date: Jul 2006
Location: Northeast Ohio
Posts: 4,430
I bet that beer tasted good, just one?
So do you have two sets of messed up rear panels now?
I think you need seats now too, or you could drive standing up like the milkmen did. You have to dead-man the brakes so they release when you push the pedal down on those.
I think I saw the Outlaws a long time ago, my memory is fuzzy at best from those concert days, seem to remember they had 3 or 4 lead guitars.
I do recall shooting down the giant Pink Floyd pig with bottle rockets.
So do you have two sets of messed up rear panels now?
I think you need seats now too, or you could drive standing up like the milkmen did.
You have to dead-man the brakes so they release when you push the pedal down on those.I think I saw the Outlaws a long time ago, my memory is fuzzy at best from those concert days, seem to remember they had 3 or 4 lead guitars.
I do recall shooting down the giant Pink Floyd pig with bottle rockets.
February 16th, 2009, 05:35 AM
#114
Registered User
Thread Starter
Join Date: Feb 2008
Location: Plano, TX
Posts: 11,798
Seats??
And cover up that sharp looking, time consuming carpet job??
Yep, one MORE!
That was what I ended up with. The Legendary rep finally asked for me to send in my original quarter panels so they can measure and be sure to fab them right. I was hesitant to do this, but I put my trust in them. They paid the shipping, too.
I joked with him about transfering the plastic rail to the new panel also, and he offered to do so at no charge, just for all the inconvenience i went through.
Soooo, I am still waiting for the return of my panels, after over a month now.
Once I get them, the rear section can be easily completed.
I recall myself standing up one time behind the wheel, imagining if I could really drive that way... That was the effects of 3 beers. (I was trapped in the garage, so the neighborhood was safe.)
Yea, I guess I should install the seats next...
I saw them in concert at the AR HOG Rally 4 years ago in Ft Smith... They did have several lead guitarists - I need to look back at the pictures I took then.
That had to have been my favorite concert so far. It was good enough that I preferred standing at the stage, 8' from the speakers...
I could not hear well for a few days but it was worth it.
I searched hi and lo for those songs they played but failed in every way.
Then one time I was at Half Price Books with a lady friend and found the cassette tape of them - live in concert!!
Like I always believe, people meet up with each other for a reason...
And cover up that sharp looking, time consuming carpet job??
Yep, one MORE!
That was what I ended up with. The Legendary rep finally asked for me to send in my original quarter panels so they can measure and be sure to fab them right. I was hesitant to do this, but I put my trust in them. They paid the shipping, too.
I joked with him about transfering the plastic rail to the new panel also, and he offered to do so at no charge, just for all the inconvenience i went through.
Soooo, I am still waiting for the return of my panels, after over a month now.
Once I get them, the rear section can be easily completed.
That was the effects of 3 beers. (I was trapped in the garage, so the neighborhood was safe.)Yea, I guess I should install the seats next...
That had to have been my favorite concert so far. It was good enough that I preferred standing at the stage, 8' from the speakers...
I could not hear well for a few days but it was worth it.
I searched hi and lo for those songs they played but failed in every way.
Then one time I was at Half Price Books with a lady friend and found the cassette tape of them - live in concert!!
Like I always believe, people meet up with each other for a reason...
Last edited by Lady72nRob71; February 16th, 2009 at 05:40 AM.
 February 27th, 2009, 08:58 AM
#116
Registered User
Thread Starter
Join Date: Feb 2008
Location: Plano, TX
Posts: 11,798
A lot has happened since the last update - in fact so much I just got the pics pulled from the camera...
Last weekend, Carl (HAMM36 from this forum) came over and helped me get the front bench seat installed. He also provided me with the genuine GM seat mounting bolts to replace the four mismatched misfits that came with the car. Many thanks, Carl!
Before installation, I pulled the amp’s circuit breaker and re-snugged the amp’s wiring connections, as the latter will be very difficult to do once the seat is installed.
While it seems like this would be a simple drop-in-bolt-in procedure, it was not.
I had neglected to cut away enough dynamat away from the seat legs, so I had to do that on all four locations while supporting the seat on wood blocks.
Also, the addition of the dynamat and extra jute under the carpet caused the seat to catch on the tranny tunnel at both extremes of seat fore and aft movement. I needed the seat all the way back, so I had used fender spacers (a good idea, Carl!) under the seat legs (four in rear, three in front). I had to use different bolts in back, but that was fine – can’t see them anyway… The seat was previously mounted on wood blocks, as if the PO had similar problems...
The amplifier was almost too big, as the seat release cable would catch on it…
But what a difference these new seats made, both in appearance and comfort!
Of course, now the interior looks a lot smaller though, hehe… Here are the front seats:

One thing I have noticed is that the seats feel a lot firmer when in the car than out, mainly due to the differences in seating positions. If I ever did this again, I would use the blue mid-firmness foam all the way through, even on the lumbar support. I took her out for a short drive, mainly to suck the cobwebs out of the carb and to fill up the gas tank which was holding 3 gallons of 5-month-old fuel.
(The header strip will be replaced later, as mine is in bad shape.)
Last weekend, Carl (HAMM36 from this forum) came over and helped me get the front bench seat installed. He also provided me with the genuine GM seat mounting bolts to replace the four mismatched misfits that came with the car. Many thanks, Carl!
Before installation, I pulled the amp’s circuit breaker and re-snugged the amp’s wiring connections, as the latter will be very difficult to do once the seat is installed.
While it seems like this would be a simple drop-in-bolt-in procedure, it was not.
I had neglected to cut away enough dynamat away from the seat legs, so I had to do that on all four locations while supporting the seat on wood blocks.
Also, the addition of the dynamat and extra jute under the carpet caused the seat to catch on the tranny tunnel at both extremes of seat fore and aft movement. I needed the seat all the way back, so I had used fender spacers (a good idea, Carl!) under the seat legs (four in rear, three in front). I had to use different bolts in back, but that was fine – can’t see them anyway… The seat was previously mounted on wood blocks, as if the PO had similar problems...
The amplifier was almost too big, as the seat release cable would catch on it…
But what a difference these new seats made, both in appearance and comfort!
Of course, now the interior looks a lot smaller though, hehe… Here are the front seats:
One thing I have noticed is that the seats feel a lot firmer when in the car than out, mainly due to the differences in seating positions. If I ever did this again, I would use the blue mid-firmness foam all the way through, even on the lumbar support. I took her out for a short drive, mainly to suck the cobwebs out of the carb and to fill up the gas tank which was holding 3 gallons of 5-month-old fuel.
(The header strip will be replaced later, as mine is in bad shape.)
Last edited by Lady72nRob71; March 19th, 2009 at 12:42 PM.
February 27th, 2009, 09:04 AM
#117
Registered User
Thread Starter
Join Date: Feb 2008
Location: Plano, TX
Posts: 11,798
Two days ago, just in time for some very warm weather, the rebuilt quarter panels finally came in from Legendary.
A big change from the inversely-faded originals!
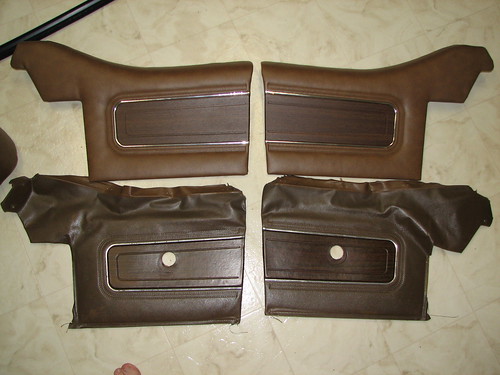
It took them more than a month and a half to get these made right for me but they sure looked good though! They are very solid, as they used a double thickness of wood. They were nice enough to transfer my rails on to the new panels for me!
After some trial fitting, I marked the openings for the window switches from the backside through the quarter vent hole. I cut the holes for the switches with a template I made from doing the door lock switch openings. I cut only on the back of the panels in case of knife slippage.

I had to notch in a little for the switch clips because of the thick wood; I did not have the metal insert rings. Afterwards the window felts were reattached using the same staples and rail holes. Bending the staples over was done with a 3/8 brass hex nut and channel-lock pliers. This worked very well with just the right hand motions; see attached picture below for technique.
The mounting clips were installed into the panels and the not-so-useful watershields were taped on.
Here is an assembled quarter panel:
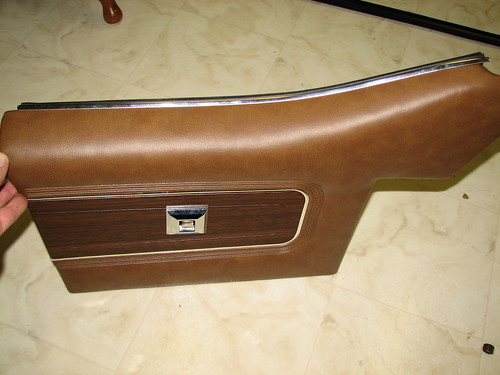
The quarter window “U” seals had to be trimmed down to fit better under the panels’ edge lips; see attached picture below.
The new quarter panels were installed and lined up perfectly; Legendary’s workmanship was very good. Reinstalling the rear armrest panels and cylinder covers were the biggest challenge. Even though they fit well before, the trim shop that installed the new upholstery decided to do me a favor by straightening out the bent-up end pieces that secured the panels to the trunk area. Well, they were bent for a reason, so they would fit! I had to reform the metal to make them fit again; not an easy task. Sheet metal vice-grips helped some. Small screwdrivers inserted through the screw holes were used to line up the panels to the mounting ears during the alignment stage. Jute was removed from under the carpet directly under the armrests. One hole had to be redrilled on the left trunk bracket. The seatback board was installed and finally, the chrome trim parts and electrical items. I formed some dynamat around the back side of the rear window switches and stuck them on inside the quarters by reaching in through the pillar vents. See attached picture below.
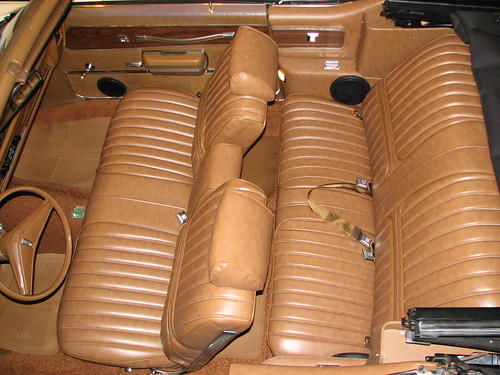
Here are the finished quarters!

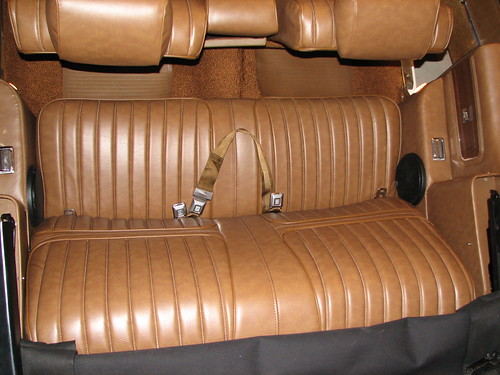
After testing the courtesy lights, radio, and rear windows, the back seat was installed.
Amazingly, everything worked well first shot and the windows even went DOWN when the switches were pushed down!
Keep in mind when I bought the car, the rear armrests were already cut for speakers – I would not have done that myself. The holes & grilles were there but the speakers were removed when the top cylinders were replaced. The cylinders had ran into the speakers and had caused some structural damage that the top-shop then repaired.
The speakers that I installed there are special low-depth Pyle models which easily clear the moving top cylinders. They sound quite good!
The back seat bottom, being new and fatter than the old one, was difficult to install with the front seat in. However, I used some chunks of wood to lever it in against the front seat carpeted area (which was of course heavily padded with towels to prevent damage.
The sill plates were installed, the cleaned-up floor mats were tossed in and the interior is done (aside from the doors!
If my plastic dying skills are good enough, I would like to dye/paint those speaker trim rings and grilles also!
I grabbed another beer and cranked up some loud rock and roll! Now the radio sounded great with the back end all assembled. However, it sounded (and felt) best when sitting in the middle of the back seat, which quickly earned its classification as the “rumble seat”! It almost makes for a massager at high volume!
One mistake I made which I will fix today is that the back two center seatbelt groups need to be bolted in with the webbing going UP. Doing this will increase the length of the belts. It is funny that I woke up at 1am, thought about this, and looked it up in the body manual to confirm… The Olds Gods have control of me I suppose…
Coming soon:
The doors - hinge repair, dynamat addition, power window conversion, door wiring boot installation, and door trim panel replacement.
A big change from the inversely-faded originals!
It took them more than a month and a half to get these made right for me but they sure looked good though! They are very solid, as they used a double thickness of wood. They were nice enough to transfer my rails on to the new panels for me!
After some trial fitting, I marked the openings for the window switches from the backside through the quarter vent hole. I cut the holes for the switches with a template I made from doing the door lock switch openings. I cut only on the back of the panels in case of knife slippage.
I had to notch in a little for the switch clips because of the thick wood; I did not have the metal insert rings. Afterwards the window felts were reattached using the same staples and rail holes. Bending the staples over was done with a 3/8 brass hex nut and channel-lock pliers. This worked very well with just the right hand motions; see attached picture below for technique.
The mounting clips were installed into the panels and the not-so-useful watershields were taped on.
Here is an assembled quarter panel:
The quarter window “U” seals had to be trimmed down to fit better under the panels’ edge lips; see attached picture below.
The new quarter panels were installed and lined up perfectly; Legendary’s workmanship was very good.
Reinstalling the rear armrest panels and cylinder covers were the biggest challenge. Even though they fit well before, the trim shop that installed the new upholstery decided to do me a favor by straightening out the bent-up end pieces that secured the panels to the trunk area. Well, they were bent for a reason, so they would fit! I had to reform the metal to make them fit again; not an easy task. Sheet metal vice-grips helped some. Small screwdrivers inserted through the screw holes were used to line up the panels to the mounting ears during the alignment stage. Jute was removed from under the carpet directly under the armrests. One hole had to be redrilled on the left trunk bracket. The seatback board was installed and finally, the chrome trim parts and electrical items. I formed some dynamat around the back side of the rear window switches and stuck them on inside the quarters by reaching in through the pillar vents. See attached picture below. Here are the finished quarters!
After testing the courtesy lights, radio, and rear windows, the back seat was installed.
Amazingly, everything worked well first shot and the windows even went DOWN when the switches were pushed down!
Keep in mind when I bought the car, the rear armrests were already cut for speakers – I would not have done that myself. The holes & grilles were there but the speakers were removed when the top cylinders were replaced. The cylinders had ran into the speakers and had caused some structural damage that the top-shop then repaired.
The speakers that I installed there are special low-depth Pyle models which easily clear the moving top cylinders. They sound quite good!
The back seat bottom, being new and fatter than the old one, was difficult to install with the front seat in. However, I used some chunks of wood to lever it in against the front seat carpeted area (which was of course heavily padded with towels to prevent damage.
The sill plates were installed, the cleaned-up floor mats were tossed in and the interior is done (aside from the doors!
If my plastic dying skills are good enough, I would like to dye/paint those speaker trim rings and grilles also!
I grabbed another beer and cranked up some loud rock and roll!
Now the radio sounded great with the back end all assembled. However, it sounded (and felt) best when sitting in the middle of the back seat, which quickly earned its classification as the “rumble seat”! It almost makes for a massager at high volume! One mistake I made which I will fix today is that the back two center seatbelt groups need to be bolted in with the webbing going UP. Doing this will increase the length of the belts. It is funny that I woke up at 1am, thought about this, and looked it up in the body manual to confirm… The Olds Gods have control of me I suppose…
Coming soon:
The doors - hinge repair, dynamat addition, power window conversion, door wiring boot installation, and door trim panel replacement.
Last edited by Lady72nRob71; February 27th, 2009 at 09:14 AM.
February 27th, 2009, 12:22 PM
#118
Registered User
Join Date: Nov 2007
Location: Rathdrum, Idano
Posts: 9,127
Rob,
Great detail and finish. The pictures tell the story of your quality work. This has been a great thread to show all of the work that goes in to a full interior remake. keep up the good work.
Great detail and finish. The pictures tell the story of your quality work. This has been a great thread to show all of the work that goes in to a full interior remake. keep up the good work.


