
Interior makeover

Thread Starter
Registered User
Joined: Feb 2008
Posts: 11,798
From: Plano, TX
Thread Starter
Registered User
Joined: Feb 2008
Posts: 11,798
From: Plano, TX
Thanks Richard...
I am very well, indeed, both in Billy's work and my own!
Whenever I get the ol' gal put back together, I will bring her on by for you to see. I think by that time, your '66 will be rolling as well.
I would definetly recommend Yoboy Enterprises for any future upholstery jobs, home or auto...
I am very well, indeed, both in Billy's work and my own!
Whenever I get the ol' gal put back together, I will bring her on by for you to see. I think by that time, your '66 will be rolling as well.
I would definetly recommend Yoboy Enterprises for any future upholstery jobs, home or auto...
Thread Starter
Registered User
Joined: Feb 2008
Posts: 11,798
From: Plano, TX
Well, progress has slowed to a crawl...
Still waiting on the %$@&! dynamat stuff that does not seem to want to ship out...
The door and quarter panels arrived Friday. I checked them over real good and the front ones were very good - no complaints.
The rear ones were a different story (they were QC stamped monday 12-1-08, so I guess the QC people were still hung over from the weekend...)
There are four issues per panel, X both panels; note the pictures attached.
1 � The wood panels are installed backwards � the crank hole and clip hole are not in the right place.
2 � The small hole for the clip is angled in the opposite direction, even if the wood panel was installed right.
3 � The upholstery was installed over �� too high. The bottom of the lower chrome trim should be 3 1/8� above the bottom of the panel; the new is 3 7/8� above.
4 � The front edges of the upholstery was not wrapped all the way around the top edgee of the wood panels.
I have a complaint in with Legendary; I think they should correct this somehow... If it ain't one thing its another...
In the meantime I need to get the rear power window regulators in. I have to use 1/2" spacers to get it to align with the glass channel...
Last edited by Lady72nRob71; Dec 15, 2008 at 11:18 AM.
Thread Starter
Registered User
Joined: Feb 2008
Posts: 11,798
From: Plano, TX
Here is their reply I just got:
Robert
I have reviewed your pictures and determined that I will make a new set of door panels for you at no cost.please discard the old panels when the new ones arrive.
If you have any questions please contact me.
I do not think they could have handled this any better... I am glad they live up to their corporate slogan! They may just had had a new guy making the rear panels...
Does anyone know where to get the plastic rails that staple to the top of the rear panels? I just noticed one of mine is missing a screw tab...
Robert
I have reviewed your pictures and determined that I will make a new set of door panels for you at no cost.please discard the old panels when the new ones arrive.
If you have any questions please contact me.
I do not think they could have handled this any better... I am glad they live up to their corporate slogan!
They may just had had a new guy making the rear panels... Does anyone know where to get the plastic rails that staple to the top of the rear panels? I just noticed one of mine is missing a screw tab...

Registered User
Joined: May 2008
Posts: 651
From: Dallas
"I have a complaint in with Legendary; I think they should correct this somehow... If it ain't one thing its another... "
Rob, And your right if it is not one thing it is something else. I did let the small thing go a year ago with my door panels from PUI, they swapped the first pair, and screwed up my chrome trim around the wood grain on the second pair. I let it slide, just tried of paying for shipping back to them and the bs. I paid the extra to have them assembled.
Last edited by hamm36; Dec 16, 2008 at 08:32 PM.
Thread Starter
Registered User
Joined: Feb 2008
Posts: 11,798
From: Plano, TX
Many thanks!
I keep saying that myself, despite how picky i really am!
The only part i did not like was how Legendary made their headrest covers; it was quite differest from original. The fit was not great either but the shop did pretty good with them anyway...
When she gets put all back together, I am doing for a LONG drive!
Thread Starter
Registered User
Joined: Feb 2008
Posts: 11,798
From: Plano, TX
I found an online place that had it for less than half than FC and had free shipping. I got what I paid for...
I decided to do the whole car, so I needed lots of this stuff. Now that is has gotten so cold and I am fighting with the power windows, the delay is not as concerning now...
Thread Starter
Registered User
Joined: Feb 2008
Posts: 11,798
From: Plano, TX
How do you dye with fire?? 
(That was how I first interpreted it anyway...)
The headrests are not too bad. The color match is perfect; just missing the piping on the edges; it was a little puckered, too. I figured I can always pop out the headrests and redo 'em later if I really wanted to. I do still have the old covers.
I have yet to find a dye that matches well enough. The upholstery shop's was too light and the year-one stuff I have is too dark. I really need to try some others before I do my new armrests.
As for the fire, I have really thought about installing a small wood stove in the garage and fuel it with all the junk mail I get at home and the worthless documents I get at work... Using just that, I would have free heat in there all winter!") Of course there is still the problem of the garage being too small...
Of course there is still the problem of the garage being too small...
I never thought I would be restoring a car when i had the house & garage built... If I did, it would be bigger and insulated with a window, heat and A/C... I do foresee moving in the future so I am not making big mods to it now. Like they say, hindsight is 20/20...
(That was how I first interpreted it anyway...)
The headrests are not too bad. The color match is perfect; just missing the piping on the edges; it was a little puckered, too. I figured I can always pop out the headrests and redo 'em later if I really wanted to. I do still have the old covers.
I have yet to find a dye that matches well enough. The upholstery shop's was too light and the year-one stuff I have is too dark. I really need to try some others before I do my new armrests.
As for the fire, I have really thought about installing a small wood stove in the garage and fuel it with all the junk mail I get at home and the worthless documents I get at work... Using just that, I would have free heat in there all winter!
Of course there is still the problem of the garage being too small... I never thought I would be restoring a car when i had the house & garage built... If I did, it would be bigger and insulated with a window, heat and A/C... I do foresee moving in the future so I am not making big mods to it now. Like they say, hindsight is 20/20...
Last edited by Lady72nRob71; Dec 17, 2008 at 10:07 AM.
Moderator
Joined: Jun 2008
Posts: 18,061
From: Atlanta, Georgia
Let me try this again.
Since it's cold, come in from the garage and build a fire in the house.
If your headrest aren't up to snuff, buy some used one on e-bay or somewhere, Go to the paint store and have them mix some dye the correct color you want and dye the head rest just like you did the seat belt thing-a-ma-jig.
Since it's cold, come in from the garage and build a fire in the house.
If your headrest aren't up to snuff, buy some used one on e-bay or somewhere, Go to the paint store and have them mix some dye the correct color you want and dye the head rest just like you did the seat belt thing-a-ma-jig.
Moderator
Joined: Jul 2007
Posts: 18,227
From: Edmond, OK
mix some dye the correct color you want
Moderator
Joined: Jun 2008
Posts: 18,061
From: Atlanta, Georgia
Thread Starter
Registered User
Joined: Feb 2008
Posts: 11,798
From: Plano, TX
Interior dye / paints
So you guys recommend that a paint shop custom mix me up some?
Can they do color matches of fabric samples?
Would it be brush on or can they rattle-can it?
I have no spray guns or the skills to even do things like that...
I sure hate to buy more off-the-shelf dye just to find out they are not the right color...
Can they do color matches of fabric samples?
Would it be brush on or can they rattle-can it?
I have no spray guns or the skills to even do things like that...
I sure hate to buy more off-the-shelf dye just to find out they are not the right color...
Proud Viet Nam Veteran
Joined: Dec 2006
Posts: 10,817
From: Rowlett, TX
Rob:
In our area I would go to English Color or Sherwin Williams (the auto paint store, not the house paint place). They can match your color plus they add something to the paint to make it more flexible for upholstery. They will also have some special stuff to clean the upholstery with. It will not be in a spray can but you can buy the small sprayers that have a small jar and a can of propellant. If they don't have them at the paint store, you can probably get them at Hobby Lobby. If you door pulls are not torn, this will probably work for them.
In our area I would go to English Color or Sherwin Williams (the auto paint store, not the house paint place). They can match your color plus they add something to the paint to make it more flexible for upholstery. They will also have some special stuff to clean the upholstery with. It will not be in a spray can but you can buy the small sprayers that have a small jar and a can of propellant. If they don't have them at the paint store, you can probably get them at Hobby Lobby. If you door pulls are not torn, this will probably work for them.
Registered Luser
Joined: Aug 2006
Posts: 3,785
From: LI,NY
If you're seriously interested in dyeing interior parts, go to your local auto body supply and have it matched in DUPONT VINYL. I have many of my restoration shops which do concours work use this product and it is bullet proof. You can call 1-800-2-DUPONT listen for the corresponding prompt and request VICTOR LEAL. He's a close friend of mine and can answer any tech questions or fax or e-mail any info you might need.
Thread Starter
Registered User
Joined: Feb 2008
Posts: 11,798
From: Plano, TX
I do not plan to dye any vinyl fabric because when i get through with this project, there will not be any original vinyl left in the car ...
There is a House of Color nearby that i get stuff from and i will mention this to them and see what they can do for me. I will take in the color code and some samples to match. This will be much more expensive than the off-color rattle cans but the price will be well spent in looks and durability. I can try it on the ratty door pulls, too.
Redolds, the Hobby Lobby sprayer method seems like it should work well for me.
Thanks to all for the great suggestions!
Last edited by Lady72nRob71; Dec 20, 2008 at 08:26 AM.
Registered Luser
Joined: Aug 2006
Posts: 3,785
From: LI,NY
Yes, as long as they sell the Dupont products , if prepped properly, it's bullet proof! Steering wheels, pulls, door panels, hard plastics on the interior, dashpads whatever. You can also have it mixed in different gloss levels(very important on an interior). Call the 1-800-2-DUPONT helpline if you go with it and ask for Victor Leal. The way your interior is turning out, I wouldn't skimp on the final details. It's looking too good!
Thread Starter
Registered User
Joined: Feb 2008
Posts: 11,798
From: Plano, TX
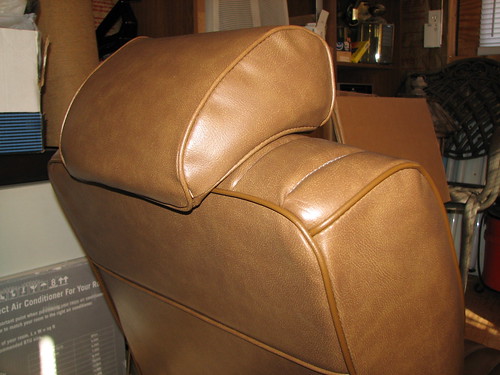
After the Legendary big-quarter-panel-build-blunder, I decided to see what they thought about the headrests with no piping. I sent them this picture in the following email:
“Good morning,
I recently bought a complete interior set for my 72 Cutlass and had it professionally installed.
All was very well made and quality was top-notched, except for the headrest covers…
If you look at the picture attached, the new HR covers (top in pic) have no piping like the original headrests (bottom in pic) and new main seat covers
Also, the entire seam area on the new HR is puckered.
--Is this the way they are supposed to be or was there a design / manufacturing error?
The new HR covers have an “unfinished” look to them.
Just wanting to check on this..”
A few days later I get this reply:
“Robert I have a new set of headrests being made for you.
Thanks so much”
So there WAS another build-boo-boo!
I now wish we held off on the headrests, but at least I can just pop them out and take them back to the upholstery shop. I am thinking of having the shop finish up the quarter panels, too, so I do not have the chance to mess them up.
Moral of the story – if it does not look or fit right, there was most likely a build snafu along the way… I am looking forward to seeing how the “new” headrest covers will look...
Last edited by Lady72nRob71; Dec 22, 2008 at 09:41 AM.
Thread Starter
Registered User
Joined: Feb 2008
Posts: 11,798
From: Plano, TX
You are so right on this statement. It will always be the nastiest part that will demand the attention of the crowd... The painting will be done this spring, around the time when the doors get yanked off.

Last edited by Lady72nRob71; Dec 22, 2008 at 09:42 AM.
Thread Starter
Registered User
Joined: Feb 2008
Posts: 11,798
From: Plano, TX
On Christmas Eve, the new headrest covers came in and they looked much better – just like they should!
The big differences between the two were penciled on the back of the tags of the covers. The first set had a different part number and a date of 2.5 years ago! They must have been an experimental run or something…
I had originally planned to let the upholstery shop rework them, but I got to thinking I should be able to do that…
So I stripped off those non-original-looking covers and the filler foam that was needed to fill them out (those covers were bigger.)
I heated the new covers and the headrests in the oven for a little while at 120* to make them pliable, and with just a little effort, the new covers went on perfectly. I stapled the fabric along the edges, reinstalled the trim covers, and here is the result!
That job took the same amount of time as driving to and from the shop and it cost me nothing.
The warm and balmy day after Christmas was “catch-up” day for the little jobs…
I completed and installed the seat heater switches and wiring.
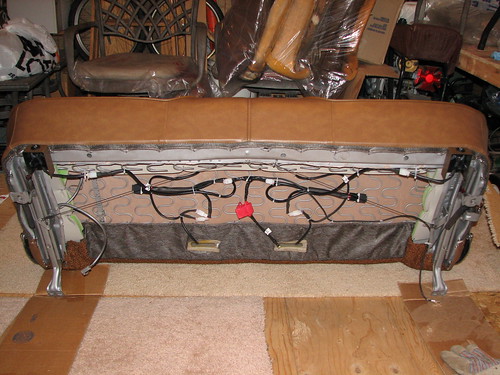
The switch housings were fabbed from plastic storage trays, cut in half, painted to match the interior, and mounted at the seat bottom edges. The high/low heat switch popped right in. The hot lead (with separate fuses) will plug right in to the car’s harness I had installed earlier.
These seats are now ready to go back in the car – WOO-HOO!

The below attachments show the incorrect and correct headrest covers.
If anyone wants the incorrect ones foc, just let me know...
The big differences between the two were penciled on the back of the tags of the covers. The first set had a different part number and a date of 2.5 years ago! They must have been an experimental run or something…
I had originally planned to let the upholstery shop rework them, but I got to thinking I should be able to do that…
So I stripped off those non-original-looking covers and the filler foam that was needed to fill them out (those covers were bigger.)
I heated the new covers and the headrests in the oven for a little while at 120* to make them pliable, and with just a little effort, the new covers went on perfectly. I stapled the fabric along the edges, reinstalled the trim covers, and here is the result!
That job took the same amount of time as driving to and from the shop and it cost me nothing.
The warm and balmy day after Christmas was “catch-up” day for the little jobs…
I completed and installed the seat heater switches and wiring.
The switch housings were fabbed from plastic storage trays, cut in half, painted to match the interior, and mounted at the seat bottom edges. The high/low heat switch popped right in. The hot lead (with separate fuses) will plug right in to the car’s harness I had installed earlier.
These seats are now ready to go back in the car – WOO-HOO!
The below attachments show the incorrect and correct headrest covers.
If anyone wants the incorrect ones foc, just let me know...
Last edited by Lady72nRob71; Dec 29, 2008 at 07:47 AM.
Thread Starter
Registered User
Joined: Feb 2008
Posts: 11,798
From: Plano, TX
Luckily those days are behind me!
I want to do it right this time, and all at once.That is the reason of the power windows, door / qtr panels, dynamat, cruise install, etc, etc... I do NOT want to pull this interior out ever again, mainly for the risks of messing up something new in the process.
Many thanks for the complements so far - I appreciate the support!
I had hoped on this all being finished by Christmas, but the dynamat issues, quarter panel blunders, and the unexpected power window installation and issues have pushed the project to spring. No rush, now... Other cars need attention then, too, so Lady will not get her A/C restored until the following spring.
Regardless, I frequently get anxiety attacks for getting it all back together and cruising for a long weekend in the mountains!
I will have patience, though!
Carl, I appreciate your offer to help, but the seats may not be going in for another month from now... I am up for meeting up for a burger and beer, though - I will have those days off, too. I will holler at you over the holiday or weekend...
Last edited by Lady72nRob71; Dec 31, 2008 at 09:13 AM.
Thread Starter
Registered User
Joined: Feb 2008
Posts: 11,798
From: Plano, TX
Seat heater control system installed...
The next day, I prepared the seat heater relay and wiring harness. This “simple” task took way too long I thought…
This relay wires up to the voltage regulator just the way the stock rear defogger does, so that it energizes only when the engine it running. I did not want the current-hogging seat heaters to run when the engine is stopped.
The relay was prepared earlier and later its mounting holes were drilled in the firewall.
I also cleaned up the firewall in this area and found it to be pretty nice under all the dirt. I hope to clean it only and not repaint it as it is in not too bad a shape and the QC markings are still there.
The wiring was planned and fabricated to look much like stock.
The wiring lengths were determined with rope, measured, and cut with a little excess that was trimmed after a test fit. The relay connector was had at Rockauto, and the fuse holders were found locally at Otterzone. Now only the BUSS brand holders were black and used black wires. The fuse for the relay is 3A and the seat heaters needed 20A. A matching fuse holder was also bought to replace the non-original A/C fan fuse holder that was crimped on in 4 places already…
The EMI reduction capacitor and clamp was removed from the regulator, cleaned and painted. The capacitor terminal was integrated with the new wire harness as illustrated by the service manual.
Here are the wire harnesses:

Top one is the regulator to relay coil harness, middle is hot junction to relay harness, and lower is the new A/C blower high-speed feed…. Near my (sliced) finger is the metal sleeve that will solder on to the wiring stub already on the car.
This work took over 5 hours… At the end of making the last harness, cleverness and intelligence were replaced with tiredness, frustration, and as a result, stupidity…
I about almost lost my ring fingertip when a razor blade slipped from a part I was cutting; I had been holding it in my hand, and not with pliers. The tip was still there, just a flapping cover which I had secured with paper towels and masking tape; hopefully it will heal somehow…
That ended that day in the garage real fast!
The next day, the fingertip had started to fuse itself with “nature’s glue” and I was able to install the relay and wiring harnesses. While they took 5 hours to create, installation was only about 15 minutes (thank goodness…)
Here is the end result:
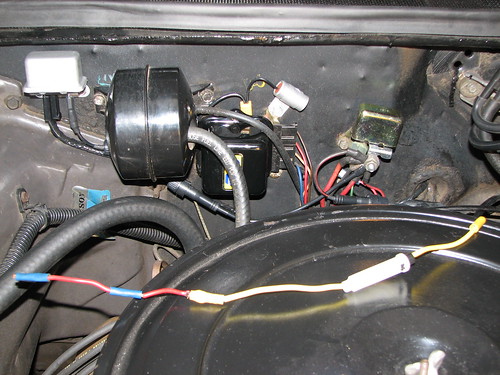
On the air cleaner lies the previous A/C high-speed feed fuse holder. The crimps were poor and arcing had occurred, burning some areas. This had four problems waiting to happen.
Connections or splices in these high-current circuits really need good soldered joints. My harness was completely soldered in all areas. The wire in the car was first wire brushed with the Dremel, soldered well to the new harness, and the joint was covered with heat shrink tubing. It looks great and will perform like new.
The next day the new replacement quarter panels came in from Legendary. Unfortunately my biggest was not resolved – it was repeated… The bottom of the lower chrome trim on the qtr panel should be 3” above the bottom of the panel; the new is 3 7/8” above the bottom edge. The original quarter panel and door panel line up well.
I sent another email to Legendary and more pictures… Lets see what happens next…
And since my under-sink water heater in the kitchen blew up a couple days ago, I will be out of the resto project for a little bit so I can get that mess cleaned up and the heater replaced. The new one is of course on backorder (as most of my online purchases lately) so I may be back in the garage anyway while waiting for it to arrive…
This relay wires up to the voltage regulator just the way the stock rear defogger does, so that it energizes only when the engine it running. I did not want the current-hogging seat heaters to run when the engine is stopped.
The relay was prepared earlier and later its mounting holes were drilled in the firewall.
I also cleaned up the firewall in this area and found it to be pretty nice under all the dirt. I hope to clean it only and not repaint it as it is in not too bad a shape and the QC markings are still there.
The wiring was planned and fabricated to look much like stock.
The wiring lengths were determined with rope, measured, and cut with a little excess that was trimmed after a test fit. The relay connector was had at Rockauto, and the fuse holders were found locally at Otterzone. Now only the BUSS brand holders were black and used black wires. The fuse for the relay is 3A and the seat heaters needed 20A. A matching fuse holder was also bought to replace the non-original A/C fan fuse holder that was crimped on in 4 places already…
The EMI reduction capacitor and clamp was removed from the regulator, cleaned and painted. The capacitor terminal was integrated with the new wire harness as illustrated by the service manual.
Here are the wire harnesses:
Top one is the regulator to relay coil harness, middle is hot junction to relay harness, and lower is the new A/C blower high-speed feed…. Near my (sliced) finger is the metal sleeve that will solder on to the wiring stub already on the car.
This work took over 5 hours… At the end of making the last harness, cleverness and intelligence were replaced with tiredness, frustration, and as a result, stupidity…
I about almost lost my ring fingertip when a razor blade slipped from a part I was cutting; I had been holding it in my hand, and not with pliers. The tip was still there, just a flapping cover which I had secured with paper towels and masking tape; hopefully it will heal somehow…
That ended that day in the garage real fast!
The next day, the fingertip had started to fuse itself with “nature’s glue” and I was able to install the relay and wiring harnesses. While they took 5 hours to create, installation was only about 15 minutes (thank goodness…)
Here is the end result:
On the air cleaner lies the previous A/C high-speed feed fuse holder. The crimps were poor and arcing had occurred, burning some areas. This had four problems waiting to happen.
Connections or splices in these high-current circuits really need good soldered joints. My harness was completely soldered in all areas. The wire in the car was first wire brushed with the Dremel, soldered well to the new harness, and the joint was covered with heat shrink tubing. It looks great and will perform like new.
The next day the new replacement quarter panels came in from Legendary. Unfortunately my biggest was not resolved – it was repeated…
The bottom of the lower chrome trim on the qtr panel should be 3” above the bottom of the panel; the new is 3 7/8” above the bottom edge. The original quarter panel and door panel line up well.I sent another email to Legendary and more pictures… Lets see what happens next…
And since my under-sink water heater in the kitchen blew up a couple days ago, I will be out of the resto project for a little bit so I can get that mess cleaned up and the heater replaced. The new one is of course on backorder (as most of my online purchases lately) so I may be back in the garage anyway while waiting for it to arrive…
Last edited by Lady72nRob71; Jan 7, 2009 at 10:27 AM.
Thread Starter
Registered User
Joined: Feb 2008
Posts: 11,798
From: Plano, TX
The saga continues...
Continuing on, some loose ends were wrapped up. I completed the POR15 treatment inside the rear quarters, finished up wiring the alarm system, repaired the long chrome trim that was along the top of the dash, and secured more wiring under the dash.
Flashing back two months, I had long debates on what to use for the floor insulation, I had bit the bullet and shelled out 460 bucks for the original Dynamat. I had ordered 100 square feet of Extreme for the floorpan, in the doors and quarters, under the quarter trim and door panels, and other interior (hidden) places. I had also ordered 36 Square feet of �” dynaliner for layering under the carpet and rear seats for thermal insulation.
See https://classicoldsmobile.com/forums/interior-upholstery/9144-dynamat-worth-waste.html for the debate.
After only two short months, 80 sq ft of the 100 sq ft of the Dynamat extreme I had ordered finally came in… I was starting to see the light at the end of a very long tunnel…
Installation soon started on a warm mid-January day. First attack was inside the rear quarter armrests and piston covers. Since speakers will still be mounted in them, rigidity is a big plus. Working with this stuff was interesting… The cheap Harbor Freight scissors and a utility knife worked well and I wore light cotton gloves when pressing it into place, as the aluminum backing had sharp edges. The cotton let your hands glide over it well. The stupid rollers they sell are useless unless the surface is perfectly flat with no ridges or bends… How much car sheetmetal is totally flat?? I also found out quickly that any type of rubber gloves stuck permanently to the mat, so they could not be worn.
I did these armrest panels in the house in the sun, but found that the black rubber crap made a mess wherever it touched, just like asphalt tar… I got some on the wall and carpet, but was able to get it off with goo-gone.
The speakers and top plates were reinstalled so these are ready for installation!
Here are the completed, recovered rear armrest panels and piston covers...
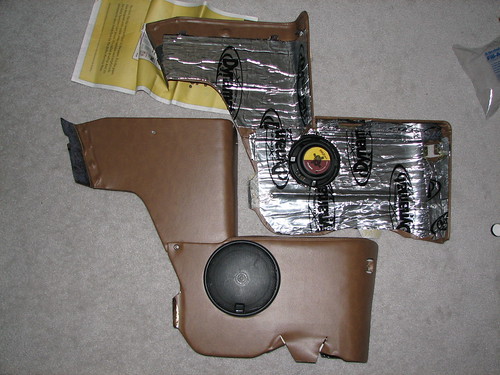
Keep in mind, the speaker holes were cut in the metal when I bought the car; I would have never done this on my own... I did choose to keep the speakers there however. Perhaps I may paint the grilles in the saddle color later...
Afterwards I went to the garage and did a final vacuuming and wipedown of the car’s floorpan in preparation for the big installation tomorrow. I marked all the screw holes by loosely inserting the screws and I removed the headlight dimmer switch.
The next day was VERY warm (70*), so I laid the dynamat out in the sun to warm up. This made it a little softer, stickier (ick!), and easier (?) to work with. I started with inside the quarters, then moved to the floorpan.
Here were my observations and some tips on installing Dynamat extreme…
Before beginning, have a bottle of goo-gone and some hand cleaner that will remove tar; this stuff will get messy after a while and it will get on things you do not want it on. “Extreme” here stands for the tackiness level… Once it is stuck, it is stuck for good! It will pull POR15 off of metal easily! I molded and cut the sheets with the backing on and cut out areas for screws, seat legs, etc. Of course, the way it molds and fits with the paper backing on is totally different than the way it fits with the backing removed… The paper backing is hard to pull off the mats and often it tears up like cheap masking tape… Remove it carefully before sticking, then reapply it loosely and roll it off as you press it in place, usually starting from an alignment reference. Here is the “pain in process”…

This stuff sticks to hands very well and will pull all the cotton off of gloves. When installing, do not use gloves to get it stuck down; wear them only to smooth it out after it is stuck (usually it will never smooth perfectly.) Doing a whole car should be made into two days, as your hands will take a lot of abuse. I found that 80 square feet will easily do a whole 72 A-body convertible. If you want to do inside the rear quarters, do so with the window and mechanism removed. I installed full sheets in mine with it all assembled and it was a major PITA. Think about water drainage when doing inside doors and quarters – allow easy drainage and avoid water entrapment possibilities. This rubber stuff is messy when doing a big job so wear disposable clothing – this tar-like stuff will not wash out of clothing. At the end of the day, allow 30 minutes to goo-gone the bottom of your shoes and NEVER wear your shoes inside the house before you goo-gone them! (Take it from an expert on that one…) This is beginning to sound like in introduction to roofing! On the positive side, the matting is like insulation – all but the tiniest scraps are usable.
I completed almost everything in about 6 hours straight on one day and 4 hours hours the next.
Here is the completed front section…
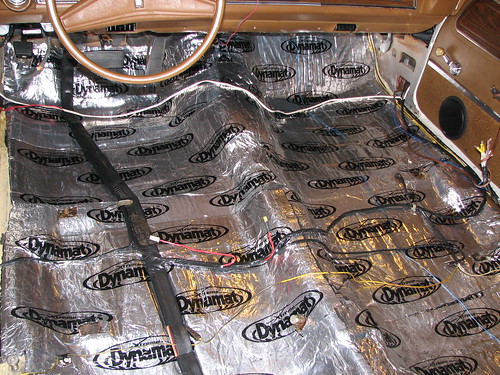
My hands were in very bad shape afterwards. I had many less fingernails and lots of cuts, cramps, and some recurring numbness for a few days... Enter prescription drugs…
I had installed 15 sheets the first day and four more for the following day. Four more sheets will be installed inside and outside the doors when they get done this spring.
Here is the completed back section:
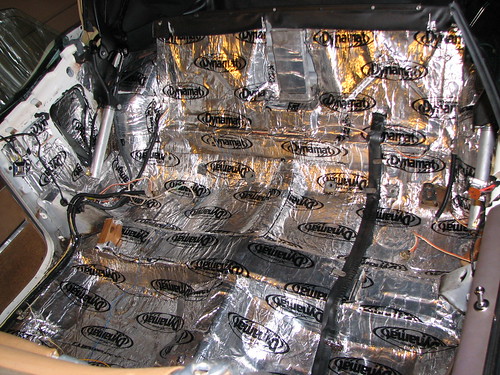
I am curious to know how much benefit all this effort, pain, and money will give me and I will find out later and will post the results.
Do I plan to ever install this stuff again? I vote ‘no’, but I will see what gains I get from it. I rather would have rebuilt an engine – less taxing on my hands!
That weekend, I pulled all of the rear seatbelts and scrubbed them again with liquid Tide. This got them as spiffy as the front ones. I pulled the retractor belts also and did them like the front ones also.
Next, the rear quarter access plates were scraped, wirebrushed and washed well to remove old sealer, rust, and other residues. After a short time in the oven to dry, I painted them both with POR15 semi-gloss black and hung them in the garage to dry.
The next day, I was amazed at the results… Given these were quickly brush painted with one coat only, they looked amazing. The paint was very hard and one coat was all they needed. How durable? I took a 3/8” x 6” ratchet extension and tossed it on the plate – no scratches or nicks! In fact the gloss and color are almost perfect for the radiator upper support. Pictures are below…
Flashing back two months, I had long debates on what to use for the floor insulation, I had bit the bullet and shelled out 460 bucks for the original Dynamat. I had ordered 100 square feet of Extreme for the floorpan, in the doors and quarters, under the quarter trim and door panels, and other interior (hidden) places. I had also ordered 36 Square feet of �” dynaliner for layering under the carpet and rear seats for thermal insulation.
See https://classicoldsmobile.com/forums/interior-upholstery/9144-dynamat-worth-waste.html for the debate.
After only two short months, 80 sq ft of the 100 sq ft of the Dynamat extreme I had ordered finally came in… I was starting to see the light at the end of a very long tunnel…
Installation soon started on a warm mid-January day. First attack was inside the rear quarter armrests and piston covers. Since speakers will still be mounted in them, rigidity is a big plus. Working with this stuff was interesting… The cheap Harbor Freight scissors and a utility knife worked well and I wore light cotton gloves when pressing it into place, as the aluminum backing had sharp edges. The cotton let your hands glide over it well. The stupid rollers they sell are useless unless the surface is perfectly flat with no ridges or bends… How much car sheetmetal is totally flat?? I also found out quickly that any type of rubber gloves stuck permanently to the mat, so they could not be worn.
I did these armrest panels in the house in the sun, but found that the black rubber crap made a mess wherever it touched, just like asphalt tar… I got some on the wall and carpet, but was able to get it off with goo-gone.
The speakers and top plates were reinstalled so these are ready for installation!
Here are the completed, recovered rear armrest panels and piston covers...
Keep in mind, the speaker holes were cut in the metal when I bought the car; I would have never done this on my own... I did choose to keep the speakers there however. Perhaps I may paint the grilles in the saddle color later...
Afterwards I went to the garage and did a final vacuuming and wipedown of the car’s floorpan in preparation for the big installation tomorrow. I marked all the screw holes by loosely inserting the screws and I removed the headlight dimmer switch.
The next day was VERY warm (70*), so I laid the dynamat out in the sun to warm up. This made it a little softer, stickier (ick!), and easier (?) to work with. I started with inside the quarters, then moved to the floorpan.
Here were my observations and some tips on installing Dynamat extreme…
Before beginning, have a bottle of goo-gone and some hand cleaner that will remove tar; this stuff will get messy after a while and it will get on things you do not want it on. “Extreme” here stands for the tackiness level… Once it is stuck, it is stuck for good! It will pull POR15 off of metal easily! I molded and cut the sheets with the backing on and cut out areas for screws, seat legs, etc. Of course, the way it molds and fits with the paper backing on is totally different than the way it fits with the backing removed… The paper backing is hard to pull off the mats and often it tears up like cheap masking tape… Remove it carefully before sticking, then reapply it loosely and roll it off as you press it in place, usually starting from an alignment reference. Here is the “pain in process”…
This stuff sticks to hands very well and will pull all the cotton off of gloves. When installing, do not use gloves to get it stuck down; wear them only to smooth it out after it is stuck (usually it will never smooth perfectly.) Doing a whole car should be made into two days, as your hands will take a lot of abuse. I found that 80 square feet will easily do a whole 72 A-body convertible. If you want to do inside the rear quarters, do so with the window and mechanism removed. I installed full sheets in mine with it all assembled and it was a major PITA. Think about water drainage when doing inside doors and quarters – allow easy drainage and avoid water entrapment possibilities. This rubber stuff is messy when doing a big job so wear disposable clothing – this tar-like stuff will not wash out of clothing. At the end of the day, allow 30 minutes to goo-gone the bottom of your shoes and NEVER wear your shoes inside the house before you goo-gone them! (Take it from an expert on that one…) This is beginning to sound like in introduction to roofing! On the positive side, the matting is like insulation – all but the tiniest scraps are usable.
I completed almost everything in about 6 hours straight on one day and 4 hours hours the next.
Here is the completed front section…
My hands were in very bad shape afterwards. I had many less fingernails and lots of cuts, cramps, and some recurring numbness for a few days... Enter prescription drugs…
I had installed 15 sheets the first day and four more for the following day. Four more sheets will be installed inside and outside the doors when they get done this spring.
Here is the completed back section:
I am curious to know how much benefit all this effort, pain, and money will give me and I will find out later and will post the results.
Do I plan to ever install this stuff again? I vote ‘no’, but I will see what gains I get from it. I rather would have rebuilt an engine – less taxing on my hands!
That weekend, I pulled all of the rear seatbelts and scrubbed them again with liquid Tide. This got them as spiffy as the front ones. I pulled the retractor belts also and did them like the front ones also.
Next, the rear quarter access plates were scraped, wirebrushed and washed well to remove old sealer, rust, and other residues. After a short time in the oven to dry, I painted them both with POR15 semi-gloss black and hung them in the garage to dry.
The next day, I was amazed at the results… Given these were quickly brush painted with one coat only, they looked amazing. The paint was very hard and one coat was all they needed. How durable? I took a 3/8” x 6” ratchet extension and tossed it on the plate – no scratches or nicks! In fact the gloss and color are almost perfect for the radiator upper support. Pictures are below…
Last edited by Lady72nRob71; Mar 19, 2009 at 12:21 PM.
Registered User
Joined: Nov 2007
Posts: 9,127
From: Rathdrum, Idano
Wanna bet that there were a few cuss words thrown around during this install. I have been considering doing the same thing on my 48 to sound proof the interior a little and help with the header and exhaust heat. Let us know how this worked out when you get it back together as I will be looking at this project in late spring. Good job by the way.
Registered
Joined: Jul 2006
Posts: 4,430
From: Northeast Ohio
"Introduction to roofing"
I told you the stuff was nothing but expensive roof watershield. Why not just get quieter mufflers or turn up the tunes louder? I like how you have all the Dynamat labels going the same direction, too bad you have to cover it all up. Are you going to do the bottom of the roof too? The Celotex reps would yell at us if we put the Celotex lettering upside down on wall sheathing. It was all covered up by the siding but that didn't matter to them. We purposely put it all on upside down from then on.
I told you the stuff was nothing but expensive roof watershield.
Why not just get quieter mufflers or turn up the tunes louder? I like how you have all the Dynamat labels going the same direction, too bad you have to cover it all up. Are you going to do the bottom of the roof too? The Celotex reps would yell at us if we put the Celotex lettering upside down on wall sheathing. It was all covered up by the siding but that didn't matter to them. We purposely put it all on upside down from then on.


