
Eddie Hansen's '69 Cutlass Convertible
 August 30th, 2012, 05:41 PM
#281
Registered User
Thread Starter
Join Date: Jan 2008
Location: South River, New Jersey
Posts: 3,515
Bury thanks the best thing I found to use with a dealt 4 1/2 grinder the beast shows no mercy lol I used that in conjunction with these black poly abrasive discs they are available at Lowes and home depot but also at harbor freight and the hf ones are half the price they look kind of like a round shredded wheat . I bought 2 inch ones for my right angle die grinder . The hardest part is when you come up against undercoating best to use a rope wheel on your dewalt also various sanding discs etc etc let me know if you need me to find the part numbers for the discs 
 August 31st, 2012, 05:29 AM
#283
Registered User
Thread Starter
Join Date: Jan 2008
Location: South River, New Jersey
Posts: 3,515
The trunk drop offs are gone along the bottoms but I have replacement ones to use'
August 31st, 2012, 03:00 PM
#285
Registered User
Thread Starter
Join Date: Jan 2008
Location: South River, New Jersey
Posts: 3,515
well Por 15 underside is now complete
I finished cleaning up the underside and I coated all the stripped metal with POR 15, next step is to scuff the the por 15 after it hardens and apply the tie coat primer, then the gm restoration black
here's some pics ( sorry)
wheel well arch

trunk bottom

wheel arch 2


trunk 2
I do have new drop downs... Thank God LOL,,,,

here's some pics ( sorry)
wheel well arch
trunk bottom
wheel arch 2
trunk 2
I do have new drop downs... Thank God LOL,,,,
September 3rd, 2012, 12:52 PM
#286
Registered User
Thread Starter
Join Date: Jan 2008
Location: South River, New Jersey
Posts: 3,515
another bite
spent today putting the tie coat primer on, this is the second part of the por -15 "treatment" this stuff is specially formulated to interact with the por-15, it is very thick, filler type primer I will need to sand this down tomorrow before the final underside black paint.
needless to say this stuff would have been better sprayed but even thinned this stuff looked thick and didn't want to screw up my gun, so I brushed it on since it is going to be sanded anyway


needless to say this stuff would have been better sprayed but even thinned this stuff looked thick and didn't want to screw up my gun, so I brushed it on since it is going to be sanded anyway
 no rest for the wicked...
September 3rd, 2012, 03:56 PM
no rest for the wicked...
September 3rd, 2012, 03:56 PM
#288
Registered User

Join Date: Jan 2011
Location: Maryland
Posts: 1,665
Eddie, looks very nice. But I'm starting to get the feeling you enjoy laying under this car so you can sand the underside of the floors.  I guess you'll be glad when the final coat of paint is done under there.
Brian
I guess you'll be glad when the final coat of paint is done under there.Brian
September 3rd, 2012, 04:16 PM
#289
Registered User
Thread Starter
Join Date: Jan 2008
Location: South River, New Jersey
Posts: 3,515
ohhhhh noooooo i don't
Actually I am taking your work and thread and saying to myself wwbd. What would Brian do
. So I am blaming you j/k Brian thank you for your thread and making us all elevate our work to make it the best we can
September 4th, 2012, 05:01 PM
#290
Registered User
Thread Starter
Join Date: Jan 2008
Location: South River, New Jersey
Posts: 3,515
another chunk of the elephant
and another step closer to putting the body on the frame, I sanded the por 15 tie coat, If I was to do it again I think I would use the por 15 etching primer and spray it, this was miserable  anyway sanded and sprayed today and will put undercoat on tomorrow but the underside is done ( paint wise )

4 speed hump

should have wiped the lens LOL

anyway sanded and sprayed today and will put undercoat on tomorrow but the underside is done ( paint wise ) 4 speed hump
should have wiped the lens LOL
September 4th, 2012, 08:20 PM
#291
Registered User
Join Date: Jan 2012
Location: Thousand Oaks, CA
Posts: 506
Looking good Eddie!
Man for all that work you might consider installing the body shinny side down! I feel your pain and I'm only doing the front clip!
I also use your mantra... "What would Brian do" (Damn it! would have been done by now!!!!)
Anyways I'm sure that beer tasted a little colder that day!
Keep it up!
Craig
Man for all that work you might consider installing the body shinny side down! I feel your pain and I'm only doing the front clip!
I also use your mantra... "What would Brian do" (Damn it! would have been done by now!!!!
)Anyways I'm sure that beer tasted a little colder that day!
Keep it up!
Craig
September 5th, 2012, 04:39 AM
#293
Registered User
Thread Starter
Join Date: Jan 2008
Location: South River, New Jersey
Posts: 3,515
Thanks fellas , putting some new undercoat down on the inside rockers, then I am going to clean up all that dust on the frame lol . Bry you probably do not have to do all the steps, probably enough to wash down the underside with marine clean or similar get all the loose stuff off and use poor 15 then when it is still slightly tacky spray the chasis black on it . That probably would have been the sane thing to do lol
September 6th, 2012, 05:17 PM
#294
Registered User
Thread Starter
Join Date: Jan 2008
Location: South River, New Jersey
Posts: 3,515
working away
Well yesterday and today have made IMHO good progress. As stated the underside was finally completed yesterday I sprayed por 15 rubberized undercoating on the rockers I figured once the body is on the frame there will be no way to adequately clean up in there and more protection the better. I cleaned the frame and then I removed the previously installed stainless fuel line gave that a rub down with a purple scotch bright pad and the stainless popped :-) looks great. I decided to order a return line in stainless and I ordered all new clipsas well. I also ordered all new brake line clips as I have all stainless steel brake lines that will be going on.
I installed the rear end , the new rear springs which are Moog cc501,s put the boxed control arms, the f41 HD supports in as well as the sway bar. While working on the rear putting the discs on the housing had it,s fair share of scratches etc and the same for the springs and the control arms, so I scuffed everything and gave everything a touch up now that it is installed .
I pulled the rear stainless brake lines and gave them the once over with the scotch brute pad .
Tomorrow I will install the new stainless e-brake cables, and the one in the front that goes through the chasis, I will also spray the w27 cover with some etching primer and hit it with some alumiblast paint, it is raw aluminum so it will corrode in no time if I don't .
As soon as the new return line and clips arrive I will be putting the body back on the frame. I placed all the bushings where they go except for two small ones I have no idea where they go?
Anyway I know you guys are sick of this thread lol but tuff lol pics of the progress tomorrow :-)
September 6th, 2012, 05:47 PM
#295
Registered User
Join Date: Jan 2011
Location: Maryland
Posts: 1,665
 I didn't realize the perfection disease I have was contagious and could be transmitted through the Internet! Sorry guys!
September 6th, 2012, 05:53 PM
I didn't realize the perfection disease I have was contagious and could be transmitted through the Internet! Sorry guys!
September 6th, 2012, 05:53 PM
#296
Registered User
Join Date: Jan 2011
Location: Maryland
Posts: 1,665
Eddie, your hard work paid off and it looks great. Sometimes certain tasks are a real PITA but in the end, you know that you did it right and you didn't cut corners. This will pay off in the long run.
I was looking at your last photo and I think you're getting carried away with the "eating the elephant" thing. Was that you who chewed off the lower part of the trunk floor drop? LOL! Chew on the elephant...you know... the project....not the car! ")
Brian
I was looking at your last photo and I think you're getting carried away with the "eating the elephant" thing. Was that you who chewed off the lower part of the trunk floor drop?
LOL! Chew on the elephant...you know... the project....not the car! Brian
September 6th, 2012, 06:16 PM
#297
Registered User
Thread Starter
Join Date: Jan 2008
Location: South River, New Jersey
Posts: 3,515
Thanks Brian :-) I have new drop downs it wasn't me it was my arch nemesis Dr rust I hate it
I can not cut the lower quarters to do the install till I put the body on the frame then the fun begins ! I do have a plasma cutter so zip zip deep in the sh%t lol.
Your perfection isn't a disease it's a great creedo that Craig and I have adopted , of course it is a goal , my skills are a long way from yours but I am trying to do the absolute best I can and for the inspiration I am very grateful :-)
September 7th, 2012, 11:54 AM
#298
Registered User
Join Date: Jan 2012
Location: Thousand Oaks, CA
Posts: 506
September 7th, 2012, 01:20 PM
#299
Registered User
Thread Starter
Join Date: Jan 2008
Location: South River, New Jersey
Posts: 3,515
ohhhh nooooo couple of pics LOL
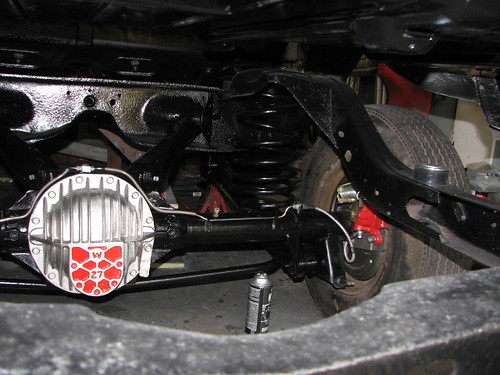
ok as mentioned I installed the rear suspension, spruced up all the scratches when I installed the spring, worked on the rear etc, I also sprayed the w-27 cover with aluminum look paint, and added some red details ( I Know, couldn't help myself, and it goes with the red powdercoated calipers LOL)
http://www.flickr.com/photos/22989597@N02/7951359270/http://www.flickr.com/photos/22989597@N02/7951359270/ by http://www.flickr.com/people/22989597@N02/, on Flickr
http://www.flickr.com/photos/22989597@N02/7951359494/http://www.flickr.com/photos/22989597@N02/7951359494/ by http://www.flickr.com/people/22989597@N02/, on Flickr
http://www.flickr.com/photos/22989597@N02/7951359190/http://www.flickr.com/photos/22989597@N02/7951359190/ by http://www.flickr.com/people/22989597@N02/, on Flickr
September 7th, 2012, 01:38 PM
#302
Registered User
Thread Starter
Join Date: Jan 2008
Location: South River, New Jersey
Posts: 3,515
easy
Craig it was fairly easy, the axles need to come out , and I had a little issue of casting flash on the axle hubs, but a little grinding and voila, I got my kit from just disc brakes and it was very very straight forward, of course I added drilled and slotted rotors all around, S's brake lines, powder coated calipers yada yada yada. I was extremely pleased with the kit , it will not however fit 14 inch wheels they do make a kit for that as well
September 7th, 2012, 01:41 PM
#303
Registered User
Thread Starter
Join Date: Jan 2008
Location: South River, New Jersey
Posts: 3,515
September 8th, 2012, 07:47 PM
#304
Registered User
Thread Starter
Join Date: Jan 2008
Location: South River, New Jersey
Posts: 3,515
still at it
Today I got a surprise delivery from inline tube my stainless return line arrived as well as the new line clips so I installed the fuel lines and I installed the rear to front brake lines I also installed the stainless e brake cable that goes through the chasis,
So that means I am going to be putting the body back on the frame . This has been a loooonnnnggggg loooonnnnggg time since these two were together yeeehaaaaaa.
Tomorrow I decided to buy a second engine hoist the idea is to lift it front and back safely, I figure I will sell one of the hoists after she is reunited . Anyway pics to follow
September 8th, 2012, 11:14 PM
#306
Registered User
Join Date: Jan 2011
Location: Maryland
Posts: 1,665
Brian
http://www.northerntool.com/shop/too...5213_200305213
September 9th, 2012, 05:26 AM
#307
Registered User
Thread Starter
Join Date: Jan 2008
Location: South River, New Jersey
Posts: 3,515
me too:-)
Brian thank you very much for the offer but I do have a coupon for the harbor freight one , and I am picking it up this morning.
I do wish you guys were closer because once this body is on and bolted in I am gonna have a paaaarrrrrttttaaaaaayyyy
September 9th, 2012, 01:32 PM
#308
Registered User
Join Date: Jan 2011
Location: Maryland
Posts: 1,665
Eddie, no problem. If you lived closer, you could have borrowed the fixture I made to hold up one end of the body. I think you should move closer to MD, although your work commute to NY would be a real PITA!
September 9th, 2012, 04:34 PM
#309
Registered User
Thread Starter
Join Date: Jan 2008
Location: South River, New Jersey
Posts: 3,515
a few more years....
Brian Maryland is gorgeous my daughter was at Washington college her freshman year, played b-ball for the shore women, once retirement comes the missus and I are heading south :-).
Not much done today picked up the hoist and 2 sets of wheel dollies put the chasis on the dollies and off the jack stands , picked up some steel and chain etc to make some spreaders front and back, had to do some yard work and honey dog's and I go back to work tomorrow :-( lol. Hate how that cuts into my hobby time
Thanks for all the encouragement fellas I feel I am on a roll now :-)
September 10th, 2012, 12:57 PM
#311
Registered User
Thread Starter
Join Date: Jan 2008
Location: South River, New Jersey
Posts: 3,515
September 10th, 2012, 09:10 PM
#312
ok as mentioned I installed the rear suspension, spruced up all the scratches when I installed the spring, worked on the rear etc, I also sprayed the w-27 cover with aluminum look paint, and added some red details ( I Know, couldn't help myself, and it goes with the red powdercoated calipers LOL)

IMG_5172 by thunderboat59, on Flickr
IMG_5170 by thunderboat59, on Flickr
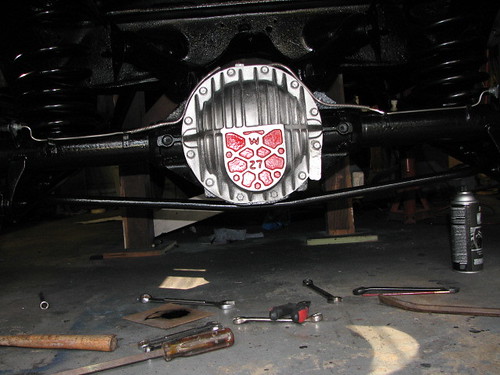
IMG_5173 by thunderboat59, on Flickr
IMG_5172 by thunderboat59, on Flickr
IMG_5170 by thunderboat59, on Flickr
IMG_5173 by thunderboat59, on Flickr
September 14th, 2012, 10:30 AM
#313
Registered User
Thread Starter
Join Date: Jan 2008
Location: South River, New Jersey
Posts: 3,515
Thank you sir!!
sometimes I can not help myself! I know they were just bolted on and left plain, but I like a little bit of color myself, glad someone else likes it too.... the body goes on this weekend I hope details to follow....
September 15th, 2012, 11:34 AM
#315
Did you have to weld in a support before you lifted off the frame?
I've been doing most of the underside while on the frame, but need to lift it to install new body mounts and catch the rest of the spots.
I've been doing most of the underside while on the frame, but need to lift it to install new body mounts and catch the rest of the spots.
September 15th, 2012, 01:33 PM
#316
Registered User
Thread Starter
Join Date: Jan 2008
Location: South River, New Jersey
Posts: 3,515
I just went and got two piece of square tubing and I am going to put her back on with two engine hoists I am going to hook to where the front of the body mounts two those boxes are 51 1/2 center to center
My body was very very solid and as I said the doors were on it. I can still open and shut the doors now and the gaps haven't changed much if at all they measure 1/4 inch all around
Make sure to spray the body bolts with penetrating oil and let sit for a few days and then spray again when you go to do them, you do not want to snap them or spin the cage nuts, I was lucky no problems. If your doors are off I would put some kind of support in there .
Are you doing a frame off? If not'you'may get away jacking up'the'body and putting some pieces of'4x4 between the frame and body perhaps in between the mounts to use the frame'to'support'the body while you change the mounts etc if that makes any sense
September 16th, 2012, 07:30 AM
#317
Slow goin'
I'm trying to keep the car driveable as much as I can. Started from the front and stopped at the firewall.
455andtri-carb.jpg
Then, did from the rear to the axle area including a new tank. Next is a full floor pan and lift the body to replace the mounts.
Untitled-1.jpg
455andtri-carb.jpg
Then, did from the rear to the axle area including a new tank. Next is a full floor pan and lift the body to replace the mounts.
Untitled-1.jpg
Last edited by Toyaholic; September 16th, 2012 at 07:45 AM.
September 16th, 2012, 07:45 AM
#318
Registered User
Thread Starter
Join Date: Jan 2008
Location: South River, New Jersey
Posts: 3,515
wow
To say I have Carb envy would be an understatement lol
I will take some snaps of my lifting method, lost lots of time yesterday but have the car hooked up and nearly ready to back on the spreaders etc seem to work really well , your diff needs a little cleaning I know it is a huge elephant tot all once as I have been told and it is better a bite at a time.
I didn't need a lot of work on my pans they were awesomely clean except a couple of small spots so I didn't do any major cutting , if your putting in a whole pan I would definately leave the doors on. And try to support the entire perimeter not just spots with jack stands put a 4x4 on top of the jack stands to spread the support as long along the entire length as possible.
I will take some snaps of my lifting method, lost lots of time yesterday but have the car hooked up and nearly ready to back on the spreaders etc seem to work really well , your diff needs a little cleaning
I know it is a huge elephant tot all once as I have been told and it is better a bite at a time. I didn't need a lot of work on my pans they were awesomely clean except a couple of small spots so I didn't do any major cutting , if your putting in a whole pan I would definately leave the doors on. And try to support the entire perimeter not just spots with jack stands put a 4x4 on top of the jack stands to spread the support as long along the entire length as possible.
September 16th, 2012, 12:54 PM
#320
Registered User
Thread Starter
Join Date: Jan 2008
Location: South River, New Jersey
Posts: 3,515
I will post the top side now that I will be working on it lol. That said the body is on the frame.
You Heard right the body is on the frame after 15 years, body alignment needs some minor tweaking but the body is on!!
You Heard right the body is on the frame after 15 years, body alignment needs some minor tweaking but the body is on!!
Last edited by Eddie Hansen; September 18th, 2012 at 10:18 AM. Reason: removed the annoying large font LOL


