
1965 442 build

Registered User
Joined: Jan 2008
Posts: 3,515
From: South River, New Jersey
enjoying this thread...
I love this thread, your progress is making a lot of us spend way too much time in the shop lol a true inspiration. I read your comments regarding your dad and "his" car and about folks thinking it is "ruined" lol I am not an old timer yet but grew up in the 60s and 70s one thing I find amazing is how many cars I can remember that were pristine bone stock muslecars and how many stock manifolds ,shifters, wheels , air cleaners, etc went into the "bin" and sent with cars to the scrap yard.
It is my thought that yes we need to keep these cars on the road for future generations to enjoy, and the best way to do that is to drive them, not pulled off a trailer like a lawn ornament . I think we all remember as kids cars we saw while be driven around by our folks that we said I want one of those.... it made us car guys forever, the fact that you are doing yours to drive and enjoy is great make it the best it can be it is yours and your choices, as long as your happy we are happy :-). Again great job
It is my thought that yes we need to keep these cars on the road for future generations to enjoy, and the best way to do that is to drive them, not pulled off a trailer like a lawn ornament . I think we all remember as kids cars we saw while be driven around by our folks that we said I want one of those.... it made us car guys forever, the fact that you are doing yours to drive and enjoy is great make it the best it can be it is yours and your choices, as long as your happy we are happy :-). Again great job
Thread Starter
Registered User
Joined: Jul 2011
Posts: 488
I love this thread, your progress is making a lot of us spend way too much time in the shop lol a true inspiration. I read your comments regarding your dad and "his" car and about folks thinking it is "ruined" lol I am not an old timer yet but grew up in the 60s and 70s one thing I find amazing is how many cars I can remember that were pristine bone stock muslecars and how many stock manifolds ,shifters, wheels , air cleaners, etc went into the "bin" and sent with cars to the scrap yard.
It is my thought that yes we need to keep these cars on the road for future generations to enjoy, and the best way to do that is to drive them, not pulled off a trailer like a lawn ornament . I think we all remember as kids cars we saw while be driven around by our folks that we said I want one of those.... it made us car guys forever, the fact that you are doing yours to drive and enjoy is great make it the best it can be it is yours and your choices, as long as your happy we are happy :-). Again great job
It is my thought that yes we need to keep these cars on the road for future generations to enjoy, and the best way to do that is to drive them, not pulled off a trailer like a lawn ornament . I think we all remember as kids cars we saw while be driven around by our folks that we said I want one of those.... it made us car guys forever, the fact that you are doing yours to drive and enjoy is great make it the best it can be it is yours and your choices, as long as your happy we are happy :-). Again great job
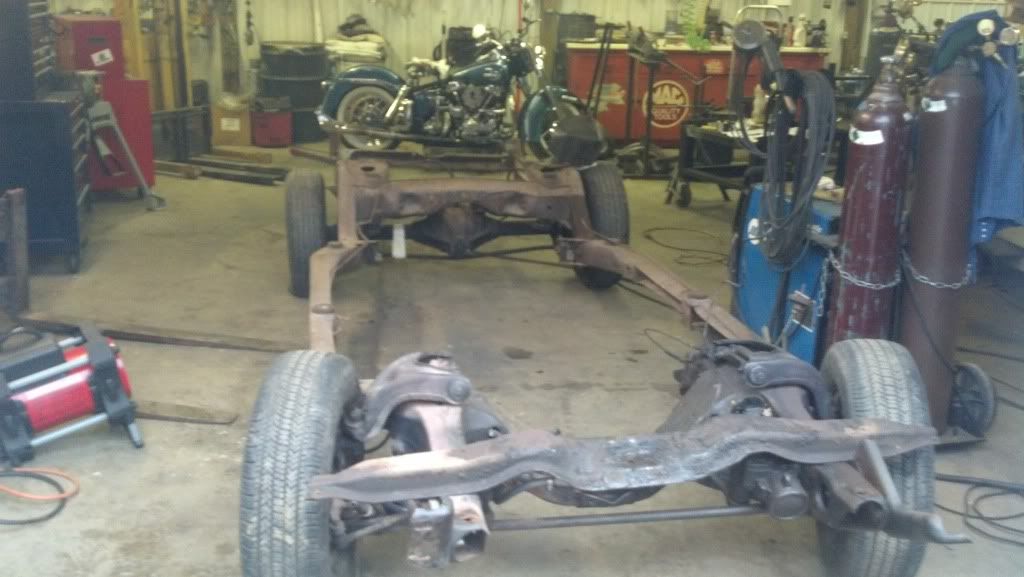
HaHa, TIME, thats what it is lots and lots and lots of time. I learned to paint, cut, and buff on this car. The first fender well I did, I smoothed, painted, sanded, sanded, sanded x20, then buffed over and over, I actually took it back to the metal 42 times, no crap 42 times until I was happy, fender well 2 took 3 times, the firewall was 1 time, so I guess either I got better or my eyes got worse LOL. We pulled the motor 20+ times to get the headers to clear properly, there is so much fab work on the frame it is insane. I am trying to get it on the road this year, I want to pick my father up and take him to some cruise ins, I would love for us both to enjoy what the car is now or what it hopefully will be soon.
I want to say again, you all have helped me, either with advice, ideas or compliments, I really have to give LOTS of credit to my Buddy Darrin who has a 65 442 vert, and my buddy Buz who is one of the greatest fabricators I know, I had a lot of ideas, but he turns them into reality. The majority of the build has been done at home in my garage, my fiance has helped tremendously also. It has been a major learning experiance, and things have been done, i didnt like it and started over, and over and over, I really want to get the car done and not have to turn a wrench on it (within reason) There are lots of you that know much more than I do, and some that are seeking advice, all I can say to those that are inspired or like this thread, is that I made sure I used all new bolts, loc-tite everything, make sure it fits properly, if it dont start over. Every part of this build, I talked to people, google imaged things, got ideas and lost LOTS of sleep over it, I am in no way wealthy, I found a lot of good deals on parts that were used for mock up only and were still brand new. I have rambled enough, Below is a pic of the finished trunk and my old crusty bumper that I polished last night.
2012-06-09_17-46-19_457.jpg
2012-06-09_18-03-16_643.jpg
2012-06-11_20-00-37_223.jpg
Registered User
Joined: Jan 2008
Posts: 3,515
From: South River, New Jersey
42 times!!! That's nuts :-) but it shows your dedication to the project, I am working in a small one car garage but when I feel sorry for myself I remember posts here and guys working outside so I count my blessings .
Taken your dad for a cruise is going to be cool:-)
Bumper looks sweet, speed on brutha, can't wait for the next installment
Taken your dad for a cruise is going to be cool:-)
Bumper looks sweet, speed on brutha, can't wait for the next installment
Thread Starter
Registered User
Joined: Jul 2011
Posts: 488
I am tired and excited, its getting closer by the day! I cut and buffed the car over the last few days, (all but the front clip)
2012-06-17_19-23-46_373.jpg
2012-06-19_22-49-00_934.jpg
2012-06-19_20-05-27_909.jpg
2012-06-20_19-03-48_332.jpg
2012-06-20_12-24-38_158.jpg
2012-06-17_19-23-46_373.jpg
2012-06-19_22-49-00_934.jpg
2012-06-19_20-05-27_909.jpg
2012-06-20_19-03-48_332.jpg
2012-06-20_12-24-38_158.jpg

Registered User
Joined: Mar 2010
Posts: 372
dude.....duuuude.....DUUUUUUUUUDE!!!!! very nice!! i'm loving your style, and may pull some ideas from this thread. i love the dash, i have been contiplating what to do with my dash and i like what you did, i may do something similar to that cuz to restore my original dash is crazy money. i have a friend who fabb'd a few things for me, i'm sure he could make me a dash panel similar to yours, great idea!!
i also noticed you went with the same aluminum radiator i have in my car, and it looks like you also had to fab the lower bracket to make it fit as it's not a direct replacement. we just plasma cut my old bracket right out and made an entire new one. that radiator makes it look so much better and cools much better as well.
also, when i did my disc brake conversion, we had to remove the motor mount bolts and lift the motor just to get those stupid lines around them, not sure why they route them that way. but apparantly it's common...did you use a Right Stuff conversion kit??
i also did tubular upper/lower front control arms up front with all new steering linkage this past spring which is awesome, you'll love how that thing handles!! i thought it was cool that were are both basically on the same page as to what we want out of our cars!! this winter i'm having a locol olds guru completely go through my heads and adding a bigger cam to get my 330 singing, hoping for 400-425HP by next summer. after that is done and blow my rear end (accidentally, of course) i plan on upgrading the entire rear rolling chassis....boxed upper & lowers, 3:55's, sway bar, adjustable shocks, & possibly a 12 bolt swap as well.
but all in all, i like what you got going on over there. good job!!
Thread Starter
Registered User
Joined: Jul 2011
Posts: 488
I worked all day yesterday on the grill, I am having a little trouble getting the fenders lined up correctly, hopefully my Olds guru buddy will lend a helping hand!
2012-06-23_17-52-03_483.jpg
2012-06-23_17-52-03_483.jpg
Registered User
Joined: May 2012
Posts: 188
From: Fl
Who's Pan in the back of the pic, I want it !, Car looks great too.. LOL
Thread Starter
Registered User
Joined: Jul 2011
Posts: 488
Thread Starter
Registered User
Joined: Jul 2011
Posts: 488
Thread Starter
Registered User
Joined: Jul 2011
Posts: 488
I havent really worked on the car much this week, but I have gotten prepared for the 4th
photobucket-11791-1341084056511.jpg
photobucket-11791-1341084056511.jpg
Thread Starter
Registered User
Joined: Jul 2011
Posts: 488
Its been a REALLY slow few weeks, I had to have a procedure done to my foot so I havent done much in the garage.
100_2875.jpg
100_2876.jpg
100_2877.jpg
100_2878.jpg
100_2879.jpg
100_2880.jpg
100_2883.jpg
100_2884.jpg
100_2885.jpg
100_2875.jpg
100_2876.jpg
100_2877.jpg
100_2878.jpg
100_2879.jpg
100_2880.jpg
100_2883.jpg
100_2884.jpg
100_2885.jpg
Thread Starter
Registered User
Joined: Jul 2011
Posts: 488
Today was a good day in the garage, We got all the tranny lines in, fixed some minor leaks on lines, repositioned the new gas pedal and throttle line, tightened the belts, checked the timing, which was at about 12 degrees vac advance unhooked at 1500 rpms, and hit 40 degrees at 3500 rpm, (is that to high?)
Dropped it on the ground (pouring rain outside) so we did a good brake check, pedal felt great, mash it about 2 inches and solid as a rock, no fade, so I assume we have plenty of vac even with a 582 lift cam, got on the throttle just a little bit and the tires went up in smoke, stall seems to be fully engaged at about 1900 rpm. One fear i have is temp, Please help if you have suggestions, but I am running a champion radiator, 3 core, dual 12" electric fans that cut on at 170 and a 190 thermostat, after about 20 minutes of running in the garage the temp will hit 215 and climb, I am confident that out on the open road it will run cooler but I built this car to take to events where it might sit in traffic for a long time, My first thought is to run a 160 degree therm, then if that doesnt solve it build a shroud for the 12" fans, I do know the fans sent with the champion radiator probably arent the best fans I might need to upgrade them to a better set up, please let me know if you have suggestions
Dropped it on the ground (pouring rain outside) so we did a good brake check, pedal felt great, mash it about 2 inches and solid as a rock, no fade, so I assume we have plenty of vac even with a 582 lift cam, got on the throttle just a little bit and the tires went up in smoke, stall seems to be fully engaged at about 1900 rpm. One fear i have is temp, Please help if you have suggestions, but I am running a champion radiator, 3 core, dual 12" electric fans that cut on at 170 and a 190 thermostat, after about 20 minutes of running in the garage the temp will hit 215 and climb, I am confident that out on the open road it will run cooler but I built this car to take to events where it might sit in traffic for a long time, My first thought is to run a 160 degree therm, then if that doesnt solve it build a shroud for the 12" fans, I do know the fans sent with the champion radiator probably arent the best fans I might need to upgrade them to a better set up, please let me know if you have suggestions

Thread Starter
Registered User
Joined: Jul 2011
Posts: 488
re

Registered User
Joined: Jul 2008
Posts: 5,510
From: Seneca Falls, NY
The thermostat is almost definitely NOT your problem. I'd start with the fan shrouds. More often than not, that's the problem when overheating at idle. I have a stock 455 with a 5 blade clutch fan and I run at 180 all the time whether 40 degrees out or 100 degrees. It's a cheap single core radiator.
Thread Starter
Registered User
Joined: Jul 2011
Posts: 488
re
Suspension, well hahaha im running hotchkins lowers and SPC totally adjustables on top with hotchkins 2" lowering springs all around
Registered User
Joined: Jul 2012
Posts: 570
From: Old Bridge, NJ
I just spent over 30mins going through this whole thread....WOW! That is very impressive bro. In your garage?? I can only dream of doing what you've done some day.
That dashboard is beautiful! Sounds like you're getting to the "gremlins" part of the build where you're so close to being "finished", just gotta deal with all the little crap. Hang in there! Looks awesome!
That dashboard is beautiful! Sounds like you're getting to the "gremlins" part of the build where you're so close to being "finished", just gotta deal with all the little crap. Hang in there! Looks awesome!
Thread Starter
Registered User
Joined: Jul 2011
Posts: 488
Re
I just spent over 30mins going through this whole thread....WOW! That is very impressive bro. In your garage?? I can only dream of doing what you've done some day.
That dashboard is beautiful! Sounds like you're getting to the "gremlins" part of the build where you're so close to being "finished", just gotta deal with all the little crap. Hang in there! Looks awesome!
That dashboard is beautiful! Sounds like you're getting to the "gremlins" part of the build where you're so close to being "finished", just gotta deal with all the little crap. Hang in there! Looks awesome!
I found a couple leaks at the carb base and intake, which might be why the seconadries arent opening, I LOVE the 200R4, Art Carr did one heck of a job. I am really leaning towards a Prosystems carb from Patrick James. The new fan shroud should be here tomorrow so I will give that a try to see if it fixes my cooling issue. fun fun!!!!!!
Registered User
Joined: May 2012
Posts: 7
From: Boise, Idaho
If you still have overheating issue after installing the shroud, you might try backing off the timing a bit. I run mine mostly at the track at 10 - 36 degrees. It seems to work the best for my 455. I believe that too much advance and too lean of a mixture can contribute to overheating.
Thread Starter
Registered User
Joined: Jul 2011
Posts: 488
I fixed the intake leak, installed a 160 thermostat, Ironically after the thermostat change the car DID run cooler, I know, I know I have heard it a million times that a cooler therm will not make an engine run cooler. Before the thermostat change, it would heat to 200-210 in ten minutes or less of idle time, I could drive it and it would cool to 180, first red light I hit if i was sitting for more than a minute its at 210 and if i sat for longer than about 4-5 minutes its climbing above 215.
Today with the 160 therm, after 10 minutes of idle time its at 185, I drove it for some time and it stayed at about 180, After driving it and bringing it home I let it sit and idle for an additional 10-15 minutes and it never got above 200 before I cut it off.
Well I had already ordered the fan shroud and cut the holes for the fans so I went ahead and installed it, Did the same round of testing and at a stand still for long periods of time it will still hit 195-200, but the second I hit the road it cools and cools QUICK, less than a mile its at 175-180 and holding, hit a red light and it takes some time to warm up to 195ish, I couldnt get it to go above 200.
I am waiting for the new carb from Prosystems, I have to do some more work on the throttle cable, I have a lokar complete throttle set up and I am having a tough time getting wide open throttle. The existing Quadrajet is all over the place, everything seems to be working properly, we get the idle set drive it and then it wasts to idle at 1500-1800 rpm, adjust it again it works great for a few minutes then fast idle again, there are no vac leaks etc, it doesnt really matter a GOOD carb is on its way.
Thread Starter
Registered User
Joined: Jul 2011
Posts: 488
Re
I actually have one I bought when I built a large BBQ smoker, I didnt use it last night but I did use it when the temps were at 215+ before changing the therm and adding the shroud and it always read within 2-5 degrees of the guage. I am running a brand new elec autometer guage, but I did question it when we first cranked the car.
Justin
Joined: Mar 2012
Posts: 3,456
From: utah
This has been such a cool build !! Very inspiering for me and the best part has been how its been built by you and your friends in your garge !! Glad to hear that you have worked out most of the bugs that come near the end .
Thread Starter
Registered User
Joined: Jul 2011
Posts: 488
re
"This has been such a cool build !! Very inspiering for me and the best part has been how its been built by you and your friends in your garge !! Glad to hear that you have worked out most of the bugs that come near the end . "
Thank you, REALLY thank you!
Its been a chore! Its one thing to take out the old and bolt in the new, or have some one build things that you bolt in, (which is a lot of work and deserves respect to do it right) but we have hours and hours of fabrication, we have so much time in the frame, making the engineand headers etc clear properly, boxing the frame, etc let alone the trunk, dash,firewall, havent even started on a console.All the above were just ideas we put together and made them happen. I love all kinds of restoration, and modification, but I will say its alot easier just to take a car and replace worn out stuff with new, There is still a lot to be done.
Last edited by real57vetteguy; Aug 24, 2012 at 10:04 PM.
Thread Starter
Registered User
Joined: Jul 2011
Posts: 488
Registered User
Joined: Jan 2009
Posts: 1,565
From: Dallas Texas
Absolutely A-W-E-S-O-M-E documented build! 1st time I've seen it, and couldn't wait to "turn the page". You should be proud, as should your Dad. He is gonna' be one happy guy when he gets his first ride..........oer...or....HIS FIRST DRIVE!!!!! Congratulations on a fine job!

Thread Starter
Registered User
Joined: Jul 2011
Posts: 488
Re
Absolutely A-W-E-S-O-M-E documented build! 1st time I've seen it, and couldn't wait to "turn the page". You should be proud, as should your Dad. He is gonna' be one happy guy when he gets his first ride..........oer...or....HIS FIRST DRIVE!!!!! Congratulations on a fine job!
I got the new carb installed tonight and I must give a HUGE hats off and thank you to Patrick James of Prosystems for building an amazing carb. The car felt good before, now WOW. I also want to sincerly thank Cutlassefi (Mark) for the cam, he did an amazing job as well. I've had several supercharged fox body mustangs in the past but I feel this is the strongest running car I have had. Its certainly the smoothest. I started this build in the garage in November last year, I drove it for the first time 2 weeks ago, I still have a couple of gremlins to chase down but I'm really happy that the only real issue I had was a carb that was too small and I am having to run a heavier guage wire from the alt to the fuse box.
It certainly has some unique qualities, some will hate it because of the modifications, some will love it. I've said it in the past and I will say it again, I wanted the looks of the 65 and the comfort, ride and technology of a modern car. I want to drive it, long distance and enjoy it. Good Lord willing I will have the hood and fron bumper on and be able to take dad for a ride in the next few weeks, which makes all the scars, frustration, bleeding and planning well worth it!
Thanks again for all your help and kind words!
2012-08-30_20-17-05_420.jpg
Thread Starter
Registered User
Joined: Jul 2011
Posts: 488
Thread Starter
Registered User
Joined: Jul 2011
Posts: 488
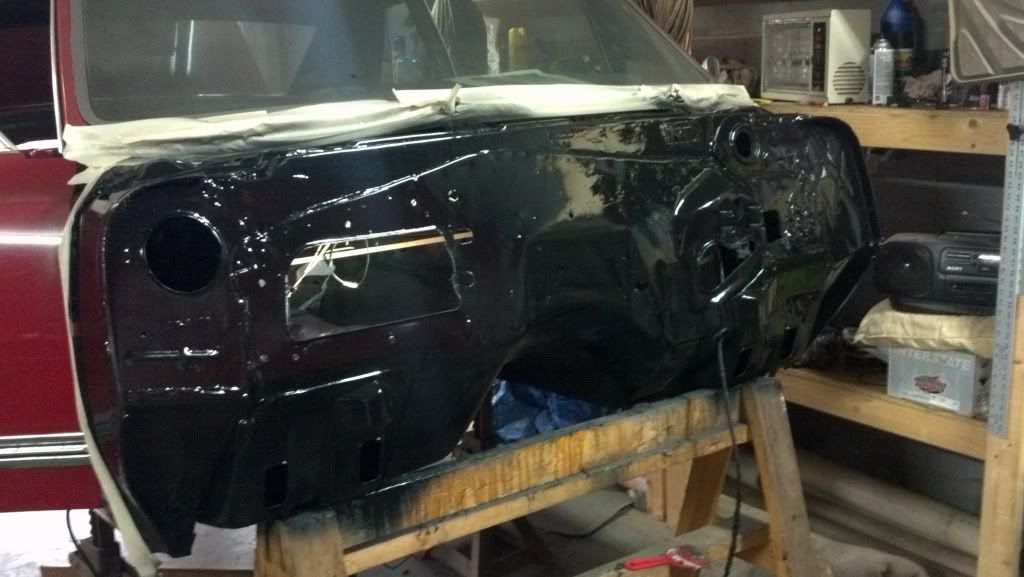
I wasnt happy with the cosmetic look of the engine, not with the coating on the intake and valve covers. I also wanted a rev limiter and my plug wire loom on the drivers side was getting into the steering shaft from time to time. I decided its time to fix all that.
The new distributor it supposed to be here monday along with some billet specialties items.
2012-09-05_20-51-17_511.jpg
2012-09-12_22-16-26_207.jpg
2012-09-13_11-23-23_76.jpg
2012-09-13_15-52-40_820.jpg
2012-09-13_15-53-05_911.jpg
2012-09-14_17-27-42_829.jpg
2012-09-14_17-27-51_556.jpg
2012-09-14_17-28-05_885.jpg
Thread Starter
Registered User
Joined: Jul 2011
Posts: 488
Re
Robert,
Thanks for the kind words, however your car is the one that is looking TOO good to get dirty. I know you have to be really excited about the paint. Check those looms out like we talked about. I hope the breather clears, it looks close.
I am waiting for the new dist, and a few other parts. My buffer went down right in the middle of wet sanding the firewall again, so I broke down and ordered a really nice variable speed. I hope to get mine back on the road for a few months of decent weather, I want to hit the dyno shop also to see if the elec pump is going to provide any gains over the mechanical on paper, so far nothing that I can see on the street.
Long term winter projects will include narrowing the rear end, (slightly maybe 2-3 inches) for cosmetic reasons. I love the exhaust set up but I am not sure how much I like the magnaflow sound I might do a muffler swap. I need to build a center console. etc etc its never endng
Thread Starter
Registered User
Joined: Jul 2011
Posts: 488
I know this is off the subject of Oldsmobile, but I dug up some pics of the 57 Vette build and wanted to share them.
IM000783.jpg
IM000784.jpg
IM000786.jpg
IM000787.jpg
IM000788.jpg
IM000789.jpg
IM000791.jpg
IM000793.jpg
VETTESEPT13018.jpg
VETTESEPT13017.jpg
IM000783.jpg
IM000784.jpg
IM000786.jpg
IM000787.jpg
IM000788.jpg
IM000789.jpg
IM000791.jpg
IM000793.jpg
VETTESEPT13018.jpg
VETTESEPT13017.jpg


