
Pulling the motor
 June 18th, 2014, 11:27 AM
#1401
Registered User
Thread Starter
Join Date: Aug 2013
Location: Central Illinois
Posts: 3,900
So I'm trying to get my accessories on and everything was going swimmingly until I realized I hadn't bolted the power steering pump to the lower block. Once I did, the pulley was pulled out of alignment with the water pump pulley. What kinda' stinks is that when I was pulling this stuff off I thought I'd be putting them right back on (not 10 months later) so I wasn't great about organizing the bolts. I just had a container of "power steering pump" bolts, and one for alternator, etc. But Once I pulled them out I realized some looked rather sketchy. For instance one looks to be maybe a #10 machine screw, about two inches long, and with six washers on it. Uhh....not sure about that one.
Anyway, I have it bolted on as per the CSM but like I said, it's not lined up. Do I start throwing washers at it myself?
Anyway, I have it bolted on as per the CSM but like I said, it's not lined up. Do I start throwing washers at it myself?
Last edited by Macadoo; June 18th, 2014 at 08:34 PM.


 June 18th, 2014, 12:08 PM
#1404
Registered User
Thread Starter
Join Date: Aug 2013
Location: Central Illinois
Posts: 3,900
Do you mean here?
[IMG]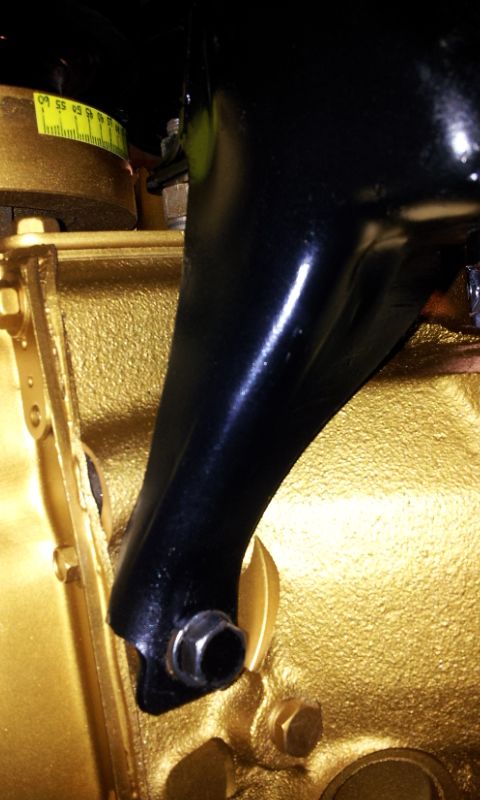 [/IMG]
That might explain this beautiful set up.
[IMG]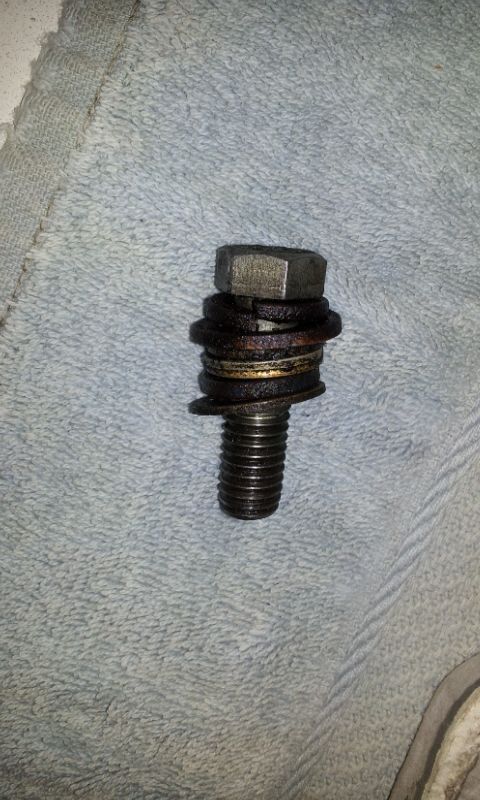 [/IMG]
Although I had this one marked as AC. Honestly though, looking at the geometry, it doesn't look like that's the direction it needs to move. But what the heck, I'll give it the ol' college try. Thanks Joe.
[IMG]
 [/IMG]
That might explain this beautiful set up.
[IMG]
 [/IMG]
Although I had this one marked as AC. Honestly though, looking at the geometry, it doesn't look like that's the direction it needs to move. But what the heck, I'll give it the ol' college try. Thanks Joe.
June 18th, 2014, 12:15 PM
#1405
Registered User
Join Date: Mar 2010
Location: Indiana
Posts: 100
I just pulled that bracket off the other day, there was a larger 5/8" bolt on the side under the exhaust manifold that had a spacer against the block, (spacer - bracket - washer - lockwasher - bolt) I think. I just recall it was larger than all the others on the front.
Maybe thats helpful?
Tim
Maybe thats helpful?
Tim
June 18th, 2014, 12:18 PM
#1406
Registered User
Thread Starter
Join Date: Aug 2013
Location: Central Illinois
Posts: 3,900
I just pulled that bracket off the other day, there was a larger 5/8" bolt on the side under the exhaust manifold that had a spacer against the block, (spacer - bracket - washer - lockwasher - bolt) I think. I just recall it was larger than all the others on the front.
Maybe thats helpful?
Tim
Maybe thats helpful?
Tim
June 18th, 2014, 12:50 PM
#1407
Registered User
Thread Starter
Join Date: Aug 2013
Location: Central Illinois
Posts: 3,900
Anyone happen to know the correct dimensions of these spacers? Because I didn't have one on the lower bolt to DS of block and the one I did have on the front of the block (pictured) is actually a large nut.
[IMG]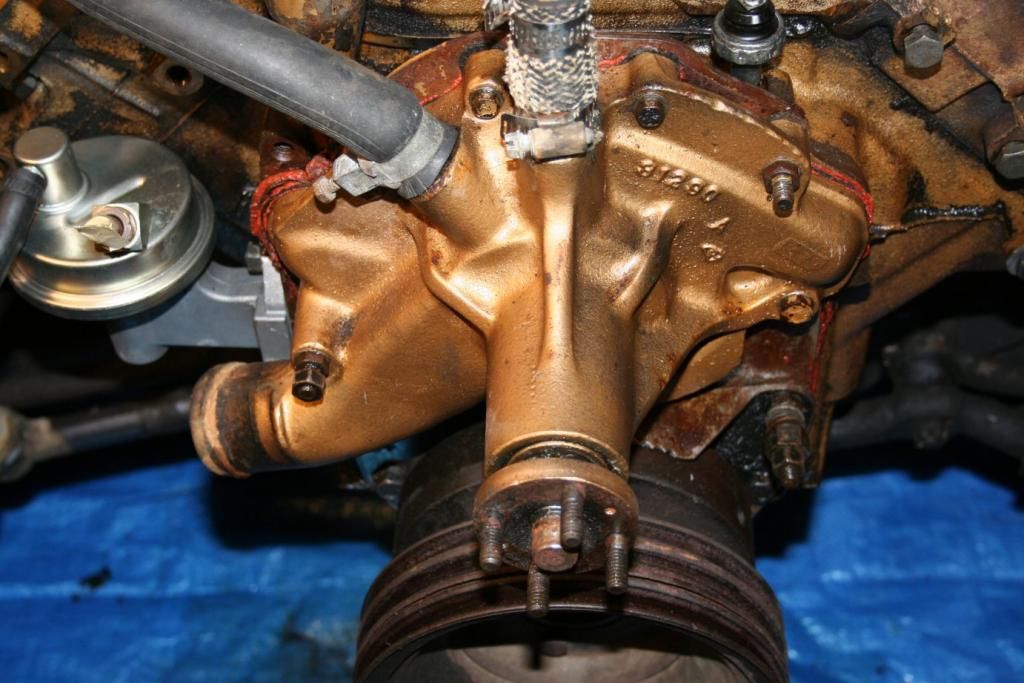 [/IMG]
[IMG]
 [/IMG]
June 18th, 2014, 12:54 PM
[/IMG]
June 18th, 2014, 12:54 PM
#1408
Registered User
Thread Starter
Join Date: Aug 2013
Location: Central Illinois
Posts: 3,900
June 18th, 2014, 01:07 PM
#1410
Registered User
Thread Starter
Join Date: Aug 2013
Location: Central Illinois
Posts: 3,900
But thanks Eric.
Last edited by Macadoo; June 18th, 2014 at 05:12 PM.
June 18th, 2014, 07:40 PM
#1411
Registered User
Thread Starter
Join Date: Aug 2013
Location: Central Illinois
Posts: 3,900
The spacers did the trick. It took a little finesse and some fabrication but I've got it all lined up. It's getting there. Another day under the [not installed yet] hood and I'll be ready to tackle the exhaust. At least I think.
Oh, and before I installed and tightened the power steering belt, I filled it to the "cold" line and spun the pump for a minute or so. But the level didn't drop. I thought it might help get fluid into the empty lines but it didn't appear to.
[IMG]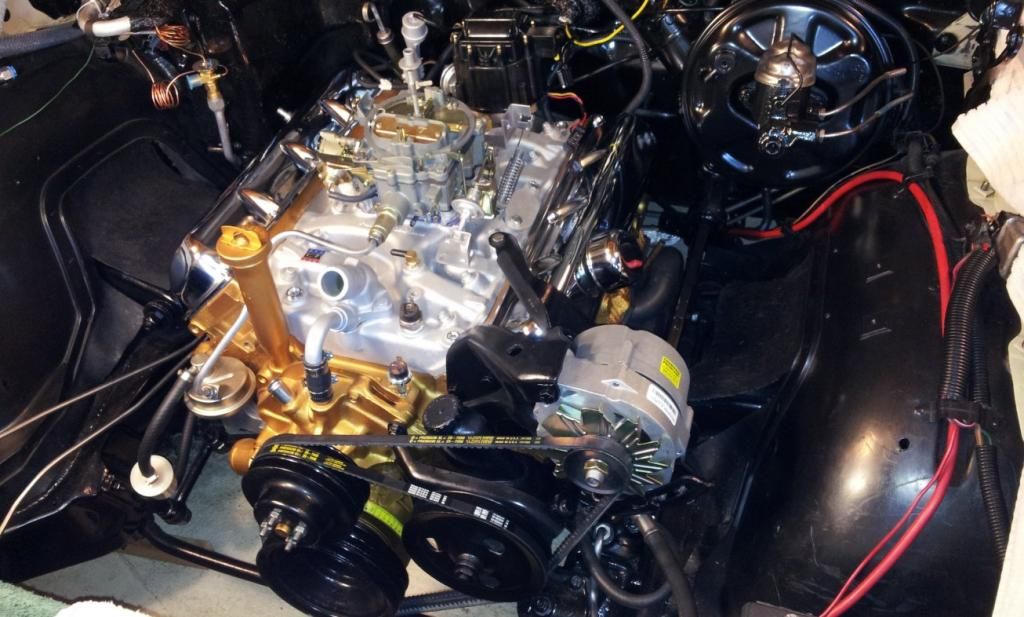 [/IMG]
Oh, and before I installed and tightened the power steering belt, I filled it to the "cold" line and spun the pump for a minute or so. But the level didn't drop. I thought it might help get fluid into the empty lines but it didn't appear to.
[IMG]
 [/IMG]
Last edited by Macadoo; June 18th, 2014 at 07:42 PM.
June 18th, 2014, 08:31 PM
#1413
Registered User
Thread Starter
Join Date: Aug 2013
Location: Central Illinois
Posts: 3,900
Thanks Eric. I'm anxious to see the results. Hey a question; the double throttle return spring setup is rubbing on the EGR port. Do I need the larger spring or would the accelerator be too soft without it?
June 18th, 2014, 08:49 PM
#1414
Connoisseur d'Junque
Join Date: Sep 2010
Location: The Hudson Valley
Posts: 21,183
You can use pretty much any combination of springs, so long as it gives you the feel you want and closes the throttle.
The dual spring setups are a newfangled setup that will still close your throttle in case one breaks.
Your car came with a single spring originally.
- Eric
The dual spring setups are a newfangled setup that will still close your throttle in case one breaks.
Your car came with a single spring originally.
- Eric
June 18th, 2014, 09:13 PM
#1415
Registered User
Thread Starter
Join Date: Aug 2013
Location: Central Illinois
Posts: 3,900
You can use pretty much any combination of springs, so long as it gives you the feel you want and closes the throttle.
The dual spring setups are a newfangled setup that will still close your throttle in case one breaks.
Your car came with a single spring originally.
- Eric
The dual spring setups are a newfangled setup that will still close your throttle in case one breaks.
Your car came with a single spring originally.
- Eric
") June 19th, 2014, 06:32 AM
June 19th, 2014, 06:32 AM
#1418
Registered User
Join Date: Jul 2013
Location: Mo-Ray-Al, K-Bec.
Posts: 1,815
You can use pretty much any combination of springs, so long as it gives you the feel you want and closes the throttle.
The dual spring setups are a newfangled setup that will still close your throttle in case one breaks.
Your car came with a single spring originally.
- Eric
The dual spring setups are a newfangled setup that will still close your throttle in case one breaks.
Your car came with a single spring originally.
- Eric
Toyota?
June 19th, 2014, 06:41 AM
#1419
Connoisseur d'Junque
Join Date: Sep 2010
Location: The Hudson Valley
Posts: 21,183
Prefer to avoid them, myself.
At least if the Olds throttle sticks open, I can shift into neutral and kill the engine.
I hear those Toyotas lock the doors and disable the door locks, seatbelt releases, gear selectors, and ignition switches, then run a soundtrack of maniacal laughter through the entertainment systems as you drive into a ditch.
- Eric
June 20th, 2014, 05:55 PM
#1423
Registered User
Thread Starter
Join Date: Aug 2013
Location: Central Illinois
Posts: 3,900
 June 23rd, 2014, 06:52 PM
#1426
Registered User
Thread Starter
Join Date: Aug 2013
Location: Central Illinois
Posts: 3,900
Update time:
I have the engine and bay finished, other than priming the engine one last time. I spent last night and today working on the bolt on exhaust, last of the list other than reinstalling the hood. Everything went really well until I had to deal with the muffler shop for my downpipes. Dude on the phone said "yeah, no problem, we bend 2-1/2" all the time. It'll take about half an hour." So I used some flex pipe stuff to mock up what I needed and headed to town. When i got there they were out of 2-1/2" pipe and lost the correct die. After three hours of waiting and calling other shops, they had them done. I brought them home and they fit great! Except for the fact that they spread the ends too much. After an hour and half with a ratchet and breaker bar I was down to the last joint but it just won't close. Like, at all. Obvioulsly I have to take them back and try again but for now can I cut a couple of kerfs perpendicular to the opening to help them close up? Or does anyone know a better way to crimp it up a little? Man, I'm this one joint away from firing this thing up for the first time!
I have the engine and bay finished, other than priming the engine one last time. I spent last night and today working on the bolt on exhaust, last of the list other than reinstalling the hood. Everything went really well until I had to deal with the muffler shop for my downpipes. Dude on the phone said "yeah, no problem, we bend 2-1/2" all the time. It'll take about half an hour." So I used some flex pipe stuff to mock up what I needed and headed to town. When i got there they were out of 2-1/2" pipe and lost the correct die. After three hours of waiting and calling other shops, they had them done. I brought them home and they fit great! Except for the fact that they spread the ends too much. After an hour and half with a ratchet and breaker bar I was down to the last joint but it just won't close. Like, at all. Obvioulsly I have to take them back and try again but for now can I cut a couple of kerfs perpendicular to the opening to help them close up? Or does anyone know a better way to crimp it up a little? Man, I'm this one joint away from firing this thing up for the first time!
June 23rd, 2014, 06:58 PM
#1428
Mdchanic robot chicken is hilarious lol. Mac try to sleeve the exhaust pipe with a pipe that will fill the void. Like if they went over 2.50 for the inside diameter expand it a bit more to accept a piece of pipe that will fit over the pipe you are trying to clamp it onto and into the pipe that's too big. I dunno if that makes sense but I did this with my old caprice when the pipes I got where weird sizes. Or go to autozone and buy a reducer and use that. use a reducer that will fit over the pipe that's too big and make sure it fits into the pipe you want it on. trimming is involved but its a 5 buck solution.
June 23rd, 2014, 08:41 PM
#1429
Registered User
Thread Starter
Join Date: Aug 2013
Location: Central Illinois
Posts: 3,900
Mdchanic robot chicken is hilarious lol. Mac try to sleeve the exhaust pipe with a pipe that will fill the void. Like if they went over 2.50 for the inside diameter expand it a bit more to accept a piece of pipe that will fit over the pipe you are trying to clamp it onto and into the pipe that's too big. I dunno if that makes sense but I did this with my old caprice when the pipes I got where weird sizes. Or go to autozone and buy a reducer and use that. use a reducer that will fit over the pipe that's too big and make sure it fits into the pipe you want it on. trimming is involved but its a 5 buck solution.
June 23rd, 2014, 09:03 PM
#1430
Hookers under Hood
Join Date: Nov 2013
Location: Ontario, Canada
Posts: 3,543
Mac have the shop make up a small header pipe 12" long. flatten the pipe where it meets the header put the flange on it then mandrel bend the pipe to 80 deg, this will keep it up nice and snug without too much restriction. then your intermediate pipe will have a small bend up to compensate thru to your mufflers. Are you just having the issue with the driver side as I did ?
June 23rd, 2014, 09:17 PM
#1431
Registered User
Thread Starter
Join Date: Aug 2013
Location: Central Illinois
Posts: 3,900
Mac have the shop make up a small header pipe 12" long. flatten the pipe where it meets the header put the flange on it then mandrel bend the pipe to 80 deg, this will keep it up nice and snug without too much restriction. then your intermediate pipe will have a small bend up to compensate thru to your mufflers. Are you just having the issue with the driver side as I did ?
Yeah, mostly the driver's side. The PS header doesn't shoot straight down like the other side.
[IMG]
 [/IMG]
June 23rd, 2014, 10:00 PM
[/IMG]
June 23rd, 2014, 10:00 PM
#1434
Registered User
Thread Starter
Join Date: Aug 2013
Location: Central Illinois
Posts: 3,900
Lol, thanks Randy. I gotta' get this thing on the road or I'm gonna' pop a blood vessel!
[IMG] [/IMG]
A collector is where all the header pipes come together, part of the header. If you mean the reducer, yeah. Header, then reducer with flange and gasket, down-pipe, front pipe, then H-pipe, muffler, rear pipe, tail pipe.
That reducer in the pic, next to the jack stand, came with the exhaust system. It's huge! The reducers that came with the headers are less than half as long. Those are what I used.
[IMG]
 [/IMG]
That reducer in the pic, next to the jack stand, came with the exhaust system. It's huge! The reducers that came with the headers are less than half as long. Those are what I used.
June 23rd, 2014, 10:09 PM
#1435
Hookers under Hood
Join Date: Nov 2013
Location: Ontario, Canada
Posts: 3,543
Yes sorry I meant the reducer Mac. I would have the shop flatten the small pipe that you have coming off the reducer so that you can eliminate the reducer that came with the headers. You may also need to bend that little pipe up a little more as well. I hope I'm explaining it better this time.
June 24th, 2014, 07:23 AM
#1436
Registered User
Thread Starter
Join Date: Aug 2013
Location: Central Illinois
Posts: 3,900
Yeah man, I get what you're saying now. Makes sense. I think I'll use a soup can or something to get that other downpipe tight and just take the whole car in and let them work their magic.
June 24th, 2014, 08:10 AM
#1437
Measure the id. Of the pipe that's too big and the od. Of the pipe that's too small. You can use a tail pipe expander to open up the smaller one or the bigger one. Using a piece of proper exhaust pipe for a sleeve will avoid the use of the expander which cost more lol.
June 24th, 2014, 10:43 AM
#1438
Hookers under Hood
Join Date: Nov 2013
Location: Ontario, Canada
Posts: 3,543
Put-er-ther Mac!!!
Eric
 June 24th, 2014, 11:36 AM
#1440
Registered User
Thread Starter
Join Date: Aug 2013
Location: Central Illinois
Posts: 3,900
All good advice, and I wouldn't have thought that about the perception Eric. Especially when the truth is after a resto like this, most of us are flat broke! When I was in there yesterday, all covered in grease and dirt and looking like an abandoned mutt, they were pretty sympathetic. When I called this morning and informed them the pipes were too long and too big, their tone was a little different.
z11, after it's on the hoist or before? I love you video BTW
z11, after it's on the hoist or before? I love you video BTW


