
Home Porting Techniques

Engine Builder
Joined: Jan 2010
Posts: 552
From: Louisville, ohio
Yep. I've done it with 3/32 stick also. If your able to put the weld on the insert and not the iron it'll work just fine.
The Ga heads had induction hardened seats which was nothing more than the seat area of the head was heated red hot and then quenched with water leaving a hard surface on the iron. Not sure what method the factory used to heat the heads but I would think they used induction coils which can heat an object with great speed and efficiency.
The Ga heads had induction hardened seats which was nothing more than the seat area of the head was heated red hot and then quenched with water leaving a hard surface on the iron. Not sure what method the factory used to heat the heads but I would think they used induction coils which can heat an object with great speed and efficiency.

Engine Builder
Joined: Jan 2010
Posts: 552
From: Louisville, ohio
Several sources for 1.625 exhaust valves. Probably stuck with a stock replacement from SpeedPro or the likes for a 2" intake valve. I believe SI has a swirl polished 2". After the last batch of valves I had from them I avoid them. I stock a variety of valves. Let me know what you need.
Thread Starter
Registered User
Joined: Apr 2010
Posts: 988
Sources
http://www.btrperformance.com/ Top notch, very busy, and last time I called about valves he directed me to someone else.
https://www.facebook.com/pages/Berna...08309059257851 Bernard Mondello is now my primary source for valves. He offers a lot of different sizes and will spend the time to measure each stem to assure quality. He is not affiliated with Mondello Performance products. He's a great guy with a ton of knowledge and very fair prices.
http://www.mjproformance.com/ This is Smitty (Mark Smith) - if you've followed along in this thread, you can see he's spent a great deal of time to help pass on his knowledge, and help others to make smart choices. Do not hessitate to call him - 330-495-4582
http://www.jsmachineoldsmobile.com/home.html This is Jim Lapikas he's a good guy that has been a pioneer in Olds for the now infamous "Halo". I have had some dealings with him, and he's always treated me good.
https://www.facebook.com/pages/KTRE-...91814724168123 This is Knowlton's Thunderheads out of Minesota. I have never personally dealt with them, but they have a good reputation.
CJ Smith - Head Machinist @ Joe Mondello Racing Engines
931-459-2760 M-F 8am-5pm
CJSmith@Mondello.com This is Cody in Tennesee. He's a good guy with a lot on his plate. This company is not affiliated with Mondello Performance Products.
http://www.rocketracingperformance.com/ This is John Stolpa - his shop is 20 minutes north of me. He's always treated me good and is always busy. Every time I've gone to see him, he's always stopped what he's doing and taken the time to answer all my questions and was never short with me.
http://www.dickmillerracing.com/ I have never had any dealings with Dick Miller so no comment here.
http://wiseperformanceengineering.vpweb.com/ This is Brad Wise he seems like a nice guy, but I have never purchased anything from him so I can't comment on anything here.
http://www.mondellotwister.com/ I've spent a lot of money with this company when Joe was alive, and running it. Now because of their customer service, and policies, I try to avoid them.
http://oldsperformanceproducts.com/ This is Andy Miller - I have dealt with him in the past, Bill Trovato directed me toward him when I needed a custom length timing chain. Apparently, he measures every one. Andy may come across a little abrasive at times, but he possesses a wealth of knowledge.
Last edited by 67 Cutlass Freak; Nov 6, 2014 at 10:52 PM.
Thread Starter
Registered User
Joined: Apr 2010
Posts: 988

By the way thanks for your input on this thread Smitty. I'll give you a call one of these days, and maybe hit you up for some parts. Feel free to post any comments you may have about specific manufacturers of valves. My opinion wouldn't be worth much because I haven't seen a bunch of failed parts yet.
Engine Builder
Joined: Jan 2010
Posts: 552
From: Louisville, ohio
SI valves are imported from Brazil, Venezuela, and Chile over the years. Valve stem sihzes have ranged from .341 to .3445. The last time I ordered from them I could not put an 8 valve set together with less variance. Makes it hard and overly time consuming to size each guide to each specific valve.
I use a lot of the Milodon valves. Stem size never varies more than .0001.
Rev is also a decent brand. Though I only use a couple of their valves because of needed head size and length that works out.
Manley is the ultimate. I turn to them for all race only valves and custom diameter valves. 100% USA materials and workmanship. The quality proves it. I've been a warehouse distributor for them for about 15yrs and the service is excellent.
Last edited by Smitty275; Apr 18, 2014 at 06:28 AM.


Engine Builder
Joined: Jan 2010
Posts: 552
From: Louisville, ohio
I would put the Milodon valves in them. Leave the intakes alone at 2.072 and add a back cut to the valve and cut the exhaust valve down to 1.625. For a titch over $200 you have as good a valve set as your gonna get for the application.
Rodney
Joined: Jun 2011
Posts: 2,589
From: Houston, TX
stock sized valves
What is a good brand of valve to use if your rebuilding iron heads with stock sized valves? I've been to the Milodon, Manley, and Ferrea websites, and it seems they only sell the oversized valves. Thanks!
Thread Starter
Registered User
Joined: Apr 2010
Posts: 988
JMHO but if you're going to purchase new valves, and get a valve job you may as well put the oversized valves in there. For the cast iron heads a SB & BB a good size would be 2.07" intake/ 1.68 " exhaust. My machine shop charges $120 to open up all 16 valve pockets with a bowl hog. This will be a big improvement over stock performance without doing any other port work. It's well worth it. I'm having them do a set of "C" castings for me right now. I'm not going to pick them up until next friday, but I'll post up some photos. The only other issue with any aftermaret valve will be valve stem height. If you're running the stock, non adjustable rockers, make sure your machine shop sets the height correctly. The other option for you would be to look into stock replacements from Rock Auto. If you want a good quality used set, I could hook you up with some 1.99" intake/ 1.62" exhaust valves that came out of the "C"s. I would clean them up for you, and put a fresh 45 degree grind onto them. Shoot me a PM if you want them.
Registered User
Joined: Dec 2013
Posts: 354
Well guys ended up going with ZA12 instead of Resbond basically wanted to play it safe with something that had a track record of holding up. I think the Resbond has a good chance of working just as good but nobody has used it for long enough to confirm yet.
I filled the crossovers and also built up the dividers with ZA12. I was able to melt it on a regular Coleman propane camping stove in a small cast iron pan. It did take about 30 minutes to melt with the sheet metal lid on. Got a set of super long vise grips to grab it and pour. Overall worked very good.
I filled the crossovers and also built up the dividers with ZA12. I was able to melt it on a regular Coleman propane camping stove in a small cast iron pan. It did take about 30 minutes to melt with the sheet metal lid on. Got a set of super long vise grips to grab it and pour. Overall worked very good.
Registered User
Joined: Dec 2013
Posts: 354
And finally the bowls, remember I am no master porter this is just a cleanup job on them so don't beat me up too much! 
Also had the rocker stud pads machined .075 to compensate for the pushrod guide plates. This was done by an actual machine shop not me.
Also had the rocker stud pads machined .075 to compensate for the pushrod guide plates. This was done by an actual machine shop not me.
Thread Starter
Registered User
Joined: Apr 2010
Posts: 988
Crusty
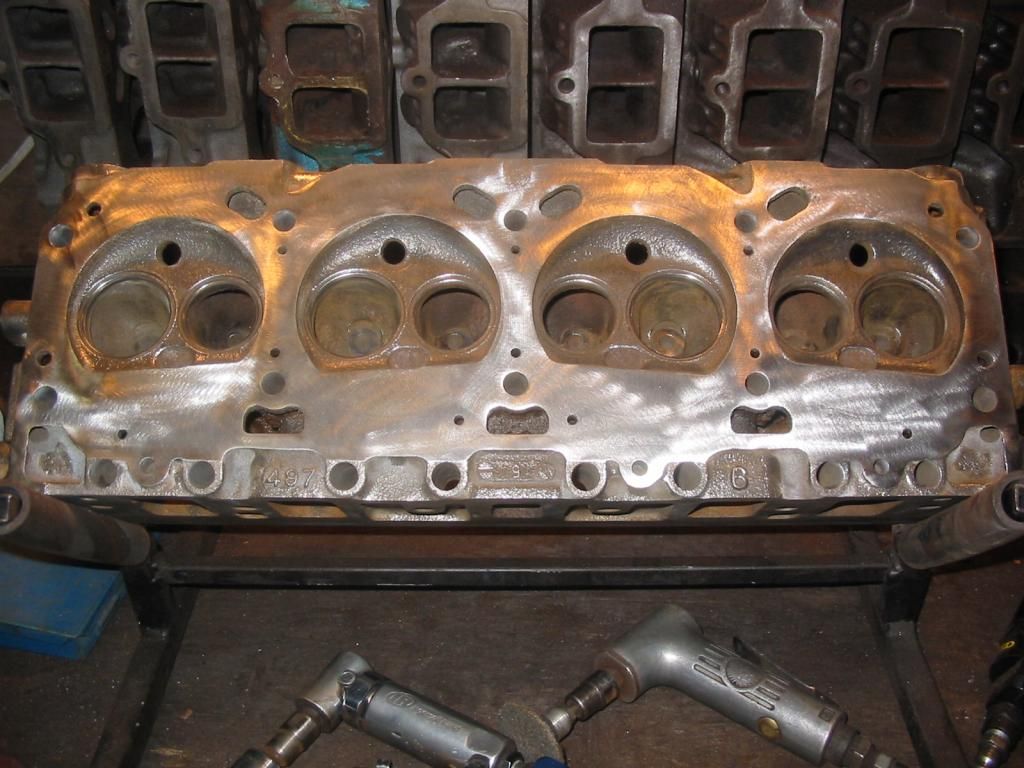
I went through my storage trailer and took inventory of the junk cast iron heads I have on hand. I found these crusty jems #4 castings. These were the original heads off my '67 race car. I'm going to descale them then lube them up and put them back into storage in bags this time. I'm not going to pay the machine shop to clean them up. I was curious if any of you guys had any cheap easy tricks for removing rust. I read somewhere that submerging them in Vinigar will do the trick. Has anyone here tried this?
120-2015_IMG.jpg

120-2015_IMG.jpg

Rodney
Joined: Jun 2011
Posts: 2,589
From: Houston, TX
I have used vinegar with great success to de-rust parts. You need to degrease the parts before using vinegar because it will not cut through the grease. My de-rusting "system" has been to 1.) Degrease with a parts cleaner soak (or spray can cleaner if the parts are large.) 2.) Soak in vinegar 1-6 hours depending on the amount of rust, the hardness of the metal and the acidity of the vinegar. Grocery store vinegar comes in 5% and 9% acidity, and softer cast metals will be etched very quickly by the vinegar. 3.) I then wire brush the parts and flush with tap water. 4.) For the final soak I dry off the water and submerse in EvapoRust which will remove the surface rust without aggressively etching the metal. 5.) Coat with WD40 or spray with a galvanizing fast etch to stop the flash rust that appears as the part dries. You can buy the EvapoRust at HarborFreight, NorthernTool, TSC, etc. It's more expensive than vinegar and looses it's potency the more you use it, which is why I use it last. With porous metal parts I will sometimes wash in a baking soda solution to neutralize the vinegar before painting.
Thread Starter
Registered User
Joined: Apr 2010
Posts: 988
bainer1290, I think you did a fine job. I was skeptical about the Coleman stove generating enough heat. Your pours look perfect and the porting looks good too. Thanks for sharing your photos.
cdrod, I will try your meathod, thanks for posting.
cdrod, I will try your meathod, thanks for posting.
Last edited by 67 Cutlass Freak; Jun 1, 2014 at 05:37 AM.
Registered User
Joined: Dec 2013
Posts: 354
I was skeptical about the propane stove too, but like I said leave it on for a good 30 minutes and in about the last 2 or 3 minutes it finally starts to melt. haha could have cooked a steak beside it!
Thread Starter
Registered User
Joined: Apr 2010
Posts: 988
Mad Science Experiment
Well thought I'd give the electolosis a try, just for fun. Here's the website I found with good instructions on how to-
http://www.ehow.com/how_6184720_clea...y-charger.html
I picked up some washing soda from the grocery store. It was cheap.
The instructions were very good and described how a larger surface area for the anode worked best.
120-2020_IMG.jpg
The angle iron that I first tried didn't work too well. It had been painted with a rust preventive primer. So I dug this old turkey tray out of the recycle bin and it worked very well. I cleaned it up before use.
120-2021_IMG.jpg
You could really see a lot of tiny bubles coming off the head. I tried to show it, but the picture sucks.
120-2023_IMG.jpg
I left it in there for seven hours, and here's how it looked after I hosed it off, and blew it dry-
120-2024_IMG.jpg
120-2025_IMG.jpg
120-2026_IMG.jpg
120-2027_IMG.jpg
It looked a lot better, but I could still see some rust. It was pretty thick before I started. I decided to descale it with the dye grinder and a braded wire brush. I put the other head in. This is how it looked after the dye grinder. I think I'm going to put it back in for some more time.
120-2028_IMG.jpg
120-2030_IMG.jpg
http://www.ehow.com/how_6184720_clea...y-charger.html
I picked up some washing soda from the grocery store. It was cheap.
The instructions were very good and described how a larger surface area for the anode worked best.
120-2020_IMG.jpg
The angle iron that I first tried didn't work too well. It had been painted with a rust preventive primer. So I dug this old turkey tray out of the recycle bin and it worked very well. I cleaned it up before use.
120-2021_IMG.jpg
You could really see a lot of tiny bubles coming off the head. I tried to show it, but the picture sucks.
120-2023_IMG.jpg
I left it in there for seven hours, and here's how it looked after I hosed it off, and blew it dry-
120-2024_IMG.jpg
120-2025_IMG.jpg
120-2026_IMG.jpg
120-2027_IMG.jpg
It looked a lot better, but I could still see some rust. It was pretty thick before I started. I decided to descale it with the dye grinder and a braded wire brush. I put the other head in. This is how it looked after the dye grinder. I think I'm going to put it back in for some more time.
120-2028_IMG.jpg

120-2030_IMG.jpg
Last edited by 67 Cutlass Freak; Apr 24, 2014 at 06:36 PM.
Chevy budget Olds powered
Joined: Jul 2011
Posts: 8,638
From: Elgin, Illinois
I think the coca cola would be more aggressive because of the level of acidity. I don't know if the electrolysis would work with coca cola but I know coca cola has phosphoric acid and that works as a rust converter you scrub the coating that it converts the rust into and that leaves a new surface underneath.

Registered User
Joined: Nov 2008
Posts: 1,120
From: Mass
Copper, I don't believe coke conductive like the washing soda
I've done the electrolysis and it works. It is directional , are the areas you aren't happy with not in line of sight to the sacrificial piece? I built my tank with about 8ish pieces of rebar so my parts would have 360 degree removal.
I've done the electrolysis and it works. It is directional , are the areas you aren't happy with not in line of sight to the sacrificial piece? I built my tank with about 8ish pieces of rebar so my parts would have 360 degree removal.
Registered User
Joined: Jul 2012
Posts: 2,990
From: Vancouver BC
I like the idea of filling the exhaust flange flush with aluminum, I hope it holds up over time.This could become the preferred method to deal with this short coming.
I really like the creative thought behind the idea, very cool.
I really like the creative thought behind the idea, very cool.
Last edited by Bernhard; Apr 26, 2014 at 11:43 AM.

Registered User
Joined: Apr 2014
Posts: 22
Hate to be a naysayer but.......how can you honestly say you are making HP without an accurate flow bench? Same goes for an accurate dyno to test. How are you going to test what you have done without either of these tools? I and a couple other guys found out a few years ago that copying Mondello's tech manual wasn't the best method. Yes the #7s dropped the ET. The next winter took them to a porter who used a flow bench and he made a world of difference.
.
.
Old Mondollar was responsible for ruining more good olds heads than any other back in the day lol..

Engine Builder
Joined: Jan 2010
Posts: 552
From: Louisville, ohio
Registered User
Joined: Apr 2014
Posts: 22
Mmm actually my friend the ports will be roughed up before final wash on the intake side.. These heads have already been flow benched and flow 278@650 with medium work. There is no restriction up in the runner the restriction is in the bowl and the short turn radius. Its not about making the port bigger only removing the right spots to allow the port to flow. If you took it right out at the throat to 92% you might get 290@650.. and then you'd kill off the flow numbers down low which the head needs for a .474-.500 lift cam.
I know you do some nice work Smitty275.. but I am no fool either. I've designed heads and ports completely from scratch.. I do have a very good grasp on ports and making power. Why don't you pop up a flow number sheet on some C castings you've ported up

www.spchoppers.com
Last edited by redneck482; Apr 29, 2014 at 08:57 AM.
Thread Starter
Registered User
Joined: Apr 2010
Posts: 988
redneck482, thanks for sharing the photos of your port work. It's real hard for me to tell from the photos if any further work would be a benefit. From the angle of the shot, I think you might have been able to remove a little bit more in the bowl area, on the intake left side. I can't see the exhaust bowl too well. In any case, nice work. Would you care to share any lower lift flow numbers? How do you plan to rough up the port, with a media blast? Are you worried about damaging the seat area, or do you have finish valve job work to do?
Engine Builder
Joined: Jan 2010
Posts: 552
From: Louisville, ohio
What's done I the runner of an Olds head has almost zero effect on low flow numbers. Low flow on these heads is influenced mostly by the short turn. To move the air through the entire port you need to enlarge it and in the right places. With no work between the pushrods or between mouth of port and the bowl area your 278 is about all your going to see.
The E heads on my car:
.100 70/66
.200 144/130
.300 248/166
.400 278/188
.500 300/200
.600 314/210
I'll have to get pics for you when I'm at the PC in the office. Haven't figured out how to post pics while on a droid.
The E heads on my car:
.100 70/66
.200 144/130
.300 248/166
.400 278/188
.500 300/200
.600 314/210
I'll have to get pics for you when I'm at the PC in the office. Haven't figured out how to post pics while on a droid.
Registered User
Joined: Jul 2012
Posts: 2,990
From: Vancouver BC
Mmm actually my friend the ports will be roughed up before final wash on the intake side.. These heads have already been flow benched and flow 278@650 with medium work. There is no restriction up in the runner the restriction is in the bowl and the short turn radius. Its not about making the port bigger only removing the right spots to allow the port to flow. If you took it right out at the throat to 92% you might get 290@650.. and then you'd kill off the flow numbers down low which the head needs for a .474-.500 lift cam.
I know you do some nice work Smitty275.. but I am no fool either. I've designed heads and ports completely from scratch.. I do have a very good grasp on ports and making power. Why don't you pop up a flow number sheet on some C castings you've ported up
Are the heads going on a class specific car, is that why you are limited to .474 - .500 max lift?
Thanks for posting pictures of your work.
www.spchoppers.com
Registered User
Joined: Apr 2014
Posts: 22
What's done I the runner of an Olds head has almost zero effect on low flow numbers. Low flow on these heads is influenced mostly by the short turn. To move the air through the entire port you need to enlarge it and in the right places. With no work between the pushrods or between mouth of port and the bowl area your 278 is about all your going to see.
The E heads on my car:
.100 70/66
.200 144/130
.300 248/166
.400 278/188
.500 300/200
.600 314/210
I'll have to get pics for you when I'm at the PC in the office. Haven't figured out how to post pics while on a droid.
The E heads on my car:
.100 70/66
.200 144/130
.300 248/166
.400 278/188
.500 300/200
.600 314/210
I'll have to get pics for you when I'm at the PC in the office. Haven't figured out how to post pics while on a droid.
I can't disagree with ya one bit Smitty.. the pinch point where that head bolt goes through and by the pushrod area there ..def are an ugly spot.
These heads were not intended for an all out port just rather just a nice port job for a street motor. They are for a high school buddy I grew up with. I really did not want to get in that much work as I'm doing it as a favor for him. They are going on a 482.. wanting to recreate a motor I had in highschool at 17.. just this time it'll have better heads and stuff.. at 17.. a guy is pretty bucks down lol
Pics be great.
Registered User
Joined: Apr 2014
Posts: 22
This is for a buddy we grew up together.. and in highschool I had a 482 I built as a punk at 17 with a W30 328 cam.. sweetest sounding motor I think today still. Back then at 3$ hour you had to do what you could with what you had lol.. but with 4.56 gears in it.. that thing was a monster on the street.. for street racing.. only car we lost to was a chevette with a tunnel rammed nitroused 350 lol..
Anyhow the idea is to re create what we had in highschool except with some worked heads and a real intake. So that's why the low lift.. were going to run a 1.8 ford rocker to push it as close to .550 as we can to make use of everything.
Its more for memory sake and the sound rather than having that last hp out of it


