When you click on links to various merchants on this site and make a purchase, this can result in this site earning a commission. Affiliate programs and affiliations include, but are not limited to, the eBay Partner Network.
Some surprises to come in the next few weeks on the heads.... the slack in the valve guides on one of the intakes was terrible, and there was more than .009 of runout on the seat that Mark measured.... New valve guides and new exhaust seats to come next by VortecPro.
For now, we are making room for the larger intake valves... I turned these exhaust valves tonight after I got home from work.... let me tell you what, Manley severe duty valves are made of some tough alloy, and it does get harder as you increase the temp, believe me!
These 1.71 valves were cut down to be ~1.635 /1.6345 inches...NOW THAT IS WHAT I CALL A MARGIN! Haha
Manley 2.125 Race Flo intake valves are on the way, and from the way the ports look, should work great in these heads!
Looking forward to your next dyno session.
The exhaust vales are old school and look heavy, are newer lighter valves that flow better not in the budget?
Haha, yeah they are Manley Severe duty valves, and they look super thick for a few reasons, one, because of the valve head construction was originally designed as a 1.71, and cutting .070 off of them without re-grinding the seat leaves them very thick, two, they are thick, and don't have undercut stems, etc.
I am looking at buying new valves as well if we don't like how these work in the seats and/or how they grind....
Thanks for staying "tuned in"; more tech and pictures of the ported heads and the reason why they weren't flowing well at low lift numbers is coming up soon.
This was such a mix-mash, hodge-podge of a an engine build originally from Mondello, it is really weird.... wait until we show a pic of the valve pockets and the seats....the rule of 86-90% max of the venturi size to valve seat didn't even come close.
We are at a 93% venturi - throat size now with only a 2.055 intake valve- almost no venturi effect = slow moving air at low lift numbers and a lazy port. Moving up to 2.125 intake valve gets us down to a 90% number, which is still high for a street engine but in the range of acceptability.... What is really crazy is that I read an article in Engine Builder magazine (online) that specifically quoted Joe M. saying that you never want to go over 90%..... that makes this even more frustrating.
To get to an 88% number, we need a 2.18 valve, which isn't available in an 11/32 stem, but is available in a 3/8 stem in the correct length.....
We want to see how the 2.125 valve works with the current port once it gets some experimental valve job on the seat, testing for flow... We will see if we need to go to the 2.18 or not.
Looking forward to your next dyno session.
The exhaust vales are old school and look heavy, are newer lighter valves that flow better not in the budget?
As the 45 is ground back into the valve the margin will be back to normal thickness. I will put up pictures as I go.
Nice attention to detail on the heads. I’m curious on what you end up with for cam specs if you switch cams. I talked to Bullet cams yesterday afternoon and they spec’d a 292-300 adv duration 240-248 @.050 .611 lift with hot lash of .010 ground on a 110+4 Lsa. This will be a low lash solid roller 461 build. Another question is what are you going to run for header size and mufflers? Thank you
That sounds like a healthy roller for a fun combo in yours.
We are juggling the fight between duration, overlap, and very low cylinder pressures related to the very thin air here at 6400ft. As the current cam only showed 115psi of cranking compression, you can imagine how much we have to increase that to get the power numbers up.
Stay tuned, cam info and valve work are both coming up!
Also, we are running 1 7/8 primary tube, 3.5 merge collector American Racing headers, with 12 inch long 3.5 to 3 inch reducer/extensions. We will likely run dual 3 inch Magnaflow straight through mufflers with 3 inch mandrel tubing with a side exit right after the muffler.
Last edited by Battenrunner; Jan 11, 2019 at 08:05 PM.
As the 45 is ground back into the valve the margin will be back to normal thickness. I will put up pictures as I go.
Thanks for the reply.
I understand that the valves will look the same as prior to reducing the diameter of the head.
I thought with so many ss valve options like a necked down steam, thin head that flows better than a standard valve with out back cutting, that you might have gone that route.
I look forward to more up dates thanks for sharing your build!
Last edited by Bernhard; Jan 11, 2019 at 06:52 PM.
Thanks for the reply.
I understand that the valves will look the same as prior to reducing the diameter of the head.
I thought with so many ss valve options like a necked down steam, thin head that flows better than a standard valve with out back cutting, that you might have gone that route.
I look forward to more up dates thanks for sharing your build!
We will see how the exhaust port works once we get a new valve seat in there for the smaller valve diameter. The exhaust numbers were really pretty strong on this head already, and the intake was very anemic, so we are really focusing the majority of effort on the intake side. I am really excited to see what happens with the head changes.
Last edited by Battenrunner; Jan 12, 2019 at 07:13 AM.
A little change of pace lately, while Vortecpro is waiting on me to bring him parts next week...
We decided to do the rebuild on the Gear Vendors overdrive tonight... we still need the adapter pieces to mate it to a gm 400, but at least it will be ready to go once we round up those parts.
Last edited by Battenrunner; Jan 17, 2019 at 09:12 PM.
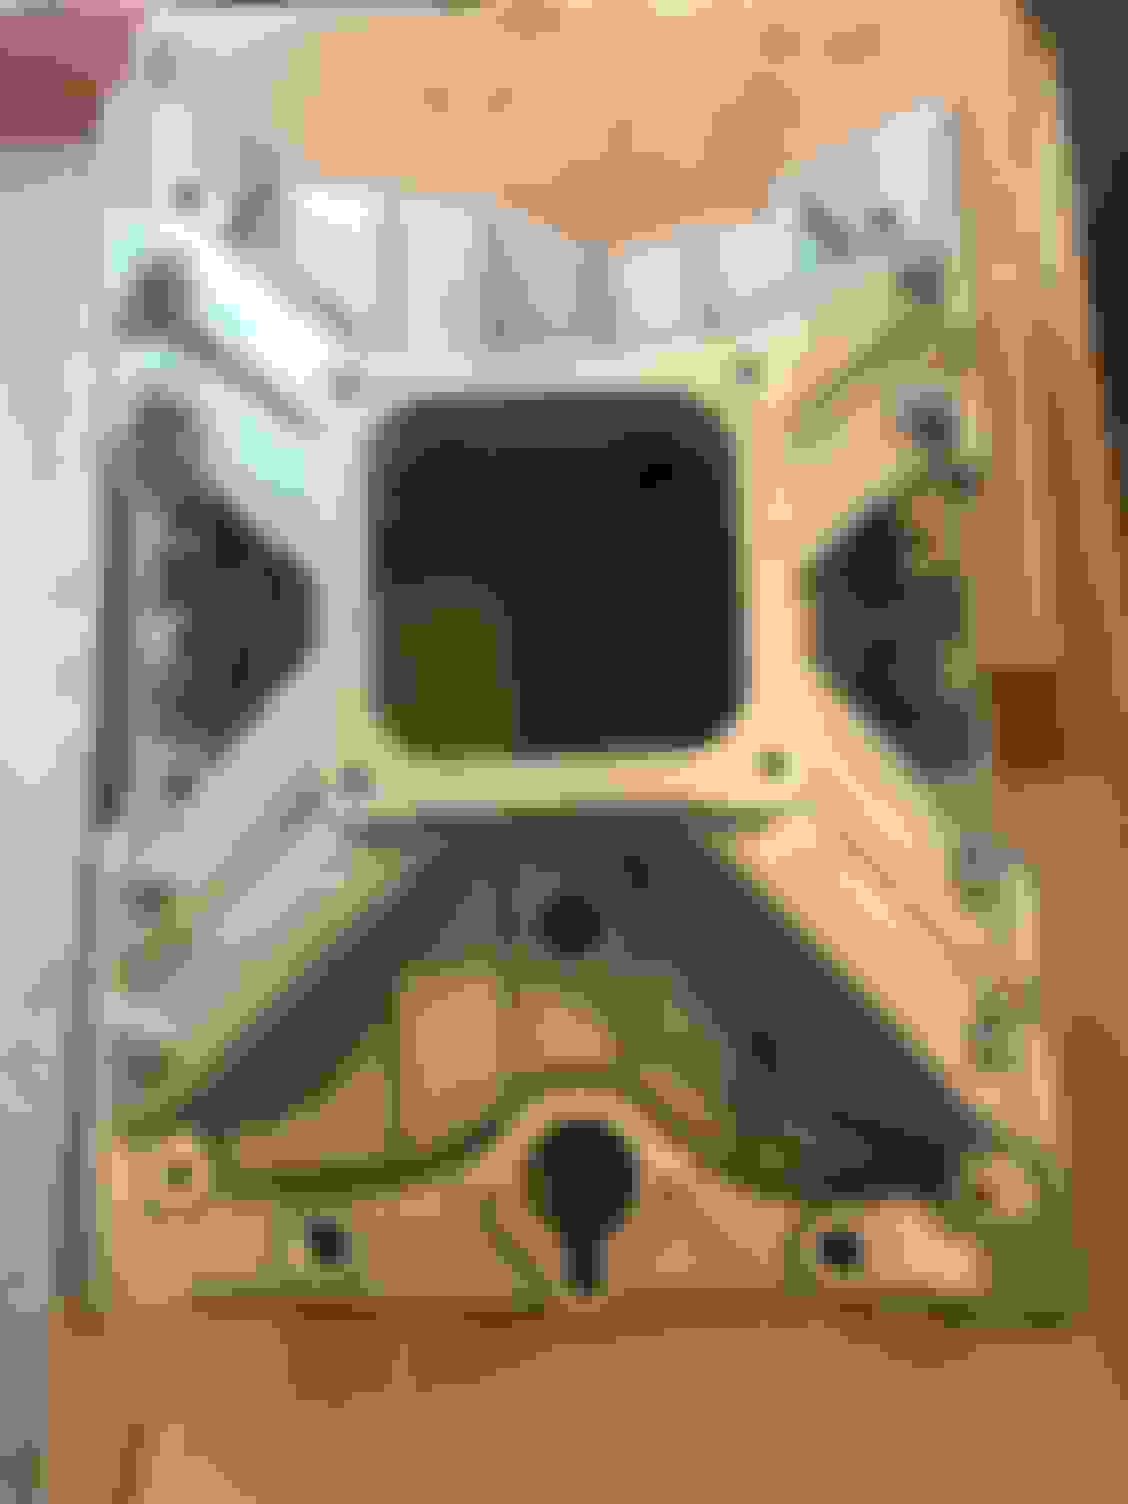
So, we got some parts delivered to Vortecpro, and unfortunately, after we checked each of the exhaust valves, two had way too much runout to try to grind. Vortecpro ordered us some new CHE ductile iron valveseats for the exhaust, and he ordered 8 Ferrea valves to make a new whole matching set for the exhaust side of the heads.
After cleaning and disassembly of the heads, it was discovered that one head had knurled guides and lots of slop on the valvestems. To remedy this, K-line valve guide inserts were utilized all around in both heads to get us a fresh, good start at a valve job and concentric seats without wobbly valves and without damaging the nicely ported castings that went all the way down to the end of the guides.
Once the new seats are installed and receive a valve job, the intake side will get the valvejob for the 2.125 intake valves and the testing/porting fun will begin. Hopefully the seats and exhaust valves show up tomorrow or in the next few days.
It looks like we really need the Batten BBO intake..... so I am searching
I will post some pictures of the head work. Some of the tools we will use. First step is to install the exhaust seats, Ryan can explain why we did this.
The ports as they delivered 474 HP @ 5300 RPM. Valve size was 1.710/2.050. Notice there is almost no 60 after the 45, denoting the bowl is way to big for a 2.050 valve.
I can say this.... the work that Mark (VORTECPRO) does is even more awesome in person.
We are moving to the 1.625 Ferrea Exhaust valves, and the smaller size required Mark to install new exhaust seats, the seats were originally sized for the 1.71 exhaust valves; the heads had no area under the last angle of the valve seat on the exhaust or the intake seats, it just went straight down and out the port with no radiused undercut or "velocity stack" for improved port response. With the new CHE seats installed and set for the 1.625, the valve job looks awesome and there is no slop or wobble in the guide as there was before. Also, there is ZERO runout on the seat versus the .009 runout that was found in the original seats. The valve is set perfectly in the hole and there is no bounce or noise when you tap it, it is perfectly seated. Also, there is a little secret under the new valve seat that will add more power, even with the smaller valve now installed versus the 1.71.
Mark is planning on port flow testing and playing with the intake valve size next to see how the head responds to the larger valve size on the intake.
As you can all see, the intake numbers have been improved considerably, and this is with virtually no chamber work or unshrouding yet..... Mark said the exhaust flowed 203cfm @.600 with the 1.625 valve, which is almost no change at all compared to the 1.71 old exhaust valve size.
Here are are pics of the just-arrived Batten-455 pattern intake 90% finished.
The intake gasket-interface sides will have to be milled to fit the heads correctly once reassembled, and the ports will need to be matched, ported, and deburred at the plenum and head sides.
Dad and I started on deburring the outside of the intake as well as cleaning up some of the plenum area before Mark@VORTECPRO gets to do some real porting on it.
Is it me, or do the threaded holes for the thermostat housing look pretty far off center?
I thought they were offset from the stat, but that looks excessive.
It is aparently normal for the Batten 455 intakes, as I have pics of another one from the early 90�s that has it drilled the same way. The housing will seal with the bolt holes in this location, as we have already checked it.
Last edited by Battenrunner; Jan 29, 2019 at 01:25 PM.
They look nice. But I have a question, with all these changes done all at once how are you going to deternine what the real cause for the lack of expected power really was?
Last edited by cutlassefi; Mar 1, 2019 at 04:13 PM.
They look nice. But I have a question, with all these changes done all at once how are you going to deternine what the real cause for the lack of expected power really was?
I think your looking at what caused the lack of HP above along with that ridiculous intake manifold with its adapter plates. If the engine peaks higher than 5300 RPM one could assume we made a gain changing the cam and valve spring set up seeing the cam is smaller than your supplied cam. Although I did not like the 112 lobe separation at this altitude I seriously doubt the cam you supplied is one of the main problems with the old build, and could make good power with the current engine. The new cam is on a 108 lobe separation, and will be installed at 104 IC, this will help the cylinder pressure at this altitude. Now the question is where will peak HP and TQ be made.