
Interior makeover
 March 10th, 2010 | 09:33 AM
#161
Thread Starter
Registered User
Joined: Feb 2008
Posts: 11,798
From: Plano, TX
Thanks for the complements - progress is slow, but positive at least... 
Thanks...
Fortunately i was born with two almost equal hands, so part goes in one and camera in the other!")
 Working at a machine shop also taught me how to use both hands almost equally.
Now when you see two hands in the picture........................
Hmmm... clothesline... I like this idea, just for painting. Time to get a retractable one and nail it to a tree! 
Yes, I saw it too, but I would have to get the door adjusted just right the first time before the stuff sets up. I plan to POR15 the hinge mounting surface, too.
Bummer, we just had a dust storm, but it was followed by a downpour.
Recipe for "insta-rust"...
Fortunately i was born with two almost equal hands, so part goes in one and camera in the other!
Working at a machine shop also taught me how to use both hands almost equally. Now when you see two hands in the picture........................
Yes, I saw it too, but I would have to get the door adjusted just right the first time before the stuff sets up. I plan to POR15 the hinge mounting surface, too.
Recipe for "insta-rust"...
March 16th, 2010 | 10:31 AM
#162
Thread Starter
Registered User
Joined: Feb 2008
Posts: 11,798
From: Plano, TX
Hinge reassembly
Now�s the time to put the lower hinge back together.
Before painting, I had masked the holes where the bushings and hinge pins go in, the hold open roller, and the hinge pin where it would ride in the bushings. No need to clog the bushings with new paint and make the pin harder to insert. Note the position of the bushings and where the masking tape was on various parts...

The bronze bushings were pressed into place using a vice. Old socks worked great for protecting the new paint.

I should have masked the hold open cam where it rides on the roller, but I forgot. I used a razor blade to carefully scrape off the paint to keep it from contaminating the cam and roller.
Here came SNAFU #1! A painted hinge pin will NOT insert, even with a very thin layer of paint. I had to use another unpainted pin.
The two parts were mated and the hinge pin carefully inserted.
The paint was protected with a cloth and the bottom pin area was supported with a socket. I tapped in the pin with a hammer. Actually, it was more of a severe beating� Another reason to assemble before painting.
The hold-open spring was put into position, the detent cam pulled back with channel lock pliers wrapped in cloth, and the hold open roller unit dropped home.

This inserted easily even after being painted. The cam was released and the roller unit secured with its Allen head bolt.
The unpainted hinge pin was carefully painted and the assembled hinges were set away for the paint to cure�

Lesson learned � install the bushings and hinge pin before paint � it is much easier to do and there is less risk in damaging the paint during assembly.
Lastly, the bolts needed resto.
I wirebrushed the bolt heads, while screwed into nuts clamped in a vice�
I then put them head first in the vice to brush the threads. Afterwards, they were washed and baked dry.
They were then poked into a box and primed and painted.
Now�s the time to put the lower hinge back together.
Before painting, I had masked the holes where the bushings and hinge pins go in, the hold open roller, and the hinge pin where it would ride in the bushings. No need to clog the bushings with new paint and make the pin harder to insert. Note the position of the bushings and where the masking tape was on various parts...
The bronze bushings were pressed into place using a vice. Old socks worked great for protecting the new paint.
I should have masked the hold open cam where it rides on the roller, but I forgot. I used a razor blade to carefully scrape off the paint to keep it from contaminating the cam and roller.
Here came SNAFU #1!
A painted hinge pin will NOT insert, even with a very thin layer of paint. I had to use another unpainted pin. The two parts were mated and the hinge pin carefully inserted.
The paint was protected with a cloth and the bottom pin area was supported with a socket. I tapped in the pin with a hammer. Actually, it was more of a severe beating� Another reason to assemble before painting.
The hold-open spring was put into position, the detent cam pulled back with channel lock pliers wrapped in cloth, and the hold open roller unit dropped home.
This inserted easily even after being painted. The cam was released and the roller unit secured with its Allen head bolt.
The unpainted hinge pin was carefully painted and the assembled hinges were set away for the paint to cure�
Lesson learned � install the bushings and hinge pin before paint � it is much easier to do and there is less risk in damaging the paint during assembly.
Lastly, the bolts needed resto.
I wirebrushed the bolt heads, while screwed into nuts clamped in a vice�
I then put them head first in the vice to brush the threads. Afterwards, they were washed and baked dry.
They were then poked into a box and primed and painted.
March 16th, 2010 | 08:29 PM
#165
Thread Starter
Registered User
Joined: Feb 2008
Posts: 11,798
From: Plano, TX
March 17th, 2010 | 12:24 AM
#166
Registered User
Joined: Dec 2007
Posts: 369
From: Nuremberg, GERMANY
Wow,
Rob your interior is looking awesome, great work, great thread!!!!
Do what ever you like, but please fasten your seat belts!!!
Keep up the good work
Regards,
Torsten
Rob your interior is looking awesome, great work, great thread!!!!
Don't worry, I can still drive her without a door...
Keep up the good work
Regards,
Torsten
March 17th, 2010 | 03:13 AM
#167
Registered
Joined: Jul 2006
Posts: 4,430
From: Northeast Ohio
Very nice.
I'll send you 4 sets to do Rob.
Actually all of mine are okay...enough.
There can't be any paint on the hinges under the bolt heads though?
I'm kidding, believe it or not.
Those bolts will tear that paint off good when you tighten them up, the vise grips will take care of the new bolt head paint too.
The heads may be a little thicker and oversized now, do you have metric vise grips just in case Rob???
March 17th, 2010 | 06:02 AM
#169
Thread Starter
Registered User
Joined: Feb 2008
Posts: 11,798
From: Plano, TX
As long as we use our seat belts and go easy around the corners...........Actually, the door should get put back on in a couple days - I dread the alignment part though. Then I can start on the other door.
Thanks, Blue!
VICE GRIPS? Are you crazy??

Yea, I don't know what I was thinking when painting those bolts. The paint will be gone after installation. Model paint will touch 'em up though!
I think i am just gonna strip the paint from them before I install them.
The top hinge would be "easy" if the pin drops out from the bottom.
The bottom would be a challenge. In the last two pictures above, note that the pin resides under the hold-open spring and bracket when door is open (hinge is in half open position). For the pin to come out, the door will need to be closed. Even then I am not fure it would come out. If so, hood and fender could be removed, but better the door.
If your bushings are worn, you would have to realign the door anyway, requiring loosening all the bolts you had wanted to avoid touching in the first place. A catch 22 type situation for sure...
And if you are changing the pins and bushings, might as well go all the way, right?
March 18th, 2010 | 07:28 AM
#170
Thread Starter
Registered User
Joined: Feb 2008
Posts: 11,798
From: Plano, TX
The highly expected unexpected problems...
All projects have them, as we all know...
The door was not painted well and the paint is cracked and bubbled and breaking when touched. Luckily, most is not due to rust, just poor painting.

The biggest issue is that the original body sealer in the cowl side is literally falling off, creating a future rust hazard…
The old seam sealer on the cowl side was easily removed by scraping and wirebrushing. Note the cardboard filler I taped into place at the bottom to catch all the chunks of old sealer. The metal under the old sealer looked great.
I wanted to keep it rust free, so 3M 8505 sealer was used to reseal this area, just like the factory did. However, the sealer required primer to be applied first for maximum corrosion protection.
A day later, I decided to put a little “Biscuit” paint on the sealer to blend it into the existing paint better.
After another day, I installed the power window wiring boot using screws and weatherstrip cement (hole was a bit too big).
Below is the photo collage...

The paint cracks were another challenge... I do not plan to repaint the car any time soon, so a decent temporary repair was needed to keep water out of the cracks.
POR15 clear turns yellow and would be hard to remove when painting time arrives. So I just took some of the seam sealer and worked it into the cracks, smoothing the excess away (not as easy as it sounds).
It got a quick shot o’ “biscuit” at the end. Not perfect at all, but it should at least shed water…
***f (picture here soon)
This will spiff it up a bit before the car gets repainting in my next lifetime…
The door was not painted well and the paint is cracked and bubbled and breaking when touched. Luckily, most is not due to rust, just poor painting.
The biggest issue is that the original body sealer in the cowl side is literally falling off, creating a future rust hazard…
The old seam sealer on the cowl side was easily removed by scraping and wirebrushing. Note the cardboard filler I taped into place at the bottom to catch all the chunks of old sealer. The metal under the old sealer looked great.
I wanted to keep it rust free, so 3M 8505 sealer was used to reseal this area, just like the factory did. However, the sealer required primer to be applied first for maximum corrosion protection.
A day later, I decided to put a little “Biscuit” paint on the sealer to blend it into the existing paint better.
After another day, I installed the power window wiring boot using screws and weatherstrip cement (hole was a bit too big).
Below is the photo collage...
The paint cracks were another challenge... I do not plan to repaint the car any time soon, so a decent temporary repair was needed to keep water out of the cracks.
POR15 clear turns yellow and would be hard to remove when painting time arrives. So I just took some of the seam sealer and worked it into the cracks, smoothing the excess away (not as easy as it sounds).
It got a quick shot o’ “biscuit” at the end. Not perfect at all, but it should at least shed water…
***f (picture here soon)
This will spiff it up a bit before the car gets repainting in my next lifetime…
March 20th, 2010 | 09:56 PM
#171
Thread Starter
Registered User
Joined: Feb 2008
Posts: 11,798
From: Plano, TX
Here was the not-so-fun thing to do on a warm March Friday evening... I hate drama.
The entire edge of jamb was masked to prevent paint chips. The hinge bushings received a couple drops of oil and the hold open cam was lightly greased.
Body sealer was applied to the upper hinge mounting area and the hinges secured to the frame, using the alignment marks made earlier. Paint is a great match!

With the help of my neighbor, the door was supported on a step stool and was shimmed up to hold the door at just the right height. Sealer was applied to the door side hinge areas and as he held it steady, I put in the bolts.
Only a few areas of paint was chipped and I will touch that up later. Painting the bolts was a waist of time�
After an initial fitment check, the door had to move down at the rear.
Here is where panic set in. I had tightened the frame side securely and I did not want to have to remove the door again. I did not have the special tool to adjust the hinges and my open end wrenches would not work. My neighbor told me to pull the rocker trim and the fender. Uhhhh � no� Anything but that!!! 
Saved by chinesium!!

I never thought I would say that, but these two $10 �funky� wrench sets just paid for themselves. I bought them cause they were cheap. I figured if I really needed them, they will be here just in case. They worked great, though a little short on leverage (pun intended). The body sealer was drying, making adjustment harder as time went on.
After a while of adjusting, I finally left good enough alone. Hinges look much better; I will touch up all the paint later.

The door now requires more effort to close and the hold-open features are strong. I was concerned about the hinges binding but the door moves more easily when half open or more. I think it is because the hold-open unit is actually working now.
The next day was one of real progress.......
The entire edge of jamb was masked to prevent paint chips. The hinge bushings received a couple drops of oil and the hold open cam was lightly greased.
Body sealer was applied to the upper hinge mounting area and the hinges secured to the frame, using the alignment marks made earlier. Paint is a great match!
With the help of my neighbor, the door was supported on a step stool and was shimmed up to hold the door at just the right height. Sealer was applied to the door side hinge areas and as he held it steady, I put in the bolts.
Only a few areas of paint was chipped and I will touch that up later. Painting the bolts was a waist of time�
After an initial fitment check, the door had to move down at the rear.
Here is where panic set in.
I had tightened the frame side securely and I did not want to have to remove the door again. I did not have the special tool to adjust the hinges and my open end wrenches would not work. My neighbor told me to pull the rocker trim and the fender. Uhhhh � no� Anything but that!!! Saved by chinesium!!
I never thought I would say that, but these two $10 �funky� wrench sets just paid for themselves. I bought them cause they were cheap. I figured if I really needed them, they will be here just in case. They worked great, though a little short on leverage (pun intended). The body sealer was drying, making adjustment harder as time went on.
After a while of adjusting, I finally left good enough alone. Hinges look much better; I will touch up all the paint later.
The door now requires more effort to close and the hold-open features are strong. I was concerned about the hinges binding but the door moves more easily when half open or more. I think it is because the hold-open unit is actually working now.
The next day was one of real progress.......
March 24th, 2010 | 09:50 AM
#172
Thread Starter
Registered User
Joined: Feb 2008
Posts: 11,798
From: Plano, TX
Moving on to more exciting things�
After the door was back on, and adjusted, the window was supported with wood blocks at � way down and the manual regulator removed and disengaged from the roller guide. Window was pulled all the way up and supported by wood blocks.
The reg was extracted roller first through the big hole in the door (yes, it DOES fit!) Door locking rod did not need to be removed as said in the body manual.
Since I had so much fun with dynamat, I decided to do it again! I called this door-na-mat...
This time it was easier, I think because it was colder (mid 50’s) and it wasn’t as willing to stick to everything it shouldn’t. However, I still could not wear gloves. The outer door skin was covered in 8” wide by 24” long strips that I fed in through the speaker hole.
The backing was removed and a portion of the backing was extended 4” above the mat to aid in grabbing it from behind the impact bar. The outer skin had a factory sprayed-on rubberized coating, but the mat stuck well to it.
It took almost 6 strips to do the door skin, overlapping each about �”. Getting it firmly pressed onto the door was painful but doable. The top of the mat was pushed upwards as high as possible to prevent water from getting under it.
The inside of the inside sheetmetal was cleaned and dynamatted also, except where the power window regulator would mount. Afterwards, the door felt even more solid than it was before – a big improvement!
Next, the power window conversion for the front. The suspense was building – what kind of mods were I up against? Find out here:
https://classicoldsmobile.com/forums/electrical/9249-power-window-conversion-2.html#post160483
After the power window regulator installation, it was now 10pm and it was time to call it the day. I grabbed one last beer and opened the garage door so I walk around outside to stretch my sore body.
I was greeted by a light blanket of snow! And spring was supposed to be here in 2 hours – phooey... No wonder the garage kept getting colder and my fingers getting number.

Here is that thread… https://classicoldsmobile.com/forums/clubhouse/21460-first-day-spring-texas.html#post159505
The next day, my arms and hands exhibited the “cheese grater” effect.

Painful at times but it was worth it.
With 6” of snow now on the ground on this first day of ‘spring’…

I took some prescription pain meds and napped it off.
The reg was extracted roller first through the big hole in the door (yes, it DOES fit!) Door locking rod did not need to be removed as said in the body manual.
Since I had so much fun with dynamat, I decided to do it again! I called this door-na-mat...
This time it was easier, I think because it was colder (mid 50’s) and it wasn’t as willing to stick to everything it shouldn’t. However, I still could not wear gloves. The outer door skin was covered in 8” wide by 24” long strips that I fed in through the speaker hole.
The backing was removed and a portion of the backing was extended 4” above the mat to aid in grabbing it from behind the impact bar. The outer skin had a factory sprayed-on rubberized coating, but the mat stuck well to it.
It took almost 6 strips to do the door skin, overlapping each about �”. Getting it firmly pressed onto the door was painful but doable. The top of the mat was pushed upwards as high as possible to prevent water from getting under it.
The inside of the inside sheetmetal was cleaned and dynamatted also, except where the power window regulator would mount. Afterwards, the door felt even more solid than it was before – a big improvement!
Next, the power window conversion for the front. The suspense was building – what kind of mods were I up against? Find out here:
https://classicoldsmobile.com/forums/electrical/9249-power-window-conversion-2.html#post160483
After the power window regulator installation, it was now 10pm and it was time to call it the day. I grabbed one last beer and opened the garage door so I walk around outside to stretch my sore body.
I was greeted by a light blanket of snow! And spring was supposed to be here in 2 hours – phooey... No wonder the garage kept getting colder and my fingers getting number.
Here is that thread… https://classicoldsmobile.com/forums/clubhouse/21460-first-day-spring-texas.html#post159505
The next day, my arms and hands exhibited the “cheese grater” effect.
Painful at times but it was worth it.
With 6” of snow now on the ground on this first day of ‘spring’…
I took some prescription pain meds and napped it off.
March 24th, 2010 | 02:54 PM
#173
Registered
Joined: Jul 2006
Posts: 4,430
From: Northeast Ohio
Dude...by the looks of those arms are you sure you don't have stigmata?
Door-na-mat?...duuuuude.
Dang Rob, your house sure is small, a door and a window? At least you don't have a lot of maintenance, should get an Ultimate Cloth for those windows.
How many rooms?
Garage??
Beer and script pain meds... sounds good.
Don't be pulling none of that Heath Ledger joker stuff on us Rob.
At least not until your power window conversion thread is finished, can't leave everybody hanging.
March 27th, 2010 | 07:37 PM
#174
Registered User
Joined: May 2008
Posts: 651
From: Dallas
March 29th, 2010 | 09:14 AM
#175
Thread Starter
Registered User
Joined: Feb 2008
Posts: 11,798
From: Plano, TX
That's what happens when I mix pain meds and beer...
Are you implying it needs curtains?
Great stuff. I think they just make you forget about the pain, rather than eliminate it...
Right - that was the desire.
The worst part of painting hinges and door alignment would have to be done even with new hinges, so this was a great area to save a chunk of dough. It made me feel that much more accomplished, too!
Coming up-
Door panel restoration and a never-seen-before door pull-strap rebuild!
March 30th, 2010 | 11:48 AM
#176
Thread Starter
Registered User
Joined: Feb 2008
Posts: 11,798
From: Plano, TX
Restoring the door panels�
On a cold, snowy spring day (that�s right!) I had started the door panel restoration using the premium �unassembled� door panels I got from Legendary last year. When received, I compared them to the old and the details were almost perfect. I pulled the right door panel as well so I could do both at the same time.
Here is a before shot of the left door panel:
I started pulling the old panels apart, carefully noting how they were put together.
The pull strap screws were removed and the steel backing strips were de-rusted by scotchbriting them under water and washing them up.
The pull straps themselves needed some serious work�
The middle metal trim pieces were easily removed (just bend up the tabs) and polished up with Mother�s aluminum polish. The polish took out the worst of the scuffs and dullness, but I could live with the deeper scratches, as there were not many. Before - top; after - below!

The switch rings, door panel clips and door lock ferrules were removed, and then the window felt strips. Process for doing the latter is described earlier in this thread when I did the rear quarter panels.
The formed metal top rails were carefully removed last. The vinyl was peeled back and the polyester-looking padding was cut off below the top rail�s bottom edge. A long screwdriver carefully popped the metal rail from the board. Note how the metal piercings dig into the wood panel to secure it. It is now loose from age and flexings.

When the pieces were separated, the wood jammed in the top rails� piercings was pushed out with an icepick and the old padding cut away where it was loose. Now�s the time to sand, wirebrush, and clean up the top rails so the upcoming contact cement will adhere well!
I prepped the new door panel in the back bedroom / hobby room on the carpeted floor to protect the new panels. Each old door panel was placed exactly onto its new panel, using the two upper oblong holes as keys). All holes in the old panel were then traced onto the new panel with a pencil. NEVER just start popping out pre-perforated holes, because some may not be in the right places! The door lock switch perforations were WAY OFF on my new panels. They would have been ON TOP of the pull strap bezels!
After double checking the holes� positions and sizes, cutting began using a sharp utility knife. I found it easiest (and safest) to simply hold the knife in my right hand and to use my left index finger and thumb to propel the knife. Take your time to avoid hurting yourself or damaging the panel.
Holes for speakers, lock switches, & window switches were knifed out. The middle trim tab holes were made with an icepick and carpet notched away with diagonal cutters. Those premade holes lined up well. Bottom screw holes were carefully drilled, stopping before hitting the carpet. The holes in the carpet were made with an icepick (NEVER drill through carpet!)
The door pull strap holes were carefully drilled and cut out.
I held the cut-out panel up to the doors to verify all holes. Here is the left panel so far�

The chromed plastic plates under the armrest bases have a metal clip that holds them onto the door panel.
See them at my finger and thumb:

I just pulled mine through the panel, since it was being replaced. The clips can be pried off and added to the new plates after they are installed on your new panel. If you wish to not damage your door panels at all, you will need to pull the clip off with pliers while on the wood panel, which is not too easy�
Now for the most tedious part - the top metal rails are to be installed on the wood panels�
An industrial stapler or a rivet gun would work, but you would have to pound down the metal piercings first, causing bumps in the metal and the panel might not seat well.
I opted to redo it just like the factory did, and drive the existing piercings into the new panel.
In a few trials with scrap wood, a hammer caused enough vibration that the parts never seated and sometimes the metal piercings were bent. I had a small assembly press, but it was cumbersome. I found a common C-clamp to work the best.
All 4 sides of each piercing were each bent upwards and straightened with needle nosed pliers, as they will need to get pressed into the new panels. Before on right, after on left!

This was time consuming and painful to the wrist, but it needed to be done. Afterwards, I used a permanent marker to make mark above each piercing so i know where to press.
The oblong holes at the top are used for alignment; I verified their proper position on the old panel.
A thin layer of contact cement was applied to the panel along the top and to the rail where they will join.
***Choose an automotive trim cement that will withstand high temperatures! regular househould stuff will come unglued in a hot car!!
When dry, the panel was laid upside down on the floor on 2x4s covered with towels.
Two small C-clamps gently held the rail to the panel at both alignment holes. I used a larger C-clamp to press the metal points into the wood.

Put a couple drops of oil in the top threads of the clamp, as it will get some abuse and get hard to turn without lube.
I continued pressing from one side to the other to get it about 3/4 way seated. I went back the other way again to fully drive in all the points and cement the two sides together. Note how the piercings are also crimped by the clamp!

This made for a VERY secure joint!!
Finally the paper over the padding was trimmed off above the where the piercings on the top rail would be (at the line):

(Yes, I left the existing crushed padding on, since it was not too bad and was stuck well.)
Now the bottom of the metal rail and the thick paper were brushed with contact cement and were stuck together.
The back of the polyester padding and the top of the metal rail got a coat of spray adhesive. When dry, they were stuck together.
The window-felt-side of the rail and the back end of the vinyl were brushed with contact cement. When dry, the vinyl was gently pulled over the rail and secured.
The side edges of the vinyl are cemented down last, using the old panels� foldings as a guide. Old-left, new-right.

After letting dry overnight, the top rails were drilled for the new window felt strips. The strips had staple holes predrilled and it is best to use them. The felt strips came with a �special� drill bit, as they say the rails are very hard. Of course they are hard � they are made of steel! That bit was useless � I used a regular bit instead. The strips were aligned just like the originals and the first two staple holes drilled. A staple (included) was inserted and gently crimped just to hold the strip. The holes for the rest of the staples were drilled with the strip held in place and staples inserted as I went. This method helps ensure that the holes will all line up and the strip goes on correctly.

When all looked okay, the staples were crimped down with channel lock pliers, using a 3/8� brass nut over the staple�s top - easy as pie. This method is shown earlier in this thread when I did the rear quarter panels.
The panel securing clips were carefully installed, as well as the switch mounting rings. The door lock ferrule hole was cut out and the ferrule installed. The metal mid trim was inserted and the tabs bent over. Almost done!
Here is a before shot of the left door panel:
I started pulling the old panels apart, carefully noting how they were put together.
The pull strap screws were removed and the steel backing strips were de-rusted by scotchbriting them under water and washing them up.
The pull straps themselves needed some serious work�
The middle metal trim pieces were easily removed (just bend up the tabs) and polished up with Mother�s aluminum polish. The polish took out the worst of the scuffs and dullness, but I could live with the deeper scratches, as there were not many. Before - top; after - below!
The switch rings, door panel clips and door lock ferrules were removed, and then the window felt strips. Process for doing the latter is described earlier in this thread when I did the rear quarter panels.
The formed metal top rails were carefully removed last. The vinyl was peeled back and the polyester-looking padding was cut off below the top rail�s bottom edge. A long screwdriver carefully popped the metal rail from the board. Note how the metal piercings dig into the wood panel to secure it. It is now loose from age and flexings.
When the pieces were separated, the wood jammed in the top rails� piercings was pushed out with an icepick and the old padding cut away where it was loose. Now�s the time to sand, wirebrush, and clean up the top rails so the upcoming contact cement will adhere well!
I prepped the new door panel in the back bedroom / hobby room on the carpeted floor to protect the new panels. Each old door panel was placed exactly onto its new panel, using the two upper oblong holes as keys). All holes in the old panel were then traced onto the new panel with a pencil. NEVER just start popping out pre-perforated holes, because some may not be in the right places! The door lock switch perforations were WAY OFF on my new panels. They would have been ON TOP of the pull strap bezels!
After double checking the holes� positions and sizes, cutting began using a sharp utility knife. I found it easiest (and safest) to simply hold the knife in my right hand and to use my left index finger and thumb to propel the knife. Take your time to avoid hurting yourself or damaging the panel.
Holes for speakers, lock switches, & window switches were knifed out. The middle trim tab holes were made with an icepick and carpet notched away with diagonal cutters. Those premade holes lined up well. Bottom screw holes were carefully drilled, stopping before hitting the carpet. The holes in the carpet were made with an icepick (NEVER drill through carpet!)
The door pull strap holes were carefully drilled and cut out.
I held the cut-out panel up to the doors to verify all holes. Here is the left panel so far�
The chromed plastic plates under the armrest bases have a metal clip that holds them onto the door panel.
See them at my finger and thumb:
I just pulled mine through the panel, since it was being replaced. The clips can be pried off and added to the new plates after they are installed on your new panel. If you wish to not damage your door panels at all, you will need to pull the clip off with pliers while on the wood panel, which is not too easy�
Now for the most tedious part - the top metal rails are to be installed on the wood panels�
An industrial stapler or a rivet gun would work, but you would have to pound down the metal piercings first, causing bumps in the metal and the panel might not seat well.
I opted to redo it just like the factory did, and drive the existing piercings into the new panel.
In a few trials with scrap wood, a hammer caused enough vibration that the parts never seated and sometimes the metal piercings were bent. I had a small assembly press, but it was cumbersome. I found a common C-clamp to work the best.
All 4 sides of each piercing were each bent upwards and straightened with needle nosed pliers, as they will need to get pressed into the new panels. Before on right, after on left!
This was time consuming and painful to the wrist, but it needed to be done. Afterwards, I used a permanent marker to make mark above each piercing so i know where to press.
The oblong holes at the top are used for alignment; I verified their proper position on the old panel.
A thin layer of contact cement was applied to the panel along the top and to the rail where they will join.
***Choose an automotive trim cement that will withstand high temperatures! regular househould stuff will come unglued in a hot car!!
When dry, the panel was laid upside down on the floor on 2x4s covered with towels.
Two small C-clamps gently held the rail to the panel at both alignment holes. I used a larger C-clamp to press the metal points into the wood.
Put a couple drops of oil in the top threads of the clamp, as it will get some abuse and get hard to turn without lube.
I continued pressing from one side to the other to get it about 3/4 way seated. I went back the other way again to fully drive in all the points and cement the two sides together. Note how the piercings are also crimped by the clamp!
This made for a VERY secure joint!!
Finally the paper over the padding was trimmed off above the where the piercings on the top rail would be (at the line):
(Yes, I left the existing crushed padding on, since it was not too bad and was stuck well.)
Now the bottom of the metal rail and the thick paper were brushed with contact cement and were stuck together.
The back of the polyester padding and the top of the metal rail got a coat of spray adhesive. When dry, they were stuck together.
The window-felt-side of the rail and the back end of the vinyl were brushed with contact cement. When dry, the vinyl was gently pulled over the rail and secured.
The side edges of the vinyl are cemented down last, using the old panels� foldings as a guide. Old-left, new-right.
After letting dry overnight, the top rails were drilled for the new window felt strips. The strips had staple holes predrilled and it is best to use them. The felt strips came with a �special� drill bit, as they say the rails are very hard. Of course they are hard � they are made of steel! That bit was useless � I used a regular bit instead. The strips were aligned just like the originals and the first two staple holes drilled. A staple (included) was inserted and gently crimped just to hold the strip. The holes for the rest of the staples were drilled with the strip held in place and staples inserted as I went. This method helps ensure that the holes will all line up and the strip goes on correctly.
When all looked okay, the staples were crimped down with channel lock pliers, using a 3/8� brass nut over the staple�s top - easy as pie. This method is shown earlier in this thread when I did the rear quarter panels.
The panel securing clips were carefully installed, as well as the switch mounting rings. The door lock ferrule hole was cut out and the ferrule installed. The metal mid trim was inserted and the tabs bent over. Almost done!
Last edited by Lady72nRob71; June 14th, 2011 at 07:42 PM. Reason: added armrest plate clip info
March 31st, 2010 | 06:00 AM
#178
Thread Starter
Registered User
Joined: Feb 2008
Posts: 11,798
From: Plano, TX
Nice weather make a difference, also!
If this home internet issue keeps up I will drop my DSL and go back to dialup, as this was the site I used the most.
March 31st, 2010 | 08:34 AM
#179
Grown Azz Kid
Joined: Nov 2006
Posts: 715
Rob, with the door panels replaced what are you going to do about the speakers? Have you looked into the kick panels with the speakers? I have them and pretty happy with them. You will have to paint them to match but would be a good addition if you want the sound and they are easily taken out to put the originals back in if needed
March 31st, 2010 | 10:58 AM
#180
Thread Starter
Registered User
Joined: Feb 2008
Posts: 11,798
From: Plano, TX
Rob, with the door panels replaced what are you going to do about the speakers? Have you looked into the kick panels with the speakers? I have them and pretty happy with them. You will have to paint them to match but would be a good addition if you want the sound and they are easily taken out to put the originals back in if needed
I have to repaint my kick panels anyway, so I could have just bought the ones with speaker holes and moved them to there.
However, I already cut the new door panels to accept the speakers like they were mounted before.
The good thing is that I am going to paint the mounting rings and grilles with custom matched interior paint so that they do not stick out like a sore thumb. If it works on the armrest bases, it should work on the speaker grilles (though they are painted metal.)
If that goes well I will paint the rear speaker grilles and rings also - I hate the black (but like the sound)...
March 31st, 2010 | 01:01 PM
#182
Registered User
Joined: Dec 2009
Posts: 231
From: Fair Play, SC
Rob, Great job on the door panels. Mine (front and rear) came in from Legendary yesterday, I went for the pre assembled ones. Looking forward to getting them in.
I installed front speaker kicks for the same reason, they work well. The rears are in the ashwell/piston covers.
I installed front speaker kicks for the same reason, they work well. The rears are in the ashwell/piston covers.
March 31st, 2010 | 02:54 PM
#185
Will NEVER Grow Up!
Joined: Sep 2009
Posts: 593
From: Landrum, SC in "The Blue Ridge Foothills"
Want to raise front bench seat
Hi......
I want to raise my front seat about 1-1/2"
Did your seats come out without too much effort?
My upholstry is in real nice shape for 45 years, one blemish on the drivers side door panel where the owner (who was 6"-3" tall) evidentaly kicked the panel every time he got out!
Project looks like it's progressing well and I,' going to contact your source for some fabric for my door.
It was 75 deg. today and we put the top down and went for a ride.
First one of the season!
Best Wishes,
--Don
The past Friday, I went to the upholstery shop pick up my seats and quarter panels.
Now understand that I am very difficult to please when I am paying somebody to do a service for me.
For the first time in a long while, I was MORE THAN PLEASED!! These seats and panels looked showroom fresh, or maybe even better!
Here is the front seat:
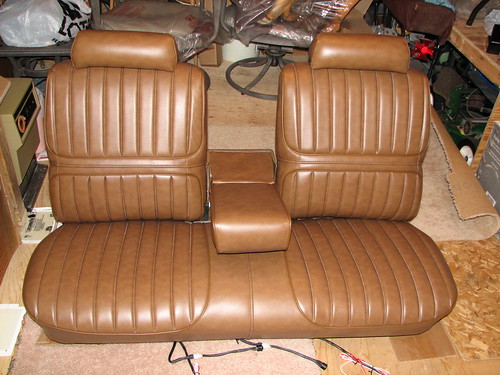

The completed rear seat is pictured earlier and I did not want to unwrap it yet after getting it home.
If anyone in the Dallas TX area needs a fine upholstery job, I highly recommend Yoboy Enterprises http://www.yoboyinc.com/. They are located a few miles north of Wylie in Nevada, TX. Call 972 494 2627 and just ask for Billy Blair. Now since he does quality work, you will not get a rush job. Allocate 2 weeks minimum. My seats took just over 4 weeks, but he did a lot for me and I told him to take his time. The seats will not be reinstalled for at least a few more weeks�
---- As a reference, here is the work done and the cost:
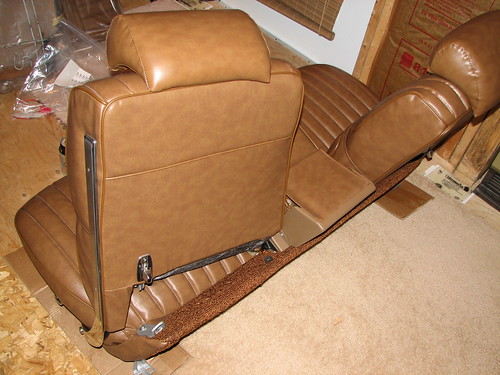
I supplied all the covering material from Legendary for the seats and all four pieces of the convertible quarter armrest panels. Billy stripped the seats to the frame and sandblasted the frames. Metal parts were painted and the plastic panel behind the armrest was refinished.
Most foam was reused, as mine was in pretty good shape, except the front bottom. It was all new. The other old foam was backed up with some new, to get everything firm. Billy custom fitted side bolsters and lumbar supports and added seat heaters. Price for basic restoration of seats only was 475 labor, 35 for foam. Quarter panels were 75 labor for all and the seat heaters were 100 each and I did both sides of the front seat only. Total was 785.
After getting the seats home, I hooked a power supply to each of the seat heaters to verify operation. Each draws 4A on high and 1.5 on low. Since the seat cover has about �� of padding in it, it takes longer to warm up than my Caddy. However, it will still get hot enough to have you switching to low after about 7 minutes� I sat there for quite a while in my cold workshop drinking a beer in celebration; it was hard to shut it off and get up!
The side bolsters on the seat bottom and the extra lumbar support in the backs felt firm and very supportive. Needless to say, it was very comfy. That really made my day � I�m VERY happy!!
Now understand that I am very difficult to please when I am paying somebody to do a service for me.
For the first time in a long while, I was MORE THAN PLEASED!! These seats and panels looked showroom fresh, or maybe even better!
Here is the front seat:
The completed rear seat is pictured earlier and I did not want to unwrap it yet after getting it home.
If anyone in the Dallas TX area needs a fine upholstery job, I highly recommend Yoboy Enterprises http://www.yoboyinc.com/. They are located a few miles north of Wylie in Nevada, TX. Call 972 494 2627 and just ask for Billy Blair. Now since he does quality work, you will not get a rush job. Allocate 2 weeks minimum. My seats took just over 4 weeks, but he did a lot for me and I told him to take his time. The seats will not be reinstalled for at least a few more weeks�
---- As a reference, here is the work done and the cost:
I supplied all the covering material from Legendary for the seats and all four pieces of the convertible quarter armrest panels. Billy stripped the seats to the frame and sandblasted the frames. Metal parts were painted and the plastic panel behind the armrest was refinished.
Most foam was reused, as mine was in pretty good shape, except the front bottom. It was all new. The other old foam was backed up with some new, to get everything firm. Billy custom fitted side bolsters and lumbar supports and added seat heaters. Price for basic restoration of seats only was 475 labor, 35 for foam. Quarter panels were 75 labor for all and the seat heaters were 100 each and I did both sides of the front seat only. Total was 785.
After getting the seats home, I hooked a power supply to each of the seat heaters to verify operation. Each draws 4A on high and 1.5 on low. Since the seat cover has about �� of padding in it, it takes longer to warm up than my Caddy. However, it will still get hot enough to have you switching to low after about 7 minutes� I sat there for quite a while in my cold workshop drinking a beer in celebration; it was hard to shut it off and get up!
The side bolsters on the seat bottom and the extra lumbar support in the backs felt firm and very supportive. Needless to say, it was very comfy. That really made my day � I�m VERY happy!!
April 1st, 2010 | 06:07 AM
#187
Thread Starter
Registered User
Joined: Feb 2008
Posts: 11,798
From: Plano, TX
They were not available when i got mine and I would like to see how they look. The top rail and window felt was the hardest to do.
In fact there is some very unique monkey business coming up!
How are things going in Europe?
Hi......
I want to raise my front seat about 1-1/2"
Did your seats come out without too much effort?
Project looks like it's progressing well and I,' going to contact your source for some fabric for my door.
It was 75 deg. today and we put the top down and went for a ride.
First one of the season!
Best Wishes,
--Don
Would you hit your head on the roof? I assume not... Do not use wood, as it crushes and the seats would be loose all the time. The PO of Lady did this.
Seats come OUT easy! Reinstalling was more difficult (as always).
Great to hear about your first cruise - I sure miss the Blue Ridge Parkway!! I would like to get out this weekend, but I just pulled Lady's right door yesterday...
Make them worth it almost.I pulled the right door yesterday and the front door jam area looks worse than the left, so I was wirebrushing that last night. Hinges will be disassembled, stripped, and hopefully painted this weekend.
Then i will fix up the door jam over the next week and get read to hang the door by next weekend, when i start a week of vacation!
Then will be final assembly - window motor, dynamat, and door panels.
Next will be rear suspension...
April 1st, 2010 | 07:43 AM
#188
Grown Azz Kid
Joined: Nov 2006
Posts: 715
Sounds like you are going to be busy....I had just finished the rear suspension before the other car was totaled. I had went all poly bushings front and rear except for the upper I went rubber. Had the bottoms boxed and sway bar and made the ride a lot better.
On the bottom of your door panel do they not sell the bottom carpet area seperate to allow you to go with the kick panel speakers and not have to paint the speaker grills for the doors?
On the bottom of your door panel do they not sell the bottom carpet area seperate to allow you to go with the kick panel speakers and not have to paint the speaker grills for the doors?
April 1st, 2010 | 09:41 AM
#189
Thread Starter
Registered User
Joined: Feb 2008
Posts: 11,798
From: Plano, TX
I had just finished the rear suspension before the other car was totaled. I had went all poly bushings front and rear except for the upper I went rubber. Had the bottoms boxed and sway bar and made the ride a lot better.
On the bottom of your door panel do they not sell the bottom carpet area seperate to allow you to go with the kick panel speakers and not have to paint the speaker grills for the doors?
On the bottom of your door panel do they not sell the bottom carpet area seperate to allow you to go with the kick panel speakers and not have to paint the speaker grills for the doors?
Good thought on the carpet bottoms - they are sold separately so I will do the math this weekend to see what moving the speakers would cost.
April 1st, 2010 | 09:49 AM
#190
Thread Starter
Registered User
Joined: Feb 2008
Posts: 11,798
From: Plano, TX
(that I know of anyway…)
The skuzzy door pull straps needed serious restoration. These things would look hideous against new door panels!
They have not been repro’ed, and I have only heard of them being repainted / dyed. I decided against that, since mine have had the texture worn smooth in many places and 40 years of weathering had turned them dark-chocolate brown. The stitching was almost all gone and the nasty feel of silicone spray remained even after lots of scrubbing. Paint will not stick to silicone…
I HAD to have new pull straps to complement this “anything goes” interior!
My curious mind started to reverse engineer the things, and I came across an outstanding uncovery!
They are NOT molded together as one unit (like I once thought), but instead made up of 5 parts: steel strap, two die-cast end pieces, a formed rubber core, and a fabric covering. Fabric covering – the exact same stuff the seats are made of.

No place sells reproduction covers for the straps, not even Legendary. I passed on the suggestion to them, but there is still a viable solution.
Option 1: Legendary sells a “1968-1972 convertible header cover” – a fabric cover that glues on the top of the windshield frame on convertibles. Part number is VV68GAHEADER(color#) and sells for $16 (as of 2010), long enough to easily make 3 door pull strap covers (both sides and an extra in case you mess up on one…) This can be purchased online.
Option 2: Legendary also sells any fabric by the yard. 54” wide by 36” long for $40. They will sell 1/2 a yard for $20 or as little as 1/3 of a yard for $16. Shipping would be at least $10. This would have to be purchased over the phone and it would be the preferred method, as you could make more covers to sell to others in need.
I was in luck, as Legendary had sent me a flawed set of headrest covers last year. When they sent new ones and told me to trash the old ones, I kept the old ones for some reason. See – it DOES pay to be a packrat!
I was able to cut out a perfect set of pull strap covers from one of them. I can cut out two more sets if someone needs some strap covers in this color…
I used a screwdriver to begin pulling the fabric apart where it was glued in the center.
Here it is, “doing the unstuck”:

Some tape wrapped around the cover indicated the fabric width and I also marked the 2 rows of stitches on the tape.
I transferred the data from that tape to a custom template made out of thick paper. It turned out to be a 14.5” x 2.75” rectangle with a row of stitches 1 3/16” from each end.
I held the template on top of the fabric, which I laid on a box, and cut out the two pieces with a sharp razor knife.

Other cars can differ slightly, so this size should be considered just a guide.
The rubber core was cleaned with goo-gone and a stiff brush. The metal strap was scraped clean with a razor blade and washed.
Since my mom did such a good job at restitching my sun visors, I let her sew the cut fabric to the rubber core. I chose 100% polyester thread for abrasion and moisture resistance – it was found at a local crafts store. This was also used on the sun visors with good results. Color was right on, too!
Here is the sewing detail…

It also pays to know bored old folks with good sewing skills…
Some details on the sewing procedure, as requested by others!
No holes stitch were marked or enlarged. - It was all a case of precision guesswork.
Only the position of the fabric on the rubber form was marked and pins held it in place.
Getting the needle in from the rubber side was easy, as you can see the hole. It was pushed through the fabric. The next stitch was guessed at, needle partially inserted, and location verified by lifting the fabric to see if it is close enough to the hole. If way off, she pulled the needle out and repositioned.
Use a long thin needle and a thimble, along with polyester thread.
3M 08090 trim adhesive is recommended for gluing.
Hope this helps!
After the fabric was sewn to the core, trim adhesive was used to carefully reglue the rubber core backside to the front of the steel strap, and then the bottom side fabric to the backside of the steel strap, and lastly the top side fabric to the back of the metal and overlapping the other side of the fabric, just like the factory did it.
***Choose an automotive trim adhesive that will withstand high temperatures! Regular househould stuff will come unglued in a hot car!! Dap weldwood failed miserably
Here is a finished strap – sweet, huh? Big improvement!

Time consuming, but the detail level was worth it.
They were then screwed onto the door panels.
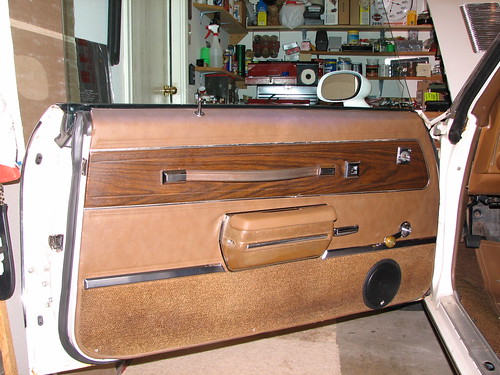
And here are the finished panels, ready for installation!

The tool you see is a bent chinesium flat-blade screwdriver that I used to separate the panel enough to insert the retaining clips.
I might move the speakers to the kick panels and replace the panel carpet but not sure yet...
The skuzzy door pull straps needed serious restoration. These things would look hideous against new door panels!
They have not been repro’ed, and I have only heard of them being repainted / dyed. I decided against that, since mine have had the texture worn smooth in many places and 40 years of weathering had turned them dark-chocolate brown. The stitching was almost all gone and the nasty feel of silicone spray remained even after lots of scrubbing. Paint will not stick to silicone…
I HAD to have new pull straps to complement this “anything goes” interior!
My curious mind started to reverse engineer the things, and I came across an outstanding uncovery!
They are NOT molded together as one unit (like I once thought), but instead made up of 5 parts: steel strap, two die-cast end pieces, a formed rubber core, and a fabric covering. Fabric covering – the exact same stuff the seats are made of.
No place sells reproduction covers for the straps, not even Legendary. I passed on the suggestion to them, but there is still a viable solution.
Option 1: Legendary sells a “1968-1972 convertible header cover” – a fabric cover that glues on the top of the windshield frame on convertibles. Part number is VV68GAHEADER(color#) and sells for $16 (as of 2010), long enough to easily make 3 door pull strap covers (both sides and an extra in case you mess up on one…) This can be purchased online.
Option 2: Legendary also sells any fabric by the yard. 54” wide by 36” long for $40. They will sell 1/2 a yard for $20 or as little as 1/3 of a yard for $16. Shipping would be at least $10. This would have to be purchased over the phone and it would be the preferred method, as you could make more covers to sell to others in need.
I was in luck, as Legendary had sent me a flawed set of headrest covers last year. When they sent new ones and told me to trash the old ones, I kept the old ones for some reason. See – it DOES pay to be a packrat!
I was able to cut out a perfect set of pull strap covers from one of them. I can cut out two more sets if someone needs some strap covers in this color…
I used a screwdriver to begin pulling the fabric apart where it was glued in the center.
Here it is, “doing the unstuck”:
Some tape wrapped around the cover indicated the fabric width and I also marked the 2 rows of stitches on the tape.
I transferred the data from that tape to a custom template made out of thick paper. It turned out to be a 14.5” x 2.75” rectangle with a row of stitches 1 3/16” from each end.
I held the template on top of the fabric, which I laid on a box, and cut out the two pieces with a sharp razor knife.
Other cars can differ slightly, so this size should be considered just a guide.
The rubber core was cleaned with goo-gone and a stiff brush. The metal strap was scraped clean with a razor blade and washed.
Since my mom did such a good job at restitching my sun visors, I let her sew the cut fabric to the rubber core. I chose 100% polyester thread for abrasion and moisture resistance – it was found at a local crafts store. This was also used on the sun visors with good results. Color was right on, too!
Here is the sewing detail…
It also pays to know bored old folks with good sewing skills…
Some details on the sewing procedure, as requested by others!
No holes stitch were marked or enlarged. - It was all a case of precision guesswork.
Only the position of the fabric on the rubber form was marked and pins held it in place.
Getting the needle in from the rubber side was easy, as you can see the hole. It was pushed through the fabric. The next stitch was guessed at, needle partially inserted, and location verified by lifting the fabric to see if it is close enough to the hole. If way off, she pulled the needle out and repositioned.
Use a long thin needle and a thimble, along with polyester thread.
3M 08090 trim adhesive is recommended for gluing.
Hope this helps!
After the fabric was sewn to the core, trim adhesive was used to carefully reglue the rubber core backside to the front of the steel strap, and then the bottom side fabric to the backside of the steel strap, and lastly the top side fabric to the back of the metal and overlapping the other side of the fabric, just like the factory did it.
***Choose an automotive trim adhesive that will withstand high temperatures! Regular househould stuff will come unglued in a hot car!! Dap weldwood failed miserably
Here is a finished strap – sweet, huh? Big improvement!
Time consuming, but the detail level was worth it.
They were then screwed onto the door panels.
And here are the finished panels, ready for installation!
The tool you see is a bent chinesium flat-blade screwdriver that I used to separate the panel enough to insert the retaining clips.
I might move the speakers to the kick panels and replace the panel carpet but not sure yet...
Last edited by Lady72nRob71; June 18th, 2010 at 08:23 AM. Reason: Added stitching details
April 1st, 2010 | 10:38 AM
#192
Grown Azz Kid
Joined: Nov 2006
Posts: 715
Rob, Those look good. I will send you mine and you can have them done for me too but in black
As to the parts of the car I kept a few little things that I was able to remove. The custon kick panels with speakers we some of what I kept. I was not able to take major items but was mad that I could not get my 4 spoke wheel off to put the deluxe back on...oh well
Let me know when you do the suspension I will see if I still have all of the pics. And let me know when my door pulls will be ready....
April 1st, 2010 | 12:51 PM
#193
Registered User
Joined: Dec 2007
Posts: 369
From: Nuremberg, GERMANY
Many thanks - just trying to help others out with their projects!
How are things going in Europe?
How are things going in Europe?
And yeah you are helping others with your project....
I will try the door hinges next
just a question on your pull strap (nice work by the way
), does the 1970 cutlass S type door panels have any pull strap, i would say no?!?! is it correct?I had one in my 71 supreme, so im just wondering?
Thanks
Torsten
April 1st, 2010 | 04:22 PM
#194
Registered User
Joined: Dec 2008
Posts: 1,179
From: West Palm Beach, FL
Torsten have you seen this site? http://www.oldcarbrochures.com/main....0296&g2_page=4
looks like the answer is no

looks like the answer is no
April 2nd, 2010 | 06:11 AM
#195
Thread Starter
Registered User
Joined: Feb 2008
Posts: 11,798
From: Plano, TX
Aside from the sewing, the rest was a piece of cake!
Just yesterday I stripped the paint and rust from the right side and this time I borrowed my neighbor's 4" angle grinder with a wire brush attachment. It made the job much easier and faster, but clamping these funky-shaped pieces in a vice is tricky.
I consumed the whole wire wheel in the process and had to finish up with the small brushes in the drill...

Now to get them painted tomorrow!
Thanks - I even impressed myself with those... I thought any outcome would be better than what I had.
Keep up the progress on you car but don't hurt you hand too much at one time - let it rest no and then.
April 8th, 2010 | 09:38 AM
#196
Thread Starter
Registered User
Joined: Feb 2008
Posts: 11,798
From: Plano, TX
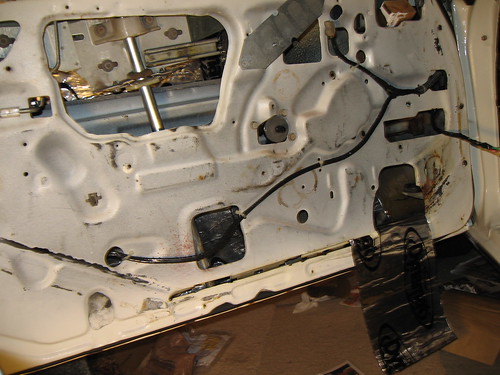
Refinishing the right door jam�
This was pretty much a repeat of the left, but the paint on the door jam area seemed to be in worse condition than the left. The wiring boot hole was drilled in the frame with a 2.25” hole saw and it was a perfect size. After a good scuffing and brushing and sanding of the whole area, 3M body sealant was applied at the seams and the hinge mounting areas were coated with 2 layers of POR15 clear. I ended up repainting the entire jam area, instead of spot spraying like I did on the left side. I could have painted over the cured POR15, but I expected poor adhesion to not make it worth it.
Here is before:

And here is after:

Again, this rustoleum “biscuit” color was almost an exact match - I bet even custom mixed paint could not be closer. Just try to find the paint lines!! (The little globs of factory sealer under the hinges were left purposely to help initial alignment of the hinges and to leave some "originality"...)
The 2” hole was made in the door for the wiring boot, but the previous �” hole in the door for the speakers posed a problem for the hole saw’s �” locator bit. A couple nuts and a bit stop adapted it perfectly:

Hole was drilled and magnets caught the filings, as well as the hole cutout itself…

After the hole was made, this end of the door had its seams resealed and was refinished just like the frame side - came out great! (forgot to bring the picture... )
)
Here is before:
And here is after:
Again, this rustoleum “biscuit” color was almost an exact match - I bet even custom mixed paint could not be closer. Just try to find the paint lines!! (The little globs of factory sealer under the hinges were left purposely to help initial alignment of the hinges and to leave some "originality"...)
The 2” hole was made in the door for the wiring boot, but the previous �” hole in the door for the speakers posed a problem for the hole saw’s �” locator bit. A couple nuts and a bit stop adapted it perfectly:
Hole was drilled and magnets caught the filings, as well as the hole cutout itself…
After the hole was made, this end of the door had its seams resealed and was refinished just like the frame side - came out great! (forgot to bring the picture...
)


