
Interior makeover
 February 27th, 2009, 05:35 PM
#121
Great detail and finish. The pictures tell the story of your quality work. This has been a great thread to show all of the work that goes in to a full interior remake. keep up the good work.
very nice job Rob
Keep up the great thread.
 February 27th, 2009, 07:38 PM
#122

Nice clean work! I was having flashbacks of doing the same to my 69 Roadrunner, always thinking about a detail I may have missed. I ended up using edead sound deadener with great sucess. I also had the same issues with the carpet. I also used Legendary interior. My rear seat back was sewn crooked and I ended up sending the whole seat back to them but they made it right. Again, really nice work!
February 27th, 2009, 07:56 PM
#124
Registered User
Thread Starter
Join Date: Feb 2008
Location: Plano, TX
Posts: 11,798
Pat, James, Chad, Darrelle,
Many many thanks... In fact, thank you too all who provided the helpful motivation and advice that kept this project chuggin' along!
Interesting you said this because i noticed the same on mine yesterday... It is not too bad so I will probably let it pass, esp. after all the efforts Legendary did on my qtr panels and headrests... ")
I also do not want to think about pulling that seat again - it must be fused to the rest of the car by now, hehe...
Many many thanks...
In fact, thank you too all who provided the helpful motivation and advice that kept this project chuggin' along! I also do not want to think about pulling that seat again - it must be fused to the rest of the car by now, hehe...
Last edited by Lady72nRob71; February 27th, 2009 at 08:30 PM.
February 27th, 2009, 08:06 PM
#125
Registered User
Thread Starter
Join Date: Feb 2008
Location: Plano, TX
Posts: 11,798
I was thinking that exact thing (noted under the last interior shot).
I would just have to do lots of very thin coats on the grilles so the holes do not fill with paint.
I have two armrest bases and the two pull straps to paint, so i will add in 4 speakers also. I really think that would help hide the speakers.
They do stand out like sore thumbs right now... 
Gotta order that saddle interior paint/dye next!
The fun never stops...
Last edited by Lady72nRob71; February 28th, 2009 at 06:31 AM.
February 27th, 2009, 10:01 PM
#126
Registered Luser
Join Date: Aug 2006
Location: LI,NY
Posts: 3,783
Hey Rob, that interior looks so good, I hope you have a roof that's even better! Not to be a harbinger or anything... like I've said before, if you are gonna do interior parts try Dupont vinyl...I believe the paint supplier in your part of Texas may be Gladwin...good people. I did some work down in S.A. about 5 yrs ago and I know they are there, but I belive they are near you also. If not, I'm sure there might be a Finish Master around!
like I've said before, if you are gonna do interior parts try Dupont vinyl...I believe the paint supplier in your part of Texas may be Gladwin...good people. I did some work down in S.A. about 5 yrs ago and I know they are there, but I belive they are near you also. If not, I'm sure there might be a Finish Master around!
February 28th, 2009, 06:26 AM
#127
Registered User
Thread Starter
Join Date: Feb 2008
Location: Plano, TX
Posts: 11,798
Hey Rob, that interior looks so good, I hope you have a roof that's even better! Not to be a harbinger or anything... like I've said before, if you are gonna do interior parts try Dupont vinyl...I believe the paint supplier in your part of Texas may be Gladwin...good people. I did some work down in S.A. about 5 yrs ago and I know they are there, but I belive they are near you also. If not, I'm sure there might be a Finish Master around!
like I've said before, if you are gonna do interior parts try Dupont vinyl...I believe the paint supplier in your part of Texas may be Gladwin...good people. I did some work down in S.A. about 5 yrs ago and I know they are there, but I belive they are near you also. If not, I'm sure there might be a Finish Master around!Roof? Who needs a roof??

I do have one even thought I do not like to use it...
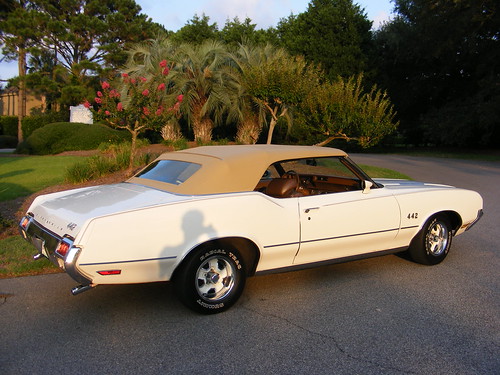
It is a little over a year old in color "buckskin". While not an original color, it blends quite well and the look was actually something that sold me on the car. I have a new top boot that I need to look at also.
Thanks again for reminding me on that paint - it saved me from having to dig through posts to find it. This was color-matched stuff wasn't it?
BTW, I like that picture of your daughter in your car - she seems to be loving every minute of it!
In fact there should be a new thread in the clubhouse showing all the young future Olds lovers!

Last edited by Lady72nRob71; February 28th, 2009 at 06:30 AM.
February 28th, 2009, 07:34 AM
#128
Registered
Join Date: Jul 2006
Location: Northeast Ohio
Posts: 4,430
Looking really good Rob. Now you have to get a big dog to ride shotgun. A good dog won't scuff the seats or use them for chew toys.
Get some of that new expensive chrome paint and do those speaker grills, then give me whatever's left over, buy a gallon at least.
The faux woodgraining technique or a combination of the two would be most stylish.
What's the next big project? buckets seats and a console?
Why do those have door pulls on the door handle and pull straps on the doors? No cupholders though?
Now you have to get a big dog to ride shotgun. A good dog won't scuff the seats or use them for chew toys.Get some of that new expensive chrome paint and do those speaker grills, then give me whatever's left over, buy a gallon at least.
The faux woodgraining technique or a combination of the two would be most stylish.
What's the next big project? buckets seats and a console?
Why do those have door pulls on the door handle and pull straps on the doors? No cupholders though?
February 28th, 2009, 03:04 PM
#129
Registered User
Thread Starter
Join Date: Feb 2008
Location: Plano, TX
Posts: 11,798
Are you referring to the two legged female varieties there??

I can sure use one there to hold my shotgun. No rear window to mount a rack in...
It was free.
Only $5 plus shipping and handling.
Whatever.
Maybe for the next car... Next is the doors and transmission reseal.
See real reason below.Shot glasses and sake cups fit in the pull opening on the front armrests; little lids secure the contents.
Beer bottles will need a console which I am working to find.
Last edited by Lady72nRob71; February 28th, 2009 at 03:10 PM.
February 28th, 2009, 04:12 PM
#130
Registered
Join Date: Jul 2006
Location: Northeast Ohio
Posts: 4,430
Sake cups?????
Boy, your car is really nice Rob. I never saw a really good pic of it like like that.
Tell the guy taking the picture to move so his shadow isn't on it.
If you have a car like that and can only get two legged dogs to ride in it I gots some things to learn you.
If they don't have fleas, can fetch and don't drool too much I guess it's okay.
Boy, your car is really nice Rob.
I never saw a really good pic of it like like that. Tell the guy taking the picture to move so his shadow isn't on it.
If you have a car like that and can only get two legged dogs to ride in it I gots some things to learn you.
If they don't have fleas, can fetch and don't drool too much I guess it's okay.
February 28th, 2009, 05:09 PM
#132
Registered User
Thread Starter
Join Date: Feb 2008
Location: Plano, TX
Posts: 11,798
Little thimble-sized cups you drink sake from...
Sake is Asian wine - it comes from fermented rice. My ex ladyfriend left me a case of it...
Many thanks...
I told him to shove over and he moved. A cleaner shot is below. Keep in mind that was how the car looked before I even drove it home from Hilton Head!
Unfortunately that rules out most of the canine varieties... I would hate to show a dog Jamesbo's "find the waterfall" picture...
I would like to see the tail action though!
Sake is Asian wine - it comes from fermented rice.
My ex ladyfriend left me a case of it... I told him to shove over and he moved.
A cleaner shot is below. Keep in mind that was how the car looked before I even drove it home from Hilton Head! I would hate to show a dog Jamesbo's "find the waterfall" picture...I would like to see the tail action though!
Last edited by Lady72nRob71; March 10th, 2009 at 11:23 AM.
February 28th, 2009, 05:14 PM
#133
Registered User
Thread Starter
Join Date: Feb 2008
Location: Plano, TX
Posts: 11,798
I still cannot believe that I went through with all this and succeeded so far. Hopefully this will give others some help on redoing their interiors. On the flipside, I hope it does not discourage them since I spilled out a lot of reality!
The way I see it, if I can do it, anyone can!
The key is not to give up...
 March 10th, 2009, 11:30 AM
#136
Registered User
Thread Starter
Join Date: Feb 2008
Location: Plano, TX
Posts: 11,798
I can say it looks a lot easier on the website than it was in real life. Despite us having different cars, hopefully there will be some good tips and tricks you can use to help you along with your interior. Interestingly, you are doing door panels and those are some of the few things I have NOT done, yet... My door panels came assembled for the most part; I just have to transfer over the metal trim and the top rails and cut the holes for the switches. I should get to those within the next month...
Last edited by Lady72nRob71; March 10th, 2009 at 11:34 AM.
March 10th, 2009, 12:19 PM
#137
Registered User
Thread Starter
Join Date: Feb 2008
Location: Plano, TX
Posts: 11,798
The first driving experience�
The first Saturday in March was warm and pleasant enough to do some driving! I hit the open farm roads and state highways for a total of 120 miles. It was much too windy for tops down, so I did 70 miles with the top up. That day was about 80 degrees and cloudy. I kept the windows up to listen for strange noises.
The Dynamat did make a noticeable difference. The engine was almost silent, except from the Rocket�s deep exhaust note from the rear, audible only through the top at idle or slower speeds. In fact the engine was quieter than my �97 Cadillac�s, aside not counting the exhaust note� With the top up at 75 it was so quiet and smooth that I was getting very sleepy... Engine noise vanished completely.
Road (and wind) noise was also only heard through the top. No vibrations were felt through the floor by my feet. The floor felt very solid, even more so than my �97 Cadillac!
During the whole trip, the windows never needed to be opened, and I used only the vent at low fan speed. Therefore, I think the Dynamat was a very good heat insulator also.
A long road to nowhere...
The following sunny Sunday I decided to take Lady out to get her 6-months-overdue inspection sticker.
Now driving a car like this ain't easy... Rounding the curve in the alley before I could exit, the guy at the end who never talked to me stared at us and started saying how nice my car was. Now caught off guard around a corner and trying to wave, I almost ran though his yard...
As soon as I turn onto the street, a group of young kids waved, so I had to wave and turn tight at the same time... Talk about too much attention!
The inspection guy looks at everything BUT the safety stuff and gives ME the sticker to put on myself!
After that, it was time to come home and do yard work. However, Lady seemed to have a mind of her own and started heading northeast... I just let her go where she wanted.
We hit the less traveled farm roads on my well-known fun route through the country. All road, wind, and exhaust sounds were heard through the open air, as expected. Very little noise through the chassis was heard. The sun felt nice and the ride was SO smooth. Later I had the music cranked way up and it was loud and clear with the top down at highway speeds. The sound was very good given the low grade radio it is, there were no vibrating body panels either. No vibrations could be felt though the floorboards, except when the tunes were cranked up very loud.
Almost back to the house I pass one of our own city cops and was glad I had that new sticker! Therefore he just gave me a big wave and a stare...
So after about 50-60 miles, I got home. This makes 120 miles+ in the past two days, going absolutely nowhere. It felt so good though and I enjoyed it all!
I then had to do my yard work so I would not get mad at myself...
So was the Dynamat worth it?? Well, for a car I will travel long distances in at a time, yes. If just a daily driver going to work or shopping, no. If a classic car I would just drive locally a few hundred miles a year in, no.
Overall I am very happy with my end accomplishments so far and I am looking forward to a short trip this spring!
However I need to get those doors done first. Just as Jamesbo suggested in a different thread, I just don't know how to put those front windows down right now...
I hit the open farm roads and state highways for a total of 120 miles. It was much too windy for tops down, so I did 70 miles with the top up. That day was about 80 degrees and cloudy. I kept the windows up to listen for strange noises.The Dynamat did make a noticeable difference. The engine was almost silent, except from the Rocket�s deep exhaust note from the rear, audible only through the top at idle or slower speeds. In fact the engine was quieter than my �97 Cadillac�s, aside not counting the exhaust note� With the top up at 75 it was so quiet and smooth that I was getting very sleepy... Engine noise vanished completely.
Road (and wind) noise was also only heard through the top. No vibrations were felt through the floor by my feet. The floor felt very solid, even more so than my �97 Cadillac!
During the whole trip, the windows never needed to be opened, and I used only the vent at low fan speed. Therefore, I think the Dynamat was a very good heat insulator also.
A long road to nowhere...
The following sunny Sunday I decided to take Lady out to get her 6-months-overdue inspection sticker.
Now driving a car like this ain't easy... Rounding the curve in the alley before I could exit, the guy at the end who never talked to me stared at us and started saying how nice my car was. Now caught off guard around a corner and trying to wave, I almost ran though his yard...
As soon as I turn onto the street, a group of young kids waved, so I had to wave and turn tight at the same time... Talk about too much attention!
The inspection guy looks at everything BUT the safety stuff and gives ME the sticker to put on myself!
After that, it was time to come home and do yard work. However, Lady seemed to have a mind of her own and started heading northeast...
I just let her go where she wanted. We hit the less traveled farm roads on my well-known fun route through the country. All road, wind, and exhaust sounds were heard through the open air, as expected. Very little noise through the chassis was heard. The sun felt nice and the ride was SO smooth. Later I had the music cranked way up and it was loud and clear with the top down at highway speeds.
The sound was very good given the low grade radio it is, there were no vibrating body panels either. No vibrations could be felt though the floorboards, except when the tunes were cranked up very loud. Almost back to the house I pass one of our own city cops and was glad I had that new sticker! Therefore he just gave me a big wave and a stare...
So after about 50-60 miles, I got home. This makes 120 miles+ in the past two days, going absolutely nowhere. It felt so good though and I enjoyed it all!
I then had to do my yard work so I would not get mad at myself...
So was the Dynamat worth it?? Well, for a car I will travel long distances in at a time, yes. If just a daily driver going to work or shopping, no. If a classic car I would just drive locally a few hundred miles a year in, no.
Overall I am very happy with my end accomplishments so far and I am looking forward to a short trip this spring!
However I need to get those doors done first. Just as Jamesbo suggested in a different thread, I just don't know how to put those front windows down right now
...
Last edited by Lady72nRob71; March 10th, 2009 at 12:23 PM.
March 6th, 2010, 07:11 AM
#139
Registered User
Thread Starter
Join Date: Feb 2008
Location: Plano, TX
Posts: 11,798
Now that the temperatures are becoming tolerable, it's time to finish up the interior...
A few weeks ago, I completed the addition of another welcomed option. It is truly one of a kind, perhaps because it was never offered. It is the built-in garage door opener, the same one that I have in my late 90’s Cadillac. I hated sharing a handheld remote with the motorcycle, and dealing with dead batteries.
The opener unit itself was obtained from a 95 STS at no charge from my favorite pick-a-part yard, as they disregarded it when I got a bunch of other big stuff from them. It is smaller than a deck of cards and hooks right into the car’s electrical system.
I wanted to mount it in a hidden place with a permanent look, and not altering any original part of the car.
The solution was easy – the lower plastic steering column cover.
I made up a mock cover out of cardboard to verify this would work and it seemed to be fine. Hidden it is, too!
I did not want to cut on my original cover, so I bought a used cover from a member here. Right before it came in, I found another cover at a classic car bone yard, pretty much free of charge due to other bigger items purchased.
So of the two, I used the worst looking one, one that had a deep gash on the side. Reason being is that if I miscut it the first time, I had a spare. I carefully cut the opening with a dremel cutoff wheel...

It took a lot of trial and error (mostly error) but turned out better than I thought, despite the unusual shape of the opener and the angle which it mounts at. I painted the cover with the off-color interior paint I had and let dry a few days. (I will fill the gaps & repaint with correct color later when I obtain the correct paint.)
I mounted the opener with epoxy and made a wiring harness that attached the opener to the back of the tach under its screw terminals. No cutting or splicing. Here is the installed GDO assembly:

I programmed the unit to the receiver and it worked great, just in time for the year’s first top-down cruise on Feb. 28, 2010!
A few weeks ago, I completed the addition of another welcomed option. It is truly one of a kind, perhaps because it was never offered. It is the built-in garage door opener, the same one that I have in my late 90’s Cadillac. I hated sharing a handheld remote with the motorcycle, and dealing with dead batteries.
The opener unit itself was obtained from a 95 STS at no charge from my favorite pick-a-part yard, as they disregarded it when I got a bunch of other big stuff from them. It is smaller than a deck of cards and hooks right into the car’s electrical system.
I wanted to mount it in a hidden place with a permanent look, and not altering any original part of the car.
The solution was easy – the lower plastic steering column cover.
I made up a mock cover out of cardboard to verify this would work and it seemed to be fine. Hidden it is, too!
I did not want to cut on my original cover, so I bought a used cover from a member here. Right before it came in, I found another cover at a classic car bone yard, pretty much free of charge due to other bigger items purchased.
So of the two, I used the worst looking one, one that had a deep gash on the side. Reason being is that if I miscut it the first time, I had a spare. I carefully cut the opening with a dremel cutoff wheel...
It took a lot of trial and error (mostly error) but turned out better than I thought, despite the unusual shape of the opener and the angle which it mounts at. I painted the cover with the off-color interior paint I had and let dry a few days. (I will fill the gaps & repaint with correct color later when I obtain the correct paint.)
I mounted the opener with epoxy and made a wiring harness that attached the opener to the back of the tach under its screw terminals. No cutting or splicing. Here is the installed GDO assembly:
I programmed the unit to the receiver and it worked great, just in time for the year’s first top-down cruise on Feb. 28, 2010!
March 6th, 2010, 08:28 PM
#142
Registered User
Thread Starter
Join Date: Feb 2008
Location: Plano, TX
Posts: 11,798
Early - mid March, 2010.
As much as I hated to tear apart a perfectly drivable car, the rising outside temperatures finally signaled me to continue with last year�s interior makeover�
The mission is door resto and power window conversion.
Since the car is stuck in a tiny little 2 car garage, I will have to do one door at a time, starting with the left side.
This is what I started with:
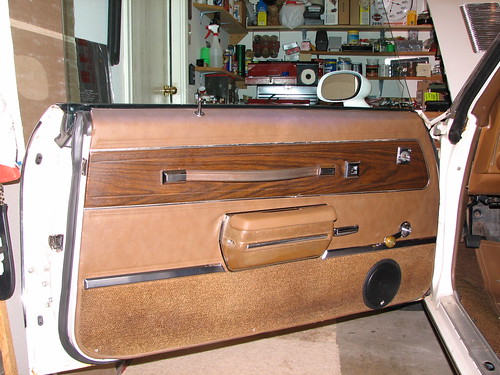
Not too bad for original, but I want everything to match up and look new.
Also, the door hinges needed lots of attention.
The upper was a GM replacement which was rusty, but reusable. It needs sanding and painting.

Skuzzy would not even begin to describe the lower one:

This will take quite a bit of elbow grease� Sanding, painting, and new bushings and hold-open roller.
The wiring boots also needed to be installed for the power window harness.
First, the door panel and all small parts were removed from the door. Kick panel and door sill were removed and an old towel covered the floor to protect the new carpet.
After disconnecting the battery, the power lock and speaker wires were cut and pulled into the door. The lock wires got a set of connectors attached to their ends, and the door side got their mates.
The garage was cleaned enough to make up a safe area for the door once it was removed. Lots of carpet and padding was used to protect the paint.
The door edges and fender edges were wrapped in masking tape to protect from chips. A sharpie pen was used to mark the hinge locations for easier reassembly. Alcohol will remove the marks later.
Pulling the door!
I have been dreading this for quite some time, but now is the time! After supporting the door well...

and removing the bolts from the door, and keeping a firm grip on it, it came off without issue. When the last bolt came out, I slid the door rearwards to clear the painted area. I lifted the door, kicked the stool away, and set it on the ground. Not bad for a one man job�

I did not want to say anything about it until I found out if it would work. Being so surrounded by metal down there gave me doubts, but in the end it worked fine!
As much as I hated to tear apart a perfectly drivable car, the rising outside temperatures finally signaled me to continue with last year�s interior makeover�
The mission is door resto and power window conversion.
Since the car is stuck in a tiny little 2 car garage, I will have to do one door at a time, starting with the left side.
This is what I started with:
Not too bad for original, but I want everything to match up and look new.
Also, the door hinges needed lots of attention.
The upper was a GM replacement which was rusty, but reusable. It needs sanding and painting.
Skuzzy would not even begin to describe the lower one:
This will take quite a bit of elbow grease� Sanding, painting, and new bushings and hold-open roller.
The wiring boots also needed to be installed for the power window harness.
First, the door panel and all small parts were removed from the door. Kick panel and door sill were removed and an old towel covered the floor to protect the new carpet.
After disconnecting the battery, the power lock and speaker wires were cut and pulled into the door. The lock wires got a set of connectors attached to their ends, and the door side got their mates.
The garage was cleaned enough to make up a safe area for the door once it was removed. Lots of carpet and padding was used to protect the paint.
The door edges and fender edges were wrapped in masking tape to protect from chips. A sharpie pen was used to mark the hinge locations for easier reassembly. Alcohol will remove the marks later.
Pulling the door!
I have been dreading this for quite some time, but now is the time! After supporting the door well...
and removing the bolts from the door, and keeping a firm grip on it, it came off without issue. When the last bolt came out, I slid the door rearwards to clear the painted area. I lifted the door, kicked the stool away, and set it on the ground. Not bad for a one man job�
I did not want to say anything about it until I found out if it would work. Being so surrounded by metal down there gave me doubts, but in the end it worked fine!
March 7th, 2010, 08:00 AM
#145
Registered User
Thread Starter
Join Date: Feb 2008
Location: Plano, TX
Posts: 11,798
I figured if I did not do this now, cruising season would start and it would get put off again... It was not easy...
March 7th, 2010, 08:07 AM
#146
Registered User
Thread Starter
Join Date: Feb 2008
Location: Plano, TX
Posts: 11,798
This is the way you drill your door���..
�for the power window wiring boots.
I was unfortunate to have to use a $3 chinesium hole saw set from Harbor Freight. The biggest issue is that the center drill bit was not straight.
Therefore it wobbled and made the hole almost another 1/8� bigger than it was supposed to be. I learned this on the bigger 2.5� hole on the frame side. Here is the cutting process there:

Note the magnets I used to help capture the metal shavings.
Bigger ones would have been better. I ran the drill at about 100RPM and kept the saw lubed with clean motor oil. The hole is almost too big, so some sealant / adhesive will be neccessary. When drilling the door, I used a smaller blade (2"), so even with the added wobble factor, the hole size was perfect - 2 1/8"!

I drilled for the boots� mounting holes last.
In the last picture, I did not like the rust found at the bottom hinge area. The outer metal seemed thinner there, but the inner metal seemed better.
March 7th, 2010, 08:13 AM
#147
Registered User
Thread Starter
Join Date: Feb 2008
Location: Plano, TX
Posts: 11,798
Hinge time!
The hinges were marked on the frame and then removed. The new one had good bushings, so it will be just sanded and painted.
The bottom needs a complete overhaul. First – remove the old pin, bushings, and hold-open roller.
A dremel with a cutoff wheel was used to cut their tabs…

and they were then tapped out with a hammer.
Note how the new hold open roller will bolt into place...
I have had it with chinesium!! Out of a whole 'dremel' kit from harbor freight, 3 out of four cutting wheel shanks were wobbly, just like the hole saw drill. Do these guys not know how to make a STRAIGHT tool? I got what I paid for - I will get the brand name stuff next time...
Scraping and sanding is in progress….. A small sand blaster would be handy right about now….
The bottom needs a complete overhaul. First – remove the old pin, bushings, and hold-open roller.
A dremel with a cutoff wheel was used to cut their tabs…
and they were then tapped out with a hammer.
Note how the new hold open roller will bolt into place...
I have had it with chinesium!!
Out of a whole 'dremel' kit from harbor freight, 3 out of four cutting wheel shanks were wobbly, just like the hole saw drill. Do these guys not know how to make a STRAIGHT tool? I got what I paid for - I will get the brand name stuff next time...Scraping and sanding is in progress….. A small sand blaster would be handy right about now….
March 7th, 2010, 03:32 PM
#150
Registered
Join Date: Jul 2006
Location: Northeast Ohio
Posts: 4,430
I had to do it for four doors on mine, and uphill both ways.
Thought you were going to try using chassis punches for that Rob?
Hole saws work good, I use them on steel doors to cut the holes for deadbolts, but I got good ones.
The hinges should have sealer between them and the door or you get rust from moisture sitting in there.
Didn't the cow get mad when you took her milking stool for your door.
March 7th, 2010, 06:20 PM
#151
Registered User
Thread Starter
Join Date: Feb 2008
Location: Plano, TX
Posts: 11,798
Well, to use the punches, you still had to cut a 1" hole. So if I had to already drill a hole, might as well discard an extra step and just cut a bigger hole!
Also, that pillar metal is THICK. I would be concerned about breaking my borrowed punch set...
Mine only had rust bonding them together.
Riddle me this, Blue: Most body sealants also work as adhesive. How do you adjust the door later if needed? If I use sealer, i wonder how long I have to get the door on and adjusted until the stuff sets up??
I wonder if my neighbor used that stool for milking cows?? I borrowed it from them. I will ask them.
Also, that pillar metal is THICK. I would be concerned about breaking my borrowed punch set...
Riddle me this, Blue: Most body sealants also work as adhesive. How do you adjust the door later if needed? If I use sealer, i wonder how long I have to get the door on and adjusted until the stuff sets up??
I wonder if my neighbor used that stool for milking cows?? I borrowed it from them. I will ask them.
March 7th, 2010, 08:35 PM
#152
Registered User
Thread Starter
Join Date: Feb 2008
Location: Plano, TX
Posts: 11,798
A sanding we will go�
Here are the hinges in the beginning.

After two hours of scraping, wire brushing and sanding…

…both by hand and drill (also notice how the rotary wire brushes peeled the gloves off my hands)…

…I finally got the hinges down to bare metal. It seems there were two layers of paint and primers, one on top of another.
It was raining outside and I was doing this nasty job on the patio. Seems that the air humidity caused surface rust right before my eyes!
After they were good enough, I took them inside and washed them (and scrubbed with scotchbrite), dried them with a rag, and put in the oven to fast dry them to prevent more rust.
They came out nicely.

However, sandblasting them would have been much better.
Now I can prime and paint them in a few days when it dries out around here.
During this process I was again thwarted by the chinisium wire brushes I got a while back.
One worked, one bounced all over the workpiece, and one turned egg-shaped upon turning the drill on.
Today marks an end to cheap crap from harbor freight. Ironically, all of that junk that failed the last few days was bought a year or two ago. It seems as if the already-low-quality really took a dive then.
After two hours of scraping, wire brushing and sanding…
…both by hand and drill (also notice how the rotary wire brushes peeled the gloves off my hands)…
…I finally got the hinges down to bare metal. It seems there were two layers of paint and primers, one on top of another.
It was raining outside and I was doing this nasty job on the patio. Seems that the air humidity caused surface rust right before my eyes!
After they were good enough, I took them inside and washed them (and scrubbed with scotchbrite), dried them with a rag, and put in the oven to fast dry them to prevent more rust.
They came out nicely.
However, sandblasting them would have been much better.
Now I can prime and paint them in a few days when it dries out around here.
During this process I was again thwarted by the chinisium wire brushes I got a while back.
One worked, one bounced all over the workpiece, and one turned egg-shaped upon turning the drill on.
Today marks an end to cheap crap from harbor freight. Ironically, all of that junk that failed the last few days was bought a year or two ago. It seems as if the already-low-quality really took a dive then.
March 8th, 2010, 08:20 AM
#154
Registered User

Join Date: Apr 2008
Location: Phoenix, AZ
Posts: 1,052
Rob, although it's too late now, next time I'd suggest buying a gallon of Zep rust, zinc & calcium remover from Home Depot. In TX, I'm guessing it's around $6.99 per gallon ($9.99 here in overinflated NYC).
Just drop the hinges in and let it do it's magic. It's pretty incredible. Stuff worked great on all my incredibly rusty steering column parts I'm currently rebuilding. It's a good idea to sand down heavy scale a bit before dropping in to speed up the process, but otherwise it works great. As all my tools are in AZ and I have no garage to work in here in the City, I had to improvise. And I'm more than pleased with the results.
If all the paint doesn't come off, it definitely makes it fairly easy to remove the remaining paint. However, if left in long enough, I found that the paint would fall off as well.
March 10th, 2010, 06:51 AM
#155
Registered User
Thread Starter
Join Date: Feb 2008
Location: Plano, TX
Posts: 11,798
Painting the hinges!
A few days later, during a HOT 77* winter day, I primed and painted the hinges.
I used a clean metal primer first, and followed the directions carefully regarding the recoat times.
Here is the prime job...
"If car parts are swingin� in your trees, you might be a redneck�"

I chose white primer because the top coat will be white.
Afterwards, in just the right timeframe, I applied the top coat to all the parts.
So is it Oldsmobile �Cameo White��

Or is it Rustoleum �Biscuit�?

Your guess!!
Thanks Tom... Its not too late to try on the right side hinges in a few weeks. I will give it a try!
I used a clean metal primer first, and followed the directions carefully regarding the recoat times.
Here is the prime job...
"If car parts are swingin� in your trees, you might be a redneck�"
I chose white primer because the top coat will be white.
Afterwards, in just the right timeframe, I applied the top coat to all the parts.
So is it Oldsmobile �Cameo White��
Or is it Rustoleum �Biscuit�?
Your guess!!
Thanks Tom... Its not too late to try on the right side hinges in a few weeks. I will give it a try!
March 10th, 2010, 08:30 AM
#160
Registered
Join Date: Jul 2006
Location: Northeast Ohio
Posts: 4,430
It says it in the Fisher manual.
"Prior to installation of hinge, apply a a coat of heavy-bodied sealer to surface of hinge that contacts door and body hinge pillar for protection aginst corrosion."
The hinges look good but you need a sandblaster Rob.
Hang them out in sandstorms or chase down a dust devil, like they did to clean the pots and pans on the mining planet on Star Trek.
The "Dammit' Jim!... I'm a doctor!... not a bricklayer! episode.
The phaser injured Horta was cool, and silicone based, keep Hortas away from cars before paint or you will get some major duty fisheyes.


