
And Here we go...


Thread Starter
Registered User
Joined: Jul 2011
Posts: 288
Thread Starter
Registered User
Joined: Jul 2011
Posts: 288
Primer
well....finally in primer..i did not have the windshield ledges cleaned up as much as I like but I went and put the car in primer anyway.
It was getting cold here and wanted to get that bare metal cleaned up. I must say after a few first bad moments with my gun not cleaned well the primer laid on nice.
I previously used the gun on POR 15 I thought I cleaned it well but not quite good enough...live and learn.
Had to take the tranny out again....broke the pump gear....live and learn

Thread Starter
Registered User
Joined: Jul 2011
Posts: 288
I am plannning on a base clear...from what I am after reading it is better for the rookie. I am not close to color yet, got to do the doors, lids and alignment yet....fun times.
Just an Olds Guy
Joined: Jul 2008
Posts: 24,528
From: Edmonton, AB. And "I am Can 'eh' jun - eh"
Looking really nice - must have taken that while the primer was still drying? The surfaces look very smooth. Did you make your final choice yet on the green you were looking for?
Thread Starter
Registered User
Joined: Jul 2011
Posts: 288
That was actually the next day...it doesnt look that nice now after trying to smooth out the quarters.
I have not decided on the colors yet...I wanted you paint pattern but the little guy wants green. Green is growing on me..the OEM green was too light. With a white interior just about any color will match. Any suggestions on a green ?
Just an Olds Guy
Joined: Jul 2008
Posts: 24,528
From: Edmonton, AB. And "I am Can 'eh' jun - eh"
Olds did have a nice green (not Pinehurst) called Radiant Green. I like the look of it, but there are some other choices. Are you looking for a deep dark or medium?
I saw this pic of a 67 Delmont in green that really pops. Don't know what color it is though. Is this what the little guy is looking for?

Or maybe this (radiant green)

I saw this pic of a 67 Delmont in green that really pops. Don't know what color it is though. Is this what the little guy is looking for?
Or maybe this (radiant green)
Thread Starter
Registered User
Joined: Jul 2011
Posts: 288
Olds did have a nice green (not Pinehurst) called Radiant Green. I like the look of it, but there are some other choices. Are you looking for a deep dark or medium?
I saw this pic of a 67 Delmont in green that really pops. Don't know what color it is though. Is this what the little guy is looking for?
Or maybe this (radiant green)
I saw this pic of a 67 Delmont in green that really pops. Don't know what color it is though. Is this what the little guy is looking for?
Or maybe this (radiant green)
Just an Olds Guy
Joined: Jul 2008
Posts: 24,528
From: Edmonton, AB. And "I am Can 'eh' jun - eh"
I know which color you mean. I had a 95 Regency Elite in Blue. Almost bought another one in that green. Sweet car. Of those ^^^ pics I like the 67 color better too.
Thread Starter
Registered User
Joined: Jul 2011
Posts: 288
major milestone....well not really
fianally back on the frame....the blue shocks gotta go or at least get a coat of paint. I only purchased them right before the teardown.
I think I'll have a beer or ten and celebrate
I think I'll have a beer or ten and celebrate
Just an Olds Guy
Joined: Jul 2008
Posts: 24,528
From: Edmonton, AB. And "I am Can 'eh' jun - eh"
Yup! No blue shocks. Did you install rear braces on your suspension for that 455? I just went through a rear end rebuild myself and it was soooo much fun. Biggest PITA was getting the bushings reinstalled in the diff ears. Also I see you replaced all your brake lines. I'm having a hard time getting that rear brake hose to break loose so I can install the new one. Here's how my diff turned out (I used NAPA shocks - they came already painted black)
Registered User
Joined: Oct 2009
Posts: 1,226
From: Central IN
Thread Starter
Registered User
Joined: Jul 2011
Posts: 288
Yup! No blue shocks. Did you install rear braces on your suspension for that 455? I just went through a rear end rebuild myself and it was soooo much fun. Biggest PITA was getting the bushings reinstalled in the diff ears. Also I see you replaced all your brake lines. I'm having a hard time getting that rear brake hose to break loose so I can install the new one. Here's how my diff turned out (I used NAPA shocks - they came already painted black)
I also had fun reinstalling the diff ears....I was using a 4x4 and a big hammer. I had put some heat on the ears and the bushing were in my fridge but they were still a pain. Never had an issue with the hose. My shocks were napa....kicking myself for not painting them first.
Thread Starter
Registered User
Joined: Jul 2011
Posts: 288
Yup! No blue shocks. Did you install rear braces on your suspension for that 455? I just went through a rear end rebuild myself and it was soooo much fun. Biggest PITA was getting the bushings reinstalled in the diff ears. Also I see you replaced all your brake lines. I'm having a hard time getting that rear brake hose to break loose so I can install the new one. Here's how my diff turned out (I used NAPA shocks - they came already painted black)
did you get you exhaust made up or did you buy a kit ??
Just an Olds Guy
Joined: Jul 2008
Posts: 24,528
From: Edmonton, AB. And "I am Can 'eh' jun - eh"
I am tempted to put my diff that color now.
I also had fun reinstalling the diff ears....I was using a 4x4 and a big hammer. I had put some heat on the ears and the bushing were in my fridge but they were still a pain. Never had an issue with the hose. My shocks were napa....kicking myself for not painting them first.
did you get you exhaust made up or did you buy a kit ??
I used my impact driver to get the bushings in. The left side was actually pretty easy because the bushing receiver I used had lots of room. The right side was the PITA. I ended up using a modified bushing press ring and a 3/32" plate steel to clamp onto. Still it took a lot of doing. I don't think I would have got them in there with the 4X4 and BFH.
The exhaust is actually old. It was a made up exhaust from the e man back to the mufflers. Stock pipes over the axles and back. I'm going to have it entirely replaced next year. Not sure if I'll go with Walker or Magna Flo. The resonators will also be gone since I'm putting on the cutout rear bumper with trumpet exhaust tips. Still searching for 'the right sound'.
Where I'm having trouble on the rear brake hose is the connection to the brake line. I've used heat and penetrating fluid. Using only box end 7/16 to avoid rounding the flare nut. It just doesn't want to break loose. I'm going to try heat again - maybe burn off some of the undercoating that was sprayed onto it 25 years ago.
Anyway - back to your build.
Thread Starter
Registered User
Joined: Jul 2011
Posts: 288
dual manifolds
picked up a set of manifolds from a guy in Ontario on kijiji for a real good price.
There are not of a 70 but they cleaned up real nice and numbers are not important to me. I used that eastwood paste on them and baked them on my woodstove.
There are not of a 70 but they cleaned up real nice and numbers are not important to me. I used that eastwood paste on them and baked them on my woodstove.
Thread Starter
Registered User
Joined: Jul 2011
Posts: 288
Thanks! I was going for the W27 axle look. I know it's not real but I really liked the theme.
I used my impact driver to get the bushings in. The left side was actually pretty easy because the bushing receiver I used had lots of room. The right side was the PITA. I ended up using a modified bushing press ring and a 3/32" plate steel to clamp onto. Still it took a lot of doing. I don't think I would have got them in there with the 4X4 and BFH.
The exhaust is actually old. It was a made up exhaust from the e man back to the mufflers. Stock pipes over the axles and back. I'm going to have it entirely replaced next year. Not sure if I'll go with Walker or Magna Flo. The resonators will also be gone since I'm putting on the cutout rear bumper with trumpet exhaust tips. Still searching for 'the right sound'.
Where I'm having trouble on the rear brake hose is the connection to the brake line. I've used heat and penetrating fluid. Using only box end 7/16 to avoid rounding the flare nut. It just doesn't want to break loose. I'm going to try heat again - maybe burn off some of the undercoating that was sprayed onto it 25 years ago.
Anyway - back to your build.
Just an Olds Guy
Joined: Jul 2008
Posts: 24,528
From: Edmonton, AB. And "I am Can 'eh' jun - eh"
Not as easy as it sounds. You have to undo the nut on the upper and lower control arms. The upper is a real beeatch with the exhausts in the way. The lower ones are a PITA also because of the bolt through the frame on the front of the CA. Even with new bolts/nuts on the upper CA, it was a PITA to get a socket in there. Ended up using a universal joint on the extension. Prolly should have just cut the exhaust out.
Thread Starter
Registered User
Joined: Jul 2011
Posts: 288
Not as easy as it sounds. You have to undo the nut on the upper and lower control arms. The upper is a real beeatch with the exhausts in the way. The lower ones are a PITA also because of the bolt through the frame on the front of the CA. Even with new bolts/nuts on the upper CA, it was a PITA to get a socket in there. Ended up using a universal joint on the extension. Prolly should have just cut the exhaust out.
I dont have my exhaust purchased yet...i got a set from bap on the way.
Just an Olds Guy
Joined: Jul 2008
Posts: 24,528
From: Edmonton, AB. And "I am Can 'eh' jun - eh"
Went back and looked at progress to date. Without the exhaust in there, you should have no trouble installing those braces. Just time consuming work. Impact tools do make it go a lot faster and easier though....
Thread Starter
Registered User
Joined: Jul 2011
Posts: 288
well finally back at it after a few weeks hiatus ...... installing the exhaust I got from BAP. One side laid in place....the kit not come with the exhaust band for the rear hanger which is a bit of a bummer. PICS to follow...happy new year.
planning on putting a push on this thing this spring...dont want to rush it but I want it running by summer.
planning on putting a push on this thing this spring...dont want to rush it but I want it running by summer.
Just an Olds Guy
Joined: Jul 2008
Posts: 24,528
From: Edmonton, AB. And "I am Can 'eh' jun - eh"
LOL a few weeks hiatus would be my dream. I have to wait till the spring till it's warm enough to do anything. FYI I'll be doing a new exhaust this year. I'm thinking about whether to go custom or to buy a complete Gardner system. They're supposed to be as good as original as possible. I know they're not cheap.
Did you ever decide to put in the body braces?
Did you ever decide to put in the body braces?
Thread Starter
Registered User
Joined: Jul 2011
Posts: 288
I did not get the braces yet....going to see how the things responds first. I am going to opt for some new bumpers so I have to hold off on some items. The exhaust was not in the budget either but it needed to be replaced. I figured this kit and a self install was a cheap way to go. It looks pretty good to boot.
Just an Olds Guy
Joined: Jul 2008
Posts: 24,528
From: Edmonton, AB. And "I am Can 'eh' jun - eh"
Just an FYI that once you put everything together it will be much more difficult to install them. It also means you'll have to re-torque the upper control arm bolts. The braces are not pricey.
Parts place has them for 65.00 Part SU4595Z
Not a critical piece of hardware, I was just thinking of the convenience of the install. Might be just as well to see how your ride performs first. I know I'm looking forward to the change to mine.
Parts place has them for 65.00 Part SU4595Z
Not a critical piece of hardware, I was just thinking of the convenience of the install. Might be just as well to see how your ride performs first. I know I'm looking forward to the change to mine.
Thread Starter
Registered User
Joined: Jul 2011
Posts: 288
Just an FYI that once you put everything together it will be much more difficult to install them. It also means you'll have to re-torque the upper control arm bolts. The braces are not pricey.
Parts place has them for 65.00 Part SU4595Z
Not a critical piece of hardware, I was just thinking of the convenience of the install. Might be just as well to see how your ride performs first. I know I'm looking forward to the change to mine.
Parts place has them for 65.00 Part SU4595Z
Not a critical piece of hardware, I was just thinking of the convenience of the install. Might be just as well to see how your ride performs first. I know I'm looking forward to the change to mine.
Last edited by CLcutlass; Jan 6, 2013 at 02:04 PM.
Just an Olds Guy
Joined: Jul 2008
Posts: 24,528
From: Edmonton, AB. And "I am Can 'eh' jun - eh"
No. They bolt onto the upper CA body bolt, and the front bolt on the lower CA. So you do have to undo both of those. It was easy for me since I had the entire suspension out and was installing new boxed lower CA's with all new bolts/nuts.
Why would you be considering 'flipping' the lower rear CA's? If you're also planning to install a rear sway bar, I would box in the rear CAs. Remember that if you have the CA's off the car, they must go back in the right orientation for the sway bar to fit. I found that out the hard way..... hint - look at the bolt up pattern for the sway bar.
Why would you be considering 'flipping' the lower rear CA's? If you're also planning to install a rear sway bar, I would box in the rear CAs. Remember that if you have the CA's off the car, they must go back in the right orientation for the sway bar to fit. I found that out the hard way..... hint - look at the bolt up pattern for the sway bar.
Thread Starter
Registered User
Joined: Jul 2011
Posts: 288
though that I read somewhere about the slot orientation on 455 cars....I installed mine in the orientation that they came out. The boxing in of the control arms crossed my mind after I had them done and in....that can be a job for a different time. Maybe when I install a posi at some point in the future.
Just an Olds Guy
Joined: Jul 2008
Posts: 24,528
From: Edmonton, AB. And "I am Can 'eh' jun - eh"
The rear braces are specific for left and right side of the car and the slot orientation is exactly the same for 350 or 455 cars. No need to flip any control arm.
re: boxing control arms after install. It can still be done even after the control arm is installed. Just buy a set of inserts for around 25.00 and weld them in. Put bolts through the sway bar mount holes to align the box inserts and then weld. It will work just fine. Inserts are usually tight enough fit they won't fall out while the car is up on a hoist. Add paint and they look great.
re: boxing control arms after install. It can still be done even after the control arm is installed. Just buy a set of inserts for around 25.00 and weld them in. Put bolts through the sway bar mount holes to align the box inserts and then weld. It will work just fine. Inserts are usually tight enough fit they won't fall out while the car is up on a hoist. Add paint and they look great.
Thread Starter
Registered User
Joined: Jul 2011
Posts: 288
hi Allan...would you have a measurement of your fender from the top edge to the bottom. The fenders I have are perfect in the opening but they had the patches installed and the guy who did it did not do a good job. I think that he made the fender bigger than it was since they use to stick out and were not aligned with the door. I have a couple of patches on the way and would like to compare to a good fender.
Just an Olds Guy
Joined: Jul 2008
Posts: 24,528
From: Edmonton, AB. And "I am Can 'eh' jun - eh"
How soon do you need the measurement? I need to know if you want a vertical line measure or a rolled measure. I'll have to take off the car cover on one side - shouldn't be too much of a problem. For consistency I'd suggest the rolled measure from the edge of the fender (where the hinges bolt on) to the lower bolt level.
re: inserts. Have a look. http://www.ebay.com/itm/64-72-Rear-C...-/190533482520
I bought mine from Eric Jensen (jensenracing77) for less than that. They were custom made by a friend of his. Very minor adjustments (grinding) needed though.
re: inserts. Have a look. http://www.ebay.com/itm/64-72-Rear-C...-/190533482520
I bought mine from Eric Jensen (jensenracing77) for less than that. They were custom made by a friend of his. Very minor adjustments (grinding) needed though.
Thread Starter
Registered User
Joined: Jul 2011
Posts: 288
How soon do you need the measurement? I need to know if you want a vertical line measure or a rolled measure. I'll have to take off the car cover on one side - shouldn't be too much of a problem. For consistency I'd suggest the rolled measure from the edge of the fender (where the hinges bolt on) to the lower bolt level.
re: inserts. Have a look. http://www.ebay.com/itm/64-72-Rear-C...-/190533482520
I bought mine from Eric Jensen (jensenracing77) for less than that. They were custom made by a friend of his. Very minor adjustments (grinding) needed though.
re: inserts. Have a look. http://www.ebay.com/itm/64-72-Rear-C...-/190533482520
I bought mine from Eric Jensen (jensenracing77) for less than that. They were custom made by a friend of his. Very minor adjustments (grinding) needed though.
Hi Allan,
My patches finally showed up. I got this pic from another thread....any chance of grabbing this measurement for me in the next week or so.
pimp ghetto sled lover
Joined: Aug 2010
Posts: 232
From: warwick,ri
i went through the whole thread and it was great reading. excellent job brother! i have a few cars i need to do that to and i suddenly feel inspired! i am also doing a 455 for one of mine and that's exactly how i pictured it in my head. can't wait to see more! dave
Just an Olds Guy
Joined: Jul 2008
Posts: 24,528
From: Edmonton, AB. And "I am Can 'eh' jun - eh"
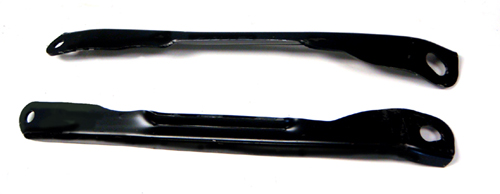
When you take off the old fender skin, there will be a fender brace spot welded to the fender at the back and on the lower horizontal part of the fender. Those spot welds have to be drilled or cut to install the new patch. That will also make it easier to line up the patch. You can see that brace and the lower mount really well in this pic.

One other thing. When you've got the patch 'tacked' in place, dry fit to see how it lines up at the bottom and make any adjustments you feel are needed. Use that in addition to this measurement and your fender should turn out 100%.
Thread Starter
Registered User
Joined: Jul 2011
Posts: 288
I used that exact diagram for measuring (ridge line to bottom of fender) Note: my fender has rocker chrome so I had to drop the tape vertical there, but this should be really close. My measurement used a nylon reinforced cloth tape so there's no stretching. Comes to 687mm - that's close enough to 27".
When you take off the old fender skin, there will be a fender brace spot welded to the fender at the back and on the lower horizontal part of the fender. Those spot welds have to be drilled or cut to install the new patch. That will also make it easier to line up the patch. You can see that brace and the lower mount really well in this pic.
One other thing. When you've got the patch 'tacked' in place, dry fit to see how it lines up at the bottom and make any adjustments you feel are needed. Use that in addition to this measurement and your fender should turn out 100%.
Awesome thanks Allan....I wish that the brace was still there. Someone previously put a patch there and cut the fender bottom off. They did a real good job putting the patch on but I think it is a bit too long. I am actually considering to see if I can do some modifications without putting on the new patch...after waiting for weeks for them.
I saw a video on you tube where a guy put on some nice looking patches for a GTO that had a brace included....I looked everywhere online and could not find them. Apart from the fender bottom the fenders are in real good shape. I spent some time with a razor blade tonight stripping the paint off...I must say it is not too bad coming off....so far.
Thread Starter
Registered User
Joined: Jul 2011
Posts: 288
thanks man....its been quite the journey.
Just an Olds Guy
Joined: Jul 2008
Posts: 24,528
From: Edmonton, AB. And "I am Can 'eh' jun - eh"
Someone previously put a patch there and cut the fender bottom off. They did a real good job putting the patch on but I think it is a bit too long. I am actually considering to see if I can do some modifications without putting on the new patch...after waiting for weeks for them.


