
And Here we go...


Thread Starter
Registered User
Joined: Jul 2011
Posts: 288
And Here we go...
After doing some research on this site and gathering some info I am officially starting to rebuild my 70 supreme with the help of my 8 year old. He is very eager at this point...hope he keep's it up. I picked up a 455 with C heads out of a 68 delta 88 and that is at the machine shop getting done so my project has officially started a couple of weeks ago. I let my son turn the first screw. He is quite helpfully so far and it keeps him of the laptop and DSI.
Stay tuned
Stay tuned

Oldsdruid
Joined: Dec 2007
Posts: 10,633
From: Southside Vajenya
I hope you can keep his interest in the car and other things mechanical. It can only help him as he grows up.
More to the point, it's good you and him time. That's speaking as someone whose dad rarely had time for him. And hell yes it hurt.
It's uncanny how much your boy looks like a 10-12 year old me.
More to the point, it's good you and him time. That's speaking as someone whose dad rarely had time for him. And hell yes it hurt.
It's uncanny how much your boy looks like a 10-12 year old me.
Registered User
Joined: Feb 2008
Posts: 11,798
From: Plano, TX
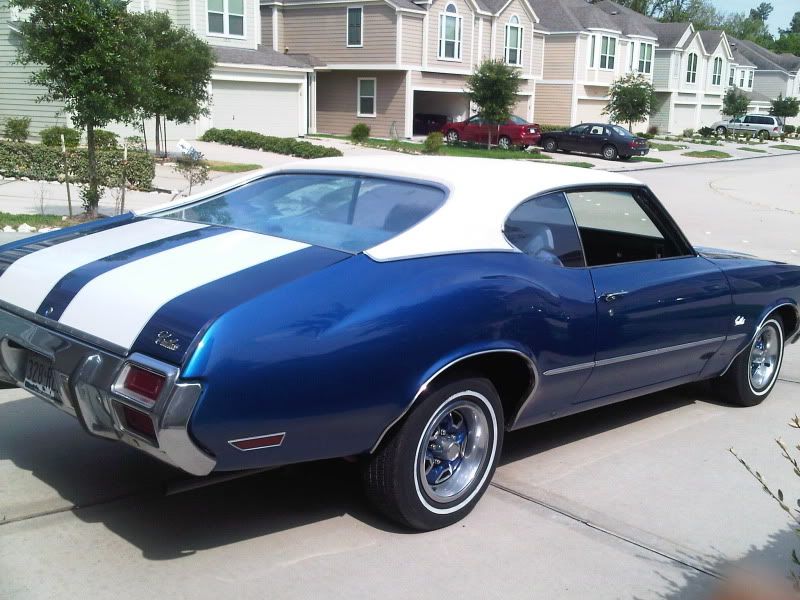
Cool deal! Are you rebuilding the car in the second picture? Certainly does not look like it needs it!
Hope your son enjoys it. Teach him what all the parts do and what they are called. It can certainly help him out later, even if he does not become a full-fledged gearhead!
Keep the progress and pics posting!
Hope your son enjoys it. Teach him what all the parts do and what they are called. It can certainly help him out later, even if he does not become a full-fledged gearhead!
Keep the progress and pics posting!
Administrator
Joined: Oct 2009
Posts: 42,506
From: Poteau, Ok
I love the father n son projects!!! Mine started that way, but I was pushing him into it. After a while I realized his heart and soul wasn't into it! Just go slow and let him work at his own pace, and most importantly, keep it fun!!
Registered User
Joined: Feb 2009
Posts: 2,230
My oldest loves cars and working on them. But I also ride skateboards and Razor scooters with him, which he loves to do.
My two boys, one shifting and the other steering.
DSC00291.jpg
My two boys, one shifting and the other steering.
DSC00291.jpg
Just an Olds Guy
Joined: Jul 2008
Posts: 24,528
From: Edmonton, AB. And "I am Can 'eh' jun - eh"
Wish I could get my son to help like that! Dad/son bonding time.....
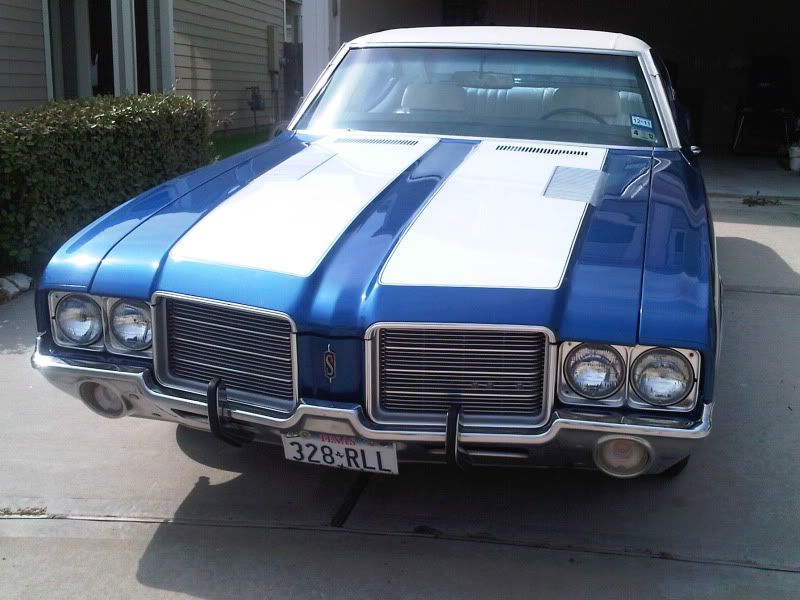
BTW, not meaning to throw monkeybars into the fire, BUT that front grill looks like someone put in one from a 69. See where the reveal chrome stops about 1/2 way down the center above the bumper 'tooth'? A 69 bumper looks similar to 70, but has a much higher tooth in the middle so the grille is different and so is the 'eyebrow molding'.
Compare:
1969

1970


Your project:
BTW, not meaning to throw monkeybars into the fire, BUT that front grill looks like someone put in one from a 69. See where the reveal chrome stops about 1/2 way down the center above the bumper 'tooth'? A 69 bumper looks similar to 70, but has a much higher tooth in the middle so the grille is different and so is the 'eyebrow molding'.
Compare:
1969
1970
Your project:

Registered User
Joined: Jun 2010
Posts: 169
From: Houston, Tx
Nice car, doesnt looks like it need much work judging from the photos you posted. Will you keep the same color scheme? My 71 looks very similar to yours.
IMG00762-20110718-1616.jpg
IMG00755-20110718-1615.jpg
IMG00762-20110718-1616.jpg
IMG00755-20110718-1615.jpg
Thread Starter
Registered User
Joined: Jul 2011
Posts: 288
Cool deal! Are you rebuilding the car in the second picture? Certainly does not look like it needs it!
Hope your son enjoys it. Teach him what all the parts do and what they are called. It can certainly help him out later, even if he does not become a full-fledged gearhead!
Keep the progress and pics posting!
Hope your son enjoys it. Teach him what all the parts do and what they are called. It can certainly help him out later, even if he does not become a full-fledged gearhead!
Keep the progress and pics posting!
Thread Starter
Registered User
Joined: Jul 2011
Posts: 288
Wish I could get my son to help like that! Dad/son bonding time.....
BTW, not meaning to throw monkeybars into the fire, BUT that front grill looks like someone put in one from a 69. See where the reveal chrome stops about 1/2 way down the center above the bumper 'tooth'? A 69 bumper looks similar to 70, but has a much higher tooth in the middle so the grille is different and so is the 'eyebrow molding'.
Compare:
1969
1970
Your project:
Is it possible the hood is of a 69 ?
Last edited by CLcutlass; Oct 12, 2011 at 06:05 PM.
Thread Starter
Registered User
Joined: Jul 2011
Posts: 288
I am actually thinking about platinum/silver with black stripes. There is a blue one nearby me and I want to change it up a bit.
Thread Starter
Registered User
Joined: Jul 2011
Posts: 288
Just an Olds Guy
Joined: Jul 2008
Posts: 24,528
From: Edmonton, AB. And "I am Can 'eh' jun - eh"
1969 - part 401758
1970 - part 404555
Usually if the same part is used from year to year, the number doesn't change. So there must be a styling change in 1970 (although probably very slight) You'll have to look closely at the front styling very closely. You won't find a part number stamped into the hood anywhere. It's really hard to tell from the angle your car is on and the lighting doesn't reveal the hood curve, but I think you have a 70 hood. Take a good look at how the grill and filler panels line up with the edge of the bumper - see if there are gaps showing.

Just an Olds Guy
Joined: Jul 2008
Posts: 24,528
From: Edmonton, AB. And "I am Can 'eh' jun - eh"
Yeah baby! Good choice on color! BTW, you'll have to change the vinyl roof to black too. Gonna have one gooooood looking car. Am I somewhat biased? Uhhh, check my sig pic.
Thread Starter
Registered User
Joined: Jul 2011
Posts: 288
found the two build sheets....one under the carpet and one on top of the gas tank...check it out. Now I know what read end it has 2.56. Picking up the long block job tommorrow.
btw the 69 grills are for sale if anyone is interested.
btw the 69 grills are for sale if anyone is interested.
Just an Olds Guy
Joined: Jul 2008
Posts: 24,528
From: Edmonton, AB. And "I am Can 'eh' jun - eh"
2 build sheets? Sure they're not the broadcast sheets? Any chance you could post a pic of one? Finding those is quite rare.

Registered User
Joined: Jul 2011
Posts: 20
very cool that your son is involved. my daughter helps me with my 74 delta. she actually catches on very fast considering that she wasn't interested until i told her that she could drive it when it is ready. figures, eh?
Thread Starter
Registered User
Joined: Jul 2011
Posts: 288
Thread Starter
Registered User
Joined: Jul 2011
Posts: 288
anyone have a pic of a 455 engine colour scheme. ( ie is everything blue, valve cover bolts, basepan,brackets etc.) The 350 is coming out and a 455 in so stock is not that important to me but I would like the colours to look somewhat right. I got some eastwood blue on the way.
Just an Olds Guy
Joined: Jul 2008
Posts: 24,528
From: Edmonton, AB. And "I am Can 'eh' jun - eh"

Just an Olds Guy
Joined: Jul 2008
Posts: 24,528
From: Edmonton, AB. And "I am Can 'eh' jun - eh"
HEY!!! I just noticed on the Build sheet- your car was delivered to Fort MacLeod in Alberta. That's only hours from where I live. (well about 4). That means that you can get extra historical documentation from GM Heritage resources in Canada if you're interested.
If you're in Texas, this car has migrated a long way!
If you're in Texas, this car has migrated a long way!
Registered User
Joined: Jun 2003
Posts: 1,226
From: Southeast Michigan
Thread Starter
Registered User
Joined: Jul 2011
Posts: 288
HEY!!! I just noticed on the Build sheet- your car was delivered to Fort MacLeod in Alberta. That's only hours from where I live. (well about 4). That means that you can get extra historical documentation from GM Heritage resources in Canada if you're interested.
If you're in Texas, this car has migrated a long way!
If you're in Texas, this car has migrated a long way!
Just an Olds Guy
Joined: Jul 2008
Posts: 24,528
From: Edmonton, AB. And "I am Can 'eh' jun - eh"
Just go online to GM vintage vehilce services (link below). The fellow who looks after this is George Zapora. You fill out the info request on line. There's also a dialogue box you can use to add info specific about your car. I did not have the build sheet for my car, just the broadcast sheet.
Vintage Vehicle Services (Canada)
General Motors Of Canada Ltd.
1908, Colonel Sam Drive
Oshawa, Ontario
L1H 8P7
Canada
1-800-263-3777
(Mon-Fri 8-5 EST)
web: www.vintagevehicleservices.com
Vintage Vehicle Services (Canada)
General Motors Of Canada Ltd.
1908, Colonel Sam Drive
Oshawa, Ontario
L1H 8P7
Canada
1-800-263-3777
(Mon-Fri 8-5 EST)
web: www.vintagevehicleservices.com
Thread Starter
Registered User
Joined: Jul 2011
Posts: 288
front clip is off....interior is next then the body comes off the frame. I was a bit worried on what I would find behind the fenders but it was not that bad. I need new fender bottoms. Gas tank looked new on top but leaking at the seams. renew was twice the cost of a new one.
I have to figure out how to mount the body to a rotissierie...anyone got any pics
I have to figure out how to mount the body to a rotissierie...anyone got any pics
Just an Olds Guy
Joined: Jul 2008
Posts: 24,528
From: Edmonton, AB. And "I am Can 'eh' jun - eh"
Actually looks pretty good. Is it all surface or is there perforation? You should be able to patch it up if needed. The top of the gas tank looks almost like new! Too bad about the rest of it. Keep up the good work.
Just an Olds Guy
Joined: Jul 2008
Posts: 24,528
From: Edmonton, AB. And "I am Can 'eh' jun - eh"
GREAT START!!! Now you want to pull the engine, lift the body, clean and paint the chassis, redo the suspension / brakes etc. Welcome to my world.... It all starts out as "I might as well" and never ends  You're doing a great job. With the front clip out of the way, you have tons of room to work with. Since your car is officially 41 years old, you 'might as well' pull the suspension and redo all the bushings etc...I FEEL YOUR PAIN..it goes away as you get into the project. At first it's a little heart stopping (or should I say heart pounding), but as you get into it, the comfort zone gets better. What I found was I spent time doing research and asking questions before I actually tore something apart. When you get a queasy feeling about whether it's right or wrong, you can always stop and ask. I get the feeling you've done this before though.
You're doing a great job. With the front clip out of the way, you have tons of room to work with. Since your car is officially 41 years old, you 'might as well' pull the suspension and redo all the bushings etc...I FEEL YOUR PAIN..it goes away as you get into the project. At first it's a little heart stopping (or should I say heart pounding), but as you get into it, the comfort zone gets better. What I found was I spent time doing research and asking questions before I actually tore something apart. When you get a queasy feeling about whether it's right or wrong, you can always stop and ask. I get the feeling you've done this before though.
Thread Starter
Registered User
Joined: Jul 2011
Posts: 288
Thanks Allan...I plan on cleaning the chassis up as I do not like the look underneath. I assure you I never did this before but I have turned a few wrenches.
Got a quote today for 300.00 to do frame sandblasting and it sounds like a good price to me.
I removed tonight what I can see for the body mounts which was 6 bolts, 4 behind the wheelwells and 2 upfront. The 4 in the middle just appear to be rubber mounts with no bolts. The kits that Fusick and other sells have many more bolts ?? Am I missing something.
Just an Olds Guy
Joined: Jul 2008
Posts: 24,528
From: Edmonton, AB. And "I am Can 'eh' jun - eh"
Thanks Allan...I plan on cleaning the chassis up as I do not like the look underneath. I assure you I never did this before but I have turned a few wrenches.
Got a quote today for 300.00 to do frame sandblasting and it sounds like a good price to me.
I removed tonight what I can see for the body mounts which was 6 bolts, 4 behind the wheelwells and 2 upfront. The 4 in the middle just appear to be rubber mounts with no bolts. The kits that Fusick and other sells have many more bolts ?? Am I missing something.
Got a quote today for 300.00 to do frame sandblasting and it sounds like a good price to me.
I removed tonight what I can see for the body mounts which was 6 bolts, 4 behind the wheelwells and 2 upfront. The 4 in the middle just appear to be rubber mounts with no bolts. The kits that Fusick and other sells have many more bolts ?? Am I missing something.
re: Body mounts. Have a look at this thread. https://classicoldsmobile.com/forums...ped-frame.html John could tell you exactly where all the body mount bolts are. I think you're right that there are only 6.
If you're still not sure after that, check the Wild About Cars website for the 70 Assembly manual. http://wildaboutcarsonline.com/membe...2_-_Sec_5_.pdf
Thread Starter
Registered User
Joined: Jul 2011
Posts: 288
I brought a rotisserie of a guy that used it on a charger....I have no lift in my garage and I am not sure how to get the car up high enough to use this thing. Anyone have any pics of how to mount a car in a rotissierie without a lift ??
Registered User
Joined: Nov 2009
Posts: 266
Thanks Allan...I plan on cleaning the chassis up as I do not like the look underneath. I assure you I never did this before but I have turned a few wrenches.
Got a quote today for 300.00 to do frame sandblasting and it sounds like a good price to me.
I removed tonight what I can see for the body mounts which was 6 bolts, 4 behind the wheelwells and 2 upfront. The 4 in the middle just appear to be rubber mounts with no bolts. The kits that Fusick and other sells have many more bolts ?? Am I missing something.
Got a quote today for 300.00 to do frame sandblasting and it sounds like a good price to me.
I removed tonight what I can see for the body mounts which was 6 bolts, 4 behind the wheelwells and 2 upfront. The 4 in the middle just appear to be rubber mounts with no bolts. The kits that Fusick and other sells have many more bolts ?? Am I missing something.
Just an Olds Guy
Joined: Jul 2008
Posts: 24,528
From: Edmonton, AB. And "I am Can 'eh' jun - eh"
you should have 10 body mount bolts.Two on the very rear two just before the rear wheels two in the middle of the car and four behind the front wheels.When I removed my body the bolt under the passenger door was missing.Good luck take your time and try not to break them
Just recently saw something about putting the body on the chassis. Just to the side of the front body mount there is a hole that is used for a line up bolt on each side of the body. It's there to make sure that when the body is fastened down, your front clip will have the right spacing and fit.
Thread Starter
Registered User
Joined: Jul 2011
Posts: 288
Had to move off the project for a bit due to work....but back in the garage now. I have the car ready to lift the body off. glass out etc.
What colour does the dash cowl go...I have some rust there not bad but it needs to be repainted. I have some eastwood underhood black and chassis satin and wonder will one of those do. I am not sure if I am even refering to it as the right part but it is the metal part of the dash under the glass.
What colour does the dash cowl go...I have some rust there not bad but it needs to be repainted. I have some eastwood underhood black and chassis satin and wonder will one of those do. I am not sure if I am even refering to it as the right part but it is the metal part of the dash under the glass.
Last edited by CLcutlass; Dec 31, 2011 at 12:52 PM. Reason: added another line
Just an Olds Guy
Joined: Jul 2008
Posts: 24,528
From: Edmonton, AB. And "I am Can 'eh' jun - eh"
Had to move off the project for a bit due to work....but back in the garage now. I have the car ready to lift the body off. glass out etc.
What colour does the dash cowl go...I have some rust there not bad but it needs to be repainted. I have some eastwood underhood black and chassis satin and wonder will one of those do. I am not sure if I am even refering to it as the right part but it is the metal part of the dash under the glass.
What colour does the dash cowl go...I have some rust there not bad but it needs to be repainted. I have some eastwood underhood black and chassis satin and wonder will one of those do. I am not sure if I am even refering to it as the right part but it is the metal part of the dash under the glass.
You are talking about the bit of the cowl that's just inside the windshield right? So that means you have the windshield out so you can check for any rust under the cowl trim, and metal prep the area to paint it easily? In your case, it should be satin black not gloss. (I went back to the earlier posts to look at your car) You would never paint it white to match your interior because of the reflective glare that would show up on your windshield. If you look at your trim - kickpanels, floor and door carpet, lower dash, and package tray - they should all be black too.


