
Gassed - another MAW disaster?
 September 8th, 2012, 09:22 PM
#161
Just an Olds Guy
Thread Starter
Join Date: Jul 2008
Location: Edmonton, AB. And "I am Can 'eh' jun - eh"
Posts: 24,525
This will happen sooner than later
So I jumped around a little. I have new hoses coming from Fusicks so I decided I MAW get the new water pump ready. The water pump on the car now is a NON AC with a 4 blade fan and fan extension. My plan is to install HD cooling, fan clutch and shroud. Got the shroud mounts on the way, and the shroud clips from a member here.
When I change the water pump, I need to change to this pulley. It's a KK from a 71 350 with AC. That means I'll also need different belts. It's a 3 greave pulley, but I only need 2. Already measured the distances needed to line up the greaves on the water pump to the other accessories. The bell on the pulley is shallow to make the greaves line up properly for the water pump I bought.

I bought this pump several years back. It's re manufactured. Sure hope it doesn't fail. I looked it up on an XLS sheet given to me by another member, and it will fit/work fine for my application.

KK pulley is the same as the KO pulley for 72. Looked it up. The pulley will clean up really nice. I just did another one that started out like this and it now looks like an NOS part.

Water pump prepped for paint

Thar she blows! I also wire wheeled the studs to clean the crud out of them and then did the nuts. Decided to paint the nuts black. I don't know if the factory put locktite on the studs into the impeller or not. I think I will though.

When I change the water pump, I need to change to this pulley. It's a KK from a 71 350 with AC. That means I'll also need different belts. It's a 3 greave pulley, but I only need 2. Already measured the distances needed to line up the greaves on the water pump to the other accessories. The bell on the pulley is shallow to make the greaves line up properly for the water pump I bought.
I bought this pump several years back. It's re manufactured. Sure hope it doesn't fail. I looked it up on an XLS sheet given to me by another member, and it will fit/work fine for my application.
KK pulley is the same as the KO pulley for 72. Looked it up. The pulley will clean up really nice. I just did another one that started out like this and it now looks like an NOS part.
Water pump prepped for paint
Thar she blows! I also wire wheeled the studs to clean the crud out of them and then did the nuts. Decided to paint the nuts black. I don't know if the factory put locktite on the studs into the impeller or not. I think I will though.
 September 8th, 2012, 09:42 PM
#163
Just an Olds Guy
Thread Starter
Join Date: Jul 2008
Location: Edmonton, AB. And "I am Can 'eh' jun - eh"
Posts: 24,525
Some MAW stuff that needs doing....
While picking up my differential parts and bringing them to the garage, I also found my TH350 pan kit. So that means while the car is up and accessible, I MAW drain the tranny and refill with new fluid. Last time I looked the pan gasket was dripping so this is probably overdue.

Well last year when I was tearing down my boat anchor 455 I ended up keeping some of the parts that I knew I'd want to re-use. One of them is this pan. I know it's from 73, but the thing I wanted to keep it for was the anti drain shield. Stupid me! I thought I had put this thing under a tarp. Noooo, it was sitting out all winter and got somewhat rusty.


Not sure why, but someone painted this black. When I cleaned it with degreaser the 455 blue was revealed. I'll give the inside another round of cleaning tomorrow and lightly sand down the outside, but it will end up being Olds gold for my 350. IIRC these oil pans are interchangeable - same bolt pattern. There was a dent at the front (see on the side wall?) where it had been hit by something. I pounded it out and it's all good now. After I paint the exterior, I'll prolly wipe the inside with light oil to keep it from rusting again.

So why am I doing this now?? WELL, since the diff and drive shaft are coming out, and I'm fixing the trans leak, I can also fix the oil pan leak at the same time. BUT, that means I'll prolly need to order some new engine mounts and replace them at the same time. Not sure how much I need to lift the engine to do that and the exhaust might be a bit of a challenge to undo, but we'll see. (I hear Super Tramp - "Dreamer" playing in the background )
)
Well last year when I was tearing down my boat anchor 455 I ended up keeping some of the parts that I knew I'd want to re-use. One of them is this pan. I know it's from 73, but the thing I wanted to keep it for was the anti drain shield. Stupid me! I thought I had put this thing under a tarp. Noooo, it was sitting out all winter and got somewhat rusty.
Not sure why, but someone painted this black. When I cleaned it with degreaser the 455 blue was revealed. I'll give the inside another round of cleaning tomorrow and lightly sand down the outside, but it will end up being Olds gold for my 350. IIRC these oil pans are interchangeable - same bolt pattern. There was a dent at the front (see on the side wall?) where it had been hit by something. I pounded it out and it's all good now. After I paint the exterior, I'll prolly wipe the inside with light oil to keep it from rusting again.
So why am I doing this now?? WELL, since the diff and drive shaft are coming out, and I'm fixing the trans leak, I can also fix the oil pan leak at the same time. BUT, that means I'll prolly need to order some new engine mounts and replace them at the same time. Not sure how much I need to lift the engine to do that and the exhaust might be a bit of a challenge to undo, but we'll see. (I hear Super Tramp - "Dreamer" playing in the background
)
September 8th, 2012, 09:54 PM
#164
Just an Olds Guy
Thread Starter
Join Date: Jul 2008
Location: Edmonton, AB. And "I am Can 'eh' jun - eh"
Posts: 24,525
Ohhhh Lawwdddyyy!! Hep me....
Funny you should say that. I was thinking that too. Brian sent me a link to a really nice barrel one, but I'm not planning to go into the business so a less expensive one will prolly do. There are some things however that you need more than a media blaster for. Those braces definitely needed a grinder. After that the blaster might have taken out those pockets
You just know it! The crank pulley LOOKS great. But that doesn't mean it might not get pulled, after all I gotta change the water pump. And I can't honestly remember when the timing gears/chain were changed. I plan to replace the fuel pump so I'll get a chance to peek in there and see. Last year I didn't replace that rubber fuel hose, so it will be done this year. I also ordered a proper steel fuel line from the carb to fuel pump to replace the jury rig one I've got on there now.
So far the fuel system at the back is going very smoothly. I just don't want to install the tank and THEN drop the diff. I'd like to have all the room in the world to work with. And you know that once the diff is out I
MAW do the shocks and springs. The boxed LCA's I've got, just need NEW BUSHINGS - what a curse! Also planning to redo the brake lines and rear brake drum/springs.
I GOT THE MAW's BAD!! I think the secret is to never admit when you should quit
September 8th, 2012, 09:58 PM
#165
NOVICE car nut
Join Date: Nov 2010
Location: Milwaukee Wisconsin
Posts: 3,123
Orrrr , you can be like me . I have a paper mask , face shield , and some heavy plastic I put the parts in , so sand don't go everywhere . The cons are .... Sand in my underwear , ears , hair , and because It's still warm out the sand sticks to my sweaty arms and legs because I'm wearing short sleeves and shorts .
September 8th, 2012, 10:05 PM
#166
NOVICE car nut
Join Date: Nov 2010
Location: Milwaukee Wisconsin
Posts: 3,123
Funny you should say that. I was thinking that too. Brian sent me a link to a really nice barrel one, but I'm not planning to go into the business so a less expensive one will prolly do. There are some things however that you need more than a media blaster for. Those braces definitely needed a grinder. After that the blaster might have taken out those pockets
I GOT THE MAW's BAD!! I think the secret is to never admit when you should quit
I GOT THE MAW's BAD!! I think the secret is to never admit when you should quit
you may as well keep on going .... Just don't forget to bag and tag everything .
 September 8th, 2012, 10:13 PM
#167
Just an Olds Guy
Thread Starter
Join Date: Jul 2008
Location: Edmonton, AB. And "I am Can 'eh' jun - eh"
Posts: 24,525
I wear full coveralls, leather gloves, safety glasses, hearing protection, respirator breather mask (sometimes), steel toe work boots (most of the time) and hat. Can get darn hot in them coveralls, but all I got to wash away is sweat. And I don't have to worry about that irritating sand getting to places that I can't scratch from time to time  September 8th, 2012, 10:16 PM
#168
NOVICE car nut
Join Date: Nov 2010
Location: Milwaukee Wisconsin
Posts: 3,123
BTW ... If you look at the begining of my Fender repair thread I have a pic of the sandblaster , and the air compressor that I have . It takes paint off no problem , and even moderate rust , but it doesn't do much on heavy rust scale though . I go to Farm & Fleet to buy the supplies for it . Beleive it or not I use to get the sandblast guns from Walmart of all places for like $14 , but like I said there are better ones out there . I beleive I paid $100 for the hopper/sandblast gun combo , and $250 for the compressor which is kinda weak for blasting . I found that making the feed line short as possible , and turning it into a gravity feed unit works the best in short bursts with the pressure set as high as it will go on the compressor .... at one point I made my own hopper with a cut off kitty litter jug with the hose sticking through the bottom . You have to use a series of screens inside the container so the sand don't plug the feed hose , and elevate it above so It's a gravity feed .
September 8th, 2012, 10:44 PM
#169
Registered User
Join Date: Apr 2011
Posts: 2,703
Allan, when you do the pan / motor mounts take the exhaust manifold bolts out and then rubber bungy them up to the hood hinges. that'll keep them close to the frame and out of your way, and you won't have to disconnect the pipes...which as you know always lead to bolts breaking and what not.
You're making great progress...glad to see you are feeling better
You're making great progress...glad to see you are feeling better
September 9th, 2012, 06:15 AM
#171
wait.... what....
Join Date: Mar 2009
Location: London Ont Canada
Posts: 817
I got my blast cabinet from princess auto. It's not the best cabinet in the world but it seems to do the trick! It's 399. but i got mine for 299. on sale. I had sand in it for years but have now switched it over to glass, and i love it. http://www.princessauto.com/pal/prod...asting-Cabinet
September 9th, 2012, 06:44 AM
#172
Old School Olds
Join Date: Nov 2008
Location: Marble Falls TX
Posts: 9,029
Allan, looking good!
I have never seen anyone blast through the MAWS
like you!
You will be driving that bad boy again before you know it.
No later than Oct 1st, ok?
Unless that damn maw bug bites you again, ha ha.
I have never seen anyone blast through the MAWS
like you!
You will be driving that bad boy again before you know it.
No later than Oct 1st, ok?
Unless that damn maw bug bites you again, ha ha.
September 9th, 2012, 07:42 AM
#173
Registered User
Join Date: Feb 2008
Location: Plano, TX
Posts: 11,798
IF you are dropping the tranny pan, MAW do the shifter shaft seal, speedo cable seals and other seals that may be already leaking. The shifter shaft seal requires the pan be dropped anyway. I need to do mine soon.
September 9th, 2012, 09:55 AM
#174
NOVICE car nut
Join Date: Nov 2010
Location: Milwaukee Wisconsin
Posts: 3,123
I got my blast cabinet from princess auto. It's not the best cabinet in the world but it seems to do the trick! It's 399. but i got mine for 299. on sale. I had sand in it for years but have now switched it over to glass, and i love it. http://www.princessauto.com/pal/prod...asting-Cabinet
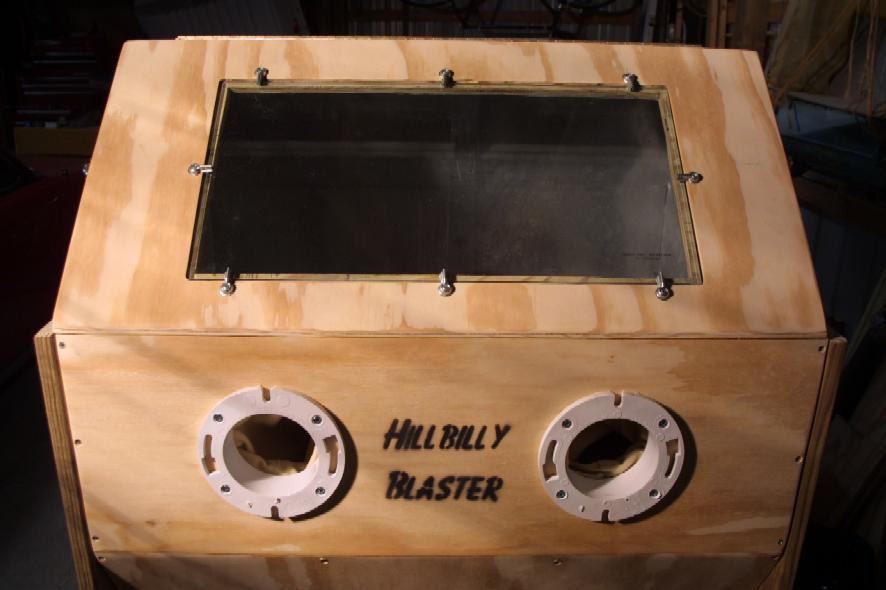
Yes , glass is great . I had a cabinet I built out of wood in my moms basement with a plexiglass window which would get fogged up after a while . I wish I would of used glass . I ran a exhaust hose with a built in fan to another exhaust fan in the other room that blew everything outside , so you would not have to breath in the dust . It worked pretty good , but I ripped all that stuff down , when we remodeled her house .
September 9th, 2012, 12:13 PM
#175
Just an Olds Guy
Thread Starter
Join Date: Jul 2008
Location: Edmonton, AB. And "I am Can 'eh' jun - eh"
Posts: 24,525
I got my blast cabinet from princess auto. http://www.princessauto.com/pal/prod...asting-Cabinet
 . Oct 1? No way. I think the secret to preventing MAW syndrome is something I'm working on. I'll post the pic of it later...It's a BIG SECRET till then
 Yes , glass is great . I had a cabinet I built out of wood in my moms basement with a plexiglass window which would get fogged up after a while . I wish I would of used glass . I ran a exhaust hose with a built in fan to another exhaust fan in the other room that blew everything outside , so you would not have to breath in the dust . It worked pretty good , but I ripped all that stuff down , when we remodeled her house .
 September 9th, 2012, 05:21 PM
#176
NOVICE car nut
Join Date: Nov 2010
Location: Milwaukee Wisconsin
Posts: 3,123
September 9th, 2012, 05:35 PM
#177
wait.... what....
Join Date: Mar 2009
Location: London Ont Canada
Posts: 817
September 9th, 2012, 05:53 PM
#178
Just an Olds Guy
Thread Starter
Join Date: Jul 2008
Location: Edmonton, AB. And "I am Can 'eh' jun - eh"
Posts: 24,525
Some light stuff today
Today I got a late start. Graeme wanted to go driving so I said sure. We went to a place he wanted to buy some school supplies from (surprise surprise it was closed) and then back home. On the way back I stopped in and picked up my wife's iPad from the store.
I think I'm getting distracted by all the things on the go. So today was slow tedious jobs. First I wanted to show you pics of the limited slip that I forgot to post yesterday. This thing is so clean because Jim packed it well and it has a light coating of machine oil sprayed on it to prevent rust.


You can see the new bearings already pressed on. Hope that makes it easier for Alberta Driveline and they can cut down some of the $$ they want to do the job.
I think I'm getting distracted by all the things on the go. So today was slow tedious jobs. First I wanted to show you pics of the limited slip that I forgot to post yesterday. This thing is so clean because Jim packed it well and it has a light coating of machine oil sprayed on it to prevent rust.
You can see the new bearings already pressed on. Hope that makes it easier for Alberta Driveline and they can cut down some of the $$ they want to do the job.
September 9th, 2012, 06:09 PM
#179
Just an Olds Guy
Thread Starter
Join Date: Jul 2008
Location: Edmonton, AB. And "I am Can 'eh' jun - eh"
Posts: 24,525
Body braces finished
Remember those ugly scaly braces from yesterday?? No? Here's a reminder

So you know I used my grinder and got rid of most of the rust and phosphate etched them, but there was a lot of surface pitting. I couldn't see leaving it that way even though no one is really going to see them. Strange philosophy huh? So I shot them with a high build primer, then coated the surface with glazing putty. Left them in the sun to bake a bit. Sanded down and had to use a bit more glaze to fill in some very small pits. After a final sanding, shot them with a coat of black. I think they turned out really nice. They aren't perfect, but close enough for a man on a fast horse not to notice.


Then I decided to tackle the oil pan again. Another round of degreasing and then sanding. The bottom showed a lot of pitting that would be consistent with a car used on gravel roads. After checking the pan metal for thickness and integrity I decided that it would need to be 'helped' much like the braces were.
The pan looked like this even after a second round of cleaning - pretty ugly.

Out came the sander and wire wheels. After about 30 minutes of sanding and wheeling the pan looked better but still ugly. So I doped up the pitted areas with a layer of glazing putty. I know it looks like a lot, but it's really a thin coat that just covers the pits. It will sand smooth so the pits are less noticeable. It's still drying in this pic. Cure overnight and I'll tackle it sometime tomorrow.

So you know I used my grinder and got rid of most of the rust and phosphate etched them, but there was a lot of surface pitting. I couldn't see leaving it that way even though no one is really going to see them. Strange philosophy huh? So I shot them with a high build primer, then coated the surface with glazing putty. Left them in the sun to bake a bit. Sanded down and had to use a bit more glaze to fill in some very small pits. After a final sanding, shot them with a coat of black. I think they turned out really nice. They aren't perfect, but close enough for a man on a fast horse not to notice.
Then I decided to tackle the oil pan again. Another round of degreasing and then sanding. The bottom showed a lot of pitting that would be consistent with a car used on gravel roads. After checking the pan metal for thickness and integrity I decided that it would need to be 'helped' much like the braces were.
The pan looked like this even after a second round of cleaning - pretty ugly.
Out came the sander and wire wheels. After about 30 minutes of sanding and wheeling the pan looked better but still ugly. So I doped up the pitted areas with a layer of glazing putty. I know it looks like a lot, but it's really a thin coat that just covers the pits. It will sand smooth so the pits are less noticeable. It's still drying in this pic. Cure overnight and I'll tackle it sometime tomorrow.
September 9th, 2012, 06:19 PM
#180
Just an Olds Guy
Thread Starter
Join Date: Jul 2008
Location: Edmonton, AB. And "I am Can 'eh' jun - eh"
Posts: 24,525
Boxed control arms
I have 2 options here.
1. I bought this set from Eric when I bought the body braces. They were in much the same condition. I can clean these up and have them ready to go when needed.
2. I can take out my non boxed control arms and have some braces that I bought welded in.
Either way, I have to replace the rear control arms and bushings. So for now I'm opting to clean up the old scaly ones. Several hours of cleaning - grinder and wire wheel netted the following results.


I tried pounding one of the bushing with my BFH and it moved a little. That's a good thing I hope. So I priced out the bushings for these and they run about 25.00/set here. I also checked for the REAR UPPER control arm bushings and they are priced at 42.00 each and come in a set of 4. TRW not MOOG. I don't know. I'll try NAPA and see what they can do instead of Part Source (Autozone).
Not sure but I think a ball joint press would pop these bushings out pretty easy.
1. I bought this set from Eric when I bought the body braces. They were in much the same condition. I can clean these up and have them ready to go when needed.
2. I can take out my non boxed control arms and have some braces that I bought welded in.
Either way, I have to replace the rear control arms and bushings. So for now I'm opting to clean up the old scaly ones. Several hours of cleaning - grinder and wire wheel netted the following results.
I tried pounding one of the bushing with my BFH and it moved a little. That's a good thing I hope. So I priced out the bushings for these and they run about 25.00/set here. I also checked for the REAR UPPER control arm bushings and they are priced at 42.00 each and come in a set of 4. TRW not MOOG. I don't know. I'll try NAPA and see what they can do instead of Part Source (Autozone).
Not sure but I think a ball joint press would pop these bushings out pretty easy.
September 9th, 2012, 07:09 PM
#182
Administrator
Join Date: Oct 2009
Location: Poteau, Ok
Posts: 41,053
Allan your getting in there deep now! What you need for those bushing is a Oxy - Acetylene torch, heat the bushing until the rubber starts to melt, pound out the rubber and the inner sleeve, then take the torch and cut a slit in the outer shell and twist it out. Piece of cake. Then just drive the new ones in and your done.
Your stuff is looking good.
Btw, got my front end redone today, with the exception of the upper ball joint. Took about 6 hours with no MAW's, I'm proud of me. Raised the front 2 inches higher than it was with no spacers.
Your stuff is looking good.
Btw, got my front end redone today, with the exception of the upper ball joint. Took about 6 hours with no MAW's, I'm proud of me. Raised the front 2 inches higher than it was with no spacers.
 September 9th, 2012, 07:26 PM
#183
Just an Olds Guy
Thread Starter
Join Date: Jul 2008
Location: Edmonton, AB. And "I am Can 'eh' jun - eh"
Posts: 24,525
What you need for those bushing is a Oxy - Acetylene torch, heat the bushing until the rubber starts to melt, pound out the rubber and the inner sleeve, then take the torch and cut a slit in the outer shell and twist it out. Piece of cake. Then just drive the new ones in and your done.
Btw, got my front end redone today, with the exception of the upper ball joint. Took about 6 hours with no MAW's, I'm proud of me.
Btw, got my front end redone today, with the exception of the upper ball joint. Took about 6 hours with no MAW's, I'm proud of me.
I don't have an OA setup but I have a propane jobbie. Prolly won't get the same heat range so likely won't work? Nice smell of burning rubber in the air? I'll be the popular guy in the neighborhood and I bet my Mrs. won't care for it either. The new ones will go in with a hammer? Or do you mean with a press? And yes, good thing I'm wearing a PFD or I'd definitely be drowning.
September 9th, 2012, 07:38 PM
#184
Administrator
Join Date: Oct 2009
Location: Poteau, Ok
Posts: 41,053
A propane torch will probably get it hot enough to melt the rubber. Yes, the neighbors and the warden will just love you. I've never used a press on bushings, just different sized sockets and or pipe to pound them in.
September 9th, 2012, 08:40 PM
#185
Once Olds Always Olds
Join Date: Nov 2011
Location: New Matamoras, Ohio
Posts: 1,202
HA.......and you acted like you could control the MAW's. I just did my motor mounts, and I never disconected the exhaust, just lifted one side at a time. Looking good!!
September 9th, 2012, 09:05 PM
#186
Just an Olds Guy
Thread Starter
Join Date: Jul 2008
Location: Edmonton, AB. And "I am Can 'eh' jun - eh"
Posts: 24,525
and I never said I could control them. Controlling MAWs is just Crazy Talk, unless you're oldcutlass 
It's not the motor mounts that need replacing, its the oil pan gasket. That's why I would need to undo the mounts and lift the engine so I can get the pan out from the crossmember. Hence the undo the exhaust part. But, I'm glad you got yours done without any problems!
Hmmm, maybe I should drop the starter and redo it while I've got the exhaust unbolted........
September 9th, 2012, 11:08 PM
#187
Registered User
Join Date: Apr 2011
Posts: 2,703
Hey Rob, if the TH350 is the same as the TH400 (and I'm pretty sure it is) the shifter shaft seal goes in from the outside. You don't have to drop the pan to get to it. There is a snap ring that holds it in and then you use a 90 degree pick to get it out. The hardest part about that job, finding replacement seals.
September 10th, 2012, 08:02 AM
#188
Registered User
Join Date: Feb 2008
Location: Plano, TX
Posts: 11,798
Hey Rob, if the TH350 is the same as the TH400 (and I'm pretty sure it is) the shifter shaft seal goes in from the outside. You don't have to drop the pan to get to it. There is a snap ring that holds it in and then you use a 90 degree pick to get it out. The hardest part about that job, finding replacement seals.
The 350 uses a seal that is kinda pressed in, so the shaft is supposed to be removed so the seal can be tapped out from behind or pulled from the front.
The CSM states to do it this way as well.
NOW - if there is a trick to remove it without dropping the pan, I want to know about it!
The seal came from Rockauto for about a buck.
September 10th, 2012, 08:12 AM
#189
Registered User
Join Date: Jul 2010
Location: Montreal, QC
Posts: 2,175
It must be different.
The 350 uses a seal that is kinda pressed in, so the shaft is supposed to be removed so the seal can be tapped out from behind or pulled from the front.
The CSM states to do it this way as well.
NOW - if there is a trick to remove it without dropping the pan, I want to know about it!
The seal came from Rockauto for about a buck.
MAW did the filter at the same time.
MAW inspected the detent linkage.
September 10th, 2012, 08:29 AM
#190
Phantom Phixer
Join Date: Dec 2011
Location: Apopka, FL
Posts: 4,902
No MAW'S here!
I just avoided the MAW's completely!
I just tore the car down to the last nut and bolt.
See my thread; https://classicoldsmobile.com/forums...storation.html
Might as well, NOTHING!
I just tore the car down to the last nut and bolt.
See my thread; https://classicoldsmobile.com/forums...storation.html
Might as well, NOTHING!
September 10th, 2012, 09:08 AM
#191
wait.... what....
Join Date: Mar 2009
Location: London Ont Canada
Posts: 817
September 10th, 2012, 09:25 AM
#192
Just an Olds Guy
Thread Starter
Join Date: Jul 2008
Location: Edmonton, AB. And "I am Can 'eh' jun - eh"
Posts: 24,525
September 10th, 2012, 10:57 AM
#194
Just an Olds Guy
Thread Starter
Join Date: Jul 2008
Location: Edmonton, AB. And "I am Can 'eh' jun - eh"
Posts: 24,525
September 10th, 2012, 11:53 AM
#195
Registered User
Join Date: Jul 2010
Location: Montreal, QC
Posts: 2,175
As per eric's insight, i indeed ended up covering myself and the floor in red-hot transmission fluid. I think i woulda ruined my camera had i even of tried to touch it.
In all honesty, i'm happy i did it, but BOY do i not enjoy transmission work. Give me a suspension system anyday.
September 10th, 2012, 12:11 PM
#196
Just an Olds Guy
Thread Starter
Join Date: Jul 2008
Location: Edmonton, AB. And "I am Can 'eh' jun - eh"
Posts: 24,525
Suspension is, yeah, suspense - full. I'm taking the slow tedious route on mine as you can see. Should have the shocks/springs/control arms and.....oh yeah, diff out soon. I'll take lots of pics in case you feel like going back in to do yours. Heavy sigh....going to change out all the brake lines too. They're in the shed under the "AM" section (Awaiting Motivation
). They are still in the ILT box and the long one needs to be straightened from shipping.After looking at those boxed control arms and bushings? I'm thinking seriously about just boxing in the ones that are on the car. I have the inserts.
September 10th, 2012, 03:37 PM
#197
Phantom Phixer
Join Date: Dec 2011
Location: Apopka, FL
Posts: 4,902
September 10th, 2012, 03:44 PM
#198
Registered User
Join Date: Jul 2010
Location: Montreal, QC
Posts: 2,175
LOL I can see it now. I won't be dealing with red hot fluid though. The car hasn't run in over a year. What did you use for a catch tray other than the floor and your coveralls? It would be nice if GM had built a plug into the bottom of the pan to make fluid changes less messy huh? My wife's Saturn has one and so does my Sonata. How many litres of AT fluid did you need to top off the tranny?
Suspension is, yeah, suspense - full. I'm taking the slow tedious route on mine as you can see. Should have the shocks/springs/control arms and.....oh yeah, diff out soon. I'll take lots of pics in case you feel like going back in to do yours. Heavy sigh....going to change out all the brake lines too. They're in the shed under the "AM" section (Awaiting Motivation). They are still in the ILT box and the long one needs to be straightened from shipping.
After looking at those boxed control arms and bushings? I'm thinking seriously about just boxing in the ones that are on the car. I have the inserts.
Suspension is, yeah, suspense - full. I'm taking the slow tedious route on mine as you can see. Should have the shocks/springs/control arms and.....oh yeah, diff out soon. I'll take lots of pics in case you feel like going back in to do yours. Heavy sigh....going to change out all the brake lines too. They're in the shed under the "AM" section (Awaiting Motivation
). They are still in the ILT box and the long one needs to be straightened from shipping.After looking at those boxed control arms and bushings? I'm thinking seriously about just boxing in the ones that are on the car. I have the inserts.
Agreed, i'm DEFINITELY going to do my rear end (Eventually Positraction and sway bar)
September 10th, 2012, 03:46 PM
#199
Phantom Phixer
Join Date: Dec 2011
Location: Apopka, FL
Posts: 4,902
September 11th, 2012, 01:37 PM
#200
Just an Olds Guy
Thread Starter
Join Date: Jul 2008
Location: Edmonton, AB. And "I am Can 'eh' jun - eh"
Posts: 24,525
I expected better
Well, I got all 3 parts orders today - Fusicks, ILT and Big Sky
This is the first time I've ever had crappy service from Fusicks. I dealt with Dave Jackson when I placed the order. He seemed nice enough, but his customer service skills could use a polishing. I only ordered the rubber coolant hoses and clamps so it wasn't a huge order. But he wouldn't quote me final pricing over the phone. Said they had to weigh the package and get a rate. He also didn't tell me they were putting in a catalogue to increase shipping weight either.
I guess the 'professional shipping team' at Fusicks must have been out on a bender in East Windsor. The shipping box was an old cigarette container that was like 're gifting'. I couldn't believe it. Plus all the paper and recycled plastic bags used for padding smelled like stale smoke.
The parts invoice came to 153.00 (3 of which is handling and ins). Then they added on another 48.00 for shipping and handling. Really? Double dip on the handling? The USPS stamp shows it only cost 38.55 to ship and they already had a $3.00 handling fee inserted. It gets better.
When I asked WHY? I got a lot of run around internal corporate speak about nothing that made sense. It was just the way it was printed and it was easier to just leave it that way.....BS! So I just cut to the chase. "Your internal policies aren't my concern, but you should disclose your shipping costs and practices BEFORE you proceed to billing. Your site and brochure say the price of shipping for this size order is 17.00. Even with doubling that to go to Canada it shouldn't come to *51.00 for shipping/handling* That's 1/3 the cost of the entire order. The USPS stamp on the box says it cost you 38.55 to ship, so why did you charge me 48.00??" Silence on the other end, then: "So what do you want me to do about it?". "I'd like part of the shipping reimbursed". Silence....So I told him about the professional shipping container Fusicks used. He agreed to give me back 24.00 because of the lousy image it projects. But he wasn't happy about it. Hell, neither was I.


Well there's been no blood spilled, so on to the next thing; the hoses. They are the same formed hoses you could get from Gates, but I ordered them from Fusicks for the proper GM stampings. HA! Proper stampings my ***! These are NOT correct and do not match the image they inserted in their web page. So I brought THIS to his attention. He didn't believe me. Fortunately my car HAS an OEM hose on it so I told him I'd send him comparison pics. He said once he could compare he would talk with the 'stamping dept' and MAYBE they'd consider doing something, but far as he's concerned their product is aces. All the way through the discussion he was defensive about how they always used OEM parts and stampings for the best yada yada. These aren't even close.
This is an OEM upper rad hose. Note crisp lettering and X's? It's also how the hose looks in the Fusick cataloge.

This is the reproduction hose with crappy stampings that aren't even correct. Notice the wrong size font for GM, stampings on 2 lines and the AU instead of the triangle, and crowns instead of Xs?

Don't get me wrong. This is the first time I've had a bad experience with Fusicks. I just never expected it, but it does jade my impression of their customer service A LOT!
Next post: ILT comparison
This is the first time I've ever had crappy service from Fusicks. I dealt with Dave Jackson when I placed the order. He seemed nice enough, but his customer service skills could use a polishing. I only ordered the rubber coolant hoses and clamps so it wasn't a huge order. But he wouldn't quote me final pricing over the phone. Said they had to weigh the package and get a rate. He also didn't tell me they were putting in a catalogue to increase shipping weight either.
I guess the 'professional shipping team' at Fusicks must have been out on a bender in East Windsor. The shipping box was an old cigarette container that was like 're gifting'. I couldn't believe it. Plus all the paper and recycled plastic bags used for padding smelled like stale smoke.
The parts invoice came to 153.00 (3 of which is handling and ins). Then they added on another 48.00 for shipping and handling. Really? Double dip on the handling? The USPS stamp shows it only cost 38.55 to ship and they already had a $3.00 handling fee inserted. It gets better.
When I asked WHY? I got a lot of run around internal corporate speak about nothing that made sense. It was just the way it was printed and it was easier to just leave it that way.....BS! So I just cut to the chase. "Your internal policies aren't my concern, but you should disclose your shipping costs and practices BEFORE you proceed to billing. Your site and brochure say the price of shipping for this size order is 17.00. Even with doubling that to go to Canada it shouldn't come to *51.00 for shipping/handling* That's 1/3 the cost of the entire order. The USPS stamp on the box says it cost you 38.55 to ship, so why did you charge me 48.00??" Silence on the other end, then: "So what do you want me to do about it?". "I'd like part of the shipping reimbursed". Silence....So I told him about the professional shipping container Fusicks used. He agreed to give me back 24.00 because of the lousy image it projects. But he wasn't happy about it. Hell, neither was I.
Well there's been no blood spilled, so on to the next thing; the hoses. They are the same formed hoses you could get from Gates, but I ordered them from Fusicks for the proper GM stampings. HA! Proper stampings my ***! These are NOT correct and do not match the image they inserted in their web page. So I brought THIS to his attention. He didn't believe me. Fortunately my car HAS an OEM hose on it so I told him I'd send him comparison pics. He said once he could compare he would talk with the 'stamping dept' and MAYBE they'd consider doing something, but far as he's concerned their product is aces. All the way through the discussion he was defensive about how they always used OEM parts and stampings for the best yada yada. These aren't even close.
This is an OEM upper rad hose. Note crisp lettering and X's? It's also how the hose looks in the Fusick cataloge.
This is the reproduction hose with crappy stampings that aren't even correct. Notice the wrong size font for GM, stampings on 2 lines and the AU instead of the triangle, and crowns instead of Xs?
Don't get me wrong. This is the first time I've had a bad experience with Fusicks. I just never expected it, but it does jade my impression of their customer service A LOT!
Next post: ILT comparison


