
Eddie Hansen's '69 Cutlass Convertible

Registered User
Joined: Feb 2009
Posts: 11,911
From: Brazil Indiana
car guy
Joined: Apr 2008
Posts: 5,675
From: Dallas TX

JC
Joined: Feb 2012
Posts: 1,069
From: So Florida
Registered User
Joined: Dec 2012
Posts: 530
From: DELCAMBRE, LOUISIANA
nice work
as always nice work eddie, looks like all u will need to finish it will be a few coats of primer and a little glazing putty, I like the rounded corner will u this method on my next repair. what type of welder do u use is it a shielded gas unit and what are the settings.
Last edited by NDERISE; Jan 14, 2015 at 07:57 AM.
Thread Starter
Registered User
Joined: Jan 2008
Posts: 3,515
From: South River, New Jersey
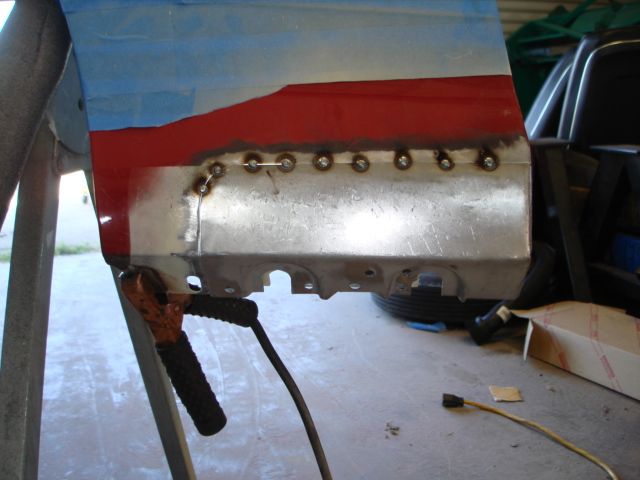
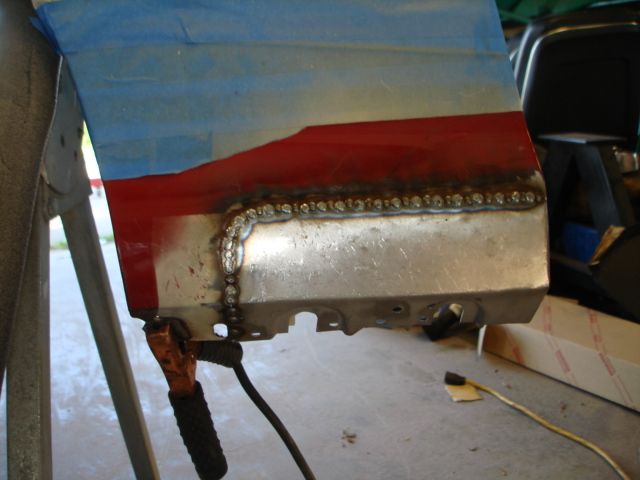
Ray I am using a millermatic 140 I am using argon/co2 mix 75/25
I am using .023 wire
I have my setting at 2.5 to 2 7/8ths ( it has a dial rheostat) wire speed is around 85-90
I tried the auto set but found these settings give me the nice bacon sizzle sound LOL
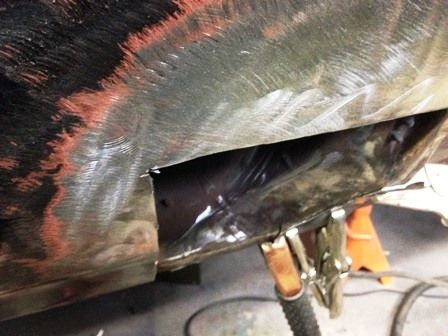
Richard thank you for the tip will give that a try, I cut it straight when removing the metal, but then I clamp the oversize replacement piece and cut again, so it is a perfect match, I do understand that the curve will help alignment, I cut and tack, cut and tack, I will definately give this a try, I love to learn...
Very much appreciated...
As an update I am still working away, I have been stripping the inside trunk floors, filling pin holes and tapping dents on the outside stripping tar out from inside the door, etc etc LOL.... not very sexy, but will update my progress shortly...
Registered User
Joined: Dec 2012
Posts: 530
From: DELCAMBRE, LOUISIANA
welder
I have a millermatic 210 but have be using a lower setting and speed, I guess I should experiment with dif. settings to fine tune the tack's(spot welds) my amperage setting is a selected detent 1 through 7 and the wire speed is 5 to 100.
thanks for the info. ray
thanks for the info. ray
Last edited by NDERISE; Jan 14, 2015 at 08:25 AM.
Thread Starter
Registered User
Joined: Jan 2008
Posts: 3,515
From: South River, New Jersey
the only way is by practice and patience, and not getting excited over a burn through, but how to deal with it. I also found various uses for copper elbows and tees attached to wood dowels as backing as the weld doesn't stick to copper, I am really enjoying the work, and when I feel I start to rush things, it is time to get a cup of coffee, sweep up the grindings etc and consider the next step.
I also recognise I got fire in the furnace and am striking while the irons hot, I waited a LOOOONNNNGGGGG time till I was ready to cut off quarters, and now that that is done it is moving to where I AM comfortable so I am hard at it.
As I said, reading your thread, Erics, Brians (69442c) , Bigins, and several
others is making me strive to make it the best I can... its going to be cool.... cant wait, my goal is to have it fired up on its own this summer, and moving so lets see.

Thanks again for the kind words.
Registered User
Joined: Jan 2012
Posts: 546
From: Boise, Idaho
Sitting here in the background watching your progress Eddie. Looking Good! Keep it up, can't wait to see it on the road!
Now quit sitting on your A$$ reading this and get back in the garage! (how's that for encouragement!)
Craig
Now quit sitting on your A$$ reading this and get back in the garage!
(how's that for encouragement!)Craig
Thread Starter
Registered User
Joined: Jan 2008
Posts: 3,515
From: South River, New Jersey
,
car guy
Joined: Apr 2008
Posts: 5,675
From: Dallas TX
lol ....thanks
NP I learned that from someone 10x better at this than me. Minimizes shrinking a lot and you dont blow through at the corner.
Ray I am using a millermatic 140 I am using argon/co2 mix 75/25
I am using .023 wire
I have my setting at 2.5 to 2 7/8ths ( it has a dial rheostat) wire speed is around 85-90
I tried the auto set but found these settings give me the nice bacon sizzle sound LOL
Richard thank you for the tip will give that a try, I cut it straight when removing the metal, but then I clamp the oversize replacement piece and cut again, so it is a perfect match, I do understand that the curve will help alignment, I cut and tack, cut and tack, I will definately give this a try, I love to learn...
Very much appreciated...
As an update I am still working away, I have been stripping the inside trunk floors, filling pin holes and tapping dents on the outside stripping tar out from inside the door, etc etc LOL.... not very sexy, but will update my progress shortly...
North Coast Rockets
Joined: Apr 2011
Posts: 576
From: Medina, Ohio, USA
I have been doing this for a long time and I never thought of radius in the corner. I will have to do that from now on. Its so nice to have you guys to learn from.
Thread Starter
Registered User
Joined: Jan 2008
Posts: 3,515
From: South River, New Jersey

Registered User
Joined: Feb 2015
Posts: 390
Ryan
North Coast Rockets
Joined: Apr 2011
Posts: 576
From: Medina, Ohio, USA
Thread Starter
Registered User
Joined: Jan 2008
Posts: 3,515
From: South River, New Jersey
Yup,
Hey Thanks everyone, I can't find enough time in the day to do everything, and keep up with everything, been doing a lot of traveling for work as well. But still doing what I can, and looking forward to taking another bite of elephant!!
Thread Starter
Registered User
Joined: Jan 2008
Posts: 3,515
From: South River, New Jersey
Thread Starter
Registered User
Joined: Jan 2008
Posts: 3,515
From: South River, New Jersey
update till now
ok I will put the update on what has been happening and will back fill with Pictures after.
The Drivers side door repairs are done, and I have been Stripping the inside of the doors of the sound deadener, etc the plan is to Por 15 the insides,
I moved on to the trunk, and I want to share some words of caution here, I stripped the entire trunk floor using the abrasive wheels I mentioned before, and even with a good mask, I was coughing up a lot of Black Junk? and I can only assume this was when I would take a break, and remove the mask, I strongly urge folks who are stripping using these abrasive wheels to somehow vent into filters, my breathing still doesn't feel right!! I hope I haven't screwed myself LOL. Anyway Just a caution. That said, I did manage to get approximately 90% of the trunk down to clean shiny metal as I did the underside, I have also decided to send the hood, trunk lid and front fenders to be media blasted.
While that is being done, my plan is to swing the motor into the car, install the tranny, drive shaft, etc. I will decide on what radiator I will use, and get the new fuel tank and associated bits.
I will also need to seal the welding seams on the quarter panels inside and out originally I was planning lead, but may just go with duraglass. that leaves me with the passenger door, either change it or repair what is there. I do not have a perfect door, so the repairing of a door whose evils I know may be the best option especially since over all they are extremely clean with just some small rot on each lower corner.
and there you have it...
Don't give up on me, I haven't given up!
Thread Starter
Registered User
Joined: Jan 2008
Posts: 3,515
From: South River, New Jersey
Long delayed update..
Well I know you guys are probably sick of hearing the updates between working on the car, I must have explained but I have many things on my plate, and I get to work on the car around these priorities, and Life, and when there is extra loot available. A lot of things I am learning as I go, and I feel as long as I keep making progress even the little things I will eventually get her done.
This has been an enormous elephant to eat, LOL. so on with the latest updates, in last installment I had fully stripped the inside of the trunk, damn miserable work, worse then the underside. I then looked at my Passenger door, let alone I bought a door from w-tony a few years ago, and another set of doors after that, LOL... I decided to try and fix the original door, why I have no effing idea but it is the way my mind works...
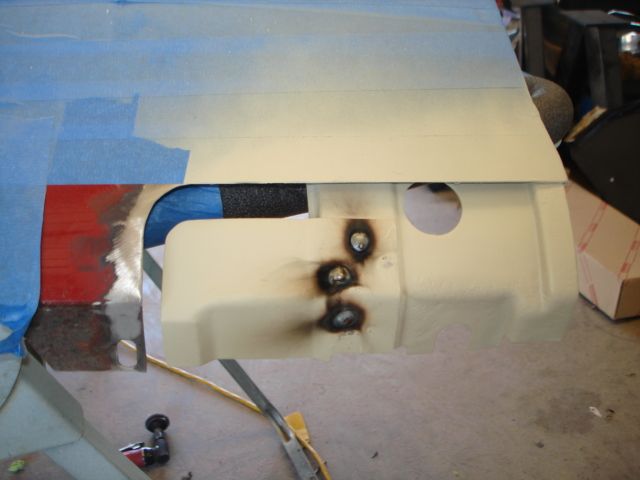
so I looked at the corner , cut a piece from a scrap door that was clean and of the right contour and fit it in, then welded as I did the quarters
This has been an enormous elephant to eat, LOL. so on with the latest updates, in last installment I had fully stripped the inside of the trunk, damn miserable work, worse then the underside. I then looked at my Passenger door, let alone I bought a door from w-tony a few years ago, and another set of doors after that, LOL... I decided to try and fix the original door, why I have no effing idea but it is the way my mind works...
so I looked at the corner , cut a piece from a scrap door that was clean and of the right contour and fit it in, then welded as I did the quarters
Thread Starter
Registered User
Joined: Jan 2008
Posts: 3,515
From: South River, New Jersey
continuing
Did the same with the front portion, but the front lower corner needed metal work as well and it was starting to dawn on me why the eff did I start this when I have two other doors to choose from? well after the repairs I decided to strip the whole door, everything was going fine until I noticed a small crease that ran half way across the door, not bad at all probably only required a little more slapping with a file and 1 1/16th of filler but I decided to use the other door, what a huge waste of time!!
Thread Starter
Registered User
Joined: Jan 2008
Posts: 3,515
From: South River, New Jersey
replacement door,
I pulled the replacement door out of storage, it is very straight, I decided to clean the inside portion, and the inside of the door shell as well, I removed all the sound proofing, stripped all the paint and used self etching primer on the outside and por 15 on the inside.
Thread Starter
Registered User
Joined: Jan 2008
Posts: 3,515
From: South River, New Jersey
moved on to the door frame
So now I moved onto the door frame which I have stripped to bare metal, I removed the hinges for rebuilding, and I should have the door fitted this weekend, a little more cleaning and it will be done more pics to follow, and thank you anyone still reading LOL...
Thread Starter
Registered User
Joined: Jan 2008
Posts: 3,515
From: South River, New Jersey
Lol...
Thank You I am on another tear, plan to have the motor and tranny in in the next few weeks... need to search for radiator recommendations, I am thinking aluminum, and a clutch thinking the centerforce stock type clutch.
Thread Starter
Registered User
Joined: Jan 2008
Posts: 3,515
From: South River, New Jersey
by the way I posted pictures of my home made t-bar, and a dolly that I use for metal shaping, I welded some steel 1/4 inch flat bar to the dolly and 3/4 steel round stock, just in case anybody fancies this kind of drudgery...
Thread Starter
Registered User
Joined: Jan 2008
Posts: 3,515
From: South River, New Jersey
Door Hinge Rebuild.
Ok So I have been working steadily on the olds, I am in the passenger side door jamb area, I completely stripped that area, and happy to say not a spec of rust, I had try to save the original door, I welded in two patches but after stripping the door completely, I found a very small long dent, I have another door, so I decided to use that , completely stripped the backside and interior, etc as said above, so Now to the door hinge rebuild, It is fairly stright forward but figure I would post the process for anyone wanting to do it, First is the upper hinge, this has no spring, so first step is to order a kit, I got mine form Tamaraz, nice kit.
There is a large pin holding the two halves together the pin is then peened in with two little ridges preventing the pin exiting, so first step is grind or file those little ridges off, I used a cheapo electric cutoff wheel as it was handy,
There is a large pin holding the two halves together the pin is then peened in with two little ridges preventing the pin exiting, so first step is grind or file those little ridges off, I used a cheapo electric cutoff wheel as it was handy,
Thread Starter
Registered User
Joined: Jan 2008
Posts: 3,515
From: South River, New Jersey
next.
Use a Pin Punch to tap out the pin, I then used a right angled die grinder with a scuff wheel and cleaned all the parts,
You will notice that the pin has flutted edges under the top, this is important as there are 2 size bushings, these are not marked, but one feels a little looser than the other the looser one goes where the fluted portion of the pin will be driven, the other goes in the bottom, you put the two pieces together, drive the pin through till it is home, and then gets secured with a keeper. easy peasy
You will notice that the pin has flutted edges under the top, this is important as there are 2 size bushings, these are not marked, but one feels a little looser than the other the looser one goes where the fluted portion of the pin will be driven, the other goes in the bottom, you put the two pieces together, drive the pin through till it is home, and then gets secured with a keeper. easy peasy
Thread Starter
Registered User
Joined: Jan 2008
Posts: 3,515
From: South River, New Jersey
lower hinge.
The lower hinge has a spring that will need to be compressed, I used a spring compressor for this stenk MFG I believe,
I compressed the spring, and removed it, I am also replacing the detent roller, same thing cut off the barbs and pop the pins out I started with the detent roller, then the hinge pin, same sort of work, pop the pins and replace no real biggie, pictures kind of tell the story
I compressed the spring, and removed it, I am also replacing the detent roller, same thing cut off the barbs and pop the pins out I started with the detent roller, then the hinge pin, same sort of work, pop the pins and replace no real biggie, pictures kind of tell the story
Thread Starter
Registered User
Joined: Jan 2008
Posts: 3,515
From: South River, New Jersey
Paint, Eastwood rattle can primer
One problem I have is spraying in the garage, I have stripped lots of metal and no way to protect it, as I will be hanging this door, I decided I would try some of eastwoods 2k epoxy primer, it is a real two part epoxy in a spray can, you pop the cylinder on the bottom to release the activator, and then use as normal, pot life is 48 hours, it isn't cheap at 24 bucks a can though, so I primered the inside areas of the door, and the hinges and the door jambs. This paint has ISos in it so wear a very good respirator, best done out doors, **** is nasty LOL.. anyway when it dried, I hung the new door in place and I am continuing around the front, I will change the drivers side hinges as well, hopefully next weekend. it should go rather quickly, then it is dropping the engine in. woohoo practically progress...LOL
Last edited by Eddie Hansen; Jun 28, 2016 at 10:51 AM.
Thread Starter
Registered User
Joined: Jan 2008
Posts: 3,515
From: South River, New Jersey
Rod, it was kind of a quick run down if you want a lengthier explanation I would be happy to explain or if you have any questions I could send my telephone or pm glad it helped, if your hanging door by yourself as I did the stench door lift was a great investment not very expensive and mounts onto floor Jack made it a snap
Thread Starter
Registered User
Joined: Jan 2008
Posts: 3,515
From: South River, New Jersey
Thread Starter
Registered User
Joined: Jan 2008
Posts: 3,515
From: South River, New Jersey
more progress believe it or not lol
Ok so I got the passenger door reinstalled and I am working my way over the top of cowl, I am going to change the windshield, mine funny enough has the antennae in the windscreen, and I will replace with same im guessing psa autoglass when I get that far I will actually be changing all the glass. So I decided to remove the front windscreen, I got a cheap windshield tool from harbor freight the knife and handle kind and it worked fine, I ran all around the edges and then I used two suction cup handles and pulled out the windscreen, my neighbor was nice enough to let me throw the windscreen in the back of his truck and away it went this morning. I might have been able to polish out tge scratches but thecorners looked a bit dodgy, I only have a single car garage so I needed the room.
Now we get to the gruesome bits, the windshield channel on the drivers side was like swiss cheese I was not a happy camper not only the lower windshield channel, but the piece of the cowl it sits on.
 so I cleaned that up cut out the rusty bits and fabricated a new piece of sheet metal for top of cowl, I welded that in and I ordered the replacement channel that will replace the top sheet metal.
While I was ordering stuff I ordered the 4 core top plate from the parts place as thorton is changing mfg, inline tube was out of stock, fusick was out of stock? I ordered the 4 row lower saddles from inline tube ,
Ok so while I am waiting I will strip the other side portion of the cowl, this week I will sand blast the radiator support , and get it ready for paint. I have pictures but I will post them later, I also need to remove drivers door and rebuild those hinges and strip around the door frame
I am also planning on putting the engine in once I am done with the window channel as it is easier to work without the engine in the way, I definately see a glimmer at the end of the tunnel, there hasnt been a motor between the framerails since 1997-1998 anyway dont even now if anybody is reading this but I will finish this thread damn it lol
Now we get to the gruesome bits, the windshield channel on the drivers side was like swiss cheese I was not a happy camper not only the lower windshield channel, but the piece of the cowl it sits on.
so I cleaned that up cut out the rusty bits and fabricated a new piece of sheet metal for top of cowl, I welded that in and I ordered the replacement channel that will replace the top sheet metal. While I was ordering stuff I ordered the 4 core top plate from the parts place as thorton is changing mfg, inline tube was out of stock, fusick was out of stock? I ordered the 4 row lower saddles from inline tube ,
Ok so while I am waiting I will strip the other side portion of the cowl, this week I will sand blast the radiator support , and get it ready for paint. I have pictures but I will post them later, I also need to remove drivers door and rebuild those hinges and strip around the door frame
I am also planning on putting the engine in once I am done with the window channel as it is easier to work without the engine in the way, I definately see a glimmer at the end of the tunnel, there hasnt been a motor between the framerails since 1997-1998
anyway dont even now if anybody is reading this but I will finish this thread damn it lol


