Eddie Hansen's '69 Cutlass Convertible

 July 5th, 2016, 06:51 PM
#643
Registered User
Thread Starter
Join Date: Jan 2008
Location: South River, New Jersey
Posts: 3,515
 the window channel had literally gobs of butyl, I cant believe it was factory, doesn't really matter either way I am putting an antennae windshield in, as I prefer the cleaner look, I did note that this car has oddities like the support brackets for the rear suspension also a 70 item I understand? Thanks for following along
 July 5th, 2016, 06:53 PM
#644
Registered User
Thread Starter
Join Date: Jan 2008
Location: South River, New Jersey
Posts: 3,515
July 6th, 2016, 05:03 AM
#646
Registered User
Thread Starter
Join Date: Jan 2008
Location: South River, New Jersey
Posts: 3,515
July 6th, 2016, 05:12 AM
#647
Registered User
Thread Starter
Join Date: Jan 2008
Location: South River, New Jersey
Posts: 3,515
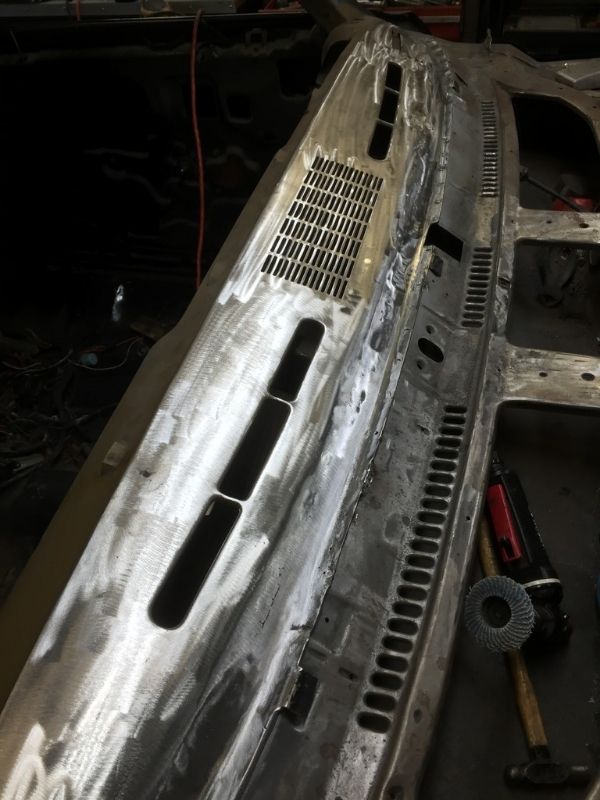
Here is the pics as promised, first picture is the wonderful treat found after pulling the windscreen, the holes are actually in the cowl piece that sits under the windshield channel !��
Last edited by Eddie Hansen; July 6th, 2016 at 05:43 AM.
July 6th, 2016, 05:29 AM
#652
Registered User
Thread Starter
Join Date: Jan 2008
Location: South River, New Jersey
Posts: 3,515
I finished grinding all the little welds then stripped the rest of the drivers side cowl, this piece gets hidden under the window channel, and is just for support and something to weld to,
July 6th, 2016, 02:00 PM
#655
Registered User
Thread Starter
Join Date: Jan 2008
Location: South River, New Jersey
Posts: 3,515
omg the maw monster got me lol
As if the workload couldnt get any longer !!!; I decided it would be prudent to take the dash vent tubes out so they dont get damaged during welding, while I was there I might as well take out the speaker, and since the speaker was out i might as well take out the ashtray as 69442c gave me anever scene a ciggy brand new one , I planned to chage the harnesses so I might as well get them out of there , then the blower controls , then the whole damn dash I mean I might as well as I plan to paint the whole dash , upgrade the gauges, etc I might as well paint the underside of the dash too, shaking my head, not to mention with the heat from the compressor and this kind of day it was like 97 degrees in the garage, I had that nasty insulation pad falling apart, might as well change that **** too lol all the damn dust and stuff from all the grinding dropping down on me, itchy azz insulation lumps clinging to every open pore, im hot , im sweaty, and I am waiting for the mountains to turn blue for a well deserved cool one lmao . On the bright side I think im making great progress,
July 9th, 2016, 07:31 AM
#656
Registered User
Thread Starter
Join Date: Jan 2008
Location: South River, New Jersey
Posts: 3,515
parts and progress
So my lower window channel arrived from fusicks, im sure it is the same found everywhere, it is marked for a chevelle as was said , and the lower channel matches up fine, I needed some extra material in one spot but found a workaround, ill explain further when I post the progress pics. My 4 core top plate arrived from the parts place what a nice looking piece, and my lowercsaddles arrived from inline tube along with some stainless straight brake tube I needed to redo the brakeline from proportion valve to distribution box, lots of things going on lol.
July 10th, 2016, 05:16 PM
#660
Registered User
Thread Starter
Join Date: Jan 2008
Location: South River, New Jersey
Posts: 3,515
Got the window channel welding seams sealed with duraglass, I also had to put a small amount of filler by the piece that went into the dashboard, I just couldnt get between the brace and the sheet metal tried every trick I knew which isnt that many lol but it was just a skim really , anyway pics and write up tomorrow .....hey I heard that 
 . Who knows someone may be doing this someday, I will say if you have any issues above the channel I highly recommend getting a nice donor piece , there is a brace that follows the channel that makes hammer work nearly impossible. Or put the channel in as is and then work the other area as separate piece? Who knows lol
. Who knows someone may be doing this someday, I will say if you have any issues above the channel I highly recommend getting a nice donor piece , there is a brace that follows the channel that makes hammer work nearly impossible. Or put the channel in as is and then work the other area as separate piece? Who knows lol
July 11th, 2016, 07:48 AM
#661
Registered User
Thread Starter
Join Date: Jan 2008
Location: South River, New Jersey
Posts: 3,515
ok So we begin, Lower windshield channel repair,
OK, to make it easier I uploaded the pics, so my channel arrived from Fusicks, very nice stamping, I am sure it is the one everyone sells, I know AMD and Dynacorp both make them, this one was marked keystone
76404599-33af-4e62-a214-2182ec3a914c.jpg
I checked it up in the car and it matched the original very well, it didn't have the area I needed where the rust went beyond the channel but I found a work around, there is extra material that needs to be cut off, in the area where I needed more metal, I flattened that metal and hammered it so I could have just one piece to weld in, in Hindsight I should have made two pieces.
80805e20-58c9-4c76-ba79-4af78380391d.jpg
I kept hammering it till it was approximately the right contour, I was worried about distorting the channel, and also the curve of the dash goes in two directions front to back and side to side, I wish I had an English wheel and knew how to use it LOL...
d8063713-d5a8-4540-9377-098e62a461fa.jpg
July 11th, 2016, 07:59 AM
#662
Registered User
Thread Starter
Join Date: Jan 2008
Location: South River, New Jersey
Posts: 3,515
moving along
So I fitted the replacement piece under the dash panel, I drilled out all the remaining spot welds, cleaned the area, and sprayed weld through primer on both the piece and the cowl, remember to grind the primer off areas that are going to be welded,
5a4be22c-7caf-4105-922c-547eabc24b80.jpg
With weld through applied
cf0ee017-e989-4584-a071-4d9fb7eb3562.jpg
I then put the channel on the car and used self tapping screws to hold the channel, I used my flanger punch to put holes every inch or so to plug weld onto the top of the cowl like the original, I do have a spot welder but no way to get it in there LOL
July 11th, 2016, 08:50 AM
#663
Registered User
Thread Starter
Join Date: Jan 2008
Location: South River, New Jersey
Posts: 3,515
I slipped the new metal under the old metal, so I will be able to cut both pieces at the same time, normally it would go over the top, but since I had that additional AREA to work, I thought it would be better this way, I am butt welding the two pieces together, the issue is there is a full width support strip right where the window channel is, so you have to be careful not to cut through that as well as it made it difficult to work the metal into shape I did the best I could, with my entire repertoire of cuss words used when banging my knuckles on sharp objects LOL
32f769f0-91cb-4db8-90f5-b949258529ea.jpg
so now the moment of truth, I used a cut off wheel and cut approximately 3 inches, I pushed the cut piece in, while using a small screw driver to align the two pieces and I zap the spot and cool with air, then cut a little more and another tack, then cool
409cbaac-8a15-40e8-98b1-1e5b0d2a695c.jpg
eventually you move along the entire length with just a few tacks, you are then able to pull the waste strip out from behind, I can not emphasize enough the importance of just a quick tack, and immediate cool down with air, this is curved so the chances of warping are less but still present, you can see the waste strip in the pic
351223c6-0a68-43a9-941e-f1e34aa127e0.jpg
Then it is time to start filling in between the welds with more spots, move from side to side and cool after every weld
it starts to really become solid, and keep checking the alignment between the two pieces, use a small screw driver to ensure both pieces are level
d369d74b-6aa7-4427-a0ce-781feb27d09e.jpg
Eventually you get to the point of about a 1/4 inch between the welds, you want to take your cut off wheel and trim the tops of the weld, do not hit the panel , then you will weld three or four quick spots between the welds then cool and move down the other side of the cowl, etc
769bbea0-8a04-432c-b2b0-3d782bcb65ed.jpg
I then took my cut off wheel and carefully cut the tops off the welds, there will be pin holes you will need to go back to etc, I am not a professional I am sure your welds will look better
[img]https://i665.photobucket.com/albums/vv17/fastelectric/e9d9cf2c-c8dd-42c4-a645-5714e2017db3.jpg[img]
then I use a right angled die grinder and some 40 grit wheel to knock the welds down, be careful and move around from side to side you don't want a lot of heat
I then used duraglass to seal the seam, one day I swear I will learn leading LOL...
62c0ce3d-d95a-44cf-ad5b-4802dade4a92.jpg
I have some more sanding to do, then I will primer with epoxy primer, I had as I said to use a little more filler than I wanted to on the dash repair higher than the channel, but not horrendous, just a skim coat maybe 3/32 to an 1/8th at the thickest
4294a1c9-9bbe-42f5-8f95-a27ab810c8fe.jpg
i'll post an update when its finished primered but as far as I am concerned another bite of elephant done!!
sorry bout all the pics, just some folks may want to try this.
I am not saying this is the best way to do it, it is how I did it right or wrong..LOL
Last edited by Eddie Hansen; July 11th, 2016 at 10:13 AM.
July 18th, 2016, 07:48 AM
#664
Registered User
Thread Starter
Join Date: Jan 2008
Location: South River, New Jersey
Posts: 3,515
moving Along
So I continued working on the windshield frame, cleaned the crud under the vinyl, cleaned all the channels, and did a little bodywork to the lower channel, finished it off with a coat of epoxy primer ( two part aerosol from Eastwood) before final filler. Over the weekend I took the hood off the roof of the car, LOL it has been there for quite awhile now. Anyway then I put power to the convertible top pump and managed to drop the top, first time in twenty years LOL, this allowed me to sand the top portion of the window frame. Anyway moving along, will post some pics later
July 28th, 2016, 05:41 PM
#665
Registered User
Thread Starter
Join Date: Jan 2008
Location: South River, New Jersey
Posts: 3,515
Blocking and sanding
Well I found the right paint color unfortunately it only came in lacquer like the original paint, that paint held up fine for 40 plus years so I bought flat for the top semi gloss for the front and lower I also bought medium gold semi gloss as it was listed in the assembly manual. Before the color goes on I have been block sanding and using two part glaze trying to do the best I can, I also related some screw holes and dings in the lower dash where the old Skool gauge pod was mounted, I am pretty happy with the finish so I sprayed two coats of 2k epoxy over everything, there are two tiny little spots that will need a touch of glaze then I am going to shoot the DuPont lacquer primer , then the color, I know it isn't perfect but it's the best I could do here's a few pics
July 29th, 2016, 10:29 AM
#670
Registered User
Thread Starter
Join Date: Jan 2008
Location: South River, New Jersey
Posts: 3,515
Man oh man like I am spinning my wheels went to a new ppg supplier and was picking up some dplf epoxy primer got to talking and I told him the nightmare with the dash paint, so the guy spends nearly an hour including talking to factory and voila I have a pint of the dash color in single stage urethane damn lol
Shout out for Norwood auto parts in new brunswick
Shout out for Norwood auto parts in new brunswick
July 29th, 2016, 01:01 PM
#672
 July 29th, 2016, 02:39 PM
#674
Registered User
Thread Starter
Join Date: Jan 2008
Location: South River, New Jersey
Posts: 3,515
July 29th, 2016, 02:43 PM
#675
Registered User
Thread Starter
Join Date: Jan 2008
Location: South River, New Jersey
Posts: 3,515
I am by no means a pro, these are the first quarters I put on before that it was all hammering dents, brazing metal etc I have painted a few cars in lacquer this is my first with epoxy and urethane , but it is done right no lap joints all but welded ground front and back thanks for reading
July 29th, 2016, 02:49 PM
#677
Registered User
Thread Starter
Join Date: Jan 2008
Location: South River, New Jersey
Posts: 3,515
Then I mixed up the single stage urethane I will use the lacquer I bought on the plastic pieces lol anyway color is exact waiting to see how the shine tones down, I may have to go get a flattening agent no biggie though at least it's urethane not lacquer
July 29th, 2016, 02:52 PM
#678
Registered User
Thread Starter
Join Date: Jan 2008
Location: South River, New Jersey
Posts: 3,515
Sprayed the front too, I used the upper frame to test gun, I'll come back and spray that cameo white in single stage this gets covered with Madrid vinyl in gold same as interior
July 30th, 2016, 11:45 AM
#679
Registered User
Thread Starter
Join Date: Jan 2008
Location: South River, New Jersey
Posts: 3,515
I went to the autobody store again and picked up the flattening agent, it worked great I scuffed the dash with 500 wet paper basically took all the shine off and then wiped it down with prep and tacked it, then mixed up the paint and te sprayed the top of the dash much much better! While I was there I picked up a satin ppg black urethane for the top of cowl , I am going to put my seam sealer on first thinking I will spray the firewall as well even though I have done all the work on the firewall and painted it already I think this will be a better product then the gm restoration black?


