Eddie Hansen's '69 Cutlass Convertible

Thread Tools
 
Search this Thread
 
Old July 30th, 2016, 03:10 PM
  #681  
Registered User
Thread Starter
 
Eddie Hansen's Avatar
 
Join Date: Jan 2008
Location: South River, New Jersey
Posts: 3,515
Then I scuffed and sprayed the firewall with dplf 50 I'll spray the black tomorrow getting there
Attached Images
File Type: jpeg
image.jpeg (1.88 MB, 43 views)
Eddie Hansen is offline  
Old July 31st, 2016, 12:09 PM
  #682  
Registered User
 
bigin1978's Avatar
 
Join Date: Apr 2011
Location: Erie,PA
Posts: 489
Perfection! that dash looks amazing! you are doing a great job!
bigin1978 is offline  
Old July 31st, 2016, 04:11 PM
  #683  
Registered User
Thread Starter
 
Eddie Hansen's Avatar
 
Join Date: Jan 2008
Location: South River, New Jersey
Posts: 3,515
Originally Posted by bigin1978
Perfection! that dash looks amazing! you are doing a great job!
thanks Mike !!!😀🍻
Eddie Hansen is offline  
Old July 31st, 2016, 04:22 PM
  #684  
Registered User
Thread Starter
 
Eddie Hansen's Avatar
 
Join Date: Jan 2008
Location: South River, New Jersey
Posts: 3,515
More progress

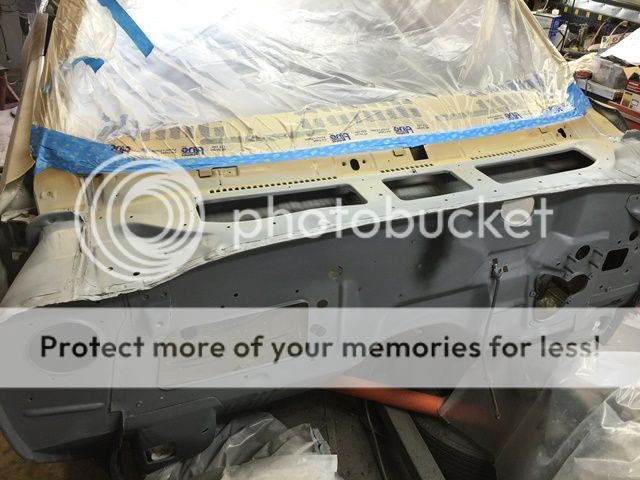
Well today I tapped off the seams and used east woods seam sealer, I then pulled the tape and then I taped off the dash I used a ppg fleet product single stage satin black I figured what the hell lol in for a pinch in for a pound so I mix it up and sprayed after waiting an extra hour more for the seam sealer then was recommended,


IMG_1384.jpg
Attached Images
File Type: jpeg
image.jpeg (2.08 MB, 25 views)

Last edited by Eddie Hansen; August 1st, 2016 at 08:57 AM.
Eddie Hansen is offline  
Old July 31st, 2016, 04:27 PM
  #685  
Registered User
Thread Starter
 
Eddie Hansen's Avatar
 
Join Date: Jan 2008
Location: South River, New Jersey
Posts: 3,515
Of course I sprayed a second coat in the prescribed time frame, but as par for my course I sprayed a little too close on one pass as I was at an odd angle to get under the lip and I got a run in it!! Sassafrasassafras no biggie I'll wet sand it out and give another coat, I am pretty happy with the way it turned out I'll be happier once that engine goes in lol won't be long now


IMG_1385.jpg

Last edited by Eddie Hansen; August 1st, 2016 at 08:52 AM.
Eddie Hansen is offline  
Old July 31st, 2016, 04:29 PM
  #686  
Registered User
Thread Starter
 
Eddie Hansen's Avatar
 
Join Date: Jan 2008
Location: South River, New Jersey
Posts: 3,515
Another shot, I also nicked the paint on the dash �� No biggie I already wet sanded the area and will spray a light coat on practice makes perfect
IMG_1389_1.jpg
IMG_1387.jpg

Last edited by Eddie Hansen; August 1st, 2016 at 08:50 AM.
Eddie Hansen is offline  
Old July 31st, 2016, 04:50 PM
  #687  
Once Olds Always Olds
 
Troys Toy 70's Avatar
 
Join Date: Nov 2011
Location: New Matamoras, Ohio
Posts: 1,202
That sure is purdy!! Great work!
Troys Toy 70 is offline  
Old July 31st, 2016, 05:47 PM
  #688  
Registered User
Thread Starter
 
Eddie Hansen's Avatar
 
Join Date: Jan 2008
Location: South River, New Jersey
Posts: 3,515
Originally Posted by Troys Toy 70
That sure is purdy!! Great work!
Thank you sir
Eddie Hansen is offline  
Old July 31st, 2016, 07:43 PM
  #689  
Member
 
timholliday's Avatar
 
Join Date: Sep 2009
Location: Howell, MI
Posts: 308
Looking great Eddie!
timholliday is offline  
Old August 1st, 2016, 03:33 AM
  #690  
NOVICE car nut
 
oldsguybry's Avatar
 
Join Date: Nov 2010
Location: Milwaukee Wisconsin
Posts: 3,123
Wow , I wish I had the place , money , patience , and welding skills to complete what I want to do with my car . I haven't been on your thread in a while , but this is truly amazing ! I'm going to have to go back to the beginning of it and check out what you have done from front to back . I just stuffed the 455 I had sitting in my moms garage in my 72 CS , and I'm loving it so far . I wish I could of restored my car first ( long story ) , BUT I'm still happy to drive a car with ***** now .

I see we had something in common on our cars .... Bad Dash Rust ! I need to get mine fixed by someone who knows how to weld . I'm sure I could do it , but I really didn't want to practice / experiment on my car learning . I will also need a spot on the roof done too .

Last edited by oldsguybry; August 1st, 2016 at 03:39 AM.
oldsguybry is offline  
Old August 1st, 2016, 03:44 AM
  #691  
NOVICE car nut
 
oldsguybry's Avatar
 
Join Date: Nov 2010
Location: Milwaukee Wisconsin
Posts: 3,123
Originally Posted by bluecab
Eddie, What's going on? Miss your updates!
Dude , that Toro in your picture would look bad *** with how you state you want it to look ! I wish I had my 68 Toro still , but AT LEAST I have the motor in my other car now . I loved that car but the frame was quite toast , along with the rest of the body .... Had to get rid of it .
oldsguybry is offline  
Old August 1st, 2016, 08:46 AM
  #692  
Registered User
Thread Starter
 
Eddie Hansen's Avatar
 
Join Date: Jan 2008
Location: South River, New Jersey
Posts: 3,515
Thank You For the Kudos

Thanks for following along fellas!
Eddie Hansen is offline  
Old August 1st, 2016, 08:59 AM
  #693  
Registered User
Thread Starter
 
Eddie Hansen's Avatar
 
Join Date: Jan 2008
Location: South River, New Jersey
Posts: 3,515
Originally Posted by timholliday
Looking great Eddie!
Thank you Very Much Tim!
Eddie Hansen is offline  
Old August 1st, 2016, 09:02 AM
  #694  
Registered User
Thread Starter
 
Eddie Hansen's Avatar
 
Join Date: Jan 2008
Location: South River, New Jersey
Posts: 3,515
Originally Posted by oldsguybry
Wow , I wish I had the place , money , patience , and welding skills to complete what I want to do with my car . I haven't been on your thread in a while , but this is truly amazing ! I'm going to have to go back to the beginning of it and check out what you have done from front to back . I just stuffed the 455 I had sitting in my moms garage in my 72 CS , and I'm loving it so far . I wish I could of restored my car first ( long story ) , BUT I'm still happy to drive a car with ***** now .

I see we had something in common on our cars .... Bad Dash Rust ! I need to get mine fixed by someone who knows how to weld . I'm sure I could do it , but I really didn't want to practice / experiment on my car learning . I will also need a spot on the roof done too .


Patience is everything, the windshield is tricky to get out without breaking, the roof, well that's a lot of real estate to keep from warping!!


I have been waiting and waiting to do this car, I mentioned I drove it into the garage in 1994 LOL just keep at it
Eddie Hansen is offline  
Old August 3rd, 2016, 07:51 AM
  #695  
Registered User
 
AJFink's Avatar
 
Join Date: Oct 2015
Location: Prescott Wash.
Posts: 548
As one restorer to another Good Luck! Will be following as well.
AJFink is offline  
Old August 3rd, 2016, 07:57 AM
  #696  
Registered User
 
Olds442redberet's Avatar
 
Join Date: Dec 2012
Location: Birmingham, Alabama
Posts: 3,079
Awesome thread showing an awesome build
Olds442redberet is offline  
Old August 3rd, 2016, 08:33 AM
  #697  
Registered User
Thread Starter
 
Eddie Hansen's Avatar
 
Join Date: Jan 2008
Location: South River, New Jersey
Posts: 3,515
Originally Posted by AJFink
As one restorer to another Good Luck! Will be following as well.
Thank You Tony!
Eddie Hansen is offline  
Old August 3rd, 2016, 08:33 AM
  #698  
Registered User
Thread Starter
 
Eddie Hansen's Avatar
 
Join Date: Jan 2008
Location: South River, New Jersey
Posts: 3,515
Originally Posted by Olds442redberet
Awesome thread showing an awesome build
Thank You Sir, !!
Eddie Hansen is offline  
Old August 3rd, 2016, 08:45 AM
  #699  
Registered User
Thread Starter
 
Eddie Hansen's Avatar
 
Join Date: Jan 2008
Location: South River, New Jersey
Posts: 3,515
Moving on

Last night I sanded the minor run in the front of the firewall, there were original runs there, but I am not a must be like it left the factory, so I sanded out the runs, and re-sprayed the ess single stage urethane, this is a PPG fleet product, comes in flat, satin and semi gloss, it went on very nicely, I used a 1.6 tip in the spray gun, It was a cheapie Husky HVLP but it sprays quite nicely I had 35 pounds at the gun, and about 80 on the line, I have a few binks guns but they are for lacquer? this mixing, and adding additives etc is all new to me!.


Anyway the satin is less shiny then semi gloss but shiner than say flat or a matte finish, if I was super particular on exact scale I would probably add some flatenner or get the flat version of this paint.


This was a very economical paint compared to even spray cans, and it is a ppg product, and it can also be cleared and I know I can get that in flat as well.


it went over the dplf with no problems, recoats in 10 minutes and dries fully over night to be safe.
Eddie Hansen is offline  
Old August 3rd, 2016, 08:48 AM
  #700  
Registered User
Thread Starter
 
Eddie Hansen's Avatar
 
Join Date: Jan 2008
Location: South River, New Jersey
Posts: 3,515
inside the cowl,

going to figure some way to paint inside the cowl area, that is just nasty! LOL. I am thinking I will scuff everything and use some por 15? then a spray bomb of satin black paint while it is still tacky.
Eddie Hansen is offline  
Old August 3rd, 2016, 09:21 AM
  #701  
NOVICE car nut
 
oldsguybry's Avatar
 
Join Date: Nov 2010
Location: Milwaukee Wisconsin
Posts: 3,123
Originally Posted by Eddie Hansen
going to figure some way to paint inside the cowl area, that is just nasty! LOL. I am thinking I will scuff everything and use some por 15? then a spray bomb of satin black paint while it is still tacky.

How do you get in the cowl ? I figured I'd ask because I was also trying to think of ways to do the inside of the frame portions that are closed up . Maybe this will give me some new ideas .
oldsguybry is offline  
Old August 3rd, 2016, 10:17 AM
  #702  
Registered User
Thread Starter
 
Eddie Hansen's Avatar
 
Join Date: Jan 2008
Location: South River, New Jersey
Posts: 3,515
Originally Posted by oldsguybry
How do you get in the cowl ? I figured I'd ask because I was also trying to think of ways to do the inside of the frame portions that are closed up . Maybe this will give me some new ideas .

you can get into the cowl a few ways and if you think about it it is fairly accessible but not for spray painting from the top down under the window channel, then through where the blower motor mounts, and also from the inside where the vents lead my car is all apart so maybe easier that way LOL.. Eastwood does sell a spray application with a long hose that might work,
cowl%20access.jpg

Last edited by Eddie Hansen; August 3rd, 2016 at 10:21 AM.
Eddie Hansen is offline  
Old August 3rd, 2016, 06:01 PM
  #703  
Registered User
Thread Starter
 
Eddie Hansen's Avatar
 
Join Date: Jan 2008
Location: South River, New Jersey
Posts: 3,515
Ok so I managed to respray the top of the dash , used a different gun and I have to say it came out great so I have the color formulae if anybody needs 69 dark gold interior paint in ppg single stage,
Eddie Hansen is offline  
Old August 8th, 2016, 10:26 AM
  #704  
Registered User
Thread Starter
 
Eddie Hansen's Avatar
 
Join Date: Jan 2008
Location: South River, New Jersey
Posts: 3,515
Chipping Away

I am chipping away, I sprayed the lower half of the dash with the same paint just used half the flattening agent as I did for the top, I will say it matched perfectly, The MAW curse attacked, I figured there will never be a better time to clean up all the pedal assemblies, so I sanded them all down, primered and gave them a coat of semi gloss, I do realize for a perfect resto that the pedals are not painted all the way up, that is not my thing, I wouldn't want to see rust coming back later so I sprayed them all the way, Damn Paint didn't dry in time for me not to get caught out using my wifes plant hangars she was not amused LOL


Eddie Hansen is offline  
Old August 8th, 2016, 10:33 AM
  #705  
Registered User
Thread Starter
 
Eddie Hansen's Avatar
 
Join Date: Jan 2008
Location: South River, New Jersey
Posts: 3,515
I will order the plastic bushings from inline tube, there was also a little piece of nylon on one of the pedals ( brake I think) it was held on with a carb type clip, I went and got a nylon spacer in the right diameter ( 3/8) at the local dyi, and I will just drill that out and fit it in, I am also planning on using electrolysis to remove rust from the inside blower box, then I will spray that , anybody have recommendations on heater core, blower motors? rock auto ok, or should I have the originals rebuilt? I have a NOS blower cover for the engine firewall but I will probably just clean up the original one. I am leaving for vacation early next week and putting the motor in may have to wait till I get back :-(
Eddie Hansen is offline  
Old August 8th, 2016, 10:34 AM
  #706  
Registered User
Thread Starter
 
Eddie Hansen's Avatar
 
Join Date: Jan 2008
Location: South River, New Jersey
Posts: 3,515
one more question...

does anyone know where to get the insulation that goes INTO the vents?
Eddie Hansen is offline  
Old August 8th, 2016, 10:36 AM
  #707  
Rodney
 
cdrod's Avatar
 
Join Date: Jun 2011
Location: Houston, TX
Posts: 2,321
Originally Posted by Eddie Hansen
...Damn Paint didn't dry in time for me not to get caught out using my wifes plant hangars she was not amused LOL
Yeah, I got caught once using the oven to bake the rattle can paint on some suspension parts. I got the evil stink eye from the wife for days - LOL. Your car is looking good, keep up the good work!
Rodney

Last edited by cdrod; August 9th, 2016 at 08:53 PM.
cdrod is online now  
Old August 8th, 2016, 10:40 AM
  #708  
Registered User
Thread Starter
 
Eddie Hansen's Avatar
 
Join Date: Jan 2008
Location: South River, New Jersey
Posts: 3,515
Originally Posted by cdrod
Yeah, I got caught once using the oven to bake the rattle can paint on some suspension parts. I got the evil stink eye from the wife for days - LOL. Your car is looking good, keep up the good work?
Rodney
Yeah I am not allowed to go near the dishwasher either for some reason LOL.. Thanks Rod!!
Eddie Hansen is offline  
Old August 8th, 2016, 11:51 AM
  #709  
Registered User
 
AJFink's Avatar
 
Join Date: Oct 2015
Location: Prescott Wash.
Posts: 548
Originally Posted by Eddie Hansen
Yeah I am not allowed to go near the dishwasher either for some reason LOL.. Thanks Rod!!
Wife's have no since of humor when it comes to using there tools. But they find it ok to go out to the garage and dig thru our tools. I'm not aloud to go thru her brush assortment under the sink ether
AJFink is offline  
Old August 8th, 2016, 12:20 PM
  #710  
Registered User
Thread Starter
 
Eddie Hansen's Avatar
 
Join Date: Jan 2008
Location: South River, New Jersey
Posts: 3,515
Originally Posted by AJFink
Wife's have no since of humor when it comes to using there tools. But they find it ok to go out to the garage and dig thru our tools. I'm not aloud to go thru her brush assortment under the sink ether


LOL right!! Its not fair LOL
Eddie Hansen is offline  
Old August 13th, 2016, 11:01 AM
  #711  
Registered User
Thread Starter
 
Eddie Hansen's Avatar
 
Join Date: Jan 2008
Location: South River, New Jersey
Posts: 3,515
Derusting by electrolysis

So I decided to try de rusting by electrolysis I got a tub, a piece of sheet metal and some washing soda , I used my battery charger as the power source and the inside blower box as the test subject seems to be working well I'll post after pics
Attached Images
File Type: jpeg
image.jpeg (2.32 MB, 28 views)
Eddie Hansen is offline  
Old August 13th, 2016, 11:04 AM
  #712  
Registered User
Thread Starter
 
Eddie Hansen's Avatar
 
Join Date: Jan 2008
Location: South River, New Jersey
Posts: 3,515
I am hoping this works well as trying to sand the interior of the box would be ugly
Attached Images
File Type: jpeg
image.jpeg (2.30 MB, 33 views)
Eddie Hansen is offline  
Old August 13th, 2016, 04:13 PM
  #713  
Registered User
Thread Starter
 
Eddie Hansen's Avatar
 
Join Date: Jan 2008
Location: South River, New Jersey
Posts: 3,515
Pretty amazing process

And it works really well
Attached Images
File Type: jpeg
image.jpeg (2.55 MB, 38 views)
Eddie Hansen is offline  
Old August 13th, 2016, 05:38 PM
  #714  
Sammy70 455 Supreme
 
sammy's Avatar
 
Join Date: Dec 2011
Location: Port Perry, Ontario
Posts: 3,069
Watching....
sammy is offline  
Old August 13th, 2016, 11:11 PM
  #715  
Registered User
Thread Starter
 
Eddie Hansen's Avatar
 
Join Date: Jan 2008
Location: South River, New Jersey
Posts: 3,515
Worked well Sammy I didn't do it for hours. And it seems to be most effective in a line of sight mode but I was very happy with the end result
Attached Images
File Type: jpeg
image.jpeg (1.60 MB, 37 views)
Eddie Hansen is offline  
Old August 13th, 2016, 11:12 PM
  #716  
Registered User
Thread Starter
 
Eddie Hansen's Avatar
 
Join Date: Jan 2008
Location: South River, New Jersey
Posts: 3,515
Another pic
Attached Images
File Type: jpeg
image.jpeg (1.34 MB, 30 views)
Eddie Hansen is offline  
Old August 14th, 2016, 05:05 AM
  #717  
Sammy70 455 Supreme
 
sammy's Avatar
 
Join Date: Dec 2011
Location: Port Perry, Ontario
Posts: 3,069
Eddie, is "washing soda" another term for baking soda? So the box was in the tub for 3 hours..?...what setting did you use on the charger?
sammy is offline  
Old August 14th, 2016, 07:30 AM
  #718  
Registered User
Thread Starter
 
Eddie Hansen's Avatar
 
Join Date: Jan 2008
Location: South River, New Jersey
Posts: 3,515
Originally Posted by sammy
Eddie, is "washing soda" another term for baking soda? So the box was in the tub for 3 hours..?...what setting did you use on the charger?
No Sammy washing soda is different I got it at Walmart
Eddie Hansen is offline  
Old August 14th, 2016, 07:34 AM
  #719  
Registered User
 
66-3X2 442's Avatar
 
Join Date: Jul 2009
Location: Birmingham,Alabama
Posts: 4,615
Very nice work,keep it up.
66-3X2 442 is offline  
Old August 14th, 2016, 07:38 AM
  #720  
Registered User
Thread Starter
 
Eddie Hansen's Avatar
 
Join Date: Jan 2008
Location: South River, New Jersey
Posts: 3,515
This box was like 3 or 4 bucks I used two table spoons per gallon s I probably put a cup and a half in that big tub the soda only conducts the electricity so making it stronger doesn't do anything I set my charger on a few different settings didn't seem to make a difference I used a 2a setting what does make a difference is the metal you use for sacrificice if you could bend a piece to go around the inside of the tub it will be best you can also suspend a piece in a cavity don't make contact etc and it's important to make sure it's hook to positive side
Attached Images
File Type: jpeg
image.jpeg (1.85 MB, 24 views)
Eddie Hansen is offline  


Quick Reply: Eddie Hansen's '69 Cutlass Convertible


All times are GMT -7. The time now is 06:12 AM.