
Eddie Hansen's '69 Cutlass Convertible

Registered User
Joined: Nov 2010
Posts: 698
From: treasure coast FL
OK Eddie... after seeing your setup, I may just modify what I got for lines and set it up more like the original installation. The front lines (especially the crossover to the passenger side will be trouble for the exhaust installation. there is not a lot of room there. I am using the thorton 350 Jr manifolds... My engine is supposed to go to dyno tomorrow or friday! I have the body mount bolts out so I can replace those when the parts arrive and will install the inline tube fuel lines.
Registered User
Joined: Nov 2010
Posts: 698
From: treasure coast FL
I wish you were in Florida on Vacation! I'd put you to work so I could get the front lines in so I could drop the engine in next week! Finally worked through much of the rear disk change over.... as a last insult, I had to grind back the bracket about an 1/8 inch to get the emergency brake cable to pop into place... (they did NOT take into acount setback for the bending of the metal when they designed the darned thing!) I will continue on a mod for the rear brake rotors to eliminate the 3/8 spacer... (using a front rotor with the center machined out, bored open to 6.065 on the back side... Then I will have no interference or setback issues! (the pads need to be .023 thinner as well!)
Thread Starter
Registered User
Joined: Jan 2008
Posts: 3,515
From: South River, New Jersey
I wish you were in Florida on Vacation! I'd put you to work so I could get the front lines in so I could drop the engine in next week! Finally worked through much of the rear disk change over.... as a last insult, I had to grind back the bracket about an 1/8 inch to get the emergency brake cable to pop into place... (they did NOT take into acount setback for the bending of the metal when they designed the darned thing!) I will continue on a mod for the rear brake rotors to eliminate the 3/8 spacer... (using a front rotor with the center machined out, bored open to 6.065 on the back side... Then I will have no interference or setback issues! (the pads need to be .023 thinner as well!)
I bleed Oldsmobile
Joined: Dec 2007
Posts: 1,390
From: Iowa

You might have some clearance issues with the valve in that location....FYI
Thread Starter
Registered User
Joined: Jan 2008
Posts: 3,515
From: South River, New Jersey
Jerr I am running manifolds , I did see some guys mounted the valve on top of the chasis with headers I am hoping there are no clearance issues with the manifolds ?
I bleed Oldsmobile
Joined: Dec 2007
Posts: 1,390
From: Iowa
You should be all right with the manifolds....I went with Hooker Headers and had to relocate to the top of the rail for clearance.....
Thread Starter
Registered User
Joined: Jan 2008
Posts: 3,515
From: South River, New Jersey
Thank God....LOL... otherwise I guess i could have left that nasty under the master set up , But it was Bufugly...... I mean capital B Capital F BuFugly


Looking forward to getting this project moving forward a little further...
Registered User
Joined: Jan 2012
Posts: 546
From: Boise, Idaho
No Craig if you got the complete kit, you should have gotten the NON ADJUSTABLE POV valve from them, just like A STOCK set up? it will divide more pressure to the front then rear to prevent rear lock up.
if you didn't get this pov valve first don't buy it I have one,
and I will PM you the contact info for a guy who may be willing to sell you the front lines I got with my kit if he isn't using them....
if you didn't get this pov valve first don't buy it I have one,
and I will PM you the contact info for a guy who may be willing to sell you the front lines I got with my kit
if he isn't using them....
Happy New Year!
Craig
Thread Starter
Registered User
Joined: Jan 2008
Posts: 3,515
From: South River, New Jersey
Thanks Eddie, Sorry for the late reply the Mother in law is in my spare bedroom where my computer resides! I am going to give Todd a call and straighten this out. I think all I need is to get the union fixed and I should be set. On another not I finally received my Jeep steering box conversion kit from Lee Engineering. I tried to instal it the other day with no luck. The new rag joint is 1/4" larger in diameter than the stock joint and hits the frame. I will be calling them today. Slow progress
Happy New Year!
Craig
Happy New Year!
Craig
Craig I hear you, I have had Holidays and honey do's get in the way, and also life outside of cars my daughter plays B-Ball for her college, and of course wants me to come to all the games,
it is a 3 hour drive each way!! cuts into my car time but she is a junior now so how many seasons left? Keep me posted about the conversion. And Yes Talk with Todd he is great!!
Thread Starter
Registered User
Joined: Jan 2008
Posts: 3,515
From: South River, New Jersey
Shout Out for Stride Tool!!!
Allan when I did the rear axle lines I bought the pliers and the bending tool from eastwood, the bender is made by imperial and looks like this....

I don't know if I got a defective one, or I don't realize my own strength, but when I was putting a 90 degree in a brake line snapped the handle off, I have done this with a few pliers as well, but I suspect poor quality for top dollar nowadays.
I bought a cheap replacement from Harbor freight and so far it has been ok, I will write to Imperial as eastwoods says I bought it two years ago and there is no warranty? Bastids
I don't know if I got a defective one, or I don't realize my own strength, but when I was putting a 90 degree in a brake line snapped the handle off, I have done this with a few pliers as well, but I suspect poor quality for top dollar nowadays.
I bought a cheap replacement from Harbor freight and so far it has been ok, I will write to Imperial as eastwoods says I bought it two years ago and there is no warranty?
Bastids I posted the above comment some time back, I bought the imperial tubing bender from Eastwood, about two years ago, and I was using it and I sanpped the handle off, now I know I am not a godzilla, so I called eastwood and since it is 2 years old they said there is no warranty.
I was ticked off because I purposely bought american, searched far and wide to buy american, and then basically get told I am S.O.L. well, I did some internet research I found Imperial tool company and then was told Stride tool, actually makes their tubing bender.
I used there contact us email address and I received a courteous reply, thanking me for purchasing the tool, and they said they are looking into the defect, it wasn't just me, and they would see what can be done after they sort the problem, I also sen them a few possible solutions and even a digital mechanical drawing as there was a few ways I thought it could be fixed.
Then I heard nothing further, moved on with the project with cheap tools and made do, well yesterday low and behold a box arrives at the house, and there is a brand new bending tool, slight modifications can be seen...
So I was quick to point out the defect, and I will be just as quick to say hey Buy with confidence, Stride tool is made in Ohio, they stand behind their stuff, and god bless them!! They are committed to delivering a great product.
they honored what eastwood would not.
Just an Olds Guy
Joined: Jul 2008
Posts: 24,528
From: Edmonton, AB. And "I am Can 'eh' jun - eh"
LOL. I was thinking the same thing. I still have (shudder) images he implanted in my brain of him hoisting that rear axle and staining (I mean stRaining) his tightey whitey's 
Thread Starter
Registered User
Joined: Jan 2008
Posts: 3,515
From: South River, New Jersey
Sad but true LOL....
Hey Craig, been super busy at work and as usual dealing with lots of "life" issues, so sad but true no progress besides getting the body on the frame and bits and pieces here and there...
I know it happens, I haven't given up, and will be back at it shortly.... I haven't even had a few moments to catch up on everyone elses project...
Hope everyone is well.
Thread Starter
Registered User
Joined: Jan 2008
Posts: 3,515
From: South River, New Jersey
oh well I'll just Gird my loins and have at it LOL...
Registered User
Joined: Jan 2012
Posts: 546
From: Boise, Idaho
Glad to see the nudge worked! I know all about the honey dos!!! I got rid of the Corvair in the garage and now the space is filled with old baby stuff! 
Ya need to get out there and inspire me!
Craig
Ya need to get out there and inspire me!
Craig
Registered User
Joined: Dec 2012
Posts: 1,605
From: Fuquay Varina NC
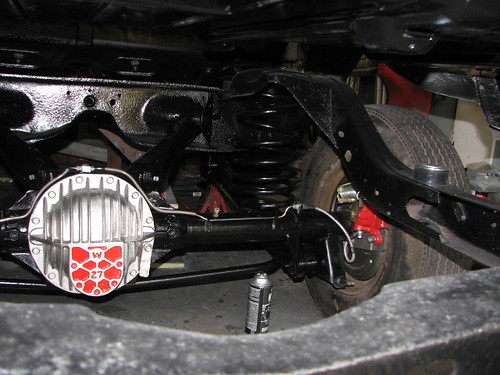
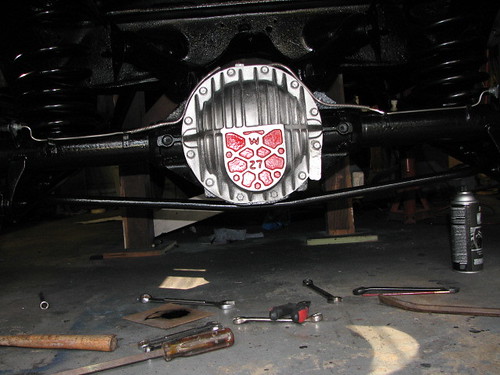
ok as mentioned I installed the rear suspension, spruced up all the scratches when I installed the spring, worked on the rear etc, I also sprayed the w-27 cover with aluminum look paint, and added some red details ( I Know, couldn't help myself, and it goes with the red powdercoated calipers LOL)

IMG_5172 by thunderboat59, on Flickr
IMG_5170 by thunderboat59, on Flickr
IMG_5173 by thunderboat59, on Flickr
IMG_5172 by thunderboat59, on Flickr
IMG_5170 by thunderboat59, on Flickr
IMG_5173 by thunderboat59, on Flickr
man Eddie. I was going back through your thread and love this detail. Would look great with the red body on mine. Would you mind if I copied? You gotta get back in the garage by the way. This ride is not far from cruising. Don' t make me come up there
Thread Starter
Registered User
Joined: Jan 2008
Posts: 3,515
From: South River, New Jersey
Definately getting itchy to get out there lol...thanks for the encouragement
Thread Starter
Registered User
Joined: Jan 2008
Posts: 3,515
From: South River, New Jersey
Believe it or NOT........
Hey Fellas, I have been on a hiatus with lots of work and home issues taking priorities, yada yada but I finally have some progress to report, ( I hope folks were sitting down!! LOL... I have girded my loins and have cut off the right side quarter panel.. so far I have replaced the trunk drop down, and repaired the out wheel housing, pictures to follow.
sorry for long delay in progress.
Eddie
sorry for long delay in progress.
Eddie

Thread Starter
Registered User
Joined: Jan 2008
Posts: 3,515
From: South River, New Jersey
Yes with Pics...Here is the Wheel housing seam, and after grinding not terrible, I will be taking a bunch more pics, so far I have the drop down on the right side done, and I am finishing up the wheel housing, inside and out, actually except for the actual wheel well lip the housings were in excellent shape..
Last edited by Eddie Hansen; Nov 4, 2014 at 09:42 AM.
Thread Starter
Registered User
Joined: Jan 2008
Posts: 3,515
From: South River, New Jersey
just updating the thread
Well it has been a long while since any progress was made, so I was able to take a few days off from work, and I knew I had to get going. I started by taking a bite out of the most accessable area by the trunk, I used a cut off wheel about 4 inches down from the molding holes. I then scribed a line around the whole quarter panel and slowly cut away using a body saw, a cut off wheel and a plasma cutter.
I then drilled the spot welds on the trunk extension and rear filler pieces.
I worked fairly slow, as I was not sure how much to cut, etc etc but it becomes clear after awhile what you need to cut etc.
I started with the drop down, Then moved onto the wheel housing.
I knew that the outer wheel housing would not be a full replacement as the top portion is different due to the convertible brace, I clamped the new housing over the old housing and trimed as needed around the conv brace so it would sit flush.
I bought my outer wheel houses from goodmark, they are the same from year one etc, and they actually were a great match for my housings there are dimples etc on the factory housings and the replacements had the same dimples etc in the same place. I lined these up and clamped the pieces together.
Thread Starter
Registered User
Joined: Jan 2008
Posts: 3,515
From: South River, New Jersey
thanx Drew...
It truly is thestory of this resto, and I suppose a lot of folks. I would get a portion done then run out of either time, money or stamina lol....it was a question of time this go round I managed to take my summer vacation in October lol... anyway I am excited to get to the next milestone, installation of the rear sheet metal
Thread Starter
Registered User
Joined: Jan 2008
Posts: 3,515
From: South River, New Jersey
Thread Starter
Registered User
Joined: Jan 2008
Posts: 3,515
From: South River, New Jersey
more work done
Beem working slowly but surely on the passenger side quarter panel , so far as said have replaced the entire trunk dropdown, and about half the outer wheel housing, just for those cotemplating they do not make a convert outerwheel housing, it is different at the top ( flatter) so as said I clamped the two together and using a body saw cut the two together I cut then tacked cut and tacked until I went around all the way , it is the same technique I will use on the quarter panel.
Well I checked all the welds went back and filled any pinholes, I then used por15 restogrip fg filler on the seams but most if not all sanded off, did inside and out, I stripped allthe undercoating down to bare shiney metal, I then wiped everything down with lacquer thinner and put a coat of por15 on all the topside new metal, dropdown and brace.
I will do the underside of the wheelwell after the quarter is on.
I am removing this rubbery goo that was on top of the rocker quarterpanel joint, once that is cleaned out ill por 15 that area as well.
Pics to follow
Thread Starter
Registered User
Joined: Jan 2008
Posts: 3,515
From: South River, New Jersey
Today I scuffed the por15 with 320 wet and dry, and gave it a second coat, also made the initial cuts on tge replacement skin. I am easing into the quarter going slow checking things a dozen times before making the cut. I used a plasma cutter that I bought used it worked great , it is a smaller unit but it is american made in putting the fender on, I plan to cut just below the chrome trim, I will be using the body saw.
I see what Brian (69442c) was talking about over the wheelwell there's a slight curve to the metal, I can push it flat with little pressure but I decided that is where I will make my first cut and tack.
Plan is to trim a little more , then put the skin in place and cut a little tack and then cut a little more. There was a great how to on the muscle car restorations website, I tried the technique on the outerwheel housing and it worked great.
I am using a millermatic 140 I tried various settings used the auto feature for gauge but wasnt happy switched to setting 2 on the power and more speed on the feed works very well no with excellent penetration with no gap. Have to be careful as you can blow through if you get trigger happy, just a quick zap, then move down. Then in the middle of the two gaps etc etc then cut some more. The cut seems to compensate for shring etc will be posting as I go along,
It feels great working on her again, I know this is a forever thread...lol
The quarters were a stumbling block, but now that I have committed the work involved reveals itself, and I am not overly daunted anymore and more confident, so here we go.
in putting the fender on, I plan to cut just below the chrome trim, I will be using the body saw.I see what Brian (69442c) was talking about over the wheelwell there's a slight curve to the metal, I can push it flat with little pressure but I decided that is where I will make my first cut and tack.
Plan is to trim a little more , then put the skin in place and cut a little tack and then cut a little more. There was a great how to on the muscle car restorations website, I tried the technique on the outerwheel housing and it worked great.
I am using a millermatic 140 I tried various settings used the auto feature for gauge but wasnt happy switched to setting 2 on the power and more speed on the feed works very well no with excellent penetration with no gap. Have to be careful as you can blow through if you get trigger happy, just a quick zap, then move down. Then in the middle of the two gaps etc etc then cut some more. The cut seems to compensate for shring etc will be posting as I go along,
It feels great working on her again, I know this is a forever thread...lol
The quarters were a stumbling block, but now that I have committed the work involved reveals itself, and I am not overly daunted anymore and more confident, so here we go.
Registered User
Joined: Jun 2011
Posts: 2,866
From: Carrolllton Texas
It truly is thestory of this resto, and I suppose a lot of folks. I would get a portion done then run out of either time, money or stamina lol....it was a question of time this go round I managed to take my summer vacation in October lol... anyway I am excited to get to the next milestone, installation of the rear sheet metal
Thread Starter
Registered User
Joined: Jan 2008
Posts: 3,515
From: South River, New Jersey
thank you
For the kind words, I still remember driving this car into the garage for a spruce up, lol... one thing led to another. Anyway, ill be losting more pics today, this is a big azz elephant thank god for you guys to keep me on track and focused and keeping me encouraged you have no idea how important that is.
In the meanwhile I see a few guys doing the same work so ill be posting all I can in the hope it helps others..
In the meanwhile I see a few guys doing the same work so ill be posting all I can in the hope it helps others..
Thread Starter
Registered User
Joined: Jan 2008
Posts: 3,515
From: South River, New Jersey
pics and backtracks
just adding some pics and stuff for clarifications also so you dont have to click added them to an image host, here is where i cut the wheel house and the tack welds, was a pretty slick way cutting both at the same time
IMG_0599.jpg
IMG_0599.jpg
Thread Starter
Registered User
Joined: Jan 2008
Posts: 3,515
From: South River, New Jersey
pics and clarifications
well continuing, the welding work was inspected, and approved, by one of my chief technical advisors LOL...
IMG_0577.jpg
IMG_0577.jpg
Last edited by Eddie Hansen; Nov 10, 2014 at 09:31 AM.


