
72 Olds 442 clone (with Gen III swap)


Thread Starter
Registered User
Joined: Nov 2010
Posts: 904
From: St Louis, MO
It's an LS1 intake, for hood clearance, with the original L59 (flex fuel) injectors and aftermarket rails.
No cam yet, just a mail order performance tune. With anything bigger than an LS1 cam swap, I would probably need a dyno tune.
The alternator and PS pump are from the truck. PS pump pulley was change to a smaller diameter to clear the steering box.
AC compressor (Sanden) and Kwik Performance bracket came with the Classic Air kit. You could use the positive displacement Trailblazer SS compressor in the stock location if you move the engine forward or notch the frame.

Registered User
Joined: Jul 2006
Posts: 694
From: Manassas, VA
Where did you source the carrier? Curious....
I am very much so enjoying your build, it's in parallel with mine, and in a direction I almost went!
.

Registered User
Joined: May 2009
Posts: 2,212
From: USA

Where did you source the carrier? Curious....
I bought my 12 bolt Chevy complete off a Lateral-G member in Dallas. Eaton posi with 3.73.
He's got a 1970 Chevelle he's blowing gobs of $$$ on and keeps changing his direction.

I'm just standing by for the fallout to go on mine with lower prices.
Registered User
Joined: Jul 2006
Posts: 694
From: Manassas, VA
10 bolt you mean right ??
Are you asking me ??
I bought my 12 bolt Chevy complete off a Lateral-G member in Dallas. Eaton posi with 3.73.
He's got a 1970 Chevelle he's blowing gobs of $$$ on and keeps changing his direction.
I'm just standing by for the fallout to go on mine with lower prices.
Are you asking me ??
I bought my 12 bolt Chevy complete off a Lateral-G member in Dallas. Eaton posi with 3.73.
He's got a 1970 Chevelle he's blowing gobs of $$$ on and keeps changing his direction.
I'm just standing by for the fallout to go on mine with lower prices.
.
Registered User
Joined: May 2009
Posts: 2,212
From: USA
Just for the carrier and 3.90 gears I was quoted $975 through 2 sources.
USED carrier too.....not new. I believe both of them were members here that redo rear ends.
So for me to then factor in rebuild costs, to keep a 10 bolt, plus if I break anything, parts are rare and $$$.
So I had to pass on that move. Sounds like you got lucky !!!!
Mine came almost all new with a new $1100 baer read disc brake system on it.....only paid $1K.
Cool guy, he must have $$$$ flying out his wallet though.
That's why I tell people to troll the bigger sites because guys are always dumping money
into their rides and changing directions. You get some great deals on higher end parts.
I just got a GM 200-4R core for $50 to rebuild from TurboBuicks.com
Gary's 68 is moving in the same direction I am eventually with my drivetrain.
Aftermarket EFI on Olds engines is VERY limited in options, and too much $$$ for the payback.
To keep it a daily driver with gas going up to $4+ a gallon again, you gotta consider the newer Gen III and IV options.
Last edited by Aceshigh; Feb 14, 2011 at 04:43 PM.
Registered User
Joined: Jan 2009
Posts: 1,565
From: Dallas Texas
I am extremely impressed! Welcome to CO. That wiring scares the hell out of me, and I did some of that in the military (a long time ago, not near as sophisicated!). Great pictures, and keep the storyline going, please!
Thread Starter
Registered User
Joined: Nov 2010
Posts: 904
From: St Louis, MO
Refurbished shift console;
DSCN0290.jpg
02 camaro LS1 exhaust clears the Z bar link.
DSCN0297.jpg
ecu mounts nicely on the flat area of the wheel well.
DSCN0298.jpg
Gas tank out. Either going to put a sumo in for the efi or a 95/96 caprice tank with a sump in it should fit.
DSCN0283.jpg
DSCN0290.jpg
02 camaro LS1 exhaust clears the Z bar link.
DSCN0297.jpg
ecu mounts nicely on the flat area of the wheel well.
DSCN0298.jpg
Gas tank out. Either going to put a sumo in for the efi or a 95/96 caprice tank with a sump in it should fit.
DSCN0283.jpg
Thread Starter
Registered User
Joined: Nov 2010
Posts: 904
From: St Louis, MO


Thread Starter
Registered User
Joined: Nov 2010
Posts: 904
From: St Louis, MO
Registered User
Joined: May 2009
Posts: 2,212
From: USA
What condensor did you use and where is it mounted and what bracket ??
Curious if you know this is going to work, so I can see how you did it.
Are those salvage yard LS1 fans ?? Do you know what controller you're using yet ??
There's a budget controller build up I did a writeup on if you're still looking.
http://www.nastyz28.com/forum/showthread.php?t=200028
VERY nicely done dude. I'm a fan.
I really think you should consider a T-56 since you're going this far.
I hope you do a Mustang rear chassis dyno. Dying to see the end result here.
Curious if you know this is going to work, so I can see how you did it.
Are those salvage yard LS1 fans ?? Do you know what controller you're using yet ??
There's a budget controller build up I did a writeup on if you're still looking.
http://www.nastyz28.com/forum/showthread.php?t=200028
I really think you should consider a T-56 since you're going this far.
I hope you do a Mustang rear chassis dyno. Dying to see the end result here.
Last edited by Aceshigh; Feb 28, 2011 at 03:37 PM.
Thread Starter
Registered User
Joined: Nov 2010
Posts: 904
From: St Louis, MO
The condensor was from the Classic Auto Air kit, biggest one they had. It's just mounted with 4 L shaped brakets. 2 hanging it fron the top, 2 on each side. It's a little forward of the core support. I'll see if I can find a pic.
The fans are from a 00 Ford Windstar bought on ebay, $40 shipped to me. Combined, they move 4400 cfm and are almost exactly the size of the radiator. Oh and if that's not enough, I can add a mechanical fan too. I used a mechanical truck fan on my vette, but it's really noisy.
Each fan is controlled by a separate relay. One is triggered by the ecu based on temp. The other by a variable coolant temp sensor (http://haywireinc.com/catalog/produc...s4el9t5jr1dek6
and/or the AC trinary switch. I could have wired for 2 speed, but thought I would see how this works first.
No T56, dont want to cut the tunnel, but a Keisler T45 or Richmond is still a possibility. I would still have to swap out thr 2.73 rear end.
With gas looking at $4 a gallon this summer, I'm more concerned about milage over dyno numbers. I'll be driving this to the lake (2 hrs each way)........ and my boat only gets 0.86 mpg.
Last edited by garys 68; Mar 1, 2011 at 12:27 AM.
Thread Starter
Registered User
Joined: Nov 2010
Posts: 904
From: St Louis, MO
Condensor mounted, from the grill side.
DSCN0302.jpg
DSCN0302.jpg
Registered User
Joined: May 2009
Posts: 2,212
From: USA
Duh.....I missed where you said they were Windstar fans.
I hear you about the MPG being much more important right now then HP concerns. I see all those guys that want a really fast drag car, but I guarantee most of them will be trailer queens all year long and maybe used only a few times unless they're legit track racers. I'd rather be able to drive mine more often.
I'm doing a 200-4R build up right now just so I can enjoy the car this summer without getting 11mpg. I'm also going to be looking into a 600cfm carb to swap out for my 750 new Edelbrock I bought. I did get 3 MPG avg better with the smaller carb.
I'd like to hear how well your A/C works for awhile after it's all done. This has been an issue of concern with what parts to use.
No T56, dont want to cut the tunnel, but a Keisler T45 or Richmond is still a possibility. I would still have to swap out thr 2.73 rear end.
With gas looking at $4 a gallon this summer, I'm more concerned about milage over dyno numbers. I'll be driving this to the lake (2 hrs each way)........ and my boat only gets 0.86 mpg.
With gas looking at $4 a gallon this summer, I'm more concerned about milage over dyno numbers. I'll be driving this to the lake (2 hrs each way)........ and my boat only gets 0.86 mpg.
I'm doing a 200-4R build up right now just so I can enjoy the car this summer without getting 11mpg. I'm also going to be looking into a 600cfm carb to swap out for my 750 new Edelbrock I bought. I did get 3 MPG avg better with the smaller carb.
I'd like to hear how well your A/C works for awhile after it's all done. This has been an issue of concern with what parts to use.
Last edited by Aceshigh; Mar 2, 2011 at 12:00 AM.
Thread Starter
Registered User
Joined: Nov 2010
Posts: 904
From: St Louis, MO
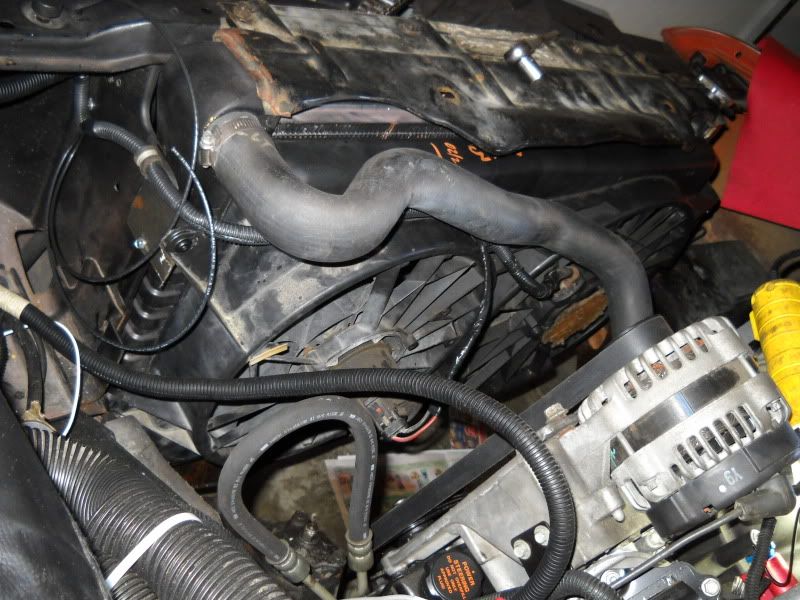
Cooling system and all electrics are done. The stock upper and lower radiator hoses fit remarkably well with only a size adapter on top and shortening the bottom a couple inches.
DSCN0313.jpg
Next is fuel system. Just picked up a 96 caprice tank. It fits pretty well in the Olds, has a 0-90 ohm sender, it's sumped/baffled for efi, and just needs a simple pump swap.
DSCN0311.jpg
DSCN0313.jpg
Next is fuel system. Just picked up a 96 caprice tank. It fits pretty well in the Olds, has a 0-90 ohm sender, it's sumped/baffled for efi, and just needs a simple pump swap.
DSCN0311.jpg
Thread Starter
Registered User
Joined: Nov 2010
Posts: 904
From: St Louis, MO
Condenser is 11-1039. Strait brackets came with it. I just bent tem to an L shape and bolted to the radiator support.
Since the evaporator/heater core is entirely in the car, I put the dryer on the firewall where the old unit used to be. It's connected with a hardline to the evap.
Since the evaporator/heater core is entirely in the car, I put the dryer on the firewall where the old unit used to be. It's connected with a hardline to the evap.
Thread Starter
Registered User
Joined: Nov 2010
Posts: 904
From: St Louis, MO
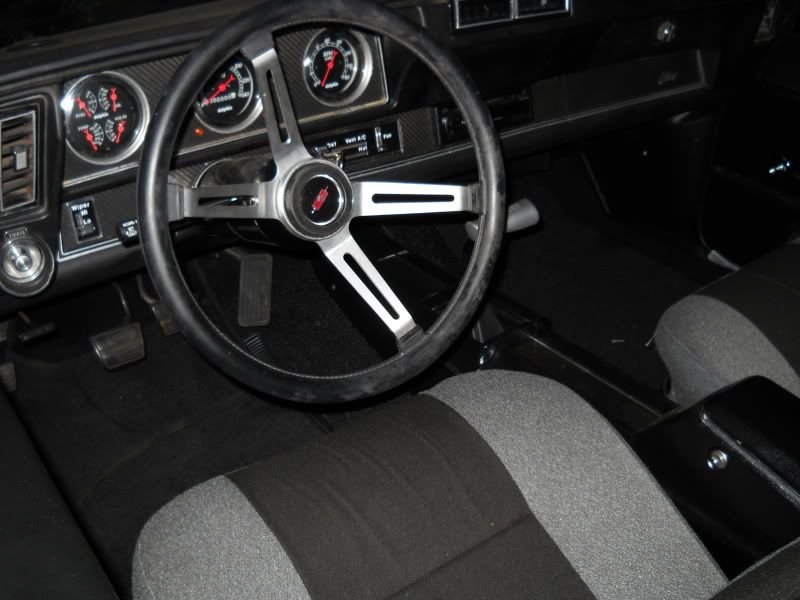
Interior is in, black and grey comfortable cloth seats. Still need to get retractable seatbelts and the 2 windlass mouldings. The 10 speaker stereo sounds pretty good too.
DSCN0316.jpg
DSCN0318.jpg
The upgraded fuel pump goes in today so it will be ready to fire up later this week.
But I ran into a couple suspension issues. swapping a 455 to an aluminum head L59 and swapping the classic Air for the old heavy system has left the front pretty high. Going to order some front springs for a 350 car w/o air.
After putting the car on all 4 wheels, I found the pinion angle was off more than 1 degree. So I need some adjustable upper control arms.
Thread Starter
Registered User
Joined: Nov 2010
Posts: 904
From: St Louis, MO
Racetronix 255 lph Walbro pump in the caprice sender/sump assembly.
DSCN0319.jpg
I decided to cut the trunk for easy access to the pump and tuck the caprice tank up higher.
DSCN0320.jpg
And then boxed in the cut, then carpet the trunk.
DSCN0321.jpg
DSCN0319.jpg
I decided to cut the trunk for easy access to the pump and tuck the caprice tank up higher.
DSCN0320.jpg
And then boxed in the cut, then carpet the trunk.
DSCN0321.jpg
Registered User
Joined: May 2009
Posts: 2,212
From: USA
Thread Starter
Registered User
Joined: Nov 2010
Posts: 904
From: St Louis, MO
2 1" tweeters in the dash
2 6 1/2" 2 way in the lower door panels
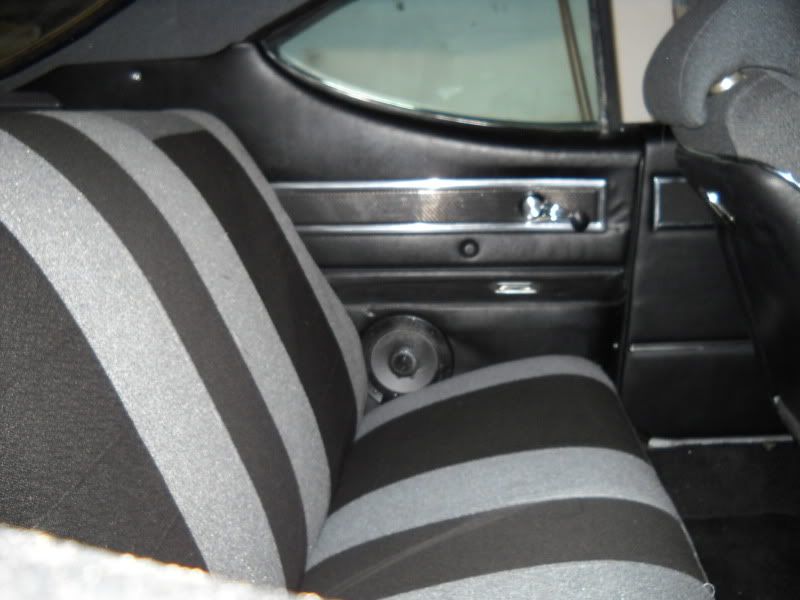
2 6 1/2" 2 way in the back seat armrests
2 6 x 9" 3 way in the sides of the package tray
2 8" woofers between the 6 x 9s in the package tray
In reality the only reason there are that many is because they were all spare stuff I had left over.
2 6 1/2" 2 way in the lower door panels
2 6 1/2" 2 way in the back seat armrests
2 6 x 9" 3 way in the sides of the package tray
2 8" woofers between the 6 x 9s in the package tray
In reality the only reason there are that many is because they were all spare stuff I had left over.
Thread Starter
Registered User
Joined: Nov 2010
Posts: 904
From: St Louis, MO
Good news, the engine compartment is done, just need to get it to a muffler shop to make downpipes with O2 sensors.
DSCN0322.jpg
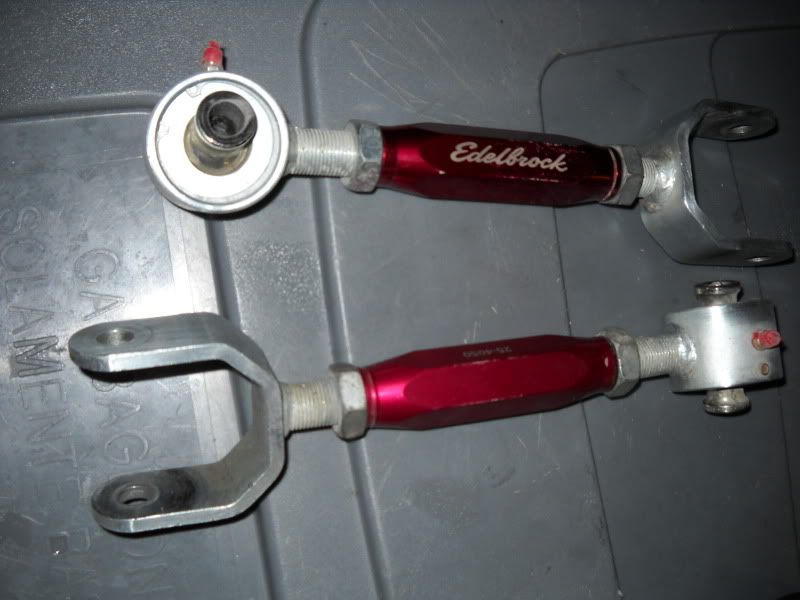
Bad news is that when I set the car on all 4 wheels, the rear pinion angle is off more than I initially measured. So I picked up a pair of these.
I'm also going to need small block front springs.
DSCN0322.jpg
Bad news is that when I set the car on all 4 wheels, the rear pinion angle is off more than I initially measured. So I picked up a pair of these.
I'm also going to need small block front springs.
Thread Starter
Registered User
Joined: Nov 2010
Posts: 904
From: St Louis, MO
I picked up the windlace molding and ordered 3 point retractable seat belts.
Pics of the interior and speakers.
Installed door panel.
DSCN0324-1.jpg
Font and console.
DSCN0326.jpg
You can see the 1" tweeter in the upper left of this photo.
Front door panel speakers.
DSCN0330.jpg
A couple shots of the rear speaker location. Btw, I put sound deadener on the inside of the armrests and package tray.
DSCN0328.jpg
And the package try, 4 speaker grill.
DSCN0332.jpg
Registered User
Joined: May 2009
Posts: 2,212
From: USA
Ahh.....I gotcha. Sound system should be jammin.
THat engine bay and interior is looking very good Gary.
I'm REALLY diggin the carbon fiber vinyl and your custom door panels.
I'm jealous.
What 3 point retractable belts did you order, and how does the shoulder point mount ??
Do you know for sure these will work ??
I hate the stock 2 piece belt system, drives me insane.
THat engine bay and interior is looking very good Gary.
I'm REALLY diggin the carbon fiber vinyl and your custom door panels.
I'm jealous.
Do you know for sure these will work ??
I hate the stock 2 piece belt system, drives me insane.
Last edited by Aceshigh; Mar 14, 2011 at 01:36 PM.
Thread Starter
Registered User
Joined: Nov 2010
Posts: 904
From: St Louis, MO
I bought some 3 point retractable belts on ebay.
http://cgi.ebay.com/ebaymotors/3-POI...mZ110660778201
I'm not abosutely sure they'll work, but I have 2 options. I removed the old 2 bolt roof mount and made a 3/16" steel plate. The single bolt new mount will go in the center of that plate and I can use the original molding around it.
If that doesn't work,. I'll use the original mount, molding, and part of the shoulder belt and a drop shash with a ring on it to thread the new belt through.
Thread Starter
Registered User
Joined: Nov 2010
Posts: 904
From: St Louis, MO
Rear suspension adjustable control arms mounted. Motor 2.5 degrees down, driveshaft 3.5 degrees down, differential 2.5 degrees up. It might have been overkill to get the angles within a half degree, but I didn't want to be chasing vibrations later on.
DSCN0336.jpg
Front suspension, 72 Cultass 350 w/o air springs. About 1.5" shorter but the rate is supposed to be different too. Cutting the old ones would have lowered the car but given a very stiff ride.
DSCN0338.jpg
Fuels system. Intank Ractronix pump, 02 corvette regulator/filter. I vented the tank to the Olds vapor tank, but without a charcoal canister, that's just vented to the air through a filter. If I have problems with fumes, I'll get a canister.
DSCN0335.jpg
Thread Starter
Registered User
Joined: Nov 2010
Posts: 904
From: St Louis, MO
It's alive. Started on the first try. I just dont have downpipes with O2 sensors, so it threw a lean code when it warmed up. Off to the muffler shop.
The other issue is that my brand new brake master cylinder is leaking out the back.
The other issue is that my brand new brake master cylinder is leaking out the back.
Registered User
Joined: May 2009
Posts: 2,212
From: USA
I have the same style roto joint UCA's in mine from UMI.
Nicely done. I'll bet you got goosebumps and swelled up real fast.
Not easy to get all that running correctly first time out.
Are you still staying with a non-OD trans ??
I'm curious if you'll get a 4L60e or 4L80e to complement it with these high gas prices.
That bug will bite eventually ....lol
I'd really like to see what kind of real world MPG #'s you're going to get City/Hwy.
Also I'm curious what this all ended up costing you to get it in and running for a budget 5.3L setup.
Nice job on the install and pics.
Last edited by Aceshigh; Mar 20, 2011 at 11:10 AM.
Thread Starter
Registered User
Joined: Nov 2010
Posts: 904
From: St Louis, MO
The trans is a muncie I rebuilt over the winter. If milage isn't over 20mpg (keep in mind 2.73 rear) I might try to build a T5 with a 0.73 or 0.80 5th.
Rpm will be about 2400 at 70mph, a 5000lb Avalanche with 4.11 gears and a 4L60 gears gets 20mpg at 2250rpm, 70mph. So I'm thinking it should be close.
On cost, you have to keep in mind I completely changed the interior, changed the entire wiring harness and gauges, and added classic air. I wont include that stuff.
05 5.3L L56 (LM7) 50k miles $900
I changed LS1 intake intake/ aftermarket fuel rail (not necessary) $150
CTS-V oil pan (not necessary, but good for ground clearance) $140
Sachs 1050 flwheel/11" 10 spline clutch/621 bell housing/etc $350
Fans/controller $60
F body exhaust/flanges $110 (still need mufler shop to make downpipes)
ECU reprogram $75
VSS $35
96 Caprice tank, pump, regulator, fuel lines, etc $350
(although others have cut that cost in half by using the existing tank and an external walbro pump)
1" setback mounts $60
Misc, wiring connectors, fittings, etc $100
So about $2500 for the engine swap, and you could probably do it under $2k.
No frame or sheet metal cutting necessary. I did cut the floor of the trunk for the caprice tank, but that was not absolutely necessary.
Registered User
Joined: May 2009
Posts: 2,212
From: USA
I'm curious if there's an issue with my tune. Because I'm only getting 20mpg in my 78z28 which weighs ~3400lbs with the LS1/4L60e in it. I did a trip from St Louis back to Chicago which was around 320 miles and that's with 3.42 gears. It's closer to 400hp though.
Who did your ECU reprogram again ??
Was it the Ebay dude ? So much cheaper then John Speartech, but he's really good.
So since you didn't change the cam or valvetrain at all, you just had VATS removed right??
No custom tune or anything ?
Last edited by Aceshigh; Mar 20, 2011 at 08:10 PM.
Registered User
Joined: Feb 2011
Posts: 81
The trans is a muncie I rebuilt over the winter. If milage isn't over 20mpg (keep in mind 2.73 rear) I might try to build a T5 with a 0.73 or 0.80 5th.
Rpm will be about 2400 at 70mph, a 5000lb Avalanche with 4.11 gears and a 4L60 gears gets 20mpg at 2250rpm, 70mph. So I'm thinking it should be close.
On cost, you have to keep in mind I completely changed the interior, changed the entire wiring harness and gauges, and added classic air. I wont include that stuff.
05 5.3L L56 (LM7) 50k miles $900
I changed LS1 intake intake/ aftermarket fuel rail (not necessary) $150
CTS-V oil pan (not necessary, but good for ground clearance) $140
Sachs 1050 flwheel/11" 10 spline clutch/621 bell housing/etc $350
Fans/controller $60
F body exhaust/flanges $110 (still need mufler shop to make downpipes)
ECU reprogram $75
VSS $35
96 Caprice tank, pump, regulator, fuel lines, etc $350
(although others have cut that cost in half by using the existing tank and an external walbro pump)
1" setback mounts $60
Misc, wiring connectors, fittings, etc $100
So about $2500 for the engine swap, and you could probably do it under $2k.
No frame or sheet metal cutting necessary. I did cut the floor of the trunk for the caprice tank, but that was not absolutely necessary.
Rpm will be about 2400 at 70mph, a 5000lb Avalanche with 4.11 gears and a 4L60 gears gets 20mpg at 2250rpm, 70mph. So I'm thinking it should be close.
On cost, you have to keep in mind I completely changed the interior, changed the entire wiring harness and gauges, and added classic air. I wont include that stuff.
05 5.3L L56 (LM7) 50k miles $900
I changed LS1 intake intake/ aftermarket fuel rail (not necessary) $150
CTS-V oil pan (not necessary, but good for ground clearance) $140
Sachs 1050 flwheel/11" 10 spline clutch/621 bell housing/etc $350
Fans/controller $60
F body exhaust/flanges $110 (still need mufler shop to make downpipes)
ECU reprogram $75
VSS $35
96 Caprice tank, pump, regulator, fuel lines, etc $350
(although others have cut that cost in half by using the existing tank and an external walbro pump)
1" setback mounts $60
Misc, wiring connectors, fittings, etc $100
So about $2500 for the engine swap, and you could probably do it under $2k.
No frame or sheet metal cutting necessary. I did cut the floor of the trunk for the caprice tank, but that was not absolutely necessary.
Thread Starter
Registered User
Joined: Nov 2010
Posts: 904
From: St Louis, MO
No cam, stock tune, just VATS and misc stuff removed. ECU was done by:
http://www.lt1swap.com/programming.htm
Interesting, the basically stock LQ9 in my 68 vette, 0.76 6 speed OD, 3.08 rear has gotten a best of 26mpg hiway and I know others in the 25mpg range. Even the stock f body and corvettes with LS1s are in the mid 20s. I think you may want to take off that lead right shoe
Last edited by garys 68; Mar 21, 2011 at 01:47 AM.
Thread Starter
Registered User
Joined: Nov 2010
Posts: 904
From: St Louis, MO
Check out this thread. Seems it can be done even cheaper, depending on what you reuse. I'm considering doing an early 60s chevy truck next winter. Maybe even keep the flex fuel capability.
http://www.ls1tech.com/forums/conver...de-1500-a.html
http://www.ls1tech.com/forums/conver...de-1500-a.html
Last edited by garys 68; Mar 21, 2011 at 01:48 AM.
Thread Starter
Registered User
Joined: Nov 2010
Posts: 904
From: St Louis, MO
Retractable seat belts in. I made a plate to mount the new belt loop in the original Olds position, but it was uncomfortable and cut across my neck.
So I used the original Olds upper belt and mount to make a drop sash.
Back seats are matching lap belts.
DSCN0342.jpg
So I used the original Olds upper belt and mount to make a drop sash.
Back seats are matching lap belts.
DSCN0342.jpg


