
72 Olds 442 clone (with Gen III swap)


Registered User
Joined: May 2009
Posts: 2,212
From: USA
AWESOME!!!!! I'd love to see all the progress pics of the build.
Which Vortec motor ? LQ4, LQ9, or LY6 ??
I'm now wondering if the mods will banish this to the
NON-Olds powered forum, like most get banished.
Agreed. I put a GTO LS1 in my 78 z28 and it had me grinning ear to ear.
You'll find a smaller reception rate to the modern pro-touring GM engine ideology here.
I'm a huge fan of it myself. I have a T-56 on standby for my 1970 442 clone.
Waiting on the LS3. Going to call it a 6F2 when I'm done.
6 on the floor.
Fuel injected LS3
Dual exhaust.
Which Vortec motor ? LQ4, LQ9, or LY6 ??
I'm now wondering if the mods will banish this to the
NON-Olds powered forum, like most get banished.
You'll find a smaller reception rate to the modern pro-touring GM engine ideology here.
I'm a huge fan of it myself. I have a T-56 on standby for my 1970 442 clone.
Waiting on the LS3. Going to call it a 6F2 when I'm done.
6 on the floor.
Fuel injected LS3
Dual exhaust.
Last edited by Aceshigh; Jan 10, 2011 at 10:14 PM.

Thread Starter
Registered User
Joined: Nov 2010
Posts: 904
From: St Louis, MO
This is a budget build that came with a 4 speed and 2.73 rear gears. So instead of changing the rear end AND buying a 5 or 6 speed trans to work with it, I decided on a 5.3 to go with the trans/rear end combo.
The 5.3s make about 20 less hp than an LS1 at about 1/4th the price.
And the nice thing about LS motors is that I can always swap it out for a 6.0 or 6.2.
I'm ok with being moved to non-olds, but I'm doing electrical, full interior, etc, so I though major builds was a better fit.
I was considering seats with better support, maybe a pair from an Olds Alero (there a pair on craigslist for $75)....would keeping the seats Olds prevent me from getting banished?
BTW, I would have considered a T56 or TKO, but they both require cutting the tunnel. The Richmonds fit nicely though.
Thinkin about a dash badge too "Fi42"
Last edited by garys 68; Jan 10, 2011 at 11:15 PM.
Registered User
Joined: May 2009
Posts: 2,212
From: USA
You're doing your OWN wiring harness and computer modifications ???
Do you have HP Tuners or EFI Live already ?
My last harness and PCM I had done by Speartech.....very $$$ though.
Works either way.
I wanted a steeper gear in mine, but I had the notoriously worthless 68-70 Oldsmobile "O" rear end that is a faux 12 bolt. Gears + carrier were $975 just for parts, so I said SCREW THAT!!!! Put in a Chevy 12 bolt with an Eaton posi and 3.73 gears. IT was that or 4.11's for the 6th gear which is .50.
The ultimate highway mileage trans.
It's a bit more HP then that. LS1tech
5.3L's were 285-305hp depending on which model year it was.
Fbody LS1's were underrated by GM on paper. 2001+ got even more hp.
Corvette's and GTO's were always 350hp on paper, but dyno'd out more.
STILL....you can't beat $1000 for a full blown EFI modern GEN III engine from most yards.
Very true....very very true.
I have my F-body oil pan , and Edelbrock SS headers for the A-body already.
Just waiting for the $$$ to pile up for the LS3 purchase.
That's the only real drawback, but at the end of the day, it's all covered with carpet anyways.
The OTHER big drawback is if I mate it to the Olds 350, I'd have to drill out the crank.
I'll probably sell my restored auto console for $$$ and have a custom console made with cup holders.
I'm taking a beginners welding course to just learn some proper welding techniques here in 2 weeks at the local CC.
Do you have HP Tuners or EFI Live already ?
My last harness and PCM I had done by Speartech.....very $$$ though.
I wanted a steeper gear in mine, but I had the notoriously worthless 68-70 Oldsmobile "O" rear end that is a faux 12 bolt. Gears + carrier were $975 just for parts, so I said SCREW THAT!!!! Put in a Chevy 12 bolt with an Eaton posi and 3.73 gears. IT was that or 4.11's for the 6th gear which is .50.
The ultimate highway mileage trans.
The 5.3s make about 20 less hp than an LS1 at about 1/4th the price.
LS1tech5.3L's were 285-305hp depending on which model year it was.
Fbody LS1's were underrated by GM on paper. 2001+ got even more hp.
Corvette's and GTO's were always 350hp on paper, but dyno'd out more.
STILL....you can't beat $1000 for a full blown EFI modern GEN III engine from most yards.
And the nice thing about LS motors is that I can always swap it out for a 6.0 or 6.2.
I have my F-body oil pan , and Edelbrock SS headers for the A-body already.
Just waiting for the $$$ to pile up for the LS3 purchase.
BTW, I would have considered a T56 or TKO, but they both require cutting the tunnel
The OTHER big drawback is if I mate it to the Olds 350, I'd have to drill out the crank.
I'll probably sell my restored auto console for $$$ and have a custom console made with cup holders.
I'm taking a beginners welding course to just learn some proper welding techniques here in 2 weeks at the local CC.
Last edited by Aceshigh; Jan 11, 2011 at 12:55 AM.
Thread Starter
Registered User
Joined: Nov 2010
Posts: 904
From: St Louis, MO
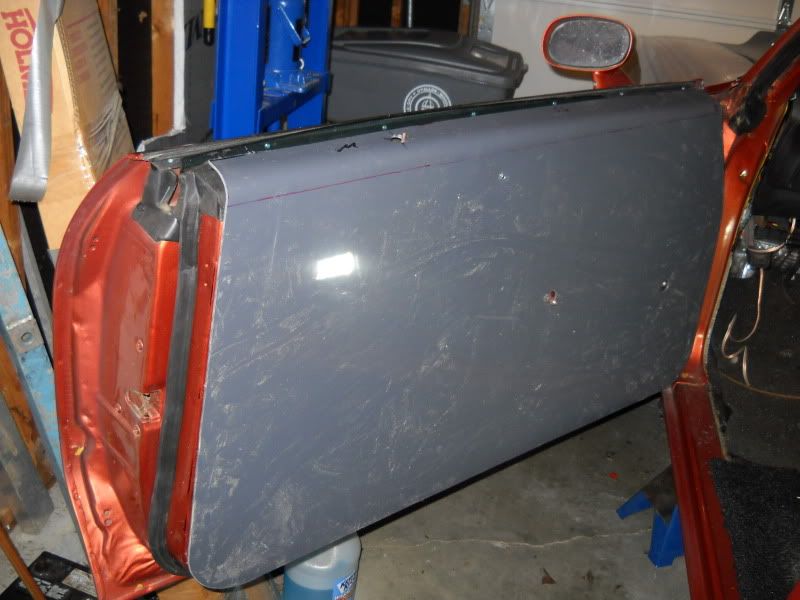
Update on the doors. I'm keeping the classic Olds lines but updating. Getting rid of the buttons and carpet. Changing the wood grain to carbon fiber. Keeping arm rests, horizontal chrome trim and adding a speaker.
Mockup of PVC panel with all the stuff on it. Hope to have vinyl on it this week.
DSCN0213.jpg
Mockup of PVC panel with all the stuff on it. Hope to have vinyl on it this week.
DSCN0213.jpg
Thread Starter
Registered User
Joined: Nov 2010
Posts: 904
From: St Louis, MO
Snow day yesterday.
I finished the door panel. Ended up reusing the armrest, handle, horizontal chrome strip, lock **** furrel, and I think I'll put the "S" emblem in the insert like the original.
DSCN0224.jpg
And now it matches the dash.
DSCN0208.jpg
I finished the door panel. Ended up reusing the armrest, handle, horizontal chrome strip, lock **** furrel, and I think I'll put the "S" emblem in the insert like the original.
DSCN0224.jpg
And now it matches the dash.
DSCN0208.jpg
Last edited by garys 68; Jan 21, 2011 at 07:50 AM.
Registered User
Joined: May 2009
Posts: 2,212
From: USA
That is FOOKIN ****!!!!
I want to convert my interior to all black from the metallic green, and that is
just SICK!!! I'm a huuuuuuge fan of your work there buddy. I REALLY dig the
carbon fiber style you did there. I'm going to Autozone today!!!!
I wish I knew about this BEFORE I blew the $130 for the new fake *** wood grain BS vinyl repop crap.
I REALLY want to know exactly how you cut the really long piece for the dash.
Thread Starter
Registered User
Joined: Nov 2010
Posts: 904
From: St Louis, MO
A more complete thread on the door panels. Should answer most questions.
http://www.pro-touring.com/showthrea...l-build-thread
http://www.pro-touring.com/showthrea...l-build-thread
Thread Starter
Registered User
Joined: Nov 2010
Posts: 904
From: St Louis, MO
Registered User
Joined: May 2009
Posts: 2,212
From: USA


Not even with a T-56 and that desirable .5 final gear ratio.
The 2002 LS1 / T56 F-bodies were much more aerodynamic and lighter by a few hundred and
got 26mpg hwy with the advertised 320hp. (Closer to 345hp tho)
455's are not very efficient motors because of their head design. (compared to modern Gen III and IV motors)
Last edited by Aceshigh; Jan 21, 2011 at 05:47 PM.
Thread Starter
Registered User
Joined: Nov 2010
Posts: 904
From: St Louis, MO
If you could get the compression high enough to have the torque to keep the rpms WAY down AND the gearing, you could get around 20mpg. That's why I thought LPG could do it on a high compression 455. SFI gets close to that with the 8.1 gas motor in trucks.
My simple approach is use the 5.3. With existing gearing, I should be over 20mpg on the hiway. And the low end torque on the SFI motors is close to a carbed big block.
My simple approach is use the 5.3. With existing gearing, I should be over 20mpg on the hiway. And the low end torque on the SFI motors is close to a carbed big block.
Thread Starter
Registered User
Joined: Nov 2010
Posts: 904
From: St Louis, MO
The rear quarter panels are in pretty good shape. They're also a more complex compound curve. I was not sure if the pvc would stretch enough for the compound curve, so my options were try the heated pvc (probably destroying the old panel), make a fiberglass version (again, destroying it), keep the original metal top and fasten the flat pvc bottom, or keep the old panel and just carbon fiber over the wood grain.
The last option was the simplest and most "reversible". The vinyl was a pretty good match to the doors too.
DSCN0226.jpg
The last option was the simplest and most "reversible". The vinyl was a pretty good match to the doors too.
DSCN0226.jpg
Thread Starter
Registered User
Joined: Nov 2010
Posts: 904
From: St Louis, MO
Xmas tree clips. I redrilled holes for 10 clips/door.
In addition to that, there are the 3 armrest bolts and a couple speaker screws. It's not going anywhere.
http://www.rochfordsupply.com/shop/A...ck)/index.html
In addition to that, there are the 3 armrest bolts and a couple speaker screws. It's not going anywhere.
http://www.rochfordsupply.com/shop/A...ck)/index.html
Registered User
Joined: May 2009
Posts: 2,212
From: USA
So do you have to peel up the vinyl and foam again to put these in through the PVC from the upholstered side ??
I guess I'll have to wait and see exactly how you do this part.
Hopefully you take LOTSA pics I think this is looking sick so far.
Took a trip to Autozone and picked up the Carbon fiber roll that was 6 in wide by 6 feet long.
Now I just gotta find the same chrome tape you used as well.
I guess I'll have to wait and see exactly how you do this part.
Hopefully you take LOTSA pics
I think this is looking sick so far.Took a trip to Autozone and picked up the Carbon fiber roll that was 6 in wide by 6 feet long.
Now I just gotta find the same chrome tape you used as well.
Thread Starter
Registered User
Joined: Nov 2010
Posts: 904
From: St Louis, MO
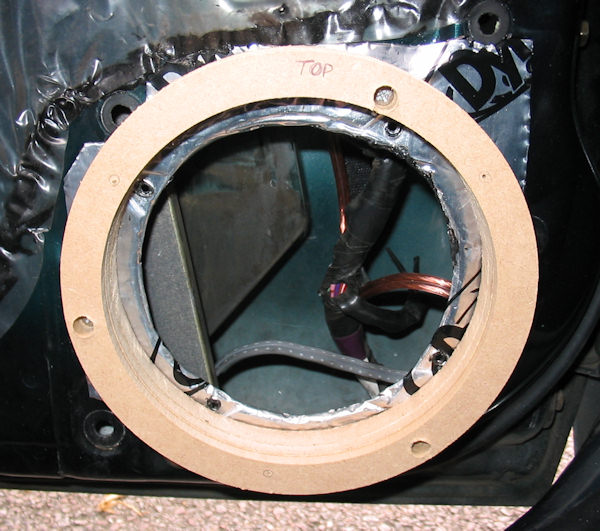
The Xmas tree fasteners are a standard Ford/GM type.
The bare panel gets drilled on the door to get it aligned, fasteners are put in, then the foam and vinyl goes on.
If you look closely, you can see them sticking out in this photo. They're in the V shaped cuts in the vinyl.
Auto zone has the adhesive chrome too in various widths.
DSCN0216.jpg
The bare panel gets drilled on the door to get it aligned, fasteners are put in, then the foam and vinyl goes on.
If you look closely, you can see them sticking out in this photo. They're in the V shaped cuts in the vinyl.
Auto zone has the adhesive chrome too in various widths.
DSCN0216.jpg
Last edited by garys 68; Jan 29, 2011 at 08:54 AM.
Registered User
Joined: May 2009
Posts: 2,212
From: USA
Thanks gary. I guess I missed that before.
I love that you fit your 6.5" speaker in the door too.
Not a big fan of kickpanels as the only option.
I was even thinking of using angled spacers to point them up more.
Something Id have to make out of wood and paint to match
Just throwin that out there since your fab skills are pretty good.
I love that you fit your 6.5" speaker in the door too.
Not a big fan of kickpanels as the only option.
I was even thinking of using angled spacers to point them up more.
Something Id have to make out of wood and paint to match
Just throwin that out there since your fab skills are pretty good.
Last edited by Aceshigh; Jan 23, 2011 at 08:09 AM.
Thread Starter
Registered User
Joined: Nov 2010
Posts: 904
From: St Louis, MO
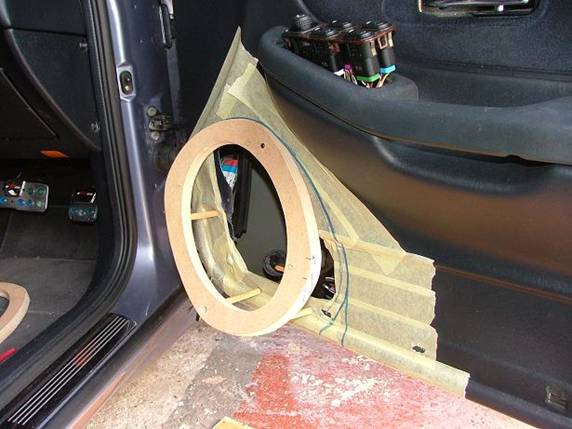
I couldn't fit decent size speakers in the kick panel with my E brake, so that left the doors.
Oh and building out angled speaker pods...you mean like this?
http://cgi.ebay.com/ebaymotors/1972-...item3cb47d9b0d
Oh and building out angled speaker pods...you mean like this?
http://cgi.ebay.com/ebaymotors/1972-...item3cb47d9b0d
Last edited by garys 68; Jan 28, 2011 at 09:47 PM.
car guy
Joined: Apr 2008
Posts: 5,675
From: Dallas TX
I couldn't fit decent size speakers in the kick panel with my E brake, so that left the doors.
Oh and building out angled spear pods...you mean like this?
http://cgi.ebay.com/ebaymotors/1972-...item3cb47d9b0d
Oh and building out angled spear pods...you mean like this?
http://cgi.ebay.com/ebaymotors/1972-...item3cb47d9b0d
Registered User
Joined: May 2009
Posts: 2,212
From: USA
Nooooooooooooo
What I mean is taking a speaker spacer, say 1.5"+ and laying it on an angle on say a belt sander and making one side of it angled.
The flat side goes to the door panel, the angled side which helps point the speaker UP at the listening position more.
You go thicker depending on the angle you want.
I did this with 6x9's before about 13 years ago.
This is a flat wooden spacer, if you angle it with a belt sander it will give a better listening angle.
Otherwise it throws the sound at your feet.
Like this.
Or this kinda idea but this is a basis for a fiberglass mold Just imagine it angling up though.
http://www.scorpiounleashed.co.uk/rspeak.htm
Last edited by Aceshigh; Jan 23, 2011 at 08:46 AM.
Thread Starter
Registered User
Joined: Nov 2010
Posts: 904
From: St Louis, MO
If you look carefully at the dash pic on this page, you can see the 1" tweeter mounted in the top of the dash. Plan ia 2 tweeters in the dash, 6 1/2" in the doors, 6 1/2" in the rear quarter or armrest panels. 4 channel amp under the rear seat powering 6 x 9s and a dual voice coil sub in the package tray.
Thread Starter
Registered User
Joined: Nov 2010
Posts: 904
From: St Louis, MO
The drivers seat kind of leaned to one side but the covers looked pretty new. They have kind of bad support anyway so I figured I might make some changes.
So I took off the covers and found the 1st problem. More covers underneath! Anyone need 4 sets of front seat covers?
You can see one side is lower.
DSCN0251.jpg
And some broken springs. I'm ordering materials to make some 2 tone cloth seats with better side support.
DSCN0252.jpg
So I took off the covers and found the 1st problem. More covers underneath! Anyone need 4 sets of front seat covers?
You can see one side is lower.
DSCN0251.jpg
And some broken springs. I'm ordering materials to make some 2 tone cloth seats with better side support.
DSCN0252.jpg
Registered User
Joined: Feb 2008
Posts: 11,798
From: Plano, TX
Now where did my magic mod-wand go???

Gary - great work on those door panels. The PVC is a great idea, especially for making custom top rails for quarter panels (where repros are not made available).
I was one of those insane ones who took a costly set of Legendary repro door panels and cut speaker holes in them (but at least i painted them to match...)

Registered User
Joined: Nov 2010
Posts: 71
Great project, one that I am paying close attention too. The LSx swaps seem to be easier than I thought. Summit sells mounts to install. I would consider an LSx/T56 for a future swap in my '67. I'd like to see some 1/4 mile times when you done. I would definitely contemplate doing a 6 liter swap. 
Thread Starter
Registered User
Joined: Nov 2010
Posts: 904
From: St Louis, MO
With 2.73 rear gears and a 2.56 1st gear on the Muncie, this wont be a 1/4 mile car. But I've got a 6.0, Richmond with 3.27 1st, and a 3.08 rear in my 68 corvette and it will break the tires easily in the first 3 gears.
Registered User
Joined: May 2009
Posts: 2,212
From: USA
What I'd REEEEEALLY like to see is what a 1970 442 or Cutlass weighs without ANY drivetrain in it.
Just to gauge the actual weight empty.
Depends on your skill level OR what you're willing to pay to farm out the work.
My 1st one wasn't easy in 2006, I paid a shop to do most of the install & Speartech for the wiring.
I was still in the amateur stages with limited options to get them into classics back then.
Today 5 years later the options are far more abundant and plentiful and lower cost.
Not only that, but many more people have done it that can help.
Just to gauge the actual weight empty.
My 1st one wasn't easy in 2006, I paid a shop to do most of the install & Speartech for the wiring.
I was still in the amateur stages with limited options to get them into classics back then.
Today 5 years later the options are far more abundant and plentiful and lower cost.
Not only that, but many more people have done it that can help.
Last edited by Aceshigh; Jan 28, 2011 at 03:24 PM.
Thread Starter
Registered User
Joined: Nov 2010
Posts: 904
From: St Louis, MO
This is the part even I call overkill. I bought carpet with insulation and some sound deadener from one of the suppliers. I was pretty unimpressed with the level of jute insulation on the carpet and the sound deadener was not even the adhesive type.
So I bought some fatmat. BTW if you heat this stuff in the oven to 150 degrees, it sticks to EVERYTHING. And you can really tell the difference by just tapping on the floor.
DSCN0254.jpg
Next was the reflexit insulation. I put this in the footwells of my corvette and it was like night and day. I already had the fatmat and reflexit on the firewall and kick panel area, so I figure I might as well do the whole passenger area.
DSCN0255.jpg
And now the overkill. I put the layer of sound deadener I originally bought with the carpet over the insulation. It may not be quite as quiet and comfortable as a Town Car, but I'm trying to get it close.
DSCN0256.jpg
And the headliner pretty much disintegrated while taking it down.
The car came with a black dash, black carpet, black doors, black seats, black headliner.....and more black.....
So I ordered material to fix and upholster the seats in grey with black inserts, and enough material to make a grey cloth headliner to match the seats.
DSCN0259.jpg
Last edited by garys 68; Jan 28, 2011 at 09:40 PM.
Thread Starter
Registered User
Joined: Nov 2010
Posts: 904
From: St Louis, MO
And for some seat mods. The foam is a little rough, but I'll be adding to it.
BTW, 3M make an adhesive for foam, it really works well.
DSCN0253.jpg
BTW, 3M make an adhesive for foam, it really works well.
DSCN0253.jpg
Thread Starter
Registered User
Joined: Nov 2010
Posts: 904
From: St Louis, MO
New 621 bellhousing bolted up. Unfortunately it's 0.020" out. Gotta order offset dowels.
DSCN0264.jpg
So while I'm waiting on the dowels the material for the seats and headliner came in. Here's the grey headliner sewn up.
DSCN0262.jpg
And the bows installed in the headliner. There were a couple broken clips, so gotta wait till they come in to install.
DSCN0263.jpg
DSCN0264.jpg
So while I'm waiting on the dowels the material for the seats and headliner came in. Here's the grey headliner sewn up.
DSCN0262.jpg
And the bows installed in the headliner. There were a couple broken clips, so gotta wait till they come in to install.
DSCN0263.jpg
Registered User
Joined: May 2009
Posts: 2,212
From: USA
Oh that's right, you're not putting an OD trans in.....forgot.
I was going to ask
How come you aren't buying new seat foam?? IIRC it's ~$100 a seat.
Never really seen how one of those bow type headliners go in.
Interested, because I'm going to be converting to an all black interior.
I was going to ask
How come you aren't buying new seat foam?? IIRC it's ~$100 a seat.
Never really seen how one of those bow type headliners go in.
Interested, because I'm going to be converting to an all black interior.
Thread Starter
Registered User
Joined: Nov 2010
Posts: 904
From: St Louis, MO
I'm putting the Muncie in it for now. But might change to a 5 or 6 speed later. The muncies are pretty tolerant of bellhousing runout, but forget about installing a Tremec or Richmond over 0.005 out. It will eat the front bearing.
I'm adding more side support and lumber support to the seat, so the existing foam is just going to be the base. It's good enough for that. I'm making grey covers (matching the headliner) with black inserts and keeping the black with chrome trim seat backs and bases.
I'll post pics of the headliner installed after the clips come in.
Thread Starter
Registered User
Joined: Nov 2010
Posts: 904
From: St Louis, MO
0.021 offset dowel pins corrected the bell housing runout.
A Sachs 1050 flywheel bolts to the LS crank. It's drilled for an 11" BBC clutch and fits a 10 spline disc. An LS7 pilot bearing seats in the outer flange of the crank and fits the Mucie input shaft.
DSCN0270.jpg
A Sachs 1050 flywheel bolts to the LS crank. It's drilled for an 11" BBC clutch and fits a 10 spline disc. An LS7 pilot bearing seats in the outer flange of the crank and fits the Mucie input shaft.
DSCN0270.jpg
Last edited by garys 68; Feb 7, 2011 at 11:30 PM.
Thread Starter
Registered User
Joined: Nov 2010
Posts: 904
From: St Louis, MO
Thread Starter
Registered User
Joined: Nov 2010
Posts: 904
From: St Louis, MO
Well the engine got put in, then the temp dropped...high of 15 degrees most of the week. So I got busy on the interior stuff.
I probably could have bought some aftermarket seats, but I kinda liked the original design. I really liked the black trim with chrome edges, so I fixee the broken springs, added some medium density foam, and reupholstered.
Grey cloth seats (matches the headliner) with black insets, new chrome trim.
DSCN0273.jpg
DSCN0275.jpg
DSCN0278.jpg
Thread Starter
Registered User
Joined: Nov 2010
Posts: 904
From: St Louis, MO
Headliner install. Thanks to those on this board for tips on putting this in.
And yes, I'll trim the hanging threads......
DSCN0280.jpg
And yes, I'll trim the hanging threads......
DSCN0280.jpg
Registered User
Joined: May 2009
Posts: 2,212
From: USA
Looks good so far.
Coming along very nicely.
So the 5.3L has new fuel rails and the car intake & injectors.
Did you swap cams and do anything else to it ??
Did you change ANY of the truck accessories or is that all factory ??
Compressor and bracket look new, that's why I ask.
I've been VERY curious if it will fit under our hoods.
I'd hate to have to spend another $750 for the vette accessory drive.


