LOG IN
REGISTER
Forums
New User Forums
The Newbie Forum
Site Related
General
General Discussion
The Clubhouse
Repair & Restoration
Technical & Reference
Major Builds & Projects
Racing and High Performance
Engine
Transmission and Driveline
Chassis, Tires/Wheels, Brakes, & Related
Body & Paint
Electrical
Interior and Trim
Other
Vehicle Lineup
Cutlass, 442, and Hurst/Olds
Large Oldsmobiles
Final Years Oldsmobiles
Vintage Oldsmobiles
Toronado
Other Oldsmobiles
Classifieds
Buyer & Seller Feedback
Oldsmobile Cars
Oldsmobile Parts
Non-Oldsmobile Classified
Miscellaneous Classifieds
Marketplace
Vendor Directory
Become a Vendor
New Posts
Tools
Car Payment Calculator
Tire Rim Calculator
Recalls
Technical Service Bulletins (TSBs)
Members List
Live Feed
Gallery
View Dark Mode
Please register or login to enable Dark Mode.
Log In
Register
Threads
Google
Threads
Posts
Advanced
Dark Mode
Please register or login to enable Dark Mode.
Log In
Forgot your Password?
By logging into your account, you agree to our
Terms of Use
and
Privacy Policy
, and to the use of cookies as described therein.
Recent
Commented
Albums
My Pictures
cfair's Photos
View Profile
Sort:
Commented
Most Recent
Most Comments
Albums
Photos
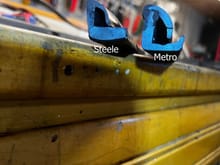
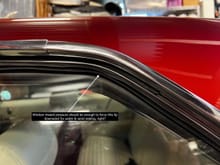
Some of the wind noise in convertibles can be attributed to where the top, vent window and windshield all come together. A good seal here should help quiet things down.
0
2023/06/17 11:04:15
cfair
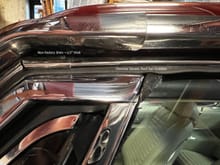
I'm hoping the thicker rubber casting of the Steele piece will create a better seal against my convertible windows.
0
2023/06/17 11:01:17
cfair
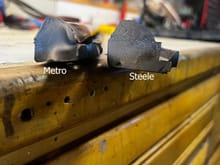
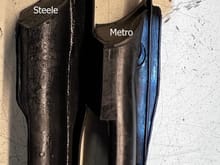
Steele piece has thicker rubber where the vent window meets the convertible top and interface is longer too.
0
2023/06/17 10:59:41
cfair
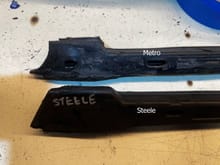
Steele part is thicker and slightly bigger, but a cruder casting. This is the front of the driver's side front window molding. Metro is a better looking part, but a bit smaller.
0
2023/06/17 10:57:11
cfair
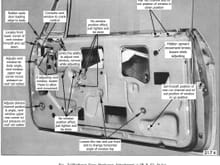
My descriptions on how each adjustor affects window positioning. Any errors here are my own.
0
2023/06/10 09:44:59
cfair
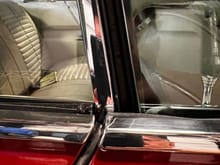
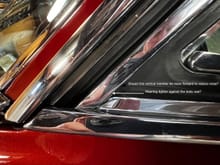
Should the front window trailing edge sit more or less flush against the rear window leading edge?
0
2023/06/03 21:26:32
cfair
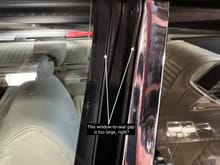
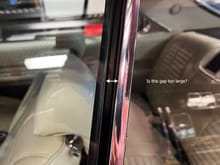
Should I adjust the windows to make this gap a lot smaller?
0
2023/06/03 21:24:46
cfair
Do additional seals reduce noise? These are oversize and there's one extra in search of minimum wind noise. Is it time to start fresh from factory?
0
2023/06/03 21:23:16
cfair
Start fresh from factory? Or do more seals usually help reduce noise?
0
2023/06/03 21:22:21
cfair
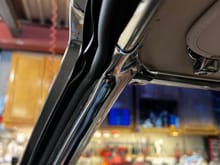
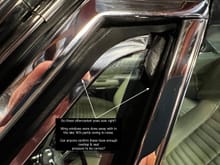
Nudge this forward 1/8" to tighten the door-to-A_Pillar seal? Or does this look right?
0
2023/06/03 21:19:20
cfair
Reproduction seals don't leak and don't seem to make noise. Are they right from what you can see here?
0
2023/06/03 21:16:22
cfair
Should I set the inward pressure of the window glass higher to keep out water & wind?
0
2023/06/03 21:12:37
cfair
Have I gone too far shimming this seal down?
0
2023/06/03 21:06:33
cfair
Should the driver's front window rear edge be close to flush against the leading edge seal of the rear window?
0
2023/06/03 21:01:55
cfair
Saving workbench space with magnets.
0
2022/07/14 09:29:57
cfair
Hang your tools with these super magnets, but they will happily pinch your fingers.
0
2022/07/14 09:28:41
cfair
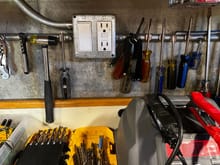
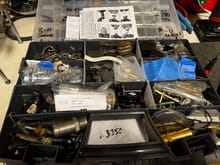
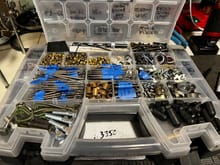
Bigger stuff on the bottom. 2ndary hangers in back left (A-M) and right (N-T); Acceleration pump stuff left middle, primary rods & power pistons on the right.
0
2022/07/14 09:20:58
cfair
Top level has tools in the back and little parts up front. Vacuum caps easy to find in the front right.
0
2022/07/14 09:19:01
cfair
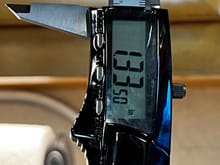
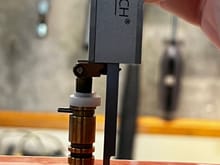
Height from bottom of 170 Series qjet power piston to top of rod hanging arms.
0
2022/07/14 09:08:21
cfair
Use the depth gauge feature on your caliper to measure the height of your qjet primary rod arms - get 'em equal for consistent side to side fuel metering.
0
2022/07/14 09:06:36
cfair
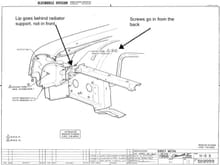
How to install your '66 big car inner fender trim correctly. It'll work both ways, so put the lip behind the radiator core and screw it in from the back.
0
2022/05/31 17:38:08
cfair
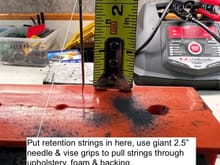
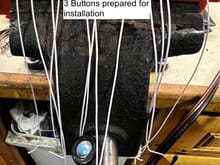
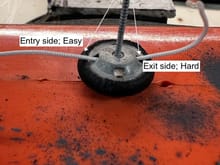
A very large needle is needed to pull all 4 strings through the upholstery, foam & backing. You might need vise-grips to pull the strings through.
0
2022/05/18 21:59:32
cfair
Tie your retention strings to consistent tension to hold the buttons consistently deep in your upholstery. Check your tension...
0
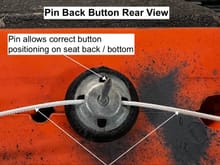
2022/05/18 21:53:47
cfair
Use the center pin to place the button correctly in your upholstery, looking at it from the front (aka visible) side. Use the strings to tie it in place if the pin isn't long enough.
0
2022/05/18 21:51:41
cfair
Cut your strings extra-long (16-20"). Mildly melting nylon cord allows you to route the string through pinback button holes.
0
2022/05/18 21:49:53
cfair
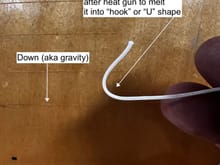
Use your heat gun to melt the nylon cord into a U shape so you can press it through PinBack button holes.
0
2022/05/18 21:47:09
cfair
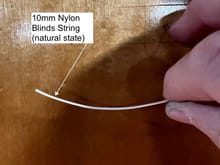
Nylon blinds string can hold your Olds seat buttons in place.
0
2022/05/18 21:44:04
cfair
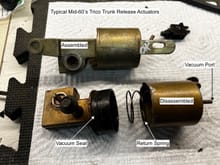
Here's what's inside your Trico vacuum trunk release.
0
2022/05/12 21:57:00
cfair
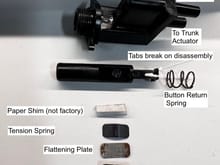
Trico vacuum trunk release sandwich with paper shim hack to increase vacuum seal tension against switch housing.
0
2022/05/12 21:37:16
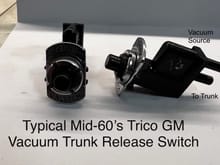
cfair
Typical Mid-60's Trico vacuum trunk release. Observe port assignments or be prepared for a vacuum hiss...
0
2022/05/12 21:19:52
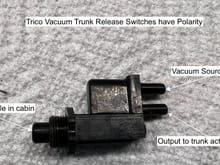
cfair
Left is what you see in the glove box of a Trico trunk release equipped '66 Big Olds. Right is a side view, so you can see the business end.
0
2022/05/12 21:17:29
cfair
Hacked Factory diagram for mid-60's Big Olds vacuum power door locks. This may help you install, repair or understand yours.
0
2022/05/10 16:08:32
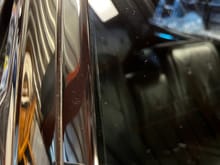
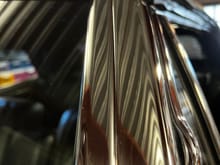
cfair
Lots of hours just to get a few shiny moldings in place. But fun.
0
2022/05/09 14:08:41
cfair
A few hours with the buffer & your stainless can look like a mirror.
0
2022/05/09 14:07:43
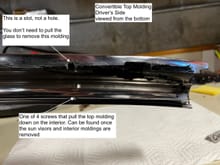
cfair
The 4 or 5 slots on the molding allow correct right-left adjustment. I didn't remove the locating screws. Luckily...
0
2022/05/09 13:36:53
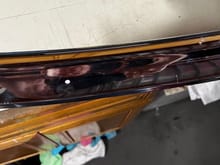
cfair
Convertible top molding. Passenger side on the left. Buffing this up makes them look almost new.
0
2022/05/09 13:31:08
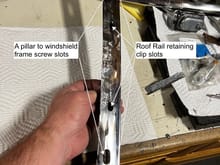
cfair
Screw slot locations, symmetric on each side of the car. This is the passenger side as viewed from the rear.
0
2022/05/09 13:24:14
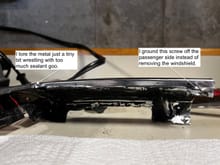
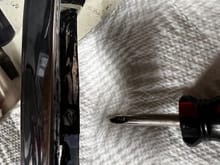
cfair
Passenger side A-pillar. Grind this screw off or remove the windshield to get at all of them.
0
2022/05/09 13:19:03
cfair
Once the reveal moldings are off, you'll see 3 screws securing the A-pillar molding to the windshield frame on the front.
0
2022/05/09 13:13:30
cfair
Windshield reveal moldings and pliers. These work, but be careful of scratching / chipping glass.
0
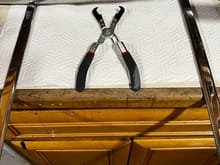
2022/05/09 13:12:14
cfair
First
Page
4 of 8
Last
Go To
Page
1
2
3
4
5
6
7
8
4 of 8
Go To
GO
Go to page
of 8
pages
1
2
3
4
5
6
7
8