200-4R tips / tricks $$ saved on tools I learned
 March 1st, 2011, 04:08 PM
#1
Registered User
Thread Starter

Join Date: May 2009
Location: USA
Posts: 2,200
200-4R tips / tricks $$ saved on tools I learned
Just going to share all the stuff I learned to save people lots of money on those specialty tools Kent Moore and everyone else tries to sell you for $100 a pop. Here's a list of all the tools they try to sell you. What I didn't learn on my own, I learned from Jakeshoe aka ObiWan of transmissions, and Chris from CK Performance , the best of the best.
I'm going to update this as I progress.
Oil Pump Removal Tool $80 Not needed
Just put a long flat head behind the pump and push in key areas that don't hit the valve body veins.

Clutch Spring Compressor KD Tools 2398 = $103-$130 Not needed
2nd person needed instead with 2 hammer handles pressed down on the springs.
Remove snap rings once pressure is applied. Takes 10 seconds.

Low / Reverse Input Drum Tool $90+
Not needed (Yet ) I removed mine by laying 2x4's into a base, and covering
with thick shop rags, and banging trans on it's bell housing til it came out. Took 2 drops for me.
Reinstall using a 4" in diameter PVC pipe, and 2x4 to push it back in evenly. Same for center support.

lip seal tool = ~$20
Can be made out of brake line crimped down on a piece of piano wire for <$1.

Pump Alignment Tool ~$30-90+ Not needed
Join 2 six inch hose clamps for $4 , cake.

Output Shaft Fixture Tool $60+ Not needed (Advised by Jake, but not applied yet)
Use a spare yoke, and once lined up with parking pawl, you wire it up with coat hangers.
I'm going to update this as I progress.
Oil Pump Removal Tool $80 Not needed
Just put a long flat head behind the pump and push in key areas that don't hit the valve body veins.
Clutch Spring Compressor KD Tools 2398 = $103-$130 Not needed
2nd person needed instead with 2 hammer handles pressed down on the springs.
Remove snap rings once pressure is applied. Takes 10 seconds.
Low / Reverse Input Drum Tool $90+
Not needed (Yet
) I removed mine by laying 2x4's into a base, and coveringwith thick shop rags, and banging trans on it's bell housing til it came out. Took 2 drops for me.
Reinstall using a 4" in diameter PVC pipe, and 2x4 to push it back in evenly. Same for center support.
lip seal tool = ~$20
Can be made out of brake line crimped down on a piece of piano wire for <$1.
Pump Alignment Tool ~$30-90+ Not needed
Join 2 six inch hose clamps for $4 , cake.
Output Shaft Fixture Tool $60+ Not needed (Advised by Jake, but not applied yet)
Use a spare yoke, and once lined up with parking pawl, you wire it up with coat hangers.
Last edited by Aceshigh; March 1st, 2011 at 07:56 PM.
 March 6th, 2011, 06:48 AM
#2
Registered User
Thread Starter
Join Date: May 2009
Location: USA
Posts: 2,200
More 200-4R info
There's more cars that had the trans, like the
Turbo Regals, Grand Nationals, Caprices, Cadillacs, and Turbo Trans Ams.
wheretofinda200r4.jpg
They can be found in Three style of bellhousing configurations.
The "BOP" (Buick-Olds-Pontiac) Bolt Pattern. The depressed flat at the top is it's most noteable feature.
Transmissions with this bolt pattern will mate to most Buick, Cadillac, Oldsmobile and Pontiac engines
BOP.gif
The third common bolt pattern is what is often refered to as the "Dual" Pattern bolt pattern.
Or sometimes called the "Universal" pattern. Transmissions with this pattern will bolt up to
engines with either of the two patterns above eliminating the need to use an adaptor plate.
The lower two bolts and the locating dowels are in the same locations for both the "Chevy" and
the "BOP" bolt patterns. The locations of the upper four bolts is different. The "Dual" takes
advantage of this and provides for mating to either pattern.
Dual_BP.gif
the "Chevy" Bolt Pattern. The high center peak at the top is it's most noteable feature.
Transmissions with this bolt pattern will mate to most Chevy engines
Chevy_BP1.gif
Last edited by Aceshigh; March 6th, 2011 at 06:51 AM.
March 6th, 2011, 07:24 AM
#3
Registered User
Join Date: Mar 2010
Location: Moreno Valley, CA
Posts: 824
This post is great!!!!!!!!!!! I am planning to convert my 1970 350 vista cruiser and have never installed an automatic in an olds. I have always had 4 speed cars. So now I know what to look for. I am guessing that a slightly modified 350 will not overpower a stock th200. It has headers, single plain aluminum intake, cam and ram air but not more than a few dozen horsepower over stock. If you can do a little what parts I will need to install it too, that will help. Linkages, driveshaft,,,thanks for helping Lee
1970 442 4 speed
1971 442 4 speed
1970 vista automatic conversion candidate
1970 442 4 speed
1971 442 4 speed
1970 vista automatic conversion candidate
Last edited by leepear; March 6th, 2011 at 08:46 AM. Reason: add
March 6th, 2011, 08:39 AM
#4
Registered User
Join Date: Nov 2009
Location: South Portland Maine
Posts: 362
"This post is great!!!!!!!!!!!" x2!
I know you are posting as you learn, and I reallllyyyyy apreciate the first hand reporting. Could you let us know any info on stock 200 4r tolerences in relation to max hp/tq #s they can live comfortably with would be helpful. I know there are folks building these to very high tolerances, but does the averge ~250-350 hp driver need to upgraded, and if so, what are the most vulnerable parts?
On a completely unrelated side note, I had always thought your screen name was a reference to card playing, but thought rather randomly the other day it could be a reference to the Iron Maiden song of the same name. May I ask which it is?
March 6th, 2011, 12:22 PM
#5
Registered User
Thread Starter
Join Date: May 2009
Location: USA
Posts: 2,200
For questions related to what modifications would be necessary to sustain itself behind certain HP applications,
Those are better left to the experts who build performance transmissions day to day.
You can try Bowtie Overdrives, CK performance, Monster Transmission, Art Carr Performance, etc
If you want a forum where guys REALLY know this transmission well, join www.TurboBuick.com
This trans is their bread and butter there. LOTS of builders sponsor that site.
David Husek is also offering me tech support and parts as well.


Top Gun motivated me to join the US Navy to become a fighter pilot.
I couldn't get medically cleared to fly due to having very bad astigmatism......so I went Intel instead.
ACE was my call sign. It's the middle of my name. StACEy.
Plus I'm a huge Iron Maiden fan and 80's metal head.
Those are better left to the experts who build performance transmissions day to day.
You can try Bowtie Overdrives, CK performance, Monster Transmission, Art Carr Performance, etc
If you want a forum where guys REALLY know this transmission well, join www.TurboBuick.com
This trans is their bread and butter there. LOTS of builders sponsor that site.
David Husek is also offering me tech support and parts as well.
Top Gun motivated me to join the US Navy to become a fighter pilot.
I couldn't get medically cleared to fly due to having very bad astigmatism......so I went Intel instead.
ACE was my call sign. It's the middle of my name. StACEy.
Plus I'm a huge Iron Maiden fan and 80's metal head.
Last edited by Aceshigh; March 6th, 2011 at 01:27 PM.
March 6th, 2011, 03:39 PM
#6
Registered User
Join Date: Nov 2009
Location: South Portland Maine
Posts: 362
Sweet! Thanks for the info and links, and and for indulging my curiosity
As it turns out, I should not have been so shallow. That's very cool. I know a couple Navy Pilots, and have a good friend who spent 10 years in Navy intell. When he returned to civillian life I had a had a half hour coversation with him where every response he gave was "I can't tell you, it's classified".
As it turns out, I should not have been so shallow. That's very cool. I know a couple Navy Pilots, and have a good friend who spent 10 years in Navy intell. When he returned to civillian life I had a had a half hour coversation with him where every response he gave was "I can't tell you, it's classified".
March 11th, 2011, 05:53 AM
#7
Registered User
Thread Starter
Join Date: May 2009
Location: USA
Posts: 2,200
Another tip I was told.
Governor's between the GN's and rest of the 200-4R's were different and help control shift points.
If you'll look, you'll see the GN Governors have smaller weight on them and they shift at higher RPM's.
So to modify your regular 200-4R governor, you drill a larger hole into the big weight.
I was told 7/16" which is pretty big, but it removes weight.
April 6th, 2011, 04:36 PM
#8
Registered User
Thread Starter
Join Date: May 2009
Location: USA
Posts: 2,200
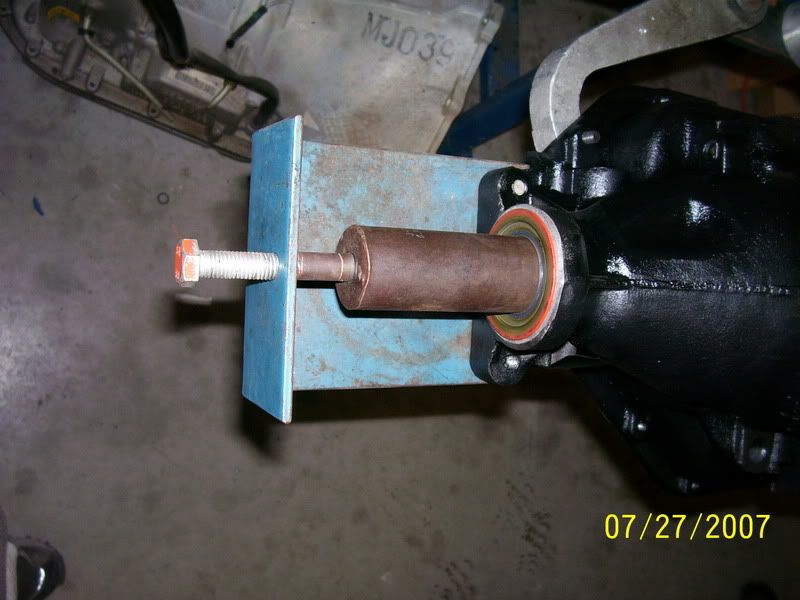
 Dig it.
 My buddy Scotty (Protour73) and I made these 2x4 home made car stands that Detroit Speed Engineering IIRC posted the specs for.

It was perfect for a transmission rebuild stand. Just had to knock in
a block through the bottom to lift the yoke up to push the rear input shaft up to meet
the parking pawl up to the low/reverse drum cogs. $6 to make the stand. WOOT.
TransMountforRebuild640x480.jpg
May 22nd, 2011, 11:31 PM
#9
Registered User

Join Date: May 2011
Location: Portland, Oregon
Posts: 48
Besides those great car stands, protour has a very nice looking ride.
I tried to locate the dims for them but was not successful.
Do you still have them?
That is a good idea that I am surely interested in.
BTW, I have seen your posts all over the place, herein and other sites.
Your suggestions and help well respected by me (and others, I'm sure).
You make a good mentor.
Have you seen any of the project by Chief Warrant Officer, ah64pilot?
I think that you would appreciate his work.
May 23rd, 2011, 07:50 PM
#10
Registered User
Thread Starter
Join Date: May 2009
Location: USA
Posts: 2,200
Yes he does, and he really put ALOT of $$ and attention to detail into his car.
Nicest classic I've seen owned by someone IMO. We're both in the Chicago
suburbs and we trade tips often for modding. I learn more from him then he
does from me though.
He just did custom door panels I'm going to check out this coming weekend.
http://www.nastyz28.com/forum/showthread.php?t=214990
Gary's 68 is a member here and on Pro-touring.com who also did custom door panels
for his Oldsmobile. You gotta check those out because he did some good work on them.
https://classicoldsmobile.com/forums...442-clone.html
I'm not sure what "Dims" you're asking about buddy.
Elaborate so I can assist.
Thanks, and I do appreciate that. 
I try to share the wealth of information I've learned from others and my experiences.
Negative, but I will go check his profile out now.
This guy right ??
https://classicoldsmobile.com/forums...ah64pilot.html
BTW I got the friend request thing on this site, and I didn't even know
it had that feature. It wasn't working when I tried to accept it.
Just letting you know that I didn't snub ya.
Nicest classic I've seen owned by someone IMO. We're both in the Chicago
suburbs and we trade tips often for modding. I learn more from him then he
does from me though.
He just did custom door panels I'm going to check out this coming weekend.
http://www.nastyz28.com/forum/showthread.php?t=214990
Gary's 68 is a member here and on Pro-touring.com who also did custom door panels
for his Oldsmobile. You gotta check those out because he did some good work on them.
https://classicoldsmobile.com/forums...442-clone.html
I tried to locate the dims for them but was not successful.
Do you still have them?
That is a good idea that I am surely interested in.
Do you still have them?
That is a good idea that I am surely interested in.
Elaborate so I can assist.
BTW, I have seen your posts all over the place, herein and other sites.
Your suggestions and help well respected by me (and others, I'm sure).
You make a good mentor.
Your suggestions and help well respected by me (and others, I'm sure).
You make a good mentor.
I try to share the wealth of information I've learned from others and my experiences.
Have you seen any of the project by Chief Warrant Officer, ah64pilot?
I think that you would appreciate his work.
I think that you would appreciate his work.
This guy right ??
https://classicoldsmobile.com/forums...ah64pilot.html
BTW I got the friend request thing on this site, and I didn't even know
it had that feature. It wasn't working when I tried to accept it.
Just letting you know that I didn't snub ya.
Last edited by Aceshigh; May 23rd, 2011 at 07:52 PM.
May 25th, 2011, 11:24 AM
#11
Registered User
Join Date: May 2011
Location: Portland, Oregon
Posts: 48
A better World from the past
Sorry, the dims (dimensions) I wanted were for the car stands (2 x 4 wood), but I redesigned it and will post it later when completed.
Yes, that’s him.
Check his work at https://classicoldsmobile.com/forums...tml#post282699
I’m in the process of re-working my 200-r4 (and a 1500 rpm stall), between the rain and the rest of my family on a small vacation.
I want to closer to the power range, but also a controllable and milder startup for city drive. Any thoughts on this?
Next, I plan to install 3.42 rear gears, and hopefully a possi.
What are your thoughts on the available possi units?
I share mine later when I have more time.
Last edited by JamesPDX; May 25th, 2011 at 11:31 AM.
May 26th, 2011, 12:51 AM
#12
Registered User
Thread Starter
Join Date: May 2009
Location: USA
Posts: 2,200
I think mine are 12" x 14".
You can see what various guys did with their DSE wooden stands.
http://www.pro-touring.com/showthrea...721-Dse-Stands
http://www.lateral-g.net/forums/showthread.php4?t=15723
I’m in the process of re-working my 200-r4 (and a 1500 rpm stall), between the rain and the rest of my family on a small vacation.
I want to closer to the power range, but also a controllable and milder startup for city drive. Any thoughts on this?
I want to closer to the power range, but also a controllable and milder startup for city drive. Any thoughts on this?
I don't know the powerband of your cars engine to recommend a RPM range for your torque converter.
Next, I plan to install 3.42 rear gears, and hopefully a possi.
What are your thoughts on the available possi units?
I share mine later when I have more time.
What are your thoughts on the available possi units?
I share mine later when I have more time.
They're able to be rebuilt.
May 26th, 2011, 03:32 PM
#13
Registered User
Join Date: May 2011
Location: Portland, Oregon
Posts: 48
AcesHigh –
Thanks for your info.
I have not determined the final dims for the car stand yet, although here are requirements for my system with the locations (tires) in mind. The lateral dims are dependent upon the rage of tire sizes that one would need to work with. Your design of 12” x 14” has 2 close ranges available. I think that is good.
The vertical dim must be versatile enough to allow for height variations. This I see as being in stacked modular increments. The entire system must be easy to use, stable, and reliably safe.
You answered my Q with a recommended product line for the positraction. Thanks. I too want to be able to rework it periodically rather than purchase a new unit (cost). The lockups are not a good idea for my application. The power range that I was referring to is usable start-up torque rather than the high end max area of the curve. Therefore, ~1500 rpm should be good for easy and controlled city traffic starts as well as the beginning of a power surge off the line. This vehicle (my ’87 Caddy) is not designed or being used for racing but would gain a slight edge for street use without sacrificing the main purpose of reliability and economy (as best I can manage) over the long term. Hence also, the TH200-r4 rework, rear gears, and limited slip unit.
The power, cooling control, and reliability components used in my engine include a 403 with .040 over => 410.8, 60-80 psi high flow oil-pump and bolt-on pickup (cooling), clean 350 heads with stock valves ($), Edelbrock 1411 750 cfm carburetor, Edelbrock 3711 intake manifold (flow) with cross-over plate (heat), Cloye s street billet true roller speed set (friction), Engle JM-16-18 cam (torque) and high rev hydraulic lifters, Mondello 1:6 roller rocker arm set (friction), Mondello .040 orifice restricted oil flow push rods (cooling), high volume aluminum water pump with reversion vein plate (cooling), relocated oil filter and cooler (up front), my design for EGR system (lower combustion temp a/r leading to very low NOx emissions), ’72 GM HEI distributor (non-ECU), my design for front pulley setup (increased surface area for better friction), my design for AIR system (very low CO, and HC emissions), my design for increased oil capacity (cooling), and I piped everything with AN fittings and great lines. There is plenty of torque and power as is.
My th200-r4 has HD bands (metal belts), a shift kit, a 1500 rpm stall converter, a relocated fluid filter and cooler (up front) with added capacity (filtering and cooling). I piped everything with AN fittings and great lines. A few months back, the fluid leaked out before I noticed it on the freeway. It over heated and took 80% of the 3rd & 4th bands. Fortunately, that was all. I refilling it and babied the unit until this week when I could swing for the work. Today, I walk over 40 blocks with the unit on a cart, to the shop for the rework of bands and to inspect anything internally. It took 2 days to pull it out, in-the-driveway, between rains, and other things that I needed to do. This was my 1st attempt at pulling the transmission. I learned a lot from this ordeal.
I now have everything monitored via AutoMeter stuff.
A drain plug is also a good idea on the tranny pan.
Last edited by JamesPDX; May 27th, 2011 at 08:40 AM.

Thread
Thread Starter
Forum
Replies
Last Post


