Pulling the motor
 June 24th, 2014, 12:20 PM
#1441
Registered User
Thread Starter
Join Date: Aug 2013
Location: Central Illinois
Posts: 3,900
Sorry Cutty, I guess I didn't see the second half of your post. The tray came from thepartsplaceinc.com and is supposed to be an exact replica. I can't know for sure because mine was in rusty tatters. The new one looks good though and just bolts into place...if you can get the original bolts out. I actually had to grind the heads off and then drill them out.
 June 24th, 2014, 12:29 PM
#1442
Hookers under Hood
Join Date: Nov 2013
Location: Ontario, Canada
Posts: 3,543
I think it will be money well spent having the shop fab up two front pipes, and get rid of those reducers, I had the shop here weld in box hangers and weld small rods to the pipe as well so that I had no universal hangers hanging down with clamps, makes it nice and tight.
Hopefully they will give you a couple options and prices.
Hopefully they will give you a couple options and prices.
 June 24th, 2014, 09:47 PM
#1445
Registered User
Thread Starter
Join Date: Aug 2013
Location: Central Illinois
Posts: 3,900
Irony, I'm all about irony. I paid like $180 for that entire exhaust system. It'll probably cost more than that for the down-pipes. Still, I was getting quotes of $700 and $800 dollars for an installed system, plus towing. And there's the bragging rights. But to be fair, it was pretty easy to install, the down-pipe snafu notwithstanding. The stock hangers were included, the holes were already in the frame (although some needed enlarging), and other the having to de-bur all the pipes, it was well made.
Glad you like the Cragars Justin. I was worried after I ordered them but nope, they're exactly what I wanted
Glad you like the Cragars Justin. I was worried after I ordered them but nope, they're exactly what I wanted
June 24th, 2014, 09:52 PM
#1446
Registered User
Thread Starter
Join Date: Aug 2013
Location: Central Illinois
Posts: 3,900
True enough...true enough. I'm hoping they cut me some slack though. The pipes they bent didn't even come close to my mock-ups. Well, they were close, but way too long and I had to use strips of sheet metal because they swaged the ends too wide.
 June 25th, 2014, 10:39 AM
#1449
Registered User
Thread Starter
Join Date: Aug 2013
Location: Central Illinois
Posts: 3,900
Yes, the quiet was a bad sign 
We have a no-go condition for 1st start. After filling it with water and a little antifreeze I heard a funny noise. Check out this freeze plug.
[IMG]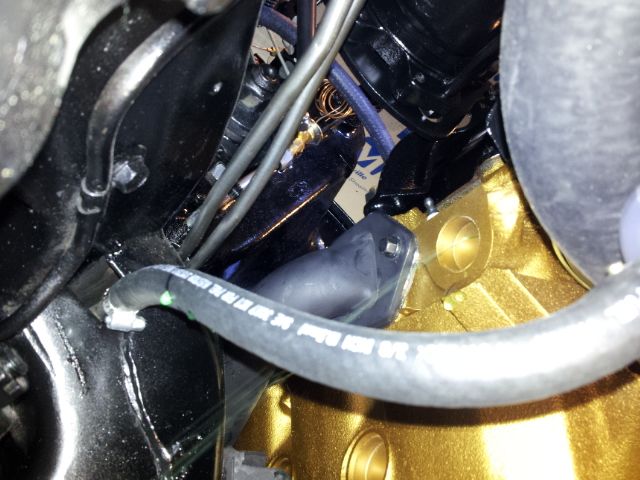 [/IMG]
See the greenish stream? Maybe this happened during the engine install but I don't see how.
What is my fault is this leak at the water pump.
[IMG]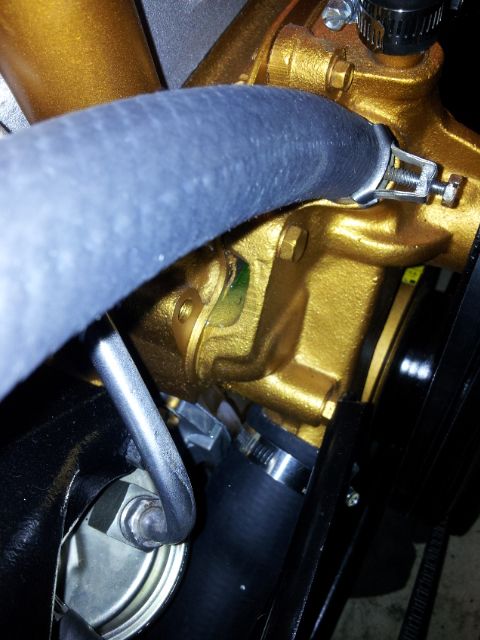 [/IMG]
I thought I did a good job sealing it up. I didn't glob the silicone on there but it was enough to squeeze out.
[IMG] [/IMG]
Not the best day but I'll bounce back. I found adjustable freeze plugs at Napa and that seems do-able. Not relishing the thought of taking off the water pump though.
We have a no-go condition for 1st start. After filling it with water and a little antifreeze I heard a funny noise. Check out this freeze plug.
[IMG]
 [/IMG]
See the greenish stream? Maybe this happened during the engine install but I don't see how.
What is my fault is this leak at the water pump.
[IMG]
 [/IMG]
I thought I did a good job sealing it up. I didn't glob the silicone on there but it was enough to squeeze out.
[IMG]
 [/IMG]
Not the best day but I'll bounce back. I found adjustable freeze plugs at Napa and that seems do-able. Not relishing the thought of taking off the water pump though.
June 25th, 2014, 10:54 AM
#1451
Registered User
Join Date: Apr 2012
Location: New Mexico
Posts: 2,972
IF you can get at it, poke a bigger hole in it with a punch, then use a screwdriver or some such to pry it out. Looking at your pic, you could probably pound a new metal one back in the hole, then paint it? If not, the rubber one should go right in and enlarge to seal the hole as you tighten the nut.
I use the black stuff on the water pump and neck.
Just put plain water in to start with, easier to clean up and cheaper if you have to drain it.............
I use the black stuff on the water pump and neck.
Just put plain water in to start with, easier to clean up and cheaper if you have to drain it.............
June 25th, 2014, 11:23 AM
#1452
Registered User
Thread Starter
Join Date: Aug 2013
Location: Central Illinois
Posts: 3,900
IF you can get at it, poke a bigger hole in it with a punch, then use a screwdriver or some such to pry it out. Looking at your pic, you could probably pound a new metal one back in the hole, then paint it? If not, the rubber one should go right in and enlarge to seal the hole as you tighten the nut.
I use the black stuff on the water pump and neck.
Just put plain water in to start with, easier to clean up and cheaper if you have to drain it.............
I use the black stuff on the water pump and neck.
Just put plain water in to start with, easier to clean up and cheaper if you have to drain it.............
The adjustable plug won't look as good, true, but I don't have room to properly pound in a new one, I don't think. Cheap enough to try I guess. Silicone on the metal plug?
I can't remember if I used the black silicone or gray. Either way, I'm using more this time.
June 25th, 2014, 11:58 AM
#1454
Registered User
Thread Starter
Join Date: Aug 2013
Location: Central Illinois
Posts: 3,900
But thanks for the kick in the pants
 June 25th, 2014, 12:24 PM
#1455
Registered User
Join Date: Jul 2013
Location: Mo-Ray-Al, K-Bec.
Posts: 1,815
You can always do what I do ... give it to the kids to solve. They don't often get the job done, but I'm always impressed at some of the methods they attempt.
Seeing that stream of **** ... that had to be heartbreaking.
Seeing that stream of **** ... that had to be heartbreaking.
June 25th, 2014, 02:50 PM
#1456
Registered User
Thread Starter
Join Date: Aug 2013
Location: Central Illinois
Posts: 3,900
It's being stubborn but I'll get it eventually. The fam is going out of town tomorrow so I'll have a few days to swear and throw tools
June 25th, 2014, 03:22 PM
#1457
Registered User
Join Date: Jul 2010
Location: Toytown, MA
Posts: 1,896
Getting the plug out is pretty easy, poke a hole in it and lever it out. Snap-on and others make a tool for installing a plug on an engine in the car. It has like a round disc to fit the plug, and a long handle at an angle to beat it back in. You can probably find a pic on the Snap-on website if they still make it. Could whip one up if you are handy. It almost looks like your plug is in too far. A tool like this...
Last edited by mrolds69; June 25th, 2014 at 03:30 PM.
June 25th, 2014, 06:59 PM
#1458
Registered User
Thread Starter
Join Date: Aug 2013
Location: Central Illinois
Posts: 3,900
Getting the plug out is pretty easy, poke a hole in it and lever it out. Snap-on and others make a tool for installing a plug on an engine in the car. It has like a round disc to fit the plug, and a long handle at an angle to beat it back in. You can probably find a pic on the Snap-on website if they still make it. Could whip one up if you are handy. It almost looks like your plug is in too far. A tool like this...Amazon.com: OTC 4603 Frost Plug Remover and Installer Set: Automotive
Tomorrow I start removing accessories and getting to that water pump. But before I do, I had another look at my water pump install pictures and I don't see how it could have leaked. I'll look around and make sure it didn't come from somewheres else, first.
Last edited by Macadoo; June 25th, 2014 at 07:01 PM.
June 26th, 2014, 01:15 PM
#1459
Registered User
Thread Starter
Join Date: Aug 2013
Location: Central Illinois
Posts: 3,900
Update: I got the new core plug in, I used one of the rubber deals because I was ready for a little "easy".
I pulled off the water pump and something seems very odd to me. I have the old install pic and I remember coating one side of the gasket with rtv, applying it to the front cover, and covering the other side of the gasket with rtv.
[IMG]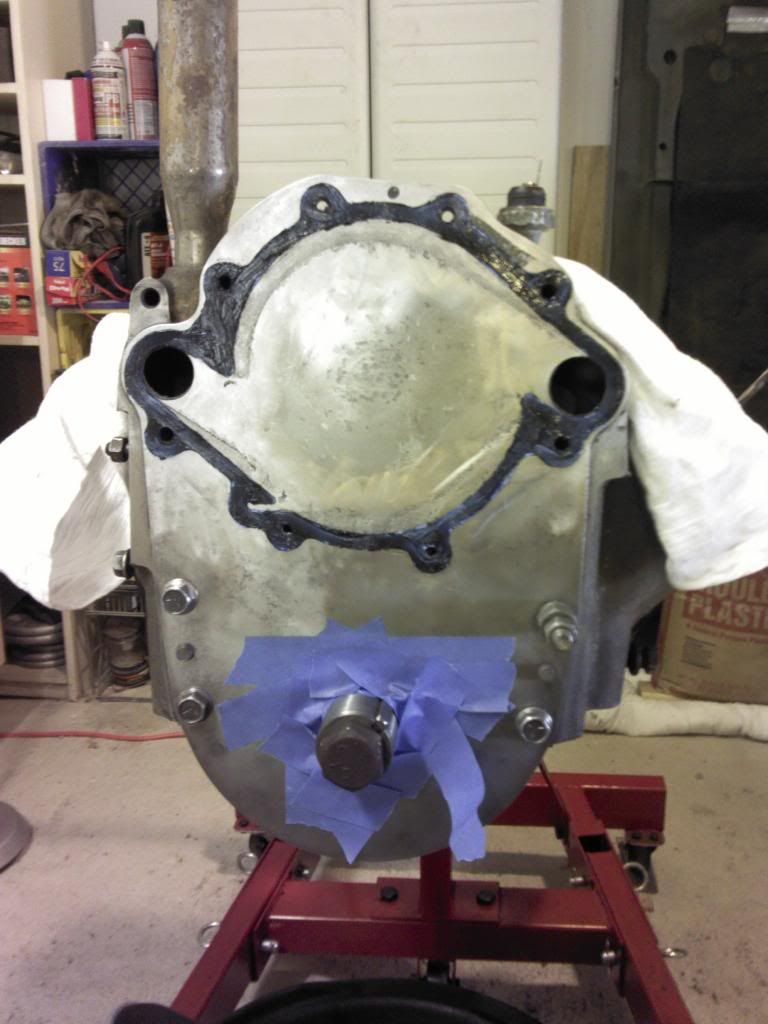 [/IMG]
But the pump pulled off wayyy too easy...and the gasket was still blue...and wet. And there was hardly any rtv to be seen. This is a pic of the pump before I cleaned it (I think I pulled off one small string of rtv before the pic).
[IMG]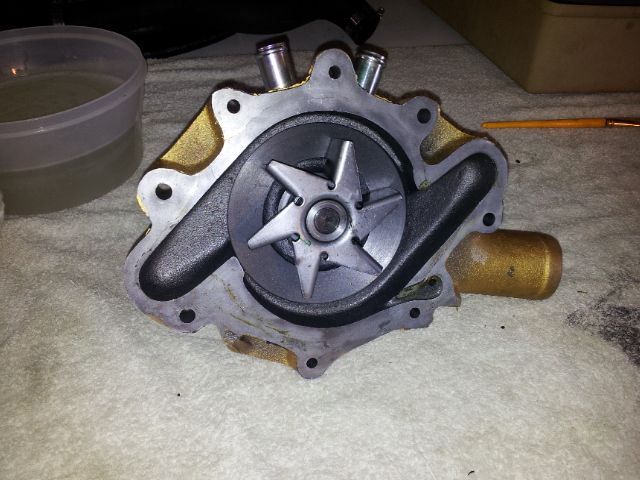 [/IMG]
The front cover was fairly clean as well and needed very little scraping. The gasket pulled off in about three pieces and left a few small strings of rtv but that's it. Very strange.
However, that not withstanding, you can see in this pic why the pump was leaking. If the paint pattern is correct (I painted the block after installing the pump) then the gasket didn't match the sealing surface of the pump. And that's odd as well as I remember checking. I had three different gaskets and I matched up what I thought was the best one. Guess I was wrong.
[IMG]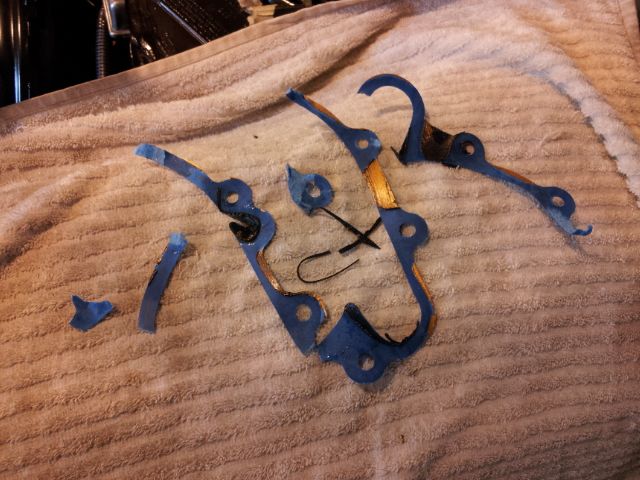 [/IMG]
Anyway, just some interesting notes. I have a new tube of black rtv but I have to wait until tomorrow for the gasket(s) to come in to my local Napa. Then I'll get 'er back together.
I pulled off the water pump and something seems very odd to me. I have the old install pic and I remember coating one side of the gasket with rtv, applying it to the front cover, and covering the other side of the gasket with rtv.
[IMG]
 [/IMG]
But the pump pulled off wayyy too easy...and the gasket was still blue...and wet. And there was hardly any rtv to be seen. This is a pic of the pump before I cleaned it (I think I pulled off one small string of rtv before the pic).
[IMG]
 [/IMG]
The front cover was fairly clean as well and needed very little scraping. The gasket pulled off in about three pieces and left a few small strings of rtv but that's it. Very strange.
However, that not withstanding, you can see in this pic why the pump was leaking. If the paint pattern is correct (I painted the block after installing the pump) then the gasket didn't match the sealing surface of the pump. And that's odd as well as I remember checking. I had three different gaskets and I matched up what I thought was the best one. Guess I was wrong.
[IMG]
 [/IMG]
Anyway, just some interesting notes. I have a new tube of black rtv but I have to wait until tomorrow for the gasket(s) to come in to my local Napa. Then I'll get 'er back together.
June 26th, 2014, 04:22 PM
#1461
Mac, I gotta wonder about the working time of the RTV before it was bolted together. Usually using this stuff on both sides of the gasket is a bear to clean up. Or could there have been a preservative on the pump to keep it from rusting that also kept the RTV from sticking? Others with more knowledge may be able to help more. Anyway I have been there done that. We all go through this stuff
June 26th, 2014, 05:03 PM
#1463
Hookers under Hood
Join Date: Nov 2013
Location: Ontario, Canada
Posts: 3,543
I normally just use rtv on the water pump then fix the gasket to the pump, then a very thin layer just around where the bolts go on the cover, as well as the thermostat housing. The rubber bung you bought should work well if it has the wing-nut to tighten up in the hole. Tryin to put it out their as clean as I can ya know guys!!. Ya so once you get that rubber in the hole dry giv-er a good few twists it will expand out nicely. then It can get as wet as it wants no leaks their.
I'm feelin your pain on this deal, hope you have better luck on the second round fire up.
I'm feelin your pain on this deal, hope you have better luck on the second round fire up.
June 26th, 2014, 05:35 PM
#1464
Registered User
Thread Starter
Join Date: Aug 2013
Location: Central Illinois
Posts: 3,900
Mac, I gotta wonder about the working time of the RTV before it was bolted together. Usually using this stuff on both sides of the gasket is a bear to clean up. Or could there have been a preservative on the pump to keep it from rusting that also kept the RTV from sticking? Others with more knowledge may be able to help more. Anyway I have been there done that. We all go through this stuff
Mystery solved!
I normally just use rtv on the water pump then fix the gasket to the pump, then a very thin layer just around where the bolts go on the cover, as well as the thermostat housing. The rubber bung you bought should work well if it has the wing-nut to tighten up in the hole. Tryin to put it out their as clean as I can ya know guys!!. Ya so once you get that rubber in the hole dry giv-er a good few twists it will expand out nicely. then It can get as wet as it wants no leaks their.
I'm feelin your pain on this deal, hope you have better luck on the second round fire up.
I'm feelin your pain on this deal, hope you have better luck on the second round fire up.
June 26th, 2014, 08:06 PM
#1466
Registered User
Thread Starter
Join Date: Aug 2013
Location: Central Illinois
Posts: 3,900
It threw me for about an hour but I'm in a good place now. Hey, after I re-install the pump, how long should I wait to start it? Hours or overnight? I'm not in a hurry, just, you know....
June 26th, 2014, 08:13 PM
#1467
Justin
Join Date: Mar 2012
Location: utah
Posts: 3,448
No Justin, I was preparing for the big 1st start. I was filling the radiator when I felt my toes get wet
It threw me for about an hour but I'm in a good place now. Hey, after I re-install the pump, how long should I wait to start it? Hours or overnight? I'm not in a hurry, just, you know....
It threw me for about an hour but I'm in a good place now. Hey, after I re-install the pump, how long should I wait to start it? Hours or overnight? I'm not in a hurry, just, you know....
Pump / over night is good but to be honest, I have started them up after install and been fine.
I did my 72 cutlass in auto zones parking lot in 2003
June 26th, 2014, 08:52 PM
#1468
Registered User
Thread Starter
Join Date: Aug 2013
Location: Central Illinois
Posts: 3,900
I'll give it a few hours at least, if not overnight to be safe.
June 26th, 2014, 09:04 PM
#1469
Justin
Join Date: Mar 2012
Location: utah
Posts: 3,448
Yes, in there parking lot I had to leave my ID to use there little tool bag of the worst tools ever to do the job.
June 27th, 2014, 07:10 PM
#1471
Registered User
Thread Starter
Join Date: Aug 2013
Location: Central Illinois
Posts: 3,900
Okay, I pulled the water pump and replaced the gasket. I definitely used the wrong gasket last time. I also pulled the bypass neck and replaced that gasket just for good measure. I used more silicone this time which took about an hour and thirty-some DRY q-tips to clean up the excess.
Then it was paint time....
[IMG]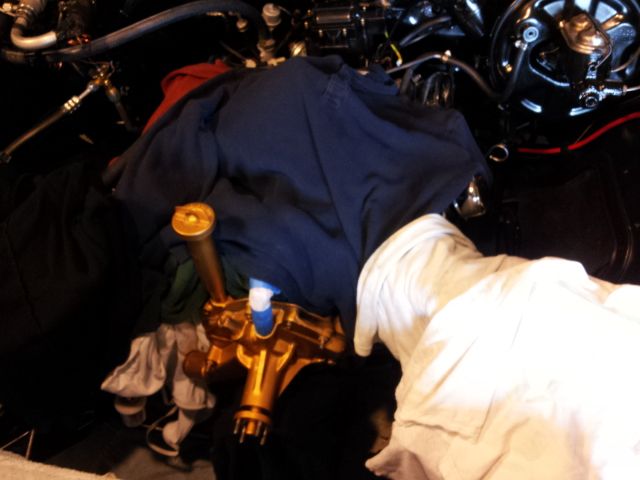 [/IMG]
It's all back together now and I'm hoping for a first start tomorrow...
[IMG]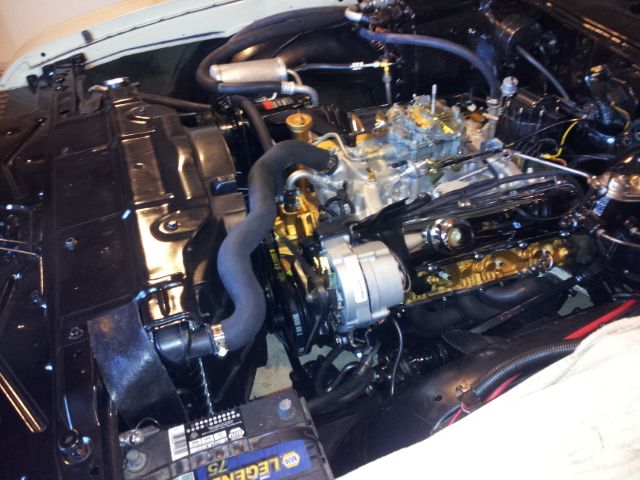 [/IMG]
...but I've learned not to make any promises")
Then it was paint time....
[IMG]
 [/IMG]
It's all back together now and I'm hoping for a first start tomorrow...
[IMG]
 [/IMG]
...but I've learned not to make any promises
June 28th, 2014, 03:36 PM
#1474
Registered User
Thread Starter
Join Date: Aug 2013
Location: Central Illinois
Posts: 3,900
It's alive! It'e alive!!!
Lol, sorry, cliche I know but I couldn't resist, and I boogered the title anyway, lol. Admin?
It wouldn't start at first so I was thinking I had the #1 on exhaust maybe? But Randy and [other]Eric set me straight. I tried advancing it a little more, then retarding it a little and she fired right up. Ran up front and cranked up the idle to about 2300 and let it rip, lowering and raising the idle a little now and then. Tons of smoke out the tail pipe (Eric-chanic suggested adding oil to the cylinders), and even more from the engine bay (stove black paint on the headers), puking water until the air pockets relieved themselves, and I tried adding trans fluid with a strong breeze blowing in the window (I needed to clean my windshield anyway), had all the doors and windows open but I still choked on fumes but it's running!
Now, it's time to tune. And I think i may have fried my trans. I got to the fluid as soon as I could but it takes a second to kick into drive and reverse. And starting from a standstill it feels like parking brake is dragging...or maybe the regular brakes....but it's running! And I want an R4 anyway.
June 28th, 2014, 04:18 PM
#1477
Administrator
Join Date: Oct 2009
Location: Poteau, Ok
Posts: 40,793
Wtg, high five, congrats, ok enough of that. Wheels and tires look great! Check your trans level as stated previously, get it tuned, straighten out your tailpipes, check your brakes, and go for a ride.
June 28th, 2014, 05:22 PM
#1480
Registered User
Thread Starter
Join Date: Aug 2013
Location: Central Illinois
Posts: 3,900
Thanks Justin!
Or 4.11s? Lol, 4 speed trans first. Thanks dude.
Thanks Eric. I went for a couple of short rides but the downpipes are scraping on the road if I hit a small bump. The next ride will be to the muffler shop.
ROTFL! Thanks Randy.
A pat on the back and a good night's sleep. It's been a while. Thanks for the thumbs-up Pogo.
Thanks for all the help everyone! I'm sure I'll have a lot of questions about tuning.
Thanks for all the help everyone! I'm sure I'll have a lot of questions about tuning.


