
Pulling the motor

Thread Starter
Registered User
Joined: Aug 2013
Posts: 3,900
From: Central Illinois
I had a hard time getting all the debris out of my oil pump screen so I spent the $12 and got a new one. I had a heck of a time hammering this in. Does it look like I got the angle right?
[IMG] [/IMG]
[IMG] [/IMG]
[IMG]
 [/IMG]
[IMG]
 [/IMG]
Connoisseur d'Junque
Joined: Sep 2010
Posts: 21,183
From: The Hudson Valley
Hmmmmm... yeah...
It looks about right.
The common wisdom, to which I subscribe, though I have not had any bad experiences, is that that sort of pickup should be secured by a single spot weld after you have it in position. If not, there is a chance that the pickup could come apart from the pump over time, with disastrous consequences.
If possible, for peace of mind if nothing else, you may wish to bring that to a friend or a shop with a welder and just have it zapped.
- Eric
Thread Starter
Registered User
Joined: Aug 2013
Posts: 3,900
From: Central Illinois
Sounds logical and shouldn't be too much trouble. Although the old one came out without any trouble and the new one is tight enough i can't re-position it. But peace of mind is always good.

Thread Starter
Registered User
Joined: Aug 2013
Posts: 3,900
From: Central Illinois
Chevy budget Olds powered
Joined: Jul 2011
Posts: 8,638
From: Elgin, Illinois
What I did on my pick up is I used red Loctite . I sanded the pressed in section of the pick up with 80 grit and the inside of the pump where it goes in and just dabbed some lock tite and so far so good. The last time I took one apart it was a pain in the nads so my guess is it worked. Just make sure you have it on a vice and press it up just to avoid getting the Loctite anywhere near the pump gears.


Thread Starter
Registered User
Joined: Aug 2013
Posts: 3,900
From: Central Illinois
I love time off!
Making some progress during my few days off for T-giving.
Advice for novices like myself that are installing a new cam; open that sucker and clean it immediately. I had the Styrofoam stuck pretty good and in a lot of places. Took about 45 minutes to get it thoroughly cleaned and prepped. With a final cleaning of brake cleaner. So clean it right away and give it a good oiling if it's going to sit.
[IMG] [/IMG]
I ran out of assembly lube at this point so had to run to ye ol' parts store for more. There wasn't much in the included packet and I feel I was being a little too conservative with it.
[IMG] [/IMG]
But the cam is now in and the new Edelbrock double roller timing set is on.
[IMG] [/IMG]
As per Joe's (actually Eric's) advice, I took a photo of the timing marks with the #1 cylinder at TDC in case I freak about it after getting the timing cover back on.
[IMG]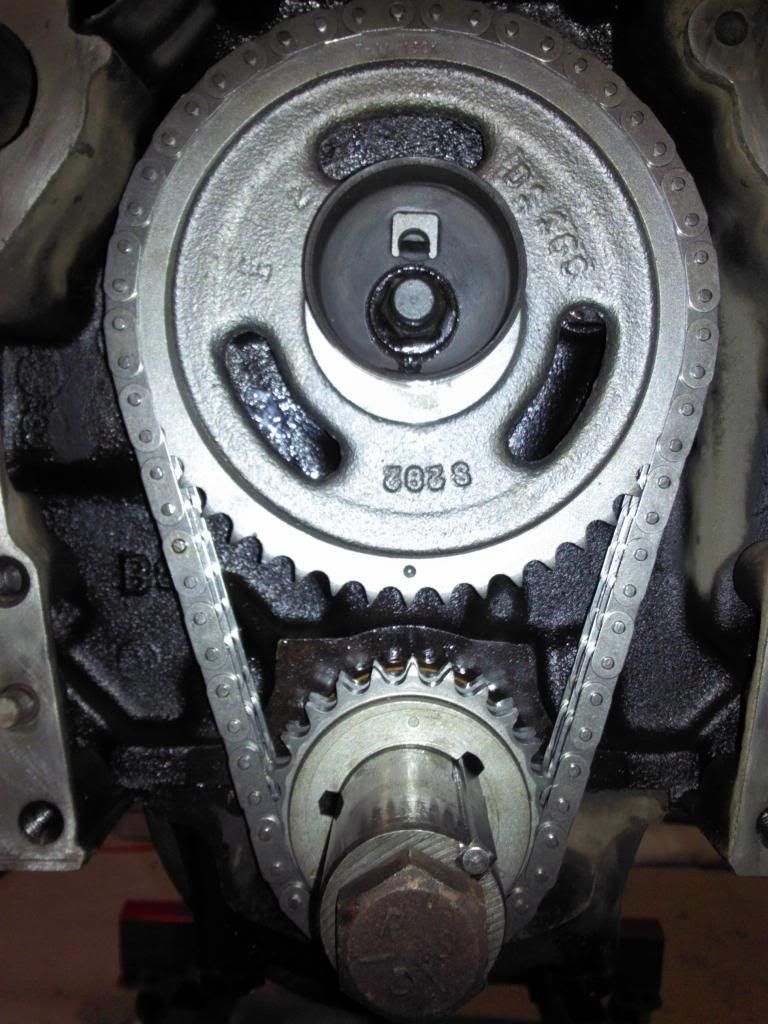 [/IMG]
The mechanical fuel pump arm seems awfully close to that chain but if nothing moves I should be good.....right? The clearance is a little more than a sixteenth, maybe 3/32".
[IMG] [/IMG]
Question; the crankshaft key, flush with the front of the crankshaft of further back?
I'm off to get the t-bird (the turkey, not the automobile )
)
Advice for novices like myself that are installing a new cam; open that sucker and clean it immediately. I had the Styrofoam stuck pretty good and in a lot of places. Took about 45 minutes to get it thoroughly cleaned and prepped. With a final cleaning of brake cleaner. So clean it right away and give it a good oiling if it's going to sit.
[IMG]
 [/IMG]
 I ran out of assembly lube at this point so had to run to ye ol' parts store for more. There wasn't much in the included packet and I feel I was being a little too conservative with it.
[IMG]
 [/IMG]
But the cam is now in and the new Edelbrock double roller timing set is on.
[IMG]
 [/IMG]
As per Joe's (actually Eric's) advice, I took a photo of the timing marks with the #1 cylinder at TDC in case I freak about it after getting the timing cover back on.
[IMG]
 [/IMG]
The mechanical fuel pump arm seems awfully close to that chain but if nothing moves I should be good.....right? The clearance is a little more than a sixteenth, maybe 3/32".
[IMG]
Question; the crankshaft key, flush with the front of the crankshaft of further back?
I'm off to get the t-bird (the turkey, not the automobile
)
Last edited by Macadoo; Nov 27, 2013 at 01:34 PM.
Connoisseur d'Junque
Joined: Sep 2010
Posts: 21,183
From: The Hudson Valley
Thread Starter
Registered User
Joined: Aug 2013
Posts: 3,900
From: Central Illinois
Thanks Copper. Yeah, that was in the instructions. It said if you don't know what you're doing, put it on 0. Figured that was me
It also said not to advance or retard if you're using an aftermarket camshaft.
How about the key? Flush with the front of the crank or no? And the manual says something about silicone in the keyway? Under the key? Over it? It's a little late for under...unless I must to keep it from leaking.
It also said not to advance or retard if you're using an aftermarket camshaft.
How about the key? Flush with the front of the crank or no? And the manual says something about silicone in the keyway? Under the key? Over it? It's a little late for under...unless I must to keep it from leaking.
Thread Starter
Registered User
Joined: Aug 2013
Posts: 3,900
From: Central Illinois
Well that's what is a little confusing to me. The keyway shallows in the rear so when I push it back it raises in the rear and isn't as engaged in the shaft. And since the keyway in the sprocket is much taller than the key, the key can push up really high. Uh...if that makes any sense.
I may add a little rtv to the key since the manual says to. Can't hurt I don't think.
I may add a little rtv to the key since the manual says to. Can't hurt I don't think.
Last edited by Macadoo; Nov 28, 2013 at 06:23 AM.
Connoisseur d'Junque
Joined: Sep 2010
Posts: 21,183
From: The Hudson Valley
The key should fit about halfway into the crank sprocket, if I recall.
The crank groove becomes shallow at that point, so that, considering that the key is of uniform thickness, if the key is pressed back as far as it will go, it will bottom about halfway under the crank sprocket, and will be roughly flush with the nose of the crankshaft in the front.
- Eric
The crank groove becomes shallow at that point, so that, considering that the key is of uniform thickness, if the key is pressed back as far as it will go, it will bottom about halfway under the crank sprocket, and will be roughly flush with the nose of the crankshaft in the front.
- Eric
Registered User
Joined: Jul 2009
Posts: 316
From: Dewey AZ
take a straight edge and lay it across the block right infront of your cam bolt, shim cambolt with a washer so you have about 10 to 20 thousants inbetween the timeing cover and cam bolt. this prevents cam walk/ "the rednek way of doing it" dont forget the crank cup or whatever that thing is called. dont put nothing on the keyway.
Last edited by Lars; Nov 28, 2013 at 06:48 AM.
Thread Starter
Registered User
Joined: Aug 2013
Posts: 3,900
From: Central Illinois
Thread Starter
Registered User
Joined: Aug 2013
Posts: 3,900
From: Central Illinois
Disappointing day...sort of
I disappointed myself a little today but you tell me if I really messed up.
I started by pressing out the front oil seal from the front. That was really tight but I used a couple pieces of pvc, one over and one in the seal. I used locktite on the new seal and it went in easy-peasy. But first I cleaned the interior with my dremel and the bit shown.
[IMG] [/IMG]
[IMG] [/IMG]
Then I cleaned all the front cover bolts on the wire wheel and laid out all the parts, the tools, and gaskets. What I didn't do was compare the gasket to the water pump so as to know where the silicone would go. Nor did I dry fit everything and I had a clearance issue with the timing gauge/pointer. The waterpump wouldn't go on with the pointer installed.
So in short, I ended up with silicone where I didn't need it and no silicone where I wanted it. The manual and the instructions both said to put a bead around both water holes and that, at least, did happen. But other than the water holes I have some silicone under the pump and other areas where there is none. So.....do I need to tear it off and start again? Somehow I ended up with three waterpump gaskets so I have plenty of those, lol. So, for the pics....
You can see I wasn't counting on all the extra gasket...
[IMG] [/IMG]
It took about an hour but I got all the excess silicone cleaned off. I'm not trying to be fastidious necessarily but I want a good paint job and paint doesn't stick to silicone.
[IMG] [/IMG]
I started by pressing out the front oil seal from the front. That was really tight but I used a couple pieces of pvc, one over and one in the seal. I used locktite on the new seal and it went in easy-peasy. But first I cleaned the interior with my dremel and the bit shown.
[IMG]
 [/IMG]
[IMG]
 [/IMG]
Then I cleaned all the front cover bolts on the wire wheel and laid out all the parts, the tools, and gaskets. What I didn't do was compare the gasket to the water pump so as to know where the silicone would go. Nor did I dry fit everything and I had a clearance issue with the timing gauge/pointer. The waterpump wouldn't go on with the pointer installed.
So in short, I ended up with silicone where I didn't need it and no silicone where I wanted it. The manual and the instructions both said to put a bead around both water holes and that, at least, did happen. But other than the water holes I have some silicone under the pump and other areas where there is none. So.....do I need to tear it off and start again? Somehow I ended up with three waterpump gaskets so I have plenty of those, lol. So, for the pics....
You can see I wasn't counting on all the extra gasket...
[IMG]
 [/IMG]
It took about an hour but I got all the excess silicone cleaned off. I'm not trying to be fastidious necessarily but I want a good paint job and paint doesn't stick to silicone.
[IMG]
 [/IMG]
Chevy budget Olds powered
Joined: Jul 2011
Posts: 8,638
From: Elgin, Illinois
Did you compare the pattern on the water pump gasket to the pump. you get like 2 or 4 because there is some diffrences from pump to pump. I once installed the incorrect one and I knew my issue right away.
Connoisseur d'Junque
Joined: Sep 2010
Posts: 21,183
From: The Hudson Valley
Absolutely.
Each of those gaskets is slightly different, and only one will work properly. For instance, I believe that one is Toro only, because of its unique motor mount and timing cover arrangement.
You'll see soon enough...
Be sure to fill with water only the first time, and antifreeze only when you know it doesn't leak.
- Eric
Thread Starter
Registered User
Joined: Aug 2013
Posts: 3,900
From: Central Illinois
This is the old pump which I compared to the new one and they are the same. The gasket on the left is an exact match. The one on the right came with the pump and is exactly like the one I used. Which is why I used the one I did. I compared it to the three in the kit and chose the Felpro over the gray one. I'm confident that all the surfaces are covered and the small port on the lower right is not (which it shouldn't be).
However, if you look at the above image of the gasket on the block, the top and bottom have beads between the gasket and block that aren't behind the water pump. I'll pull it and do it right. I know what I'm doing tomorrow. Question; should I run the silicone bead around all the bolt holes or just on the outside? Or the inside?
[IMG] [/IMG]
However, if you look at the above image of the gasket on the block, the top and bottom have beads between the gasket and block that aren't behind the water pump. I'll pull it and do it right. I know what I'm doing tomorrow. Question; should I run the silicone bead around all the bolt holes or just on the outside? Or the inside?
[IMG]
 [/IMG]
Last edited by Macadoo; Nov 29, 2013 at 05:26 PM.


Thread Starter
Registered User
Joined: Aug 2013
Posts: 3,900
From: Central Illinois
Yeah, I got it Eric. I pretty much covered the entire gasket with a thin layer both sides. Thinking more clearly today. I pushed through fatigue yesterday which is always a mistake for me.
Question: I'll be installing the heads soon. For the rockers, do I need to make sure the lifters are off the lobes for each cylinder before torquing? The manual doesn't say anything other than to torque them to specs. And how do I know if my pushrods are still the appropriate length?
Question: I'll be installing the heads soon. For the rockers, do I need to make sure the lifters are off the lobes for each cylinder before torquing? The manual doesn't say anything other than to torque them to specs. And how do I know if my pushrods are still the appropriate length?
Connoisseur d'Junque
Joined: Sep 2010
Posts: 21,183
From: The Hudson Valley
In general it is considered good practice to torque each set of rockers at TDC compression stroke, so as to get the torque right, if nothing else, but I really doubt that it matters.
It's a small amount of extra work, so I just do it.
As for push rod length, I am under the impression that you replaced the original head gasket with one 0.030" thicker and did not deck the heads. Is that correct? Or did you send the heads out to be machined for the difference in height between the two head gaskets?
In general, the hydraulic lifters will self adjust within that 0.030" range, so you're probably okay, but there is always a small chance in these cases that you could have your valves opening a bit less than spec'd. You could be certain with a dial indicator.
- Eric
Thread Starter
Registered User
Joined: Aug 2013
Posts: 3,900
From: Central Illinois
I brought along my head gaskets (the felpro blues) when i dropped off the heads. They said they would compensate with the decking. I'm assuming they did but I'd like to know for sure. Should I be able to turn the pushrod after torquing? (assuming it's off the lobe).
Actually, now that I'm thinking about it, when i picked them up I had asked if I could have increased my CR by milling more off the surface. After talking for a bit, he chuckled and said we probably raised the CR by about .1, not sure what that equates to but it sounds like the heads are very slightly shorter. Plus I did had Mark grind me a slightly more aggressive cam.
Actually, now that I'm thinking about it, when i picked them up I had asked if I could have increased my CR by milling more off the surface. After talking for a bit, he chuckled and said we probably raised the CR by about .1, not sure what that equates to but it sounds like the heads are very slightly shorter. Plus I did had Mark grind me a slightly more aggressive cam.
Last edited by Macadoo; Nov 30, 2013 at 12:18 PM.
Thread Starter
Registered User
Joined: Aug 2013
Posts: 3,900
From: Central Illinois
Lol, Prof, i was waiting for that.
Dar dar deh dah nud....well I blew a gasket yesterday..... Dar dar deh dah nud.....it made my old lady cry.... Dar dar deh dah nud.... it was blowin' smoke and steam.....Dar dar deh dah nud...... right before my eyes......
Dar dar deh dah nud....well I blew a gasket yesterday..... Dar dar deh dah nud.....it made my old lady cry.... Dar dar deh dah nud.... it was blowin' smoke and steam.....Dar dar deh dah nud...... right before my eyes......


