
Home Porting Techniques

Thread Starter
Registered User
Joined: Apr 2010
Posts: 988
Still grinding
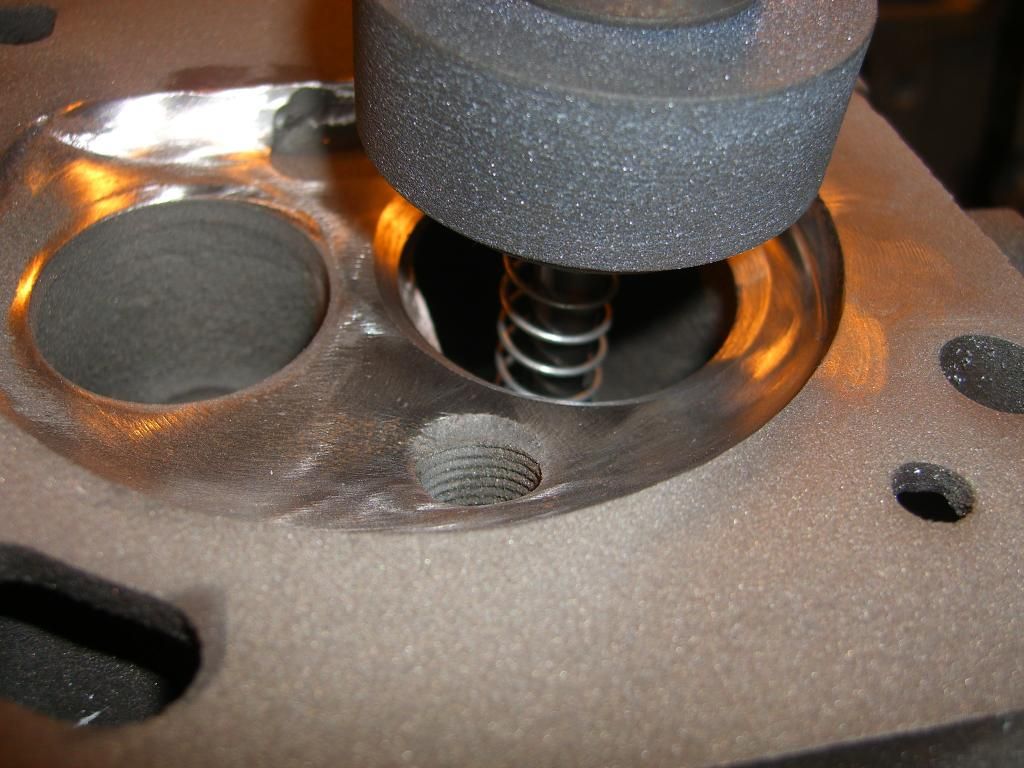
That makes sense Smitty. I was considering opening the chamber on J-(Chicago)'s heads to unshroud the intake valve but now I don't think I'm going to. I've got a lot done on his heads. I finished porting the intake bowls and runners yesterday. I'm using 2.07" intake and 1.68" exhaust valves on this set of heads. It really does help to rough in the seats when going with oversized valves.
Here I was setting the dividers to establish the outer part of the seat-
CIMG4384.jpg
CIMG4387.jpg
That was my 45 degree grind. This was done with a rough cut stone. Notice I didn't go all the way to the outer edge of the valve. Then I set up a different divider for the lower part of the seat, leaving plenty of room for finishing later after the port work-
CIMG4385.jpg
This is after the 60 degree rough cut-
CIMG4389.jpg
Now I can see how much I want to hog out by looking straight down into the bowl. This shot was taken as I was opening the bowl up with the carbide-
CIMG4390.jpg
CIMG4393.jpg
Here's some other shots I took yesterday-
CIMG4402.jpg
CIMG4401.jpg
CIMG4394.jpg
CIMG4398.jpg
Now I will start doing the exhaust side. I promise I will show the divider build up. I think I'm going to weld in Lars' clips on these heads. Coppercutlass wants to poor zinc alloy on his heads, so I will document both methods. I will also be porting the intakes very soon so stay tuned.
Here I was setting the dividers to establish the outer part of the seat-
CIMG4384.jpg

CIMG4387.jpg
That was my 45 degree grind. This was done with a rough cut stone. Notice I didn't go all the way to the outer edge of the valve. Then I set up a different divider for the lower part of the seat, leaving plenty of room for finishing later after the port work-
CIMG4385.jpg
This is after the 60 degree rough cut-
CIMG4389.jpg
Now I can see how much I want to hog out by looking straight down into the bowl. This shot was taken as I was opening the bowl up with the carbide-
CIMG4390.jpg
CIMG4393.jpg
Here's some other shots I took yesterday-
CIMG4402.jpg
CIMG4401.jpg
CIMG4394.jpg
CIMG4398.jpg
Now I will start doing the exhaust side. I promise I will show the divider build up. I think I'm going to weld in Lars' clips on these heads. Coppercutlass wants to poor zinc alloy on his heads, so I will document both methods. I will also be porting the intakes very soon so stay tuned.
Chevy budget Olds powered
Joined: Jul 2011
Posts: 8,638
From: Elgin, Illinois
Ok so I was about to order the ingots. 4 lbs for 8 bucks. The only issue is I was looking at the melting point. The zinc ingots melt at 780 degrees. Is there a specific alloy mix I should be looking for. I just want to make sure what I order is something we can use.
Here is aluminum.
http://www.rotometals.com/product-p/alumingots.htm
here is what I was looking at
http://www.rotometals.com/product-p/zincingots.htm
Here is aluminum.
http://www.rotometals.com/product-p/alumingots.htm
here is what I was looking at
http://www.rotometals.com/product-p/zincingots.htm
Last edited by coppercutlass; Feb 3, 2014 at 07:31 PM.
Thread Starter
Registered User
Joined: Apr 2010
Posts: 988
Ok so I was about to order the ingots. 4 lbs for 8 bucks. The only issue is I was looking at the melting point. The zinc ingots melt at 780 degrees. Is there a specific alloy mix I should be looking for. I just want to make sure what I order is something we can use.
Here is aluminum.
http://www.rotometals.com/product-p/alumingots.htm
here is what I was looking at
http://www.rotometals.com/product-p/zincingots.htm
Here is aluminum.
http://www.rotometals.com/product-p/alumingots.htm
here is what I was looking at
http://www.rotometals.com/product-p/zincingots.htm
Call Smitty. He sells the right stuff. It might be a mix. I'm not sure.
Thread Starter
Registered User
Joined: Apr 2010
Posts: 988
10,000 Views
Well guys I just wanted to say thanks to everyone that has posted in this thread and shared their thoughts, photos, and expertise. I’m really glad that we have this forum to share ideas and compile data. This thread could never have been successful over on ROP. I’m glad the moderators here take an active roll in keeping our threads on track. The title of this thread is Home Porting Techniques, I wanted to thank the professional engine builders that have come into my thread to offer up their wealth of knowledge that goes beyond what most of us can achieve at home. I’m also happy that the other thread debating Aftermarket Heads or Porting Cast Iron, has taken off as well. In that thread I posted some “good” reasons to port cast iron heads. Just for fun I thought I would repost it here.
There was a lot of talk about why anyone would even consider porting cast iron heads with the low cost and availability of the Procomps. I can think of a couple reasons, maybe not good:
1) Crazy in the head
2) Have to do things for themselves
3) Limited by class rules
4) More time than money
5) Delusional about the cost to pay someone else to port your heads
6) A psychological disorder that forces one to create metal shavings
7) Matter of pride to say I did this myself
8) Practice on cast iron before moving up to aluminum
9) Unclear about the overall cost with parts and machining to do cast iron
Once again thanks for all the interest. If no one was viewing or responding to me, I don’t think that this thread would have gone as far as it did.
Last edited by 67 Cutlass Freak; Feb 6, 2014 at 08:05 AM.


Registered User
Joined: May 2013
Posts: 87
From: Weaverville, NC
12. J heads have hardened seats..bonus!
67 Cutlass freak, excellent job with your post! Just wanted to say this thread is very informative for the home porter.
I prefer to weld the center divider with the correct rod and tig method, takes me about an hour to do 2 heads and another hour to clean up the exhaust ports.
I also use Splash Zone epoxy on the exhaust hole filling, good stuff.
With my time and top materials, I'll have over 2k in iron heads that flow in the mid 275 range, those heads will support 550+ HP.
E brocks have their place, but you will need to spend $$$$ on top of the head cost for port work and quality components, +1500-2000k. So do the math.
Its all application and budget specific, my therory is build it once and build it right. .02
Thread Starter
Registered User
Joined: Apr 2010
Posts: 988
A Wise man once said
Thanks for checking in Brad & for your input. I agree about doing things right the first time. Some of us just have to make mistakes, and hopefully learn from them. My goal for my race car is to be one of the fastest Olds powered, door slammers, running the cast iron heads, naturally aspirated. That puts me in the 9.50 range. My car is built to handle the power, but my current engine is definitely not going to get me there. I will need more compression and a lighter rotating assembly. I just need to finish all the small details and get it down the track. I will need about 750 HP to reach my goals and that will be tough to do with the cast iron heads.
Brad how's the UFO project coming? Any chance you might start a thread about the build? It would be really cool if you could post up some details about your heads in the other head thread. I really just scratched on the surface because I didn't want to post anything that was not factual. IMHO they look like they have the most potential out of any heads available for Oldsmobiles.
Thread Starter
Registered User
Joined: Apr 2010
Posts: 988
Z Head
I suggest you give Brad Wise a call and talk to him directly. He's a busy guy and most likely has not seen your post. Here's a link to his website-
http://wiseperformanceengineering.vpweb.com/
http://wiseperformanceengineering.vpweb.com/

Registered User
Joined: Mar 2010
Posts: 114
I suggest you give Brad Wise a call and talk to him directly. He's a busy guy and most likely has not seen your post. Here's a link to his website-
http://wiseperformanceengineering.vpweb.com/
http://wiseperformanceengineering.vpweb.com/
Thread Starter
Registered User
Joined: Apr 2010
Posts: 988
Porting The Intake Manifold
Well I got Copper's intake manifold back today. He bolted the heads on his block with gaskets and marked the intake to match port. In Joe Mondello's technical reference manual, he outlines the procedure for laying out the ports. We did it a little different. First we tacked the intake gaskets in place with just a tiny bit of RTV at each end. We made sure the ports lined up perfectly and did a final trim on the gaskets. We let the silicone set up over night so the gaskets would not move. Then we applied a healthy amount of machinist' dye to the gaskets around the intake ports. Then we bolted the intake on and torqued it to allow the blue dye to transfer. It worked out well. I like to do this instead of just matching the gasket because it can move around, the bolt holes in the gasket are pretty big. It's also important to do this after the block has been decked and the heads have been milled, or everything will be off.
When porting aluminum it's important to use the correct open type carbide bit. The material comes off fast, so you really don't want too much pressure at all. I like to use my left hand to help steady the grinder and minimize the bit from bouncing. On this Edelbrock RPM Performer intake there's not much I can do in the plenum area. I tried to get rid of any casting marks and smooth out the radius of the roofs of the ports. I don't think this will really help with the performance too much. I really just try to smooth out the pathway slightly. I will not touch the floor of the plenum area. This intake has a checker board pattern on the floor that is supposed to aid with atomizing the air fuel mixture.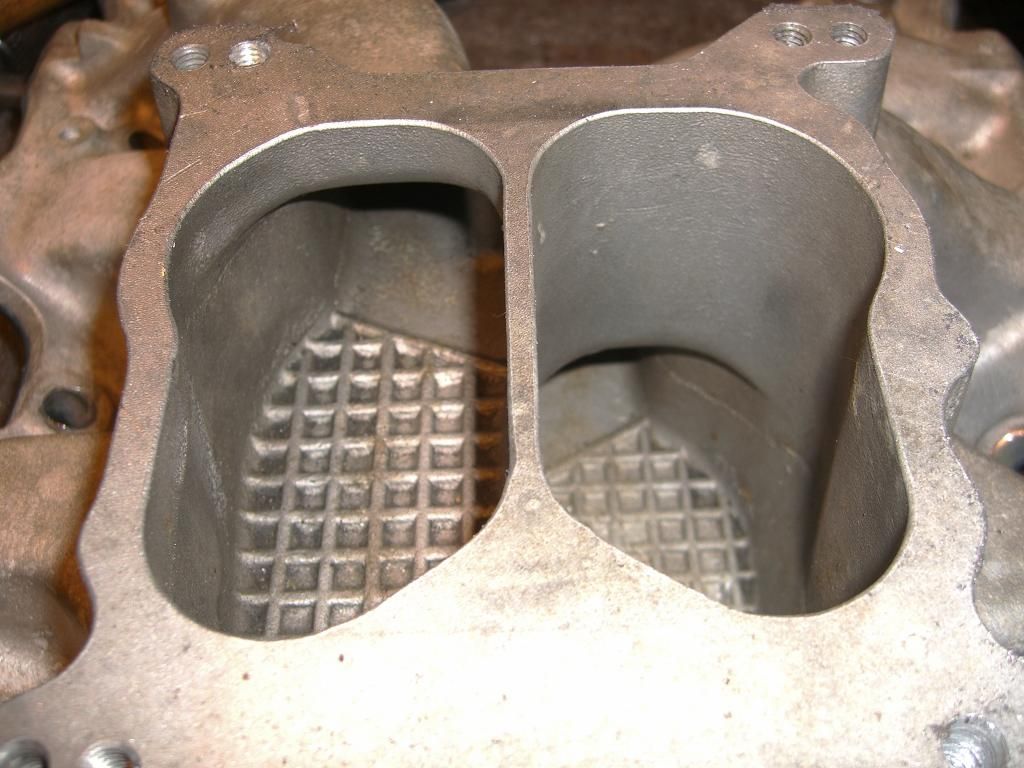 CIMG4412.jpg CIMG4411.jpg CIMG4423.jpg CIMG4421.jpg
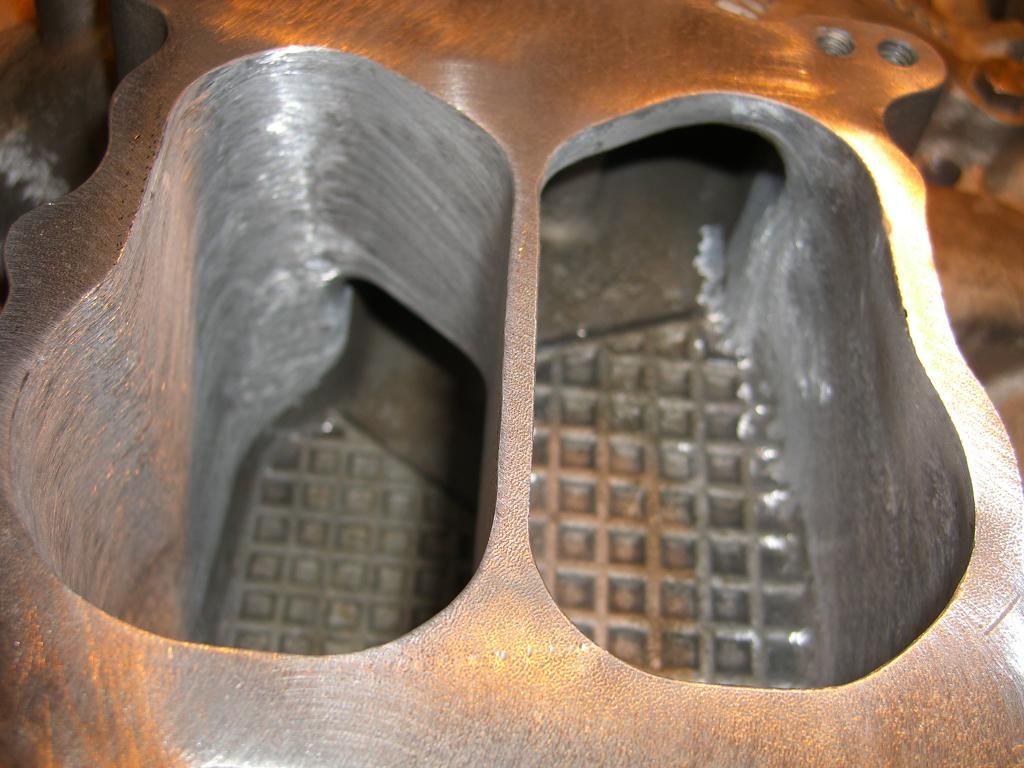
For the runners I reach in as far as I can and try to straighten the port for the entry into the head. Most of the grinding is done on the roof. Someone else had done some grinding on this intake, but we were lucky they didn't do too much. I try to keep all the widths and height the same in each of the ports. CIMG4403.jpg CIMG4406.jpg CIMG4404.jpg CIMG4405.jpg CIMG4408.jpg CIMG4409.jpg CIMG4415.jpg CIMG4416.jpg CIMG4417.jpg CIMG4420.jpg
When porting aluminum it's important to use the correct open type carbide bit. The material comes off fast, so you really don't want too much pressure at all. I like to use my left hand to help steady the grinder and minimize the bit from bouncing. On this Edelbrock RPM Performer intake there's not much I can do in the plenum area. I tried to get rid of any casting marks and smooth out the radius of the roofs of the ports. I don't think this will really help with the performance too much. I really just try to smooth out the pathway slightly. I will not touch the floor of the plenum area. This intake has a checker board pattern on the floor that is supposed to aid with atomizing the air fuel mixture.
 CIMG4412.jpg CIMG4411.jpg CIMG4423.jpg CIMG4421.jpg
For the runners I reach in as far as I can and try to straighten the port for the entry into the head. Most of the grinding is done on the roof. Someone else had done some grinding on this intake, but we were lucky they didn't do too much. I try to keep all the widths and height the same in each of the ports. CIMG4403.jpg CIMG4406.jpg CIMG4404.jpg CIMG4405.jpg CIMG4408.jpg CIMG4409.jpg CIMG4415.jpg CIMG4416.jpg CIMG4417.jpg CIMG4420.jpg
Engine Builder
Joined: Jan 2010
Posts: 552
From: Louisville, ohio
For those who decide to do this, take notice that they left the scribe marks they made at the edge of where the dye transfer was made. You never want to take away the line or you will be leaving a edge which would be a restriction and can cause disruption worse than if you had never tried to match the ports. They did a very nice job on this.
Another way to get the transfer from head to intake is to tape the gasket to the head across the top. Then put silicone in several places across the gaskets and bolt the intake on lining it up as best as you can. Let the silicone dry ant cut the tape with a razor blade.remove the intake and carefully scribe the inside of the gasket openings. Proceed as they did above.
Another way to get the transfer from head to intake is to tape the gasket to the head across the top. Then put silicone in several places across the gaskets and bolt the intake on lining it up as best as you can. Let the silicone dry ant cut the tape with a razor blade.remove the intake and carefully scribe the inside of the gasket openings. Proceed as they did above.

Registered User
Joined: Aug 2007
Posts: 2,250
For those who decide to do this, take notice that they left the scribe marks they made at the edge of where the dye transfer was made. You never want to take away the line or you will be leaving a edge which would be a restriction and can cause disruption worse than if you had never tried to match the ports. They did a very nice job on this.
Another way to get the transfer from head to intake is to tape the gasket to the head across the top. Then put silicone in several places across the gaskets and bolt the intake on lining it up as best as you can. Let the silicone dry ant cut the tape with a razor blade.remove the intake and carefully scribe the inside of the gasket openings. Proceed as they did above.
Another way to get the transfer from head to intake is to tape the gasket to the head across the top. Then put silicone in several places across the gaskets and bolt the intake on lining it up as best as you can. Let the silicone dry ant cut the tape with a razor blade.remove the intake and carefully scribe the inside of the gasket openings. Proceed as they did above.
While on the subject, several professional porters and race shops have told me that this produces insignificant gains at best and can actually hurt performance. Your thoughts??
Engine Builder
Joined: Jan 2010
Posts: 552
From: Louisville, ohio
All depends on the application, just how small the intake port is compared to the port mouth, and so on. There is no clear cut answer. On street machines I rarely port match unless its a major mismatch or the customer insists. On the race builds I almost always do.
Registered User
Joined: Aug 2007
Posts: 2,250
That sounds both practical and reasonable, thanks.
Thread Starter
Registered User
Joined: Apr 2010
Posts: 988
Exhaust side
First of all if you raise the exhaust port .100" you should make sure your header is opened up enough to flow. Most headers are not welded on the outside of the flange so it's easy to wreck the header by porting too far into the flange. There's two options here: either port the header with very sharp angle, only going half way into the flange, or have the headers welded on the outside of the flange and then port with a gradual transition. I had a pair of Hooker Comp 2" primary tube headers that I match ported. When I got them back from JettHot Coatings there was pin holes, so be very careful. Smitty offers some of the best stainless steel headers available for Olds, but I don't know if the outer portion of the flange is welded. Maybe he will post up some photos if you ask him nicely. The other option would be to have a custom flange made from your local machine shop and build your own headers. That's what I did.
CIMG2774.jpg
CIMG3326.jpg
Thread Starter
Registered User
Joined: Apr 2010
Posts: 988
What's the maximum port height anyone has done to a SB Olds cast iron head? Specifically, could you port the roof up to BB height? Has anyone here bolted BB cast iron heads on a SB, and how well did it work out for you?
Engine Builder
Joined: Jan 2010
Posts: 552
From: Louisville, ohio
BB on a SBO, yes, many times and it works great.
I've taken the roof of an SBO #4 head to BBO height with no issues. But you cannot go straight in on the roof or you'll hit water. You have to blend it down to match the roof of the bowl more or less.
I've taken the roof of an SBO #4 head to BBO height with no issues. But you cannot go straight in on the roof or you'll hit water. You have to blend it down to match the roof of the bowl more or less.
Thread Starter
Registered User
Joined: Apr 2010
Posts: 988
Thanks Smitty, that's exactly what I was thinking. What other mods did you do on the SB with BB heads? How far did you have to mill them to get the compression back up? How far can you mill cast iron heads before you weaken the floor and have warpage issues?
Registered User
Joined: Aug 2007
Posts: 2,250
Hey Smitty, in your opinion, on a high performance SBO build, say you are shooting for high 11s, and using iron heads, would you use BBO heads and mill with a little port work or SBO heads with a lot of porting?
Engine Builder
Joined: Jan 2010
Posts: 552
From: Louisville, ohio
I wouldn't take more than .100" off of any cast iron Olds head. Figure about .005-.006/cc. I normally stop at .060 which puts the average BB head @ 70cc. I do know of many who have taken .100 and not had issues. If you go that far I would only use a Cometic gasket or the .011 I have.
Engine Builder
Joined: Jan 2010
Posts: 552
From: Louisville, ohio
6 of one, half dozen of the other. Pretty much works out the same either way.

Registered User
Joined: Oct 2009
Posts: 3,814
From: Erie,PA
If the SBO shortblock has not been built yet,pick a piston with a flat top,or dome. That way,you can run a BBO iron head,or any if the aftermarket aluminum heads,without having to mill them excessively.
Just an option.
Just an option.
Thread Starter
Registered User
Joined: Apr 2010
Posts: 988
That's exactly what I did. I plan on running a ported set of Ga's on a 350. I was asking these questions more for others that are currently running off the shelf dished pistons in their SB. The other reason I was asking is for guys considering the Pro-Comps on their SB. A lot of guys have said the BB heads don't work too well on a SB, I just wanted to hear from some guys that have made it work well.
109-0977_IMG.jpg
Engine Builder
Joined: Jan 2010
Posts: 552
From: Louisville, ohio
I would venture to guess that those who say the BB heads on a SB don't work, put stock uncut heads on a stock 8.5:1 engine plus used a .040 Felpro head gasket in place of the steel shim to get their poor results.
On a short block built with the intention of using the BB heads they work very well.
On a short block built with the intention of using the BB heads they work very well.
Seasoned beater pilot.
Joined: Jan 2007
Posts: 5,468
From: Chicago
I took a drive up to the land of cheese today to pay Mr. freak a visit.
Much to his dismay, I brought a #16 intake and a new carbide bit with me for some fun. I ROUGHLY sawzalled and die grinded the center out of it, and he went to town porting it with a big grin. Here's some pics of the general rough in of the stock iron intake I'll be using. Why you ask? ......well.... why not? It's just laying around doing nothing, so I might as well bolt onto something. Nobody is ever going to give any money for it, and it's totally useless just sitting on a shelf til' the day i die. It'll be put back into service.
Plus I get to hang out with a fellow Olds guy and enjoy some of a Sunday morning with the both of us not rotting away on the couch all day.
119-1968_IMG.jpg
119-1972_IMG.jpg

Seasoned beater pilot.
Joined: Jan 2007
Posts: 5,468
From: Chicago
Seasoned beater pilot.
Joined: Jan 2007
Posts: 5,468
From: Chicago

Just a regular old iron motor with really quiet mufflers, nothing fancy.

Turn the #5 into a #8 and away we go.
Thread Starter
Registered User
Joined: Apr 2010
Posts: 988
Seasoned beater pilot.
Joined: Jan 2007
Posts: 5,468
From: Chicago
Car Farmer
Joined: May 2009
Posts: 100
From: McHenry County, IL
I want to thank you for starting this thread. I've been a forum lurker for the last 7 years or so and remember all the times this has been brought up. I am looking to do this same thing to a set of heads I have laying around and in the past week started trying to find all the old threads and came upon this one after watching Tom's videos from Headbytes. That guy is full of knowledge. Since ROP took a dive a lot of that information I used to reference is now gone. This is a great collection of all of that information, with some great knowledgeable people contributing to this. Yes, aluminum is where it's at now, but I'm a hobbyist on a budget and this is what DIY is all about, feeling the rewards in the end and pains along the way.  In the end, you may come out ahead or behind money-wise, but I'm not a racer and am just looking to have fun and doing what I enjoy to pass the time.
One thing that I keep seeing is that going Aluminum has its advantages, namely on savings. I want to put it out there that running a set of aluminum heads out of the box is not always the best thing to do and it seems that the same amount of money is still spent. Yes you get the weight advantage and what not, but it's sounding like there's a lot of time and money spent no matter how you look at it. They will still need to be gone over. Check this out:
In the end, you may come out ahead or behind money-wise, but I'm not a racer and am just looking to have fun and doing what I enjoy to pass the time.One thing that I keep seeing is that going Aluminum has its advantages, namely on savings. I want to put it out there that running a set of aluminum heads out of the box is not always the best thing to do and it seems that the same amount of money is still spent. Yes you get the weight advantage and what not, but it's sounding like there's a lot of time and money spent no matter how you look at it. They will still need to be gone over. Check this out:
Registered User
Joined: May 2013
Posts: 87
From: Weaverville, NC
BEFORE~ The way most Iron heads look when we get them.

AFTER~ Full street/strip port work, welded exhaust, filled EGR, all bolt holes chased, Manley Stainless intake and exhaust, bronze liners, 3 angle valve job.
Each set is machined and ported for your application needs.

Thinking about an exchange program for All heads(Iron, Edelbrocks, Batten, ect..)
AFTER~ Full street/strip port work, welded exhaust, filled EGR, all bolt holes chased, Manley Stainless intake and exhaust, bronze liners, 3 angle valve job.
Each set is machined and ported for your application needs.
Thinking about an exchange program for All heads(Iron, Edelbrocks, Batten, ect..)


