
Interior makeover

Registered
Joined: Jul 2006
Posts: 4,430
From: Northeast Ohio
Beauteousful Rob.

The painter is doing all my jambs, prob'ly done by now, he gave me no choice.")
He was showing me how the little thin plastic edges against the paint on the plastic trim clips break off and the paint can be scuffed when you pop the trim on, the guys more nuts than me.
He may not let me put the trim on.

How did you turn the car sideways in that first pic and on an angle in the other one?
I know you have a thing for gadgets Rob so I think I've figured it out.
You have a "Green Hornet" type rotisserie in your garage!??!
2 cool
I won't tell anybody, no snitchin'...
I never thought about being able to use one for resto jobs.
What car do you keep underneath?, or is Lady the one that comes out when action calls?
I always wondered...How do you keep the fluids from draining when it's in the stored position?
I'm getting real susperious, he likes gadgets too.... do you have a driver named Kato??
If not could I be Kato??
http://www.youtube.com/watch?v=P2RDh0EqRH8
The painter is doing all my jambs, prob'ly done by now, he gave me no choice.
He was showing me how the little thin plastic edges against the paint on the plastic trim clips break off and the paint can be scuffed when you pop the trim on, the guys more nuts than me.
He may not let me put the trim on.
How did you turn the car sideways in that first pic and on an angle in the other one?
I know you have a thing for gadgets Rob so I think I've figured it out.
You have a "Green Hornet" type rotisserie in your garage!??!
2 cool
I won't tell anybody, no snitchin'...
I never thought about being able to use one for resto jobs.
What car do you keep underneath?, or is Lady the one that comes out when action calls?
I always wondered...How do you keep the fluids from draining when it's in the stored position?
I'm getting real susperious, he likes gadgets too.... do you have a driver named Kato??
If not could I be Kato??
http://www.youtube.com/watch?v=P2RDh0EqRH8
Registered User
Joined: Dec 2007
Posts: 369
From: Nuremberg, GERMANY
Quote:
Originally Posted by cutlasssupreme71
hmm, things getting closer, my hand really hurts (tendon inflammation?!?) after sanding and stripping the last couple of days
I have the same problem with my hand and wrist (tendonitis). I thought it was carpal tunnel, but it does go away eventually. So I just rely on RX painkillers when it starts hurting after a busy day in the garage.
Damn, that hurts....
Today i`ve blasted my door hinges, too....it seems that i need new bolt sleeves....
Thanks for the help rob, and link jeffreyalman, thats what i thought - no pull strap, Thanks!!!
Progress looking good Rob, keep it up!!!
Torsten
Thread Starter
Registered User
Joined: Feb 2008
Posts: 11,798
From: Plano, TX
Many thanks for the compliments guys and gals - they sure help keep the motivation levels going!
Blue, I can't reveal my secret invention. It came about when I saw a Jeep with an upsidedown sticker that says "If you can read this, roll me over!"
OUCH! That hurts just looking! It reminds me too much of when I almost lost my entire fingertip earlier in this thread by incorrect use of a razor blade.
You need to teach your car not to bite the hand that restores it...
If you mean new bushings and rollers, those are easy. Stripping and painting are the hard and time consuming parts, not to mention realigning the door..
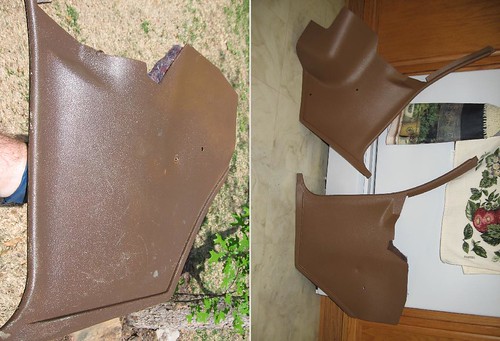
Speaking of hinges, here are my before and after shots of the right side pieces:

Obviously before - NASTY! BTW - the top hinge had PLASTIC bushings! Anyone hear of plastic hinge bushings???
And here is after - ready to install:

How beautiful they are! They were well worth photographing like fine jewelry! (Alice will get a kick out of this for sure...)
My mom finished the other pull strap and i installed it. Here it is with the two old covers next to it. Nice improvement, eh?

I passed the previous compliments on this to my mom and she was very happy to know that the true car enthusiasts approved of her work!
And here is the door after it was painted.

The hinge areas got two coats of POR15 clear and the white might not have adhered to it well. Around the edges it seemed fine though......
Coming up:
Rob attempts to spray interior plastic parts with $400/gallon SEM paint using a real air sprayer for the first time!
I bet I can guess how Sherwin Williams' slogan "Cover the Earth" came about...
Blue, I can't reveal my secret invention. It came about when I saw a Jeep with an upsidedown sticker that says "If you can read this, roll me over!"
That hurts just looking! It reminds me too much of when I almost lost my entire fingertip earlier in this thread by incorrect use of a razor blade. You need to teach your car not to bite the hand that restores it...
Speaking of hinges, here are my before and after shots of the right side pieces:
Obviously before - NASTY!
BTW - the top hinge had PLASTIC bushings! Anyone hear of plastic hinge bushings???And here is after - ready to install:
How beautiful they are!
They were well worth photographing like fine jewelry! (Alice will get a kick out of this for sure...)My mom finished the other pull strap and i installed it. Here it is with the two old covers next to it. Nice improvement, eh?
I passed the previous compliments on this to my mom and she was very happy to know that the true car enthusiasts approved of her work!
And here is the door after it was painted.
The hinge areas got two coats of POR15 clear and the white might not have adhered to it well. Around the edges it seemed fine though......
Coming up:
Rob attempts to spray interior plastic parts with $400/gallon SEM paint using a real air sprayer for the first time!
I bet I can guess how Sherwin Williams' slogan "Cover the Earth" came about...
Registered User
Joined: Dec 2009
Posts: 231
From: Fair Play, SC
Looks great Rob! Nice progress. Cudos again to Mom.
I went for the rattle can on the SEM. Of course I wasn't planning on spraying a gallon.
My 1st rodeo with a gun and a compressor was the base and clear on my stone shield and headlight surrounds. They turned out nice. It's like anything else, preparation is 90% and take your time. Multiple light coats!
You been watching me?? Been there, done that, got the Tshirt(s).
100_0291 (Medium).jpg
I went for the rattle can on the SEM. Of course I wasn't planning on spraying a gallon
.My 1st rodeo with a gun and a compressor was the base and clear on my stone shield and headlight surrounds. They turned out nice. It's like anything else, preparation is 90% and take your time. Multiple light coats!
100_0291 (Medium).jpg
Thread Starter
Registered User
Joined: Feb 2008
Posts: 11,798
From: Plano, TX
Thanks - I will pass the word on. She needs a side job in minor upholstery work!
I wish i could have gone the rattle route () but nothing premixed comes close to the dark saddle. I had to get this stuff custom mixed and it is a new water-based stuff. It is more expensive and safer to use. Of course i question its durability, but that is all they could get me.
I bought a pint for $55 - that is the smallest can they sell.
Holy crap!
Looks like you did it alright... Just where is the sticker that says if you could read this, roll me over??
It looks like your 4WD could not even unstick you then.
Wow....
) but nothing premixed comes close to the dark saddle. I had to get this stuff custom mixed and it is a new water-based stuff. It is more expensive and safer to use. Of course i question its durability, but that is all they could get me.I bought a pint for $55 - that is the smallest can they sell.
You been watching me?? Been there, done that, got the Tshirt(s). Attachment 15749
Attachment 15749Looks like you did it alright... Just where is the sticker that says if you could read this, roll me over??
It looks like your 4WD could not even unstick you then.
Wow....
Thread Starter
Registered User
Joined: Feb 2008
Posts: 11,798
From: Plano, TX
A new painting adventure�
Now mid April, the new armrest bases were prepared. They are not available in repro colors (just black), so they had to be painted. The repro OPG armrest pads have misdrilled holes, so I had to redrill the new bases for them, keeping the left and rights matched. Small fender washers under the original screws will secure them well later.
Next, the metal trim was removed and polished and the holes for them were drilled in the new bases.
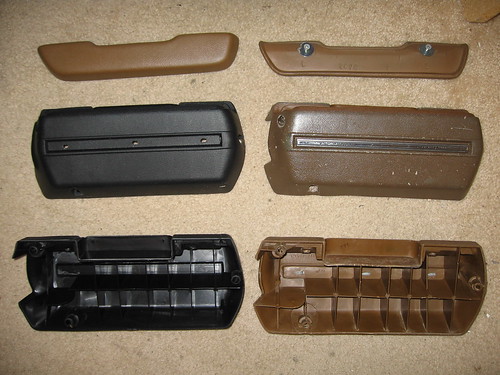
The new bases and other parts were scrubbed with warm soapy water & scotchbrite and let dry. These along with the speaker grilles and kick panels will be painted with custom mixed interior plastic parts paint. I used SEM�s SureCoat water based interior paint which was ordered from the local English Color. It was a hefty 55 bucks a pint, so this better come out right!
A few days later I got the paint and it looked very close to the fabric color, but it still looked strange for some reason. The person at English color said it will look right when applied and dried. Hmmm�..
Since this was too thick to spray through a disposable sprayer, I opted to buy a small inexpensive gravity-feed sprayer to use with the compressor, along with a dryer.
On a somewhat-windy Saturday, I had at it. I used about 30psi and the gun had a 1.5mm nozzle, just a hair bigger than the recommended 1.4mm. I filled the sprayer with about 7oz of paint and applied like the tech sheet instructed, first practicing and adjusting the new gun on a plastic flower pot.
One light coat, 10 min later a heavier coat, and 15min later, a second heavier coat.
I started with the plate for the garage door opener. The armrest bases were done afterward, then the speaker mounting rings & grilles. Here is the war zone as I started:

Notice the trash cans are there just in case I FUBAR the parts�
The speaker grilles, hung for drying:

Here are the painted armrests and the old ones for comparison. Note the off-color armrest pads from OPG.

I did the kick panels last. Here is before and after:
For most parts, holding them worked the best. Long rubber gloves came in handy.
The parts were stored away to dry; hopefully this watercolor will hold up well.
As days past, I kept noticing the color differences from the paint to the upholstery that I told them to match. It was not mixed right. Not a huge difference, but enough to be bothersome.
Also the durability of this stuff is poor. After a few days, a mere tap of the fingernail nicks the stuff. It was cleaned and prepped as per the instructions and the results were the same whether new bare plastic or previously painted.
Maybe more time will help the bonding���.
Next, the metal trim was removed and polished and the holes for them were drilled in the new bases.
The new bases and other parts were scrubbed with warm soapy water & scotchbrite and let dry. These along with the speaker grilles and kick panels will be painted with custom mixed interior plastic parts paint. I used SEM�s SureCoat water based interior paint which was ordered from the local English Color. It was a hefty 55 bucks a pint, so this better come out right!
A few days later I got the paint and it looked very close to the fabric color, but it still looked strange for some reason. The person at English color said it will look right when applied and dried. Hmmm�..
Since this was too thick to spray through a disposable sprayer, I opted to buy a small inexpensive gravity-feed sprayer to use with the compressor, along with a dryer.
On a somewhat-windy Saturday, I had at it. I used about 30psi and the gun had a 1.5mm nozzle, just a hair bigger than the recommended 1.4mm. I filled the sprayer with about 7oz of paint and applied like the tech sheet instructed, first practicing and adjusting the new gun on a plastic flower pot.
One light coat, 10 min later a heavier coat, and 15min later, a second heavier coat.
I started with the plate for the garage door opener. The armrest bases were done afterward, then the speaker mounting rings & grilles. Here is the war zone as I started:
Notice the trash cans are there just in case I FUBAR the parts�
The speaker grilles, hung for drying:
Here are the painted armrests and the old ones for comparison. Note the off-color armrest pads from OPG.
I did the kick panels last. Here is before and after:
For most parts, holding them worked the best. Long rubber gloves came in handy.
The parts were stored away to dry; hopefully this watercolor will hold up well.
As days past, I kept noticing the color differences from the paint to the upholstery that I told them to match. It was not mixed right. Not a huge difference, but enough to be bothersome.
Also the durability of this stuff is poor.
After a few days, a mere tap of the fingernail nicks the stuff. It was cleaned and prepped as per the instructions and the results were the same whether new bare plastic or previously painted.Maybe more time will help the bonding���.
Thread Starter
Registered User
Joined: Feb 2008
Posts: 11,798
From: Plano, TX
Reassembly!
The bottom door hinge had the hold-open roller unit and spring installed just like the left one. It worked out better to have the new hinge pins & bushings installed before painting. I installed the wiring boot (which fit much better on this side) and I secured it to the frame with weatherstrip cement and then the screws.
That Sunday, my neighbor helped me reattach the door. Adjustment was smoother and easier, based on what I had learned on the left. It still took a lot of work and patience. Boot was connected to the door and wiring run into the door.
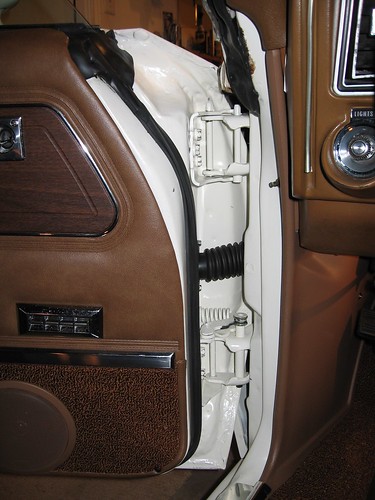
Here is the finished door jam, with restored hinges:

The next day, the manual regulator removed, dynamat (doornamat) installed, and power regulator installed with custom-cut 5/8” bolts. All wiring pulled in and secured. Window operation was verified with both switches and dynamat added to the inside inner door.
I had to make the inside door handle line up also – stupid OPG repro part!
This involved rotating the whole assembly and drilling new holes. This of course required the linkage to be tweaked so the door would even open! Now the handle is straight at least...

Finally, everything was lubed and window alignment was verified (never had to mess with it – just rechecking.)
Watershield was properly installed last with 3M strip caulk and foil tape.
Finishing up!
Door panels were installed last. Armrests, speakers, door handle, pull strap bezels, and mirror control bezels were installed, with the kick panels and door sill plates last.
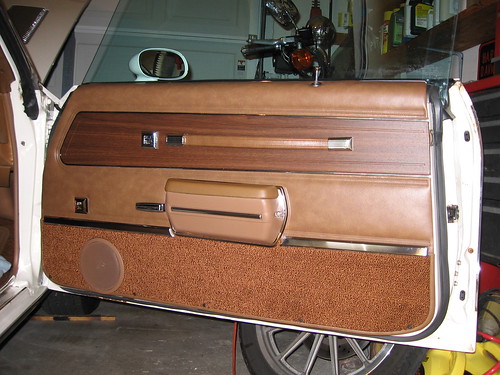
And here is the right finished door, complete with new power windows!
And here is the left:

Note this picture is after a second repaint, which corrected the previous paint's off-color.
(This is the only picture in this post with the new color.)
Note this restored door jam, too!
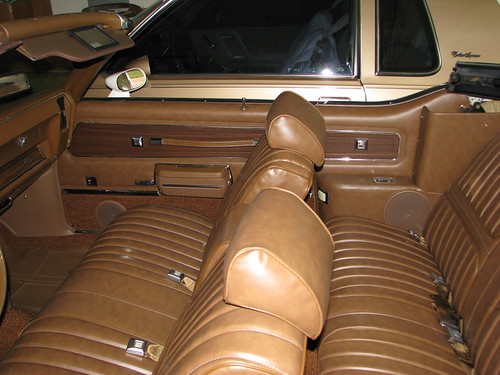
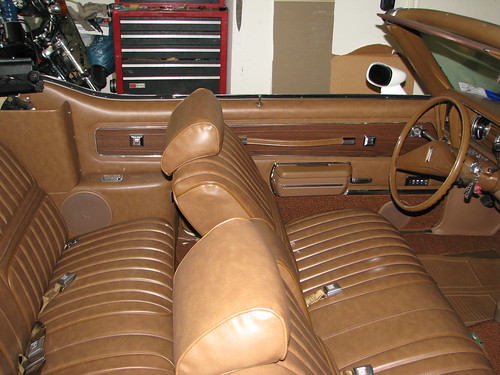
Rear quarter speakers and grilles were remounted. The painted parts look MUCH better than black!

The silver trim on the dash was repainted with a silver metallic sharpie pen and some final details completed.
I’m officially done with this interior!
Top down, windows down - let’s cruise!!

That Sunday, my neighbor helped me reattach the door. Adjustment was smoother and easier, based on what I had learned on the left. It still took a lot of work and patience. Boot was connected to the door and wiring run into the door.
Here is the finished door jam, with restored hinges:
The next day, the manual regulator removed, dynamat (doornamat) installed, and power regulator installed with custom-cut 5/8” bolts. All wiring pulled in and secured. Window operation was verified with both switches and dynamat added to the inside inner door.
I had to make the inside door handle line up also – stupid OPG repro part!
This involved rotating the whole assembly and drilling new holes. This of course required the linkage to be tweaked so the door would even open! Now the handle is straight at least...
Finally, everything was lubed and window alignment was verified (never had to mess with it – just rechecking.)
Watershield was properly installed last with 3M strip caulk and foil tape.
Finishing up!
Door panels were installed last. Armrests, speakers, door handle, pull strap bezels, and mirror control bezels were installed, with the kick panels and door sill plates last.
And here is the right finished door, complete with new power windows!
And here is the left:
Note this picture is after a second repaint, which corrected the previous paint's off-color.
(This is the only picture in this post with the new color.)
Note this restored door jam, too!
Rear quarter speakers and grilles were remounted. The painted parts look MUCH better than black!
The silver trim on the dash was repainted with a silver metallic sharpie pen and some final details completed.
I’m officially done with this interior!
Top down, windows down - let’s cruise!!
Last edited by Lady72nRob71; Jul 9, 2010 at 10:14 AM. Reason: New left door picture showing armrest base repaint.
Registered User
Joined: Dec 2007
Posts: 369
From: Nuremberg, GERMANY
The painted parts look MUCH better than black!
Let me think, finally, i havent seen an interior like yours....
Great work, as usual...
I agree with the painted grilles, they match the interior perfect!!!
Obviously before - NASTY! BTW - the top hinge had PLASTIC bushings! Anyone hear of plastic hinge bushings???
BTW - the top hinge had PLASTIC bushings! Anyone hear of plastic hinge bushings???
yesterday i received my rebuild kit...
Well lets see how it works and fit
BTW, you are missing one pull strap end cap!!!!
Regards,
Torsten
Thread Starter
Registered User
Joined: Feb 2008
Posts: 11,798
From: Plano, TX
Thanks... The empty passenger seat was my biggest problem, but hopefully that is fixed soon!
Many thanks - I thought I would never see the end of this...
Should fit well. The bushings press in with a vice (note the sizes) and the pins beat in with a hammer.
It is on there now - When i went out for that drive, the JBweld was drying. The clip part under it was loose. I was not about to let that keep me from a 200 mile drive! 
It is on there now - When i went out for that drive, the JBweld was drying.
The clip part under it was loose. I was not about to let that keep me from a 200 mile drive!
Registered User
Joined: Dec 2007
Posts: 369
From: Nuremberg, GERMANY
I was not about to let that keep me from a 200 mile drive!
I`m sure you enjoyed your trip.....
I thought I would never see the end of this...
Should fit well. The bushings press in with a vice (note the sizes) and the pins beat in with a hammer.
Torsten
Thread Starter
Registered User
Joined: Feb 2008
Posts: 11,798
From: Plano, TX
Worst part was having to come home... I do not want to see a 'door hinges wanted' post because you flattened yours....
I used a 24oz framing hammer as anything with a bigger head would not fit and hit just the pin...
Thanks.
I even got the rear suspension done - time for another longer cruise!
Many thanks... The other sides of the doors look pretty crappy now.
Looks like they need a repaint soon.
I am pretty happy with the results, except for that SEM watercolor. I got a better color match & durability with the $4 can of rustoleum that I used on the hinges and door jams.
I bet the old solvent-based SEM that they used to sell would have been much better.
Registered User
Joined: Jul 2008
Posts: 180
From: North West Michigan
Brilliant details. Rob, I have followed your interior restoration with enthusiasm and am extremely impressed with the outcome. Of course I do have questions. Have applied Fatmat to my restoration and been told by multiple local paint/body technicians not to apply Fatmat to inside of exterior shells of doors and rear quarter panels for moisture will develop between it and the metal causing rust from within.
Your comments and input would be greatly appreciated.
Rick
Your comments and input would be greatly appreciated.
Rick
Thread Starter
Registered User
Joined: Feb 2008
Posts: 11,798
From: Plano, TX
Brilliant details. Rob, I have followed your interior restoration with enthusiasm and am extremely impressed with the outcome. Of course I do have questions. Have applied Fatmat to my restoration and been told by multiple local paint/body technicians not to apply Fatmat to inside of exterior shells of doors and rear quarter panels for moisture will develop between it and the metal causing rust from within.
Your comments and input would be greatly appreciated.
Rick
Your comments and input would be greatly appreciated.
Rick
When all dry, on a dry day, I started the mat at the very tops and overlapped seams in ways to shed water. Seams were tightly sealed.
I stopped the mat before reaching the bottoms. Given all this prep and the fact that she hardly sees water, I don't worry.
Thanks!
Will NEVER Grow Up!
Joined: Sep 2009
Posts: 593
From: Landrum, SC in "The Blue Ridge Foothills"
Thanks for doing a really great tutorial on "How To restore a 442 Interior!"
I'm glad that I don't have to do that anytime soon. But, when I do, I hope your essay will still be posted.
Once again, an envious, but still cool, Oldsmamaniac!
--Don
Thread Starter
Registered User
Joined: Feb 2008
Posts: 11,798
From: Plano, TX
__________________________________________________ _______
Thanks for doing a really great tutorial on "How To restore a 442 Interior!"
I'm glad that I don't have to do that anytime soon. But, when I do, I hope your essay will still be posted.
Once again, an envious, but still cool, Oldsmamaniac!
--Don
Thanks for doing a really great tutorial on "How To restore a 442 Interior!"
I'm glad that I don't have to do that anytime soon. But, when I do, I hope your essay will still be posted.
Once again, an envious, but still cool, Oldsmamaniac!
--Don
Hopefully it will still be there for a while!
You are welcome!
Just went for a longer cruise this evening - I loved it... Revamped rear suspension is doing its thing!
Thread Starter
Registered User
Joined: Feb 2008
Posts: 11,798
From: Plano, TX
Interior paint update:
Since I was not happy with the expensive color-unmatched SEM paint I got, they remixed it for me at no charge and matched it to the armrest pads instead of the seat fabric. I was expecting to give them heck over it, but they did it no questions asked.
I tried the paint out by applying it in some large areas with a cotton swab.
It looked much better (though not perfect), so that weekend (6-24-10) I pulled off all the painted parts again and resprayed them.
I thought I was smart by spraying early in the morning while the temps were in the 80’s, but the 63+% humidity did not allow the paint to dry well. I got runs and had to remove some and start over. I figured if I did it in the evening, the mid 90’s temps would cause the paint to dry in mid-air. No application temp specs were mentioned in the TDS…
Anyway, after 3 hours, I was back inside taking a nap. Parts were left in the garage to bake dry. (That is a carpet sample upside down...)


The next weekend the parts were reassembled, in preparation to our 4th of July trips to the lake.


Looks much better (although still not perfect).
One can see the differences the new color made by comparing the two doors in this post above:
After first paint:
After repaint:
Note that the paint matches the fabric well, but in reality this armrest pad is a bit off color... The right side armrest pad was lighter for some reason so i matched the color to it.
I have half a pint of paint left; hopefully my next Olds will have the same color interior!
I tried the paint out by applying it in some large areas with a cotton swab.
It looked much better (though not perfect), so that weekend (6-24-10) I pulled off all the painted parts again and resprayed them.
I thought I was smart by spraying early in the morning while the temps were in the 80’s, but the 63+% humidity did not allow the paint to dry well. I got runs and had to remove some and start over. I figured if I did it in the evening, the mid 90’s temps would cause the paint to dry in mid-air. No application temp specs were mentioned in the TDS…
Anyway, after 3 hours, I was back inside taking a nap. Parts were left in the garage to bake dry. (That is a carpet sample upside down...)
The next weekend the parts were reassembled, in preparation to our 4th of July trips to the lake.
Looks much better (although still not perfect).
One can see the differences the new color made by comparing the two doors in this post above:
After first paint:
After repaint:
Note that the paint matches the fabric well, but in reality this armrest pad is a bit off color... The right side armrest pad was lighter for some reason so i matched the color to it.
I have half a pint of paint left; hopefully my next Olds will have the same color interior!
Will NEVER Grow Up!
Joined: Sep 2009
Posts: 593
From: Landrum, SC in "The Blue Ridge Foothills"
After hours of vacuuming and scrubbing with wire brushes, the loose crap was off. Of course, ALL of the old dried out seam sealer came out as well and will need to be replaced. All of these wires will be routed better also.
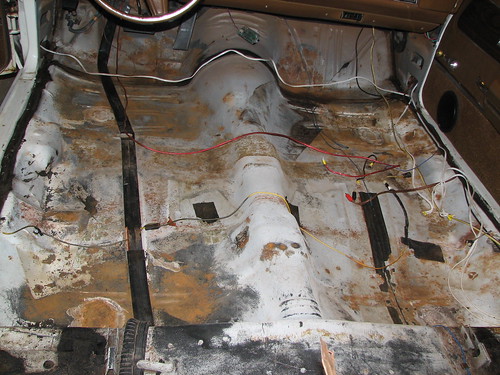
Luckily the rust was not too bad, but there were some isolated pin holes that were still surrounded by thick strong metal. These will need patching and POR-15 will be applied afterward to the entire rusted areas.
Luckily the rust was not too bad, but there were some isolated pin holes that were still surrounded by thick strong metal. These will need patching and POR-15 will be applied afterward to the entire rusted areas.
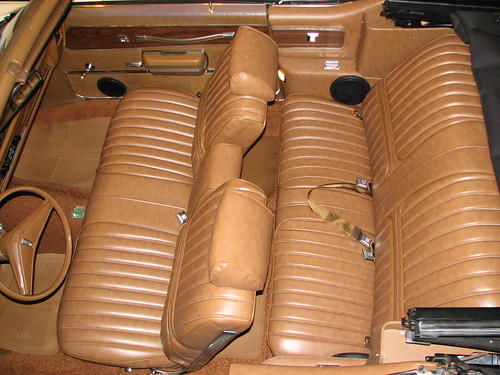
My front bench seat is at the upholsterer's getting the springs (all broken under driver's rear-end, and new foam. How did the firm foam work out for you? The rest of the vinyl is in really good shape for 45 years old.
I have the rear-seat bottom out, and the bottom of the seat back disengaged, and I'm not too sure on how to get the back out. Some say there are screws, some say lift it up? How did yours come out?
My rear seat also has a speaker in it. I want to be carefull not to damage it! I read somewhere that sometimes they had screws behind the seat under the top well.
The floor is really in good shape. Very little rust, and I'm going to use either Eastwood's or POR-15 on it.
I didn't find a build sheet under the back seat. Only lots of mice stuff! Car was stored in a barn for 8 years!
Thanks for any advice.......
--Don
Thread Starter
Registered User
Joined: Feb 2008
Posts: 11,798
From: Plano, TX
Don, my seat back lifted up. After the two bolts at its bottom were removed, the back was rocked back and forth some and lifted up at the same time. The longer it is in there, it more it seems to want to stay in there. I am not sure if yours has screws or not...
You may want to cover the speaker with masking tape and thick plastic sheeting or thick paper to prevent accidental nscratching.
I had 3 levels of foam firmness to choose from and the middle grade was ideal. The firmest was way too firm - useless for seats.
However, this may differ from shop to shop, so you might get the recommendation from the shop owner. Best thing is to try it out - sit on some that he has in the shop! If you do not sink into it, then it is too firm. Foam should conform to your body in order to provide comfortable support.
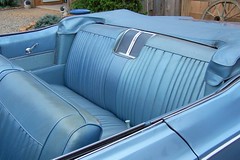
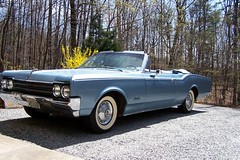
That sure is a nice blue beauty you have!
It is so cool for it to have its original upholstery in such good a shape, too!
You may want to cover the speaker with masking tape and thick plastic sheeting or thick paper to prevent accidental nscratching.
I had 3 levels of foam firmness to choose from and the middle grade was ideal. The firmest was way too firm - useless for seats.
However, this may differ from shop to shop, so you might get the recommendation from the shop owner. Best thing is to try it out - sit on some that he has in the shop! If you do not sink into it, then it is too firm. Foam should conform to your body in order to provide comfortable support.
That sure is a nice blue beauty you have!
It is so cool for it to have its original upholstery in such good a shape, too!
Will NEVER Grow Up!
Joined: Sep 2009
Posts: 593
From: Landrum, SC in "The Blue Ridge Foothills"
... You may want to cover the speaker.
Good idea!
... sit on some that he has in the shop! If you do not sink into it, then it is too firm. Foam should conform to your body in order to provide comfortable support.
I'm going to do that!
... It is so cool for it to have its original upholstery in such good a shape, too!
The trim shop owner couldn't believe the condition.
Thanks for the advice... I'll tell you what happens!
--Don
Will NEVER Grow Up!
Joined: Sep 2009
Posts: 593
From: Landrum, SC in "The Blue Ridge Foothills"
Don, my seat back lifted up. After the two bolts at its bottom were removed, the back was rocked back and forth some and lifted up at the same time. The longer it is in there, it more it seems to want to stay in there. I am not sure if yours has screws or not...
You may want to cover the speaker with masking tape and thick plastic sheeting or thick paper to prevent accidental scratching.
You may want to cover the speaker with masking tape and thick plastic sheeting or thick paper to prevent accidental scratching.
I did what you said and the seat back came straight up with a bunch of tugging! The pump, cylinders, and hoses look great. Just a tiny bit of leakage around the top of the driver's side cylinder.
There's only a small amount of surface rust on the floor.
I'll wire brush it and do the Eastwood Rust Encapsulator (I have some.) There is so little rust I'm NOT going to pull up the original carpet which is in beautiful condition. The floor is very solid, and I also inspected it from underneath before I bought Blue Belle. For being 45 years old, I'm amazed at the condition of the metal, especially since she came from Lake Forest, IL. I bought her from the original owner and he told me that she was always garaged and never driven in the winter.
Thanks, again....
--Don
Registered User
Joined: Dec 2009
Posts: 231
From: Fair Play, SC
Rob, loon-n-good! All your trim looks new now. When I did all of mine I didn't have the matching issues since all of my trim is black. Looks great put back together. Now go drive, assuming it's still not 100+ like it is here...
Thread Starter
Registered User
Joined: Feb 2008
Posts: 11,798
From: Plano, TX
Don, you sure have an original keeper! Not many can boast about the original interiors still in our cars.
Keep an eye on that cylinder weep - maybe even put some rags in there to catch anything that might come out faster later. That fluid can ruin the carpet and trim (it did to mine years ago.)
Black and white are great cause color matching is so easy! Glad the trim mess is over.
Yesterday's drive plans were cancelled due to scattered showers!
Keep an eye on that cylinder weep - maybe even put some rags in there to catch anything that might come out faster later. That fluid can ruin the carpet and trim (it did to mine years ago.)
Yesterday's drive plans were cancelled due to scattered showers!
Will NEVER Grow Up!
Joined: Sep 2009
Posts: 593
From: Landrum, SC in "The Blue Ridge Foothills"
Keep an eye on that cylinder weep - maybe even put some rags in there to catch anything that might come out faster later. That fluid can ruin the carpet and trim (it did to mine years ago.)
While wire brushing to get ready for the Eastwood's, I knocked out some seam-sealer, of course! What kind did you use, and where did you get it?
I Googled it and got confused!
--Don
Thread Starter
Registered User
Joined: Feb 2008
Posts: 11,798
From: Plano, TX
Use human hair stuffed inside pantyhose.
The next day, the perimeter body seams were resealed with 3M Ultrapro 08300 body seam sealer. Although the 08505 is more widely available, 3M has had complaints of the odor lingering inside cars for up to a month after installation. The 08300 was later recommended by 3M to use inside.
So the 08300 is recommended for interior, 08505 for exterior.
Both should be available from automotive paint suppliers - i got mine from the local English Color.
Watch out - you are walking on a thin rope.
You will try to replace more and more of that old crumbly sealer, the carpet would then need to be pulled, all sealer replaced, floorpan repainted, dynamat installed, carpet would start to look "dirty", and the process will go on forever........................................
Will NEVER Grow Up!
Joined: Sep 2009
Posts: 593
From: Landrum, SC in "The Blue Ridge Foothills"
Watch out - you are walking on a thin rope.
You will try to replace more and more of that old crumbly sealer, the carpet would then need to be pulled, all sealer replaced, floorpan repainted, dynamat installed, carpet would start to look "dirty", and the process will go on forever........................................
You will try to replace more and more of that old crumbly sealer, the carpet would then need to be pulled, all sealer replaced, floorpan repainted, dynamat installed, carpet would start to look "dirty", and the process will go on forever........................................
Thanks, Rob-
--Don
Will NEVER Grow Up!
Joined: Sep 2009
Posts: 593
From: Landrum, SC in "The Blue Ridge Foothills"
Originally posted on February 27th, 2009, 12:04 PM
One mistake I made which I will fix today is that the back two center seatbelt groups need to be bolted in with the webbing going UP. Doing this will increase the length of the belts. It is funny that I woke up at 1am, thought about this, and looked it up in the body manual to confirm… The Olds Gods have control of me I suppose…
One mistake I made which I will fix today is that the back two center seatbelt groups need to be bolted in with the webbing going UP. Doing this will increase the length of the belts. It is funny that I woke up at 1am, thought about this, and looked it up in the body manual to confirm… The Olds Gods have control of me I suppose…
I'm ordering some seat-belts for the rear seat, but I have absolutely no idea where to attach them! I have the 1965 Body Services Manual and there is not a mention of rear belts either in the "B" body or the "C" body sections. I think I might mount them on the slant portion of the floor where it goes up to the trunk divider about a foot below the top pump................................................... ..Here-------> /
___Floor_____________________________/ <--- Slant to Divider
Where did you bolt yours?
Thanks,
--Don
Last edited by Ddbord; Jul 18, 2010 at 06:57 PM. Reason: Spell'n
Thread Starter
Registered User
Joined: Feb 2008
Posts: 11,798
From: Plano, TX

Registered User
Joined: Jul 2010
Posts: 2,175
From: Montreal, QC
Hope you're having a great holiday!
I was looking over your thread, i was wondering if you could lend me a tip on installing my carpet, mainly, how do i line up the two carpets and the heel pad?? It seems that the vinyl line on the front carpet is about 6'' in front of the seat belt buckle on the floor??
Also, did you have to do a lot of trimming?? I ordered a PUI Carpet a year ago and it seems i have ALOT of excess...
Thanks!


