
'72 Cutlass Supreme Restoration


Thread Starter
Registered User
Joined: Sep 2009
Posts: 1,450
From: Hamilton, ON
Where can I find concourse type Delco shocks in the orig gray color? I see ILT has them for $80 and $90 each, but then I see Fusick has what appears to be (from the pics at least) 'regular' Delco shocks @ $30 each.
Registered User
Joined: Nov 2009
Posts: 366
From: South Portland Maine
I'm not sure they would qualify as concourse, but Rob had a good solution here: https://classicoldsmobile.com/forums...ancements.html
Thread Starter
Registered User
Joined: Sep 2009
Posts: 1,450
From: Hamilton, ON
I found a local baking soda blasting shop, and am taking my almost gutted rear end in soon to get blasted. Should be much easier to clean inside also if anything gets in there. I believe it is water soluble stuff they use (that particular media anyway). They also have other media type, can adjust PSI, and do not use sand at all.
Have not 100% decided on powdercoating yet. I still cannot get the pinion races out. Will the powdercoat oven warp them even more, and make them even harder to get out?
What color were these rear ends originally? All black, or bare cast iron center/cover with black axle tubes?
Have not 100% decided on powdercoating yet. I still cannot get the pinion races out. Will the powdercoat oven warp them even more, and make them even harder to get out?
What color were these rear ends originally? All black, or bare cast iron center/cover with black axle tubes?
Last edited by oldzy; Oct 8, 2010 at 08:54 PM.
Thread Starter
Registered User
Joined: Sep 2009
Posts: 1,450
From: Hamilton, ON
Some powdercoated frame pics. Not as nice as I expected. Several bare (4 points in particular where frame was sitting obviously) and rough spots that need to be touched up. I also see rust inside some holes. I thought it was dipped and all that crap dissolved, then zinc dipped. Oh well. guess not. I guess I can't complain too much, as it was cheaper than normal (friend of a friend thing).


Last edited by oldzy; Oct 22, 2011 at 09:48 PM.
wait.... what....
Joined: Mar 2009
Posts: 817
From: London Ont Canada
Looks good! There might be a few spots your not happy with but, it now has a rock hard finish to it that is better than the factory did it. Plus no one is going to probably see those spots when the body is back on the frame. Keep up the good work!
Registered User
Joined: Feb 2008
Posts: 11,798
From: Plano, TX
Wow - great work!
Just dab some POR15 ont he bare areas and it will not rust.
The way it turned out was a LOT better than the factory finish.
There is special paint that is "Delco shock gray" - Firewheel classics sells it, but other places do also. Very close to Rustoleum charcoal gray.
Keep it up!
Just dab some POR15 ont he bare areas and it will not rust.
The way it turned out was a LOT better than the factory finish.
There is special paint that is "Delco shock gray" - Firewheel classics sells it, but other places do also. Very close to Rustoleum charcoal gray.
Keep it up!


Thread Starter
Registered User
Joined: Sep 2009
Posts: 1,450
From: Hamilton, ON
Are these bearing caps on the right way? I drew a little diagram before removing, but did not mention orientation of the housing. Doh.
I had the entire rear end powdercoated today. Has a bunch of acne, and remaining oil inside is now all 'gummy'. Better than nothing though.

I had the entire rear end powdercoated today. Has a bunch of acne, and remaining oil inside is now all 'gummy'. Better than nothing though.
Last edited by oldzy; Oct 22, 2011 at 09:49 PM.
Thread Starter
Registered User
Joined: Sep 2009
Posts: 1,450
From: Hamilton, ON
Powdercoated rear end with acne. Looks a little too glossy to me. Not sure why, everything was done semi-gloss and the rear backing plates look less glossy.


Last edited by oldzy; Oct 22, 2011 at 09:49 PM.


Thread Starter
Registered User
Joined: Sep 2009
Posts: 1,450
From: Hamilton, ON
Started ripping apart the dash - oh so fun. A large mirror helped to see the 6 or so speed type nuts. Of course, pulling things off, something always breaks. ie. plastic parts. I also forgot just how much I messed with the wires over the past 20 years - what a mess.

Last edited by oldzy; Oct 22, 2011 at 09:51 PM.
Thread Starter
Registered User
Joined: Sep 2009
Posts: 1,450
From: Hamilton, ON
Anyone know how to safely remove these 8 plastic pieces? I see they sell replacements, but I see no mention of how to remove/replace. I want to get these powdercoated, so I need to remove the plastic somehow. At the worst, I will have to paint them.


Last edited by oldzy; Oct 22, 2011 at 09:51 PM.
Registered
Joined: Jul 2006
Posts: 4,430
From: Northeast Ohio
What does the place that sell them recommend for fastening?

Registered User
Joined: Sep 2009
Posts: 172


Dave
Last edited by fjross; Nov 20, 2010 at 04:03 AM.
Thread Starter
Registered User
Joined: Sep 2009
Posts: 1,450
From: Hamilton, ON
Picked up some GW rear frame braces. I like the looks of them better than the Hotchkis ones I have now b/c the bolt holes do not seem to 'protrude' as much as the Hotchkis. The bolts on the Hotchkis braces get very close if not touching the mufflers.

Power steering stuff back from Chip @ powersteering.com. Rebuild/fast ratio/extreme detailing.


Power steering stuff back from Chip @ powersteering.com. Rebuild/fast ratio/extreme detailing.
Last edited by oldzy; Oct 22, 2011 at 09:52 PM.
Registered User
Joined: Feb 2008
Posts: 11,798
From: Plano, TX
Nice progress, Oldzy! You have a big project going and also the right amount of patience and determination to see it through completion.
Keep up the great work!
I like the way your steering stuff turned out - I will probably send my set to Chip, also next year some time.
Keep up the great work!
I like the way your steering stuff turned out - I will probably send my set to Chip, also next year some time.
Thread Starter
Registered User
Joined: Sep 2009
Posts: 1,450
From: Hamilton, ON
Oh my, first thing mounted to the frame. 
You can still see the 'dry' spot on the frame to the right of the gearbox. I did spray it a bit with Eastwood Extreme Chassis Black, but it was pretty cold out. I thought it would it turn out a bit better but oh well. At least I covered most if not all (that I could see) of the bare spots the powdercoater forgot to do.


You can still see the 'dry' spot on the frame to the right of the gearbox. I did spray it a bit with Eastwood Extreme Chassis Black, but it was pretty cold out. I thought it would it turn out a bit better but oh well. At least I covered most if not all (that I could see) of the bare spots the powdercoater forgot to do.
Last edited by oldzy; Oct 22, 2011 at 09:52 PM.
Registered User
Joined: May 2008
Posts: 27
From: Brisbane, Queensland, Australia
I'm tossing up weather to powder coat or go the POR-15 route and spend the extra money else were, but POR-15 only comes in Black and I was thinking Dark Grey.
Your chassis looks great
How did you get your body off and going to get it back on?
Your chassis looks great
How did you get your body off and going to get it back on?
Registered User
Joined: May 2008
Posts: 467
From: Toronto,Ontario
I must commend you on the fine job you have been doing. I only wish I had the patience and resources to do that to my car. Keep the pictures coming. You are going to have a beautiful car when your done.
Thread Starter
Registered User
Joined: Sep 2009
Posts: 1,450
From: Hamilton, ON
Most of the fuel/vapor lines connected. It was not as easy as I thought it would be (even on a bare frame!) b/c either they are out of spec a bit, or I did not install them right. See how the two gray caps touch each other in the 1st pic. There should be a few inch at least gap per pics in the assembly manual.
Also, at the very back, it says there is a hole to mount a clip for the 3/8" fuel line, but the only hole nearby is a few inches away (circled in red).
Any suggestions? Try to wiggle lines further rear? tx


Also, at the very back, it says there is a hole to mount a clip for the 3/8" fuel line, but the only hole nearby is a few inches away (circled in red).
Any suggestions? Try to wiggle lines further rear? tx
Last edited by oldzy; Oct 22, 2011 at 09:53 PM.
Thread Starter
Registered User
Joined: Sep 2009
Posts: 1,450
From: Hamilton, ON
Perhaps it is this hole to use (in pink). They don't even give the right clips anyway, at least not the one that is left (for a 3/8 and 5/16" line) in a t-type position. And this the kit from Fusick and ILT (both the same).

Last edited by oldzy; Oct 22, 2011 at 09:53 PM.
Thread Starter
Registered User
Joined: Sep 2009
Posts: 1,450
From: Hamilton, ON
LOL, not really, I was cursing inlinetube earlier this evening. The main fuel line ends touch each other (almost certain my originals had a inch or so gap in between), and I had a hard time squeezing a 2" or so length of 3/8" rubber hose in. Hopefully, it is not an issue. Pics below.


Last edited by oldzy; Oct 22, 2011 at 09:53 PM.
Thread Starter
Registered User
Joined: Sep 2009
Posts: 1,450
From: Hamilton, ON
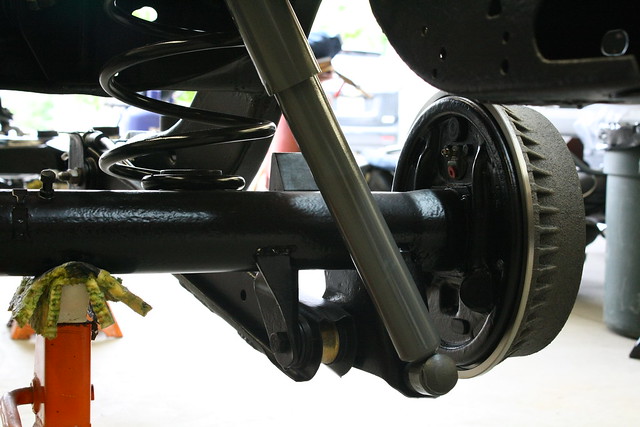
Hotchkis rear control arms with Hotchkis HPS1000 (Bilstein) circus colored shocks.  I am hoping my rear end is ready within a few weeks. I should also have my new Edelbrock rear frame braces in a few days (unlikely going to use the Hotchkis or Global West ones b/c I no like the bolts).

I am hoping my rear end is ready within a few weeks. I should also have my new Edelbrock rear frame braces in a few days (unlikely going to use the Hotchkis or Global West ones b/c I no like the bolts).
Last edited by oldzy; Oct 22, 2011 at 09:53 PM.


