
Spring Compressor problem - urgent
 November 7th, 2011, 03:42 PM
#1
Just an Olds Guy
Thread Starter
Join Date: Jul 2008
Location: Edmonton, AB. And "I am Can 'eh' jun - eh"
Posts: 24,525
Spring Compressor problem - urgent
I'm trying to put the front springs back in my car. They are out of the car so I need to compress them to get them into the upper seat and control arm. So I rented a spring compressor from Partsource (autozone). Had a hell of time getting the spring to compress because it's one of those 4 'finger' jobbies. Anyway I got the spring compressed enough to seat it, then gave it a little kick and it popped into the lower control arm...........but.....
PROBLEM: The spring compressor is too big to get through the shock hole in the bottom of the LCA.
SECOND PROBLEM: When the spring popped in, it assumed a slight 'arc' shape because the control arm is down. That takes some tension off one of the hooks completely and I can move it up and down freely. I know how dangerous the forces stored in springs are and I don't want to get hurt, or damage my car or property taking it back out. There's absolutely no point in lifting the control arm, because the compressor needs to come out first.
BIGGEST CONCERN: If I try to pop this spring back out, will it hold its shape and will the hook on the spring compressor just absorb the tension again? My guess is it will, but I need someone who knows for sure that it's safe to remove in this manner.
My options at this point are either get HD springs which are shorter, or a different style of spring compressor (plates/worm gear) like the ones used at Mercedes dealers.
 November 7th, 2011, 04:10 PM
#2
Registered User

Join Date: Dec 2009
Location: KY
Posts: 390
Hard to picture the bottom not fitting the control arm hole. Need to see pics but I'm wondering if you put the hooks of the compressor on the very top and bottom coil or one coil in from the ends. They should be in at least one coil.
If you're concerned about it flying out should you try and remove it, just take a chain or heavy rope and secure the spring loosely to the control are or frame or something so that if it does come loose, it will be held in place by the rope or chain.
When I put mine in, 11 years ago, I remember the spring being curved but I just made sure it was turned to the correct position and jacked the lower control arm up and connected the ball joint. The tip of the bottom coil has to be positioned in a certain spot if I recall correctly.
Good luck,
Randy
Last edited by W70442; November 7th, 2011 at 04:16 PM.
November 7th, 2011, 04:16 PM
#3
Connoisseur d'Junque
Join Date: Sep 2010
Location: The Hudson Valley
Posts: 21,183
It sounds like one of the fingers is loose and the other's pinched between the coils.
This is an annoying, frustrating problem.
Instead of taking it all back apart, I would recommend disassembling the compressor where it sits - remove the shaft and then remove the fingers, slip each part out individually, and drive the pinched finger out with a sledgehammer.
It worked for me.
- Eric
This is an annoying, frustrating problem.
Instead of taking it all back apart, I would recommend disassembling the compressor where it sits - remove the shaft and then remove the fingers, slip each part out individually, and drive the pinched finger out with a sledgehammer.
It worked for me.
- Eric
November 7th, 2011, 04:21 PM
#4
NOVICE car nut
Join Date: Nov 2010
Location: Milwaukee Wisconsin
Posts: 3,123
yea , I had the same problem .... the compressor would only fit in one spot on the spring , and had to compress the coils till they were almost touching each other before the darn thing was loose enough to get out.... obviously I had to draw a picture of where to put the compressor fingers it in order to get the springs back in.
November 7th, 2011, 05:06 PM
#6
Just an Olds Guy
Thread Starter
Join Date: Jul 2008
Location: Edmonton, AB. And "I am Can 'eh' jun - eh"
Posts: 24,525
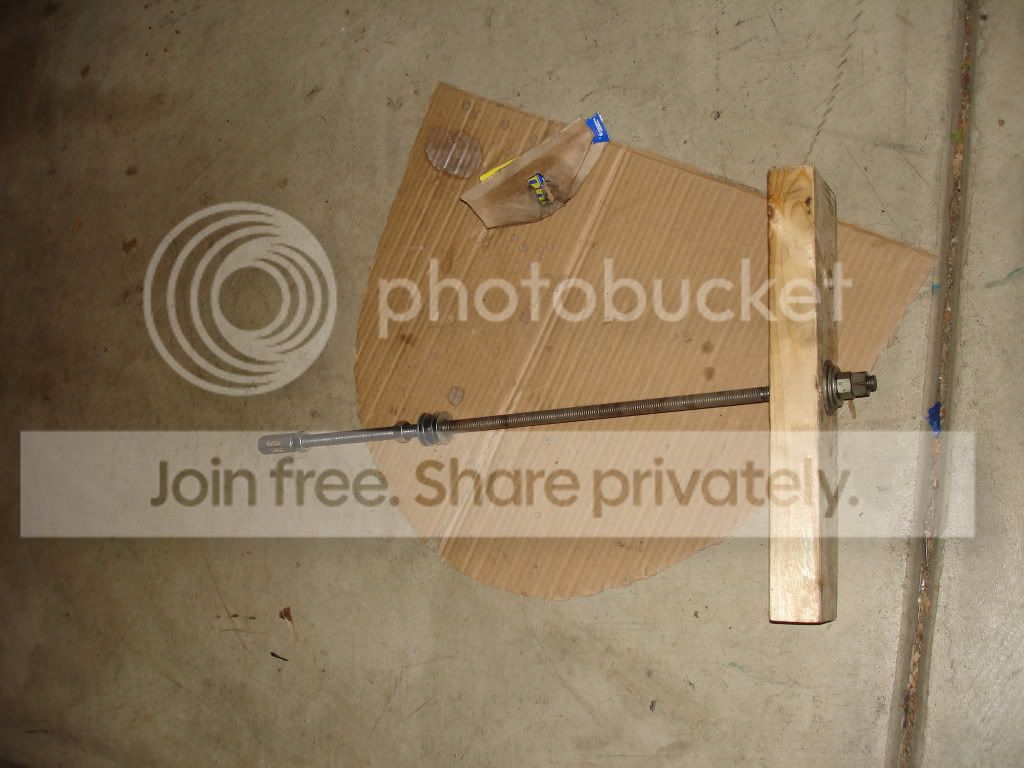
Pics for you
Ok, here are the pics
Eric, the compressor does not come apart unless you turn the worm gear all the way out of the 2 upper hook holder.
The shaft of the compressor was centered until I kicked the lower part of the spring into place. Now it looks like it's bent but it's actually the spring that's bent.
The hook I'm pointing to (and lifting to show it has no tension) is what I'm worried about. As you can see from these pics, I've totally also desecrated my paint job on this spring.
Randy, did you use this type of compressor? And it actually fit through the shock hole in the bottom of the control arm?
Ok, gearheads,wrenchers and engineers I'm waiting for your replies. This compressor has to go back to Partsource tomorrow or I've bought it and there's no way in heck I'm shelling out 110.00 for a piece of worn out crap like this.
Does ANYONE suggest that I decompress the spring and see if it will come out through the shock bracket? I guess I could try that if all else fails because that's how I got it out in the first place - with minimal tension on it.

As you can see there's no tension on this hook. The one opposite it is loaded full tension though.


Eric, the compressor does not come apart unless you turn the worm gear all the way out of the 2 upper hook holder.
The shaft of the compressor was centered until I kicked the lower part of the spring into place. Now it looks like it's bent but it's actually the spring that's bent.
The hook I'm pointing to (and lifting to show it has no tension) is what I'm worried about. As you can see from these pics, I've totally also desecrated my paint job on this spring.
Randy, did you use this type of compressor? And it actually fit through the shock hole in the bottom of the control arm?
Ok, gearheads,wrenchers and engineers I'm waiting for your replies. This compressor has to go back to Partsource tomorrow or I've bought it and there's no way in heck I'm shelling out 110.00 for a piece of worn out crap like this.
Does ANYONE suggest that I decompress the spring and see if it will come out through the shock bracket? I guess I could try that if all else fails because that's how I got it out in the first place - with minimal tension on it.
As you can see there's no tension on this hook. The one opposite it is loaded full tension though.
November 7th, 2011, 05:18 PM
#7
Connoisseur d'Junque
Join Date: Sep 2010
Location: The Hudson Valley
Posts: 21,183
Allan,
1. Yes, the compressor should fit out through that hole, if all of the parts are positioned correctly.
2. Yes, I mean unscrew the shaft from the top part, and withdraw it from the bottom part, then, if necessary, unscrew the bolts that hold the fingers on and take those pieces out.
If you tap the fingers that are pinched around to the non-pinched side, they will come out easily.
3. You put a nice coat of paint on your springs?!? Optimist.
- Eric
November 7th, 2011, 05:41 PM
#8
Registered User

Join Date: Mar 2008
Posts: 3,885
Here is what I do, but if you follow this procedure, don't sue me.. .
1. remove the ball joint boot so it won't get torn. 2. use a long bar, stand out of the way, and pry the spring out of the lower A arm.
I have a cheap Harbor Freight spring compressor, and I have made up clips like half bent staples out of 1" x 3/16" steel, with the ends short enough to pry out later but long enough to securely hold the spring coil. They should be bent at more than 90 degrees so they won't pop off. The straight center parts are about 6" long. I then compress the spring to the length I need or shorter, so that when I attach two clips it will hold the spring pretty straight and short enough. I position them so they are accessible when the spring is installed. If a bit long, I pry the spring into the lower a arm, then lift at the sway bar hole not under the spring, so I get more leverage and don't just lift the car up. Often the clips will just fall off when the ball joint is going into the spindle.
November 7th, 2011, 05:52 PM
#9
Registered User
Join Date: Feb 2008
Location: Plano, TX
Posts: 11,798
Wow - I am stumped, too. Do they still make the compressors that compress on the outside of the spring?
The bottom part looks too big to pass through the hole. If you unscrew the tool, the spring will decompress and the top hookes could be extracted. However, one ould have to unscrew the thing all the way to get the lower hooks out, but the main screw would hit the ground, first...
Can the fingers be removed as mentioned to take it all out in pieces?
Do secure the spring to the control arm before removing the tool.
November 7th, 2011, 06:02 PM
#10
Just an Olds Guy
Thread Starter
Join Date: Jul 2008
Location: Edmonton, AB. And "I am Can 'eh' jun - eh"
Posts: 24,525
It sounds like one of the fingers is loose and the other's pinched between the coils.
This is an annoying, frustrating problem.
Instead of taking it all back apart, I would recommend disassembling the compressor where it sits - remove the shaft and then remove the fingers, slip each part out individually, and drive the pinched finger out with a sledgehammer.
It worked for me.
- Eric
This is an annoying, frustrating problem.
Instead of taking it all back apart, I would recommend disassembling the compressor where it sits - remove the shaft and then remove the fingers, slip each part out individually, and drive the pinched finger out with a sledgehammer.
It worked for me.
- Eric
Allan,
1. Yes, the compressor should fit out through that hole, if all of the parts are positioned correctly.
2. Yes, I mean unscrew the shaft from the top part, and withdraw it from the bottom part, then, if necessary, unscrew the bolts that hold the fingers on and take those pieces out.
If you tap the fingers that are pinched around to the non-pinched side, they will come out easily.
3. You put a nice coat of paint on your springs?!? Optimist.
- Eric
1. Yes, the compressor should fit out through that hole, if all of the parts are positioned correctly.
2. Yes, I mean unscrew the shaft from the top part, and withdraw it from the bottom part, then, if necessary, unscrew the bolts that hold the fingers on and take those pieces out.
If you tap the fingers that are pinched around to the non-pinched side, they will come out easily.
3. You put a nice coat of paint on your springs?!? Optimist.
- Eric
2. Got it. The lower hooks are the ones that are really pinched. I need them out of there so I can rotate the spring a bit and seat it properly by the drain hole. BTW, this control arm only has one big oval drain hole. What I read in the CSM is there are 2 drain holes? The CA also has a stamped outline to limit the amount you can rotate it. Should I just position the lower coil so it blocks 1/2 the drain hole, or none of it?
3. Yeah, I'm so ashamed ......

Ummm, no. That's a brand new ball joint. Just went in 2 weeks ago and its not coming out unless it's broken. If I have to tug the spring out I think I should be ok with just wrapping a chain around it and the CA. It's not under a lot of sideway tension.
November 7th, 2011, 06:15 PM
#11
Connoisseur d'Junque
Join Date: Sep 2010
Location: The Hudson Valley
Posts: 21,183
Okay, Allan, here's what I would do:
• Put a jack or something under the end of the control arm, to be sure you've got the spring under control. If Rob is correct, and there's no room under the control arm to extract the threaded rod, you will have to jack up the car a few inches, with the control arm being jacked up a corresponding amount.
• Unscrew and remove the threaded rod. When you do, the two parts it goes through will probably reorient themselves, and may move into even worse positions.
• Move the top, non-pinched fingers off of the coils, and maneuver the top piece down, through the spring long-wise, that is, perpendicular to the position it's in now. If it's oriented vertically, it will go right through the hole.
• Use a wrench of some sort to remove the bolt that holds the pinched finger onto the lower piece. Remove the non-pinched finger and the center piece as a unit in the same way.
• With an appropriate hammer and drift, tap the pinched finger out from between the coils, either around to the loose side, or straight out --OR-- Jack up the ball joint end, thus equalizing the spring compression, and, possibly, releasing the pinched finger.
Once all the parts are out, you can reunite the ball joint and the spindle.
If necessary, you can run a chain or a rod through the center of the spring as a safety, and lower the ball joint end a bit further, so that you can place the cut bottom end of the spring squarely in the pocket.
Good luck!
- Eric
ps: if these springs aren't exactly right, you're planning to switch them for another pair next week, right?
November 7th, 2011, 06:17 PM
#12
Registered User
Join Date: Feb 2008
Location: Plano, TX
Posts: 11,798
I had just one oval drain hole, too. I had the spring end cover about 1/4 of it - within spec given in the CSM.
Can you rotate it the way it is in there now?
BTW, Run did not suggest to remove the ball joint, but just the rubber boot so it will not get torn.
Can you rotate it the way it is in there now?
BTW, Run did not suggest to remove the ball joint, but just the rubber boot so it will not get torn.
November 7th, 2011, 06:44 PM
#13
Just an Olds Guy
Thread Starter
Join Date: Jul 2008
Location: Edmonton, AB. And "I am Can 'eh' jun - eh"
Posts: 24,525
Okay, Allan, here's what I would do:
• Put a jack or something under the end of the control arm, to be sure you've got the spring under control. If Rob is correct, and there's no room under the control arm to extract the threaded rod, you will have to jack up the car a few inches, with the control arm being jacked up a corresponding amount.
Eric, there was enough room to get a 1/2" drive in there, and it would probably have been enough room to get the worm gear off. The hooks come apart like you said, and the bolts were on partly threaded (loose) when I took the hooks out. Note to self: Always check equip to see if it's safe. Never know who was using it before.
• Unscrew and remove the threaded rod. When you do, the two parts it goes through will probably reorient themselves, and may move into even worse positions.
I was lucky. I wrapped a chain around the spring and LCA. Pushed down on the LCA with both feet and gave the spring a solid tug. Out she came!
Once all the parts are out, you can reunite the ball joint and the spindle.
If necessary, you can run a chain or a rod through the center of the spring as a safety, and lower the ball joint end a bit further, so that you can place the cut bottom end of the spring squarely in the pocket.
Done. BTW, the spindle is not yet hooked up. This car has been going through a front end rebuild similar to Rob's. Only thing is this one has been scrapping with everything . Nothing has worked out easy.
ps: if these springs aren't exactly right, you're planning to switch them for another pair next week, right?
Like you can read my mind Eric! I'm going to find a different spring compressor and try this again. This one is a royal PITA. Just to get it setup is like 15 minutes of struggling.
• Put a jack or something under the end of the control arm, to be sure you've got the spring under control. If Rob is correct, and there's no room under the control arm to extract the threaded rod, you will have to jack up the car a few inches, with the control arm being jacked up a corresponding amount.
Eric, there was enough room to get a 1/2" drive in there, and it would probably have been enough room to get the worm gear off. The hooks come apart like you said, and the bolts were on partly threaded (loose)
when I took the hooks out. Note to self: Always check equip to see if it's safe. Never know who was using it before.• Unscrew and remove the threaded rod. When you do, the two parts it goes through will probably reorient themselves, and may move into even worse positions.
I was lucky. I wrapped a chain around the spring and LCA. Pushed down on the LCA with both feet and gave the spring a solid tug. Out she came!
Once all the parts are out, you can reunite the ball joint and the spindle.
If necessary, you can run a chain or a rod through the center of the spring as a safety, and lower the ball joint end a bit further, so that you can place the cut bottom end of the spring squarely in the pocket.
Done. BTW, the spindle is not yet hooked up. This car has been going through a front end rebuild similar to Rob's. Only thing is this one has been scrapping with everything . Nothing has worked out easy.
ps: if these springs aren't exactly right, you're planning to switch them for another pair next week, right?
Like you can read my mind Eric! I'm going to find a different spring compressor and try this again. This one is a royal PITA. Just to get it setup is like 15 minutes of struggling.
I had just one oval drain hole, too. I had the spring end cover about 1/4 of it - within spec given in the CSM.
Can you rotate it the way it is in there now? No. Its locked solid because of the hooks on the lower end of the spring. Sokay though, I got the sucker out. Scratched up all my purty paint, even on the LCA
BTW, Run did not suggest to remove the ball joint, but just the rubber boot so it will not get torn. Ah! Sorry bout that Run. BTW glad I didn't need to use the BFH or crowbar....
A big THANK YOU to all of youse for your help. Stay tuned for another episode maybe tommorrow???? BTW that garage floor is cccooold. That's why I have that carpet sitting next to the car - to avoid freezing my a$$ off.
Last edited by Allan R; November 7th, 2011 at 06:46 PM. Reason: hit enter by mistake
November 7th, 2011, 06:55 PM
#14
CH3NO2 LEARN IT BURN IT
Join Date: Jul 2010
Location: Land of Taxes
Posts: 5,020
Allen,
Just a friendly safety observation you really should consider replacing your brake hoses. They should never be pinched off with vice grips. This will seriously compromise the walls of the hose. There is hundreds of PSI of brake fluid passing through it depending on how hard you mash the pedal. At best you will have a caliper that wont release on the rotor due to internal collapse at worse you could hurt your car or yourself.
Ive also seen plenty of people let the caliper dangle on the hose when doing a brake job another no-no. Always support it with a bungie or wire. Good measure to replace all soft lines every 15-20 years, sooner if its a daily driver. Cheap insurance.
November 7th, 2011, 06:59 PM
#15
NOVICE car nut
Join Date: Nov 2010
Location: Milwaukee Wisconsin
Posts: 3,123
Here it is, all scratched up but outta there! BTW, for Rob note the green paint marks on the spindle? Just like the ones we both wire brushed off and then painted over... I know no one's ever going to see them, but what the heck? I had some nice green tremclad rust paint and a paint brush just sitting around.....
A big THANK YOU to all of youse for your help. Stay tuned for another episode maybe tommorrow???? BTW that garage floor is cccooold. That's why I have that carpet sitting next to the car - to avoid freezing my a$$ off.
A big THANK YOU to all of youse for your help. Stay tuned for another episode maybe tommorrow???? BTW that garage floor is cccooold. That's why I have that carpet sitting next to the car - to avoid freezing my a$$ off.
November 7th, 2011, 07:09 PM
#16
Just an Olds Guy
Thread Starter
Join Date: Jul 2008
Location: Edmonton, AB. And "I am Can 'eh' jun - eh"
Posts: 24,525
Allen,
Just a friendly safety observation you really should consider replacing your brake hoses. They should never be pinched off with vice grips. This will seriously compromise the walls of the hose. There is hundreds of PSI of brake fluid passing through it depending on how hard you mash the pedal. At best you will have a caliper that wont release on the rotor due to internal collapse at worse you could hurt your car or yourself.
Ive also seen plenty of people let the caliper dangle on the hose when doing a brake job another no-no. Always support it with a bungie or wire. Good measure to replace all soft lines every 15-20 years, sooner if its a daily driver. Cheap insurance.
Just a friendly safety observation you really should consider replacing your brake hoses. They should never be pinched off with vice grips. This will seriously compromise the walls of the hose. There is hundreds of PSI of brake fluid passing through it depending on how hard you mash the pedal. At best you will have a caliper that wont release on the rotor due to internal collapse at worse you could hurt your car or yourself.
Ive also seen plenty of people let the caliper dangle on the hose when doing a brake job another no-no. Always support it with a bungie or wire. Good measure to replace all soft lines every 15-20 years, sooner if its a daily driver. Cheap insurance.
This car is not a daily driver, it's my pet. Last time the front end was looked at was about 25 years ago, hence the overhaul. Not a lot of miles in that time - maybe 800 or so counting this year. If you want the whole story, it's on my thread disc plate backing plate . Started off with possibly a simple brake job, then changed to a 'might as well' nightmare.
I've still got 3 more days of 'good' weather before the snow is supposed to fall. Hope this is over and done by then.
Thank you again for your observations and concerns. It's good to see others who know safety is more than a word in the dictionary, and understand the implications of a bad shortcut. Cheers!
November 7th, 2011, 07:12 PM
#17
Just an Olds Guy
Thread Starter
Join Date: Jul 2008
Location: Edmonton, AB. And "I am Can 'eh' jun - eh"
Posts: 24,525

Thx Bryon. Sometimes I feel like that too....need to move somewhere where it's warm all the time and only the beer is cold
November 7th, 2011, 07:59 PM
#18
Moderator
Join Date: Sep 2006
Location: Medford, Oregon
Posts: 13,808
Spring compressors... I've got one and have only got it to work right a couple times. What I've done, and some of you may disagree, is to put the floor jack cup under the spring cup of the lower A-arm (after removing the shock). I jack it up until the spring is compressed enough to easily remove the ball joint nuts. I make sure I'm standing to the side in case the hydralics of the jack fail, and I remove the ball joint nuts. Then remove the spindle, off the top ball joint first and then the lower. Then from the front of the car, well away from the A-arm I release the floor jack. Typically the spring will not pop out, but has most of the compression off of it, still in the A-arm cup much like your first picture. I then use a long 2"X4" board and standing well off to the side poke the bottom of the A-arm outboard of the ball joint with the end of the board. Usually the spring will pop out, but not launch out.
That said, I never want anybody to put themselves in front of a coil spring while removing or installing it. But I have done this many times and felt I was safe in doing so. When the engine is still in the car there is plenty of weight to compress the spring. I have tried it on a bare chassis like the 1972 I just stripped, but had to put a LOT of weight on the front of the frame to compress the spring enough for the ball joint nuts to be loose. John
That said, I never want anybody to put themselves in front of a coil spring while removing or installing it. But I have done this many times and felt I was safe in doing so. When the engine is still in the car there is plenty of weight to compress the spring. I have tried it on a bare chassis like the 1972 I just stripped, but had to put a LOT of weight on the front of the frame to compress the spring enough for the ball joint nuts to be loose. John
Last edited by 2blu442; November 7th, 2011 at 08:12 PM. Reason: Clarified the steps
November 7th, 2011, 08:14 PM
#19
Connoisseur d'Junque
Join Date: Sep 2010
Location: The Hudson Valley
Posts: 21,183
Glad you got it out, Allan!
I don't know whether you'll find a different kind of compressor, the outside-type are for MacPherson struts, which have a shock absorber shaft running permanently through the middle and have no surrounding superstructure.
The trick with these is to pick the right coils to grab when you first start, so that the fingers run the least chance of getting pinched, and you may have to grab less of the spring than you'd like to, in order to grab them where you can access the fingers.
---- Interrupted while posting -----
It's easier to get this right if you've taken the same springs off with the same compressor, because that way, you know just where it fits properly and how much it has to be cranked down.
- Eric
November 7th, 2011, 08:18 PM
#20
Connoisseur d'Junque
Join Date: Sep 2010
Location: The Hudson Valley
Posts: 21,183
Oh, and I agree with John - that method works fine, and I've done it myself.
A spring compressor like Allan mentioned earlier, that goes through the upper shock absorber hole and essentially squeezes the spring like a shock absorber would (if it squoze), is pretty much the ideal, but I think you'd have to make it up yourself.
- Eric
A spring compressor like Allan mentioned earlier, that goes through the upper shock absorber hole and essentially squeezes the spring like a shock absorber would (if it squoze), is pretty much the ideal, but I think you'd have to make it up yourself.
- Eric
November 7th, 2011, 08:22 PM
#21
not sure if it will help at this point in the procedure, but I didn't see any mention of it before...
The way I have done these in the past, I compressed he spring with any style compressor, then used some "C" clips (Large & HEAVY duty) to keep tension on the spring and removed the compressor. Then once the spring is installed, use the weight of the car (and maybe a few friends) to jounce it enough to get the C clips back off the spring.
Tried looking for these tools, but didn't have any luck in a quick web search for them. I know a set of them are hanging on the spring compressor at a buddy's shop, but can't remember seeing them for sale for a while...
Hope this may be able to help.
-Jeff
November 7th, 2011, 08:30 PM
#22
Registered User
Join Date: Jul 2009
Location: Birmingham,Alabama
Posts: 4,714
Take both sets of fingers off the bolt>put the bolt through the shock hole @ the top>put the bottom set of fingers back on>put the spring up in the socket>put the fingers as low as they will go on the spring>tighten the screw to pull the spring up>when you have it as high as it will go,swing the lower a-arm in place>loosen the screw and you're in business. I've tried every way to install springs and this is the easiest way I have used. Be sure to put a couple of washers and some grease @ the top of the bolt where it goes through the shock hole. You will have to adjust the positioning of the fingers so the spring pulls up straight. I can't take credit for this idea,a buddy told me how he does it. I've told guys who tried it and can't believe how easy it is.
November 7th, 2011, 08:45 PM
#23
Registered User
Join Date: Dec 2009
Location: KY
Posts: 390
In the first pic, it looks like you have plenty more compression with that spring compresor. I would try it again but put the hooks another coil up on the bottom and another coil down from the top. I'd also position the hooks 90 degrees from what you did the first time. Have one toward the car and one facing away from the car. Looks like that would help in clearing the control arms though you may not have an issue with them hitting at all if you moved the hooks in a coil.
I think it's pretty normal for one hook to get loose due to the sprial of the coil.
I also put oil or grease on the threads of the compressor. That seemed to make it much easier to turn especially when you get to max compression.
Again, first thing I do once I get a spring compressed is quickly put a chain or something strong on it so that IF the compressor fails, the energy will at least be minimized if not contained completely.
Good luck,
Randy
November 7th, 2011, 08:56 PM
#24
Just an Olds Guy
Thread Starter
Join Date: Jul 2008
Location: Edmonton, AB. And "I am Can 'eh' jun - eh"
Posts: 24,525
Thx guys,
I'll give it another go tommorrow using the info you've all provided. With luck I'll have the springs in and the spindle torqued to the upper/lower ball joints.
Was a spring compressor invented by a man or a woman? I haven't worked with anything this complicated since I started dating my wife.
I'll give it another go tommorrow using the info you've all provided. With luck I'll have the springs in and the spindle torqued to the upper/lower ball joints.
Was a spring compressor invented by a man or a woman? I haven't worked with anything this complicated since I started dating my wife.
November 7th, 2011, 09:30 PM
#25
Registered User
Join Date: Oct 2009
Location: Central IN
Posts: 1,226
Oh, and I agree with John - that method works fine, and I've done it myself.
A spring compressor like Allan mentioned earlier, that goes through the upper shock absorber hole and essentially squeezes the spring like a shock absorber would (if it squoze), is pretty much the ideal, but I think you'd have to make it up yourself.
- Eric
A spring compressor like Allan mentioned earlier, that goes through the upper shock absorber hole and essentially squeezes the spring like a shock absorber would (if it squoze), is pretty much the ideal, but I think you'd have to make it up yourself.
- Eric
More info...
November 8th, 2011, 01:16 AM
#26
Registered User

Join Date: Nov 2010
Location: St Louis, MO
Posts: 904
Yep, made the same type of contraption. But mine used a piece of C channel for the cross piece.
November 8th, 2011, 11:59 AM
#27
Just an Olds Guy
Thread Starter
Join Date: Jul 2008
Location: Edmonton, AB. And "I am Can 'eh' jun - eh"
Posts: 24,525
UPDATE: Am I on the right track???
Frick! Stupid computer just dumped all my post. So here we go again.
I finally got the compressor hooks in what I think are the right spots and compressed the spring about 2 1/2" after a good half hour of fiddling with it. Test fit: Looks like it might fit ok with a boot to the lower spring, and I would be able to rotate it for position by the drain hole. BUT (notice its a BIG but??) the compressor shaft is sticking way up inside the spring seat. The spring is about 4" from even touching the seat. I've tried to position the spring to where it is closest to the seat flanges. One side of the spring is close, but the other side will hit the flange when pressure comes off.

The spring looks like it will go into the lower CA ok with a little persuasion and note it's not binding on anything this time. Moving the hooks up was a good idea

Now the big question is about the upper spring mount. I don't know if you can see it in this shot, but what I did was position the compressor shaft as close to the shock hole as possible (the shaft is way too big to fit through the hole by a little more than 1/8". I don't think it's a good idea to drill out the hole because the shock bushings are an exact fit to that hole.
If I kick the spring into place it will be 'eccentrically' offset at the upper mount. Can the spring be 'levered' into position with a tire iron as the compressor shaft releases stored energy? I don't want to end up with such a released force that it kicks the spring right out, and I think I have to do this really carefully (a little at a time) to get the spring to where it will naturally unload around the seat flange. I can chain it to the CA to minimize any possible kickout I guess.
I can't get a really good shot of this but you can see that the spring is not centered like it's supposed to be. All because of the compressor shaft sticking out so much

I have to take this stupid tool back today, so I'm hoping someone will chime in fairly quickly on this. I've released most of the tension on the spring right now just to be safe.
Pls LMK if I'm on the right track. I know these springs have enough stored energy to kill me and do serious damage to the car if not handled right.
I finally got the compressor hooks in what I think are the right spots and compressed the spring about 2 1/2" after a good half hour of fiddling with it. Test fit: Looks like it might fit ok with a boot to the lower spring, and I would be able to rotate it for position by the drain hole. BUT (notice its a BIG but??) the compressor shaft is sticking way up inside the spring seat. The spring is about 4" from even touching the seat. I've tried to position the spring to where it is closest to the seat flanges. One side of the spring is close, but the other side will hit the flange when pressure comes off.
The spring looks like it will go into the lower CA ok with a little persuasion and note it's not binding on anything this time. Moving the hooks up was a good idea
Now the big question is about the upper spring mount. I don't know if you can see it in this shot, but what I did was position the compressor shaft as close to the shock hole as possible (the shaft is way too big to fit through the hole by a little more than 1/8". I don't think it's a good idea to drill out the hole because the shock bushings are an exact fit to that hole.
If I kick the spring into place it will be 'eccentrically' offset at the upper mount. Can the spring be 'levered' into position with a tire iron as the compressor shaft releases stored energy? I don't want to end up with such a released force that it kicks the spring right out, and I think I have to do this really carefully (a little at a time) to get the spring to where it will naturally unload around the seat flange. I can chain it to the CA to minimize any possible kickout I guess.
I can't get a really good shot of this but you can see that the spring is not centered like it's supposed to be. All because of the compressor shaft sticking out so much
I have to take this stupid tool back today, so I'm hoping someone will chime in fairly quickly on this. I've released most of the tension on the spring right now just to be safe.
Pls LMK if I'm on the right track. I know these springs have enough stored energy to kill me and do serious damage to the car if not handled right.
November 8th, 2011, 04:33 PM
#28
Just an Olds Guy
Thread Starter
Join Date: Jul 2008
Location: Edmonton, AB. And "I am Can 'eh' jun - eh"
Posts: 24,525
RESOLVED!! Yea!!!
It's done! Woo Hooo!!! I'm so happy you couldn't bring me down from cloud 9 with a ton of bricks !!!!
Shortly after my last post I noticed my neighbor was home. He's a police constable who used to be the service foreman at a local Yota dealership. Anyway I asked him to come over and eyeball my problem.
'Easy fix' he says. Goes back to his house and brings back 3 honkin big prys. The way he figured it is that I pulled the springs out (rusty as heck) and they popped out with a persuading tug. So he figured they should go in a lot easier now that everythings all cleaned up. Here's what we did.
1. Orient the spring to where I want it to end up.
2. Insert the upper end into the seat, then line up the spring in the lower CA
3. Gentle assist to the spring from a pry and POP! in it went. Minor adjustment to line up the end with the drain as per CSM
4. Jack up LCA and connect upper / lower ball joints to spindle
Off to the other side, repeat process. Took all of 15 minutes to do both sides. Thank God for neighbors who know what they're doing and have the right tools.
Return the compressor to Partsource. Didn't say anything to them about how I hated using it. Decided to buy a rattle can of black engine enamel to touch up the scuffs I put on the springs and CA's. With some creative angle shots and masking, I got it all looking like new again. The white marks you see on the arms and springs are actually reflections. The paint was still wet when I took these shots. The rest of the assembly should be pretty straight forward from here on. Should be back on the ground and rolling by Thurs I hope. That's the refinished gear box arm waiting for the steering linkage at the top left of the pic.
November 8th, 2011, 04:45 PM
#29
NOVICE car nut
Join Date: Nov 2010
Location: Milwaukee Wisconsin
Posts: 3,123
That picture a few replies above with the compressor orientation in that spring was real close , from what I remember I could only grab like three or four coils or it will interfere in some way.... thats why I drew a picture of the spring and counted and marked each spot that the fingers from the compressor sat , so I knew where to put them when I put it back on
November 8th, 2011, 05:02 PM
#30
Registered User
Join Date: Dec 2009
Location: KY
Posts: 390
You might not like to hear this but if you really don't think that the upper end of the spring will pop into place when the tension is released, you may have to take the compressor off and rotate it so that, when it curves when compressed, it will curve such that it will be in the correct position when compressed. I can't really see how far it is off but I would think that it would pop into place once you got the control are raised with the jack.
Most places "rent" those compressors for just the value of the tax on the item so getting another one shouldn't be a big deal. I'd actuallly call them and tell them that I was going to keep it another day or two if I needed it.
Oooops, you posted while I was typing. Congrats !!!!
Most places "rent" those compressors for just the value of the tax on the item so getting another one shouldn't be a big deal. I'd actuallly call them and tell them that I was going to keep it another day or two if I needed it.
Oooops, you posted while I was typing. Congrats !!!!
Last edited by W70442; November 8th, 2011 at 05:06 PM.
November 8th, 2011, 05:19 PM
#31
Registered User
Join Date: Feb 2008
Location: Plano, TX
Posts: 11,798
GREAT! SUCCESS!! Sounded about as easy as mine went in! Of course mine were shorter, so I did not even get a stinkin' compressor thingie...
After this mess, things should roll along fairly smoothly.
One thing though - you did make sure you got the left spring on the left and the right one on the right - correct? They are wound in opposite directions.
After this mess, things should roll along fairly smoothly.
One thing though - you did make sure you got the left spring on the left and the right one on the right - correct? They are wound in opposite directions.
 November 9th, 2011, 08:27 AM
#34
Just an Olds Guy
Thread Starter
Join Date: Jul 2008
Location: Edmonton, AB. And "I am Can 'eh' jun - eh"
Posts: 24,525
November 9th, 2011, 09:17 AM
#35
Seasoned beater pilot.
Join Date: Jan 2007
Location: Chicago
Posts: 5,468
Mine were an adventure as well. Only took 1/2 hr, but it was definitely creepy.
I used 4 outside type compressors, tightened them all down equally, and gradually, then bolted chains around the 2nd from the top/bottom coils to keep them compressed.
Removed the compressor rods , slipped the springs in the pocket, grabbed 2 ratchets with extensions, and unbolted the chains. BOING!
November 9th, 2011, 09:30 AM
#36
Just an Olds Guy
Thread Starter
Join Date: Jul 2008
Location: Edmonton, AB. And "I am Can 'eh' jun - eh"
Posts: 24,525
I think the process is exactly the same for the B bodies only you're working on a slightly larger scale. Glad yours turned out ok too!
November 9th, 2011, 09:48 AM
#37
Registered User
Join Date: Jul 2010
Location: Montreal, QC
Posts: 2,175
Hey Allan,
So if i understand correctly, you didnt need to use a spring compressor in the end?? You just jacked up the LCA to be able to get the spindles back on?
I'm going to be doing my front suspension VERY Soon, and would appreciate any insight on what tools to use. I've got stock springs and drum brakes up front.
It's done! Woo Hooo!!! I'm so happy you couldn't bring me down from cloud 9 with a ton of bricks !!!!
Shortly after my last post I noticed my neighbor was home. He's a police constable who used to be the service foreman at a local Yota dealership. Anyway I asked him to come over and eyeball my problem.
'Easy fix' he says. Goes back to his house and brings back 3 honkin big prys. The way he figured it is that I pulled the springs out (rusty as heck) and they popped out with a persuading tug. So he figured they should go in a lot easier now that everythings all cleaned up. Here's what we did.
1. Orient the spring to where I want it to end up.
2. Insert the upper end into the seat, then line up the spring in the lower CA
3. Gentle assist to the spring from a pry and POP! in it went. Minor adjustment to line up the end with the drain as per CSM
4. Jack up LCA and connect upper / lower ball joints to spindle
Off to the other side, repeat process. Took all of 15 minutes to do both sides. Thank God for neighbors who know what they're doing and have the right tools.
Return the compressor to Partsource. Didn't say anything to them about how I hated using it. Decided to buy a rattle can of black engine enamel to touch up the scuffs I put on the springs and CA's. With some creative angle shots and masking, I got it all looking like new again. The white marks you see on the arms and springs are actually reflections. The paint was still wet when I took these shots. The rest of the assembly should be pretty straight forward from here on. Should be back on the ground and rolling by Thurs I hope. That's the refinished gear box arm waiting for the steering linkage at the top left of the pic.
November 9th, 2011, 10:15 AM
#38
Just an Olds Guy
Thread Starter
Join Date: Jul 2008
Location: Edmonton, AB. And "I am Can 'eh' jun - eh"
Posts: 24,525
Hey Allan,
So if i understand correctly, you didnt need to use a spring compressor in the end?? You just jacked up the LCA to be able to get the spindles back on?
I'm going to be doing my front suspension VERY Soon, and would appreciate any insight on what tools to use. I've got stock springs and drum brakes up front.
So if i understand correctly, you didnt need to use a spring compressor in the end?? You just jacked up the LCA to be able to get the spindles back on?
I'm going to be doing my front suspension VERY Soon, and would appreciate any insight on what tools to use. I've got stock springs and drum brakes up front.
2. When you're ready to start your suspension, I'd be pleased to help you any way I can. Having a drum front brake is not that big a deal. It's not a hard thing to do, just very time consuming when you're dealing with built up gunk, grease or rusted parts. You can post your progress on the site and that will keep everyone up to speed with your project. Be advised though; just about when you think something is close to done, something else pops up that 'might as well' get done while everything's apart. You really have to control those urges or before long you'll have a garage full of parts that used to be a car
For references, you can go to either of these threads: https://classicoldsmobile.com/forums...t-end-job.html (that's from Lady72'nRob71 - Rob Young) or mine - which I need to update shortly with the progress to date. I expect my suspension, steering and brakes will be back together and on the ground by the end of the week. My project started as a brake job question: https://classicoldsmobile.com/forums...ing-plate.html
November 9th, 2011, 10:49 AM
#39
Registered User
Join Date: Jul 2010
Location: Montreal, QC
Posts: 2,175
Hey Allan,
That's exactly what i plan on doing! I might not be good at suspension jobs but i can sure take a bunch of pictures!
I do feel quite the same way about the "might as well's", I started 2 weeks ago by saying i "might as well" replace the windshield since it's cracked, which is turning out to be a complete dash removal and welding in a new dash from one of our fellow CO members.
So far, my brake spindles are clean since i tore out the break system (lines and all) and bent all new lines from Flexible hoses to brake drums.
I'm probably going to start by disassembling, cleaning up the LCA and UCA's and shooting them with some chassis paint.
I have all the parts ready in boxes (balljoints, shocks, bolts, nuts, bushings and BFH) Unfortunately i was meaning to get to this suspension since last december...
That's exactly what i plan on doing! I might not be good at suspension jobs but i can sure take a bunch of pictures!
I do feel quite the same way about the "might as well's", I started 2 weeks ago by saying i "might as well" replace the windshield since it's cracked, which is turning out to be a complete dash removal and welding in a new dash from one of our fellow CO members.
So far, my brake spindles are clean since i tore out the break system (lines and all) and bent all new lines from Flexible hoses to brake drums.
I'm probably going to start by disassembling, cleaning up the LCA and UCA's and shooting them with some chassis paint.
I have all the parts ready in boxes (balljoints, shocks, bolts, nuts, bushings and BFH
) Unfortunately i was meaning to get to this suspension since last december... 1. You understand correctly. When the spring goes back in, you just put your jack under the Control arm shock cup and jack it up. It will lock in the spring and when the control arm is the right height, you just reconnect your upper and lower ball joints to the spindle. Turn the nuts till they're on at least 5 or 6 threads and you can lower the jack. Then you can torque the ball joint castle nuts and put in the cotter pins. Sounds too easy doesn't it?
2. When you're ready to start your suspension, I'd be pleased to help you any way I can. Having a drum front brake is not that big a deal. It's not a hard thing to do, just very time consuming when you're dealing with built up gunk, grease or rusted parts. You can post your progress on the site and that will keep everyone up to speed with your project. Be advised though; just about when you think something is close to done, something else pops up that 'might as well' get done while everything's apart. You really have to control those urges or before long you'll have a garage full of parts that used to be a car
For references, you can go to either of these threads: https://classicoldsmobile.com/forums...t-end-job.html (that's from Lady72'nRob71 - Rob Young) or mine - which I need to update shortly with the progress to date. I expect my suspension, steering and brakes will be back together and on the ground by the end of the week. My project started as a brake job question: https://classicoldsmobile.com/forums...ing-plate.html
November 9th, 2011, 11:45 AM
#40
Just an Olds Guy
Thread Starter
Join Date: Jul 2008
Location: Edmonton, AB. And "I am Can 'eh' jun - eh"
Posts: 24,525
Hey Allan,
That's exactly what i plan on doing! I might not be good at suspension jobs but i can sure take a bunch of pictures! So far, my brake spindles are clean since i tore out the break system (lines and all) and bent all new lines from Flexible hoses to brake drums. I'm probably going to start by disassembling, cleaning up the LCA and UCA's and shooting them with some chassis paint. I have all the parts ready in boxes (balljoints, shocks, bolts, nuts, bushings and BFH) Unfortunately i was meaning to get to this suspension since last december...
That's exactly what i plan on doing! I might not be good at suspension jobs but i can sure take a bunch of pictures! So far, my brake spindles are clean since i tore out the break system (lines and all) and bent all new lines from Flexible hoses to brake drums. I'm probably going to start by disassembling, cleaning up the LCA and UCA's and shooting them with some chassis paint. I have all the parts ready in boxes (balljoints, shocks, bolts, nuts, bushings and BFH
) Unfortunately i was meaning to get to this suspension since last december...On your list of parts, make sure you have ALL the upper, lower CA bushings, stabilizer bushings, and new link kits. If you need new locking nuts or bolts check your local bolt supply house. I went to the one here and got new locking nuts (11/16) for the upper control arms cheap like borscht. (gr 8) Also, you want to keep Partsource in mind. They have 'free' tool rentals and you'll need a Ball Joint press kit, + a bushing press kit. They have both and this makes the bushing and ball joint work easy. Other than that, I found that an air ratchet and impact driver + assorted wrenches/sockets are your basic friends on a rebuild. For some strange reason, you will find that some nuts or bolts on your car may not be standard, they might need a metric socket/wrench instead. It baffles me too.
Do you have access to a bead blaster? That will make your cleanup work really easy. Follow up with a light sanding to smooth out the surfaces that were blasted. If there are good powder coaters that will give a deal, I'd seriously look at them for the Control arms. Paint does work well too; I guess it comes down to what is affordable and practical.


