When you click on links to various merchants on this site and make a purchase, this can result in this site earning a commission. Affiliate programs and affiliations include, but are not limited to, the eBay Partner Network.
As you move forward today, I want to point out something we can't clearly see since no one can see the entire wiring on your car. Note that CO member Stellar indicated the blue wire goes to "F" - this is critical. Do not place the blue wire on "R".
Someone has seriously noodled about with those two wires (white & blue). Both (blue & white) wires should be contained within a black socket and the black socket should be plugged into alternator. Why someone would have removed the black socket and left the blue & white wires open is anyone's guess - but that is not correct. I'm suspecting somewhere along these two (blue & white) wires you are most likely to find an "issue". Pay careful attention to how you hook up the blue & white wire and trace those two wires to ensure they feed correctly. Again, someone has been noodling around with the connection wires for some reason. Good Luck.
Originally Posted by boamridge
question here is do the blue connects to the r side or the f side in the back of Alternator…. The blue comment has play at the connector
Before install just battery alone before I left the parts store last night test 12.63
this morning I did my own multimeter test and it was 12.40 I called the part store to get some feedback about my reading and there�s and he said that maybe it�s the difference of volt testers as their are commercial mine is a cheapo
so before cables went on it was12.40
after I hooked the negative then positive terminal alternator as well it went 12.45
1/2 later still with cables hooked up alternator connected properly it read 12.45 still
I will continue to monitor it as the day goes on to see if there�s any change
I just walked in the door & I need to begin cleaning persimmons I picked today. I'm not comfortable, and you should not be comfortable with what I am seeing in these images. You should never have two black wires to a battery - plain and simple never. That is a disaster waiting to happen and honestly it speaks to what we may find next - that is a disaster and if it represents what we may find next, you're in for some serious hardship. What you need to do (I'm going to STRONGLY suggest this from the very first start before we move any further) is to at the absolute very minimum wrap red tape at the end of the positive wire leading to the positive (+) battery terminal. I'll have more to address shortly. But you have a disaster there.
Remove that torn up ancient disaster looking electrical tape off the positive cable leading to the alternator - another disaster waiting to happen, IMO. In all honestly, you need to clean up that mess.
Trace both the blue wire and the white wire and make 100% certain they are routed correctly at the other end (e.g. VR). Look at the wiring diagram.
That skinny black wire which is joined by a Ben & Franklin 0.10 butt connector leading to the red wire is another disaster waiting to happen if it hasn't already happened. I believe that wire leads to the horn relay junction. Remove the wires from the horn relay junction and clean the horn relay junction terminal(s) and the ends of the wires which attach to the horn relay junction.
You're trending in a positive direction with the batteries state of charge, but those wires are a nightmare. Please, clean up that mess & remove all the bubble gum wrapping which no one can determine what is going on there. This is paramount. We can't work like this, honestly. I'm willing to assist, but you need to clean that mess up. We'll get you there, but you need to clean things up.
In addition to what Norm has mentioned, all 12v Positive wiring inside the engine bay should always be RED. Keeps the gremlins at bay. You can buy RED wire and terminals at any auto parts store. I would replace that wire going to the Pos terminal on the Alternator with 16 ga. RED wire. While you're at the auto parts store, buy a replacement for the 2 wire alternator plug.
Agree w/ what Randy stated. We collectively would like to get you to a point you feel you've made great progress and can feel comfortable with moving forward. Working with someone else disaster only perpetuates the disaster and often leads to further disasters. This may take you another day (or two) but let's get this engine bay wiring cleaned up so we can think logically how to fix your issue and get build some confidence in your trust with the vehicle. We're not going anywhere, it's your dime, you call but we're providing you the best option and that is to clean up the wiring to move forward with methodical troubleshooting.
At this point, it would be so easy to say - OK, just fire up the car with a new alternator and new battery and we'll just see what happens. Well, that's plain wrong. You in particular need to know and assure yourself you know where those wires make contact and they are routed correctly. There are no ifs and or buts about this. But, hey - if you want to leave it as is and fire it up - that's your call alone, but I would never recommend that to you as your wiring presents itself currently. Save yourself the headaches, take your time, clean it up and do it right.
I am quite uncomfortable with the wire Randy is referencing - that blue wire leading to the positive terminal post of the alternator. No one who has ever worked on any electrical device/appliance would ever run a blue wire to the positive terminal of that alternator (or anywhere to any appliance for that matter - never). It is plain, simple, stupid and wrong. What you seriously need to do is ensure you know where that blue wire is going at the other end, as well. We can't address this stuff without some level of confidence you're following the wiring diagram.
I suspect you don't know how to follow the wiring diagram because those wire colors do not represent the wiring diagram and that creates more trepidation on your part. Let's eliminate that trepidation and build some confidence in the troubleshooting and the wiring so you again have some confidence this is done correctly. You'll get there - with a little more pain - but, you'll get there.
In addition to what has been said about battery cables I would add that your positive cable should be about as large as the negative cable. That small gauge cable doesn't do well on the positive side.
Look I�m starting from scratch here not knowing where anything goes because of the paint that has been over the wires �..now I am going to rewire and clean some areas but for the interim to get a gauge on what is going on with the charging and not charging problem
im sending pics only to show for example the blue wire to the alternator or maybe the fusable link not for you to rave on about what you see not cleaned wow I have not got to a lot of areas dude chill and help if you have the knowledge if not thanks anyways
after all your talk Notm �..what and where need to be checked next dealing with the charging aspect you said very little on the main aspects what about the testing numbers ��just is trending in a positive diredction if so just say that lol not a paragraph to hear yourself or see yourself talk or sound whatever you are trying to sound like please keep it my friend this a start to correct people mistakes or unfinished work
it is a 69 ��
With that said. It is my STRONGEST opinion, your very first step is this.
Look at, review and understand the 1969 wiring diagram. Each wire is labeled with the size of the wire, the color of the wire and the routing of the wire. There is nothing mysterious about this. That is how GM assembled and wired the vehicle. They did not wire a crow's nest of meandering off-colored wires into the engine bay - someone else did. Someone who wasn't thinking clearly. SIZE of the wire is critical. Look at the wiring diagram. If you don't have wire cutters (buy one), buy the correct size and the correct color wire; in addition, purchase some heat shrink wrap to enclose end points on wire and splices. Yes, folks get by and use butt connectors without soldering wires together (best) and they wrap with electrical tape - that's fine, but it isn't preferred.
We're going to be (I'll speak for myself) - I'm going to be a little bit picky here about what I see, but I believe you're a person who wants this done correctly and you can handle the straightforwardness of our communication. Nothing is personally directed, it's to help/assist you.
Norm norm forget your help my friend�..I don�t want it thank you cause I have not wired one thing in this car furthermore I don�t want to spend one more second trying to defend to you lol this type help please take your help to someone else but I do thank you
Norm I am not taking nothing person here lol its just the way you are going about trying to help isnt helping ......no by all mean stay like you are it is not taken personally in any way..... I just do not want your type help .....no problem
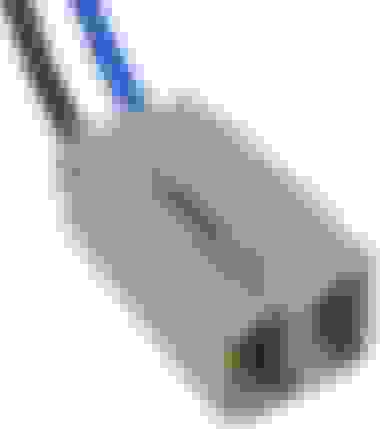
This is the connector you need to repair your blue/white alternator wires. You should be able to find this and other connectors to clean up and make good wiring repairs.
We're talking about a 52 year old GM A-body that has been through who knows how many owners- EACH of whom has left their stamp on this car. Wiring unfortunately is one area where ignorant people try to fix things over the years to keep the car running. They don't know or care about correct, they want the car running so they can get where they need to go.
Plastic pieces get old and brittle and break when trying to remove them. Otherwise why are replacements made?
Both my Starfires and my Toronado had their original battery cables when purchased. Both + and - cables were black. They've been replaced with a combination of NOS and Fusick reproduction parts- also black. The 70s side-terminal cars have gray cables; + cable has a moulded red battery end, - has black.
Parts store + cables rarely have the full-length junction block pigtail; they come with a short pigtail and a butt splice connector. Not my preferred way to do it, but again goes back to someone needed their car repaired.
Boamridge, you can get reproduction underhood wiring harnesses but they're $$$. No reason that, equipped with a wiring chart and some new connectors, you can't repair what's there. Joe Padavano has some good posts on making good splice repairs and sources for the connectors. Look in tech editors desk forum.
Last edited by rocketraider; October 12th, 2021 at 04:18 PM.
WOW!!!!!!!!!!!!!! Amazing how things work out when direction is applied in a direct way.
So, I was informed to do a parasitic draw test and found the culprit. For people that need the help like myself lol , I turned my volt tester to Amps (10a) side , I disconnected my neg battery terminal, I put a aligator clip on one end of the multi tester then the aligator clip on the neg post.
I placed the other aligator clip on the end of the neg multi test then placed that end of the aligator test to the neg terminal
And wow I had a above .50 reading actually it was .77, so I went to my fuses pulled a couple then found the culprit my radio fuse which was not blown but when I pulled it out my multi tester went to zero.....now in the coming days I will pull the after market radio and amplifier completely out then start over......
After I pulled the bad fuse I lef tit out connected my negative termianl back onto the neg post proceeded to crank the car to do a final charging test while the car is running and got a 14.63 reading ...see pic....
Look OC family one person does not have the answer ....however proper/diliberate direction just might turn up the answer.....no jab at anyone trying to help but be mindful that your knowledge is your knowledge and if you decide to share it do just that share it.....be well all
I hope my post helps anyone that need it kinda simple but man this crap has been puzzling to me to find a parasitic draw. I will post update in days to come to show how a couple days of sitting charging test reading before and after cranking
Now, hopefully as I monitor the charging I can get to cleaning up wires getting all the paint crap off to see real colors. Change wires that are not right gauge and better connectors etc.....
FUN71 thanks for the words .....means a lot as I am not a mechanic nor electrician just a guy with an old car that wants to what I can before having to haul it to shop and pay wow type money to find out what I just found....simple things
OOPS my bad on the pic ...as the reading was going from 14.31 to 14.63 range, I took the pic thought it was the 14.63 reading but you guys get the pic......its charging that is all that matter, right
Most shops (here anyway) are all over top of $100/hr labor rate and a lot have a minimum diagnostic charge. I figure you've saved a few Benjamins by doing the troubleshooting.
Get some paint thinner, a box of white or blue paper shop towels, and some 0000 steel or brass wool. These will clean overspray and decades of grunge off the wires so you can see what color each wire is. Has another benefit of softening wire insulation.
If you have to splice in new wire you may not be able to find an exact color match. In that case, get some wire labels at Lowe's or somewhere like that and mark what the wire is for reference down the road.
I went to my fuses pulled a couple then found the culprit my radio fuse which was not blown but when I pulled it out my multi tester went to zero.....now in the coming days I will pull the after market radio and amplifier completely out then start over......
After I pulled the bad fuse I lef tit out connected my negative termianl back onto the neg post proceeded to crank the car to do a final charging test while the car is running and got a 14.63 reading ...see pic....
Ho-kay... plot thickens!
That pop you heard in the no start thread was probably your amp frying itself.
What kind of head unit and amp are you running? Ideally amp should power off the junction block with a trigger relay on the head unit so they'll power up together. There are a couple guys on here who installed professionally. They'll help you with that end of it. But for now leave all the audio equipment disconnected.
Ye gods. An amp that pulls the battery down to 10v just by turning on.😬
WOW !!!!!! That could have been the pop if you noticed in pic I left off the power connector that would normally go on the positive terminal......The head unit is a Pioneer and the amp/woofer is 250/1 Memphis and Memphis 12 woofer ....thats all.....
Keep this in mind when making new connections. It is my opinion that crimping connections is better than soldering if it is a good crimp. A GOOD crimp is the key here. If you can't get a good crimp you should probably solder. To get a good crimp you need to have a good crimping tool and use the correct size connectors. A soldered connection has higher resistance and is more susceptible to breakage over time from movement and vibration. Good luck with your wire repairs.
Stellar thanks for that ��you have read my mind on the crimp tool going by harbor freight today because I�d rather crimp�.any other tidbits shoot it my way
rocketraider , Yesterday 08:22 PM
Oldsdruid
Most shops (here anyway) are all over top of $100/hr labor rate and a lot have a minimum diagnostic charge. I figure you've saved a few Benjamins by doing the troubleshooting.
Rocketraider this is what a good forum site should be about SAVING some benji�s
Shop wanted me to leave it with them and they�ll get to it also they could not tell me anything off hand with 20 plus years of experience they sad they would have to �look into it� ��man that sounds like a few bills to shell out so was worth a try myself ��just gotta take the time and patience�..either of which I�m learning to be about with this old car
A HF crimp tool will do it but makes a flat crimp. I like the G-B or NAPA Carlyle style crimper as they make a stronger crimp. They're more expensive but a crimper is one of those "lifetime" tools.
T&B brand connectors are better than the HF stuff too.
This is just me but I like to use shrink tubing on any wiring connector. Keeps moisture and grunge out and gives a finished look to the repair. HF shrink tubing works fine.
From top- NAPA Carlyle, G-B, and a generic like HF sells. Note the tooth in the crimper that ensures the connector "bites" into the wire for good connection.
Last edited by rocketraider; October 13th, 2021 at 08:26 AM.
Got the NAPA tool when they had their tool truck at the store. Lowe's should have the G-B stuff and decent quality connectors. You'll need some yellow for 10-12 gage wire, blue for 14-16 and sometimes 12 gage will fit in them, and red for 16-18. That should cover about any size wire you'll encounter on the car.
Heat shrink is your call. I like it especially on butt splices. A small butane torch or electric heat gun does the trick, or I've known guys who swiped the wife's hair dryer to heat it up and shrink it. A cheap lighter can shrink it too but has a bad habit of running out of fuel in the middle of the job.
Once you get into wiring repair you might find that you enjoy it!

 October 12th, 2021 | 04:07 AM