
Heat crossover ?
 November 15th, 2014, 01:29 PM
#1
Registered User
Thread Starter

Join Date: Sep 2014
Posts: 42
Heat crossover ?
I've stripped down my mates 1972 350 ready for a complete rebuild, rebore,grind,cam and performer intake. I've read bits about blocking off the heat crossover (whatever that is) what does that involve ?
Also, the siamesed exhaust ports, do you separate them by welding in an insert of some sort ?
Any advice or pics would be great.
Also, the siamesed exhaust ports, do you separate them by welding in an insert of some sort ?
Any advice or pics would be great.
 November 16th, 2014, 01:13 PM
#3
Registered User
Join Date: Feb 2013
Location: Phoenix, AZ
Posts: 14,689
I think it depends upon what the plans are for the vehicle. Keep in mind that blocking the heat crossover will result in poor cold weather driveability, so if there are plans to drive the vehicle during cool/cold weather any performance gains may not be worth the hassle.
As for the exhaust ports, unless this is going to be a max performance build (which I assume it is not based on the intake manifold choice) then I wouldn't worry about it.
As for the exhaust ports, unless this is going to be a max performance build (which I assume it is not based on the intake manifold choice) then I wouldn't worry about it.
 November 17th, 2014, 04:21 PM
#6
Registered User
Join Date: Feb 2013
Location: Phoenix, AZ
Posts: 14,689
November 17th, 2014, 11:41 PM
#8
Registered User

Join Date: Nov 2008
Location: Lehigh Valley Pa
Posts: 731
I plugged mine using the simple pound in plugs and have had NO problems even in cold weather. They do need some grinding to get them to the point of fitting even with pounding them in. Again an electric choke needs to be used but that's better anyway.
November 18th, 2014, 03:19 PM
#10
Registered User
Join Date: Nov 2008
Location: Lehigh Valley Pa
Posts: 731
No sorry. I bought the plugs from Jegs fairly cheap. You just test fit them and grind them down a little at a time until you think you can pound them in with a large hammer. You may need to grind down the top to be flush with the head if you can't get it all the way in. Not hard at all. The biggest thing is not to grind to much away so that slide in too easy.
November 18th, 2014, 11:04 PM
#11
Registered User

Join Date: Sep 2010
Location: Norfolk, Va
Posts: 1,444
The thought of a crossover blocker that you "pound in" was too much to resist so I looked it up. Here is a link to it on JEGS. Not too sure if pounding a cast iron plug into a cast iron head with a BFH is the best idea ever, but if you grind it to fit close enough I guess it would work. It's mde by Edelbrock so it has to be a quality product, right?
http://www.jegs.com/i/Edelbrock/350/2733/10002/-1
http://www.jegs.com/i/Edelbrock/350/2733/10002/-1
November 19th, 2014, 06:04 AM
#12
CH3NO2 LEARN IT BURN IT
Join Date: Jul 2010
Location: Land of Taxes
Posts: 5,011
If you not worried about it being cold blooded its a good mod for several reasons.
1. reduced heat on the carb lessens gas boil and hot heat soak starts.
2. prevents the discoloration on the intake aluminum or painted iron.
3. Cooler gas charge into the engine = a few ponies and better throttle response especially in the heat of the day.
I have them in my current 400G welded into the intake. This car has the original divorced choke. When its cold out you really need to let it warm up. I've tweaked the spring on the choke to open sooner. In the summer months its fine with normal warm up. The paint on the intake looks like the day I sprayed it on (13 years ago)
November 19th, 2014, 11:00 AM
#14
CH3NO2 LEARN IT BURN IT
Join Date: Jul 2010
Location: Land of Taxes
Posts: 5,011
Ya thats why I chose to weld them into my intake. A talented welder could weld in aluminum plugs into the Edelbrock intake. I dont like putting the plugs into the heads. Per pref.
November 19th, 2014, 04:35 PM
#16
. For what its worth. I have never had luck with fiber composite gaskets . I finally have had a set in long enough to see what happens to them after heat cyces. The result is a chared intake gasket. I have to redo my intake gaskets anyway but I noticed this the other day that the ends of the gasket that pop out past the inakemanifold sealing surface where chared and burnt. Either way I'm going to the individual non egr shim gaskets from the early 330's . That's just my experience. I'm probably going to use the plugs for now to keep exhaust off the inake surface. The next set of heads which are done we filled the risers with an melted alloy. I'm not sure if this has happened to anyone else but I found it odd the gasket was burning up.
Last edited by coppercutlass; November 19th, 2014 at 04:38 PM.
November 19th, 2014, 05:51 PM
#17
Shaking out the cobwebs..
Join Date: May 2011
Location: Marysville, Michigan
Posts: 234
Both of mine are loose. The first one, the passenger side, came loose less than 50 miles after the build.
The engine builder replaced it free of charge. 3 months later the driver side came loose. It still is. Sounds like a semi truck lug nut rattling around in a coffee can.
The passenger side came loose again this spring.
I have set of Bernard Mondello ProComp heads waiting for my 'car fund' account to grow. I need to get all of the necessary additions, like rockers, new push rods, electric in-tank fuel pump, etc, so I can install them next spring.
November 19th, 2014, 07:30 PM
#18
Registered User
Join Date: Feb 2013
Location: Phoenix, AZ
Posts: 14,689
. For what its worth. I have never had luck with fiber composite gaskets . I finally have had a set in long enough to see what happens to them after heat cyces. The result is a chared intake gasket. I have to redo my intake gaskets anyway but I noticed this the other day that the ends of the gasket that pop out past the inakemanifold sealing surface where chared and burnt. Either way I'm going to the individual non egr shim gaskets from the early 330's . That's just my experience. I'm probably going to use the plugs for now to keep exhaust off the inake surface. The next set of heads which are done we filled the risers with an melted alloy. I'm not sure if this has happened to anyone else but I found it odd the gasket was burning up.
I have used composite gaskets with good results on several intake manifolds. I like the Mr Gasket UltraSeals better than the regular Mr Gasket or the ones from Mondello. Those seem to be more paper-like and get oil saturated.
I found that the composite gaskets require periodic re-torquing of the intake manifold bolts. The heat cycling expansion/contraction of the aluminum intake manifold crushes the gasket so the bolts need to be tightened to take out the slack.
November 19th, 2014, 07:52 PM
#19
Out of Line, Everytime😉
Join Date: Dec 2006
Location: Melville, Saskatchewan
Posts: 9,133
I did the grind and pound plugs, worked OK but can rattle. The last set of heads I bought had the crossovers filled with zinc, I believe. The plugs just mostly block heat, the filled crossovers block heat and supposedly increase scavenging. It does run rougher in the cold, more choppy.
November 20th, 2014, 12:01 AM
#20
Registered User
Join Date: Jul 2012
Location: Vancouver BC
Posts: 2,847
Some Olds performance shops offer a sheet metal block off plate that is die stamped to fit the heat riser opening. I have used these in the past they work but are not for a max effort type of build.
November 20th, 2014, 02:47 AM
#21
Registered User
Join Date: Feb 2009
Location: West Hartford, CT
Posts: 1,495
I have never had a problem in my cars or others with filled or blocked heat crossovers in CT weather which means commonly 20-30 degrees in winter, even with various OAI in place. Even with a 160 stat & the car sometimes not getting above 140 due to cold & usually big radiators drivability not an issue. I usually put a 180 in for cold weather & the blue car gets a piece of cardboard to block appx 1/4 of radiator core. Cars generally but not always electric choke. Get in, push pedal once, turn key & crank, bowl fills, maybe one more pedal pump, car starts, put in gear & drive, generally with no warmup, sometimes 30 seconds or so if I'm loading stuff or whatever.
I have filled the crossovers on my last few engines & the Edelbrocks don't have any passage. I have never used the cast plugs. Mondello offers thin stainless shims for block off that seem to work. I have used these on a few engines & on some that I did an intake swap down the road they seemed to hold up.
I have filled the crossovers on my last few engines & the Edelbrocks don't have any passage. I have never used the cast plugs. Mondello offers thin stainless shims for block off that seem to work. I have used these on a few engines & on some that I did an intake swap down the road they seemed to hold up.
November 20th, 2014, 08:51 AM
#22
Registered User

Join Date: Sep 2011
Location: Plano, TX
Posts: 1,899
Of course fiber gaskets won't block exhaust on their own!
In my younger and stupider days I tried to use sheet metal to block off the crossover. Guess what? Melted that crap and burned right through.
If you want to block the crossover, do it right. Have a machinist melt a piston, pour into the head and get a decent exhaust port shape. Plugs and blocks are just asking for trouble. Or better yet, get new heads that don't have it at all. Much better exhaust port shape that way, too.
It doesn't matter much on a basic street build. I'm in Texas, so getting unnecessary heat away from the engine is good in the summer, and our winters don't get cold enough to worry about icing the carb. Otherwise it really doesn't matter.
November 20th, 2014, 09:21 AM
#23
Registered User
Join Date: Jul 2012
Location: Vancouver BC
Posts: 2,847
In my younger and stupider days I tried to use sheet metal to block off the crossover. Guess what? Melted that crap and burned right through.
I used die stamped sheet metal block offs from Dave Smith and they held up fine.
I think you can get these now in stainless steel from some shops.
It would be interesting to know what part of the modification yields the most performance gain.
The removal of heat from the bottom of the intake?
The improved exhaust flow?
Some mill a recess in the head around the heat riser port and make there own plate to fit the recess.
I like this modification you control the metal thickness and martial and you have a nice flat surface for the manifold gasket.
Last edited by Bernhard; November 20th, 2014 at 09:35 AM.
November 20th, 2014, 09:28 AM
#24
CH3NO2 LEARN IT BURN IT
Join Date: Jul 2010
Location: Land of Taxes
Posts: 5,011
Its easier to weld the iron plug(s) into an iron intake (or Al plug into Al intake).
Pull the intake, clean, pre-fit the plug shy of the gasket surface, weld (I MIG'ed), dress weld, re-install intake, done deal.
I also removed the heat stove in the drivers ex mani and welded those holes shut.
If the engines out and the heads can be yanked then fill the heads. I just didnt want to alter a "numbers matching" set of heads. I figured the intake could take that sacrifice vs the heads.
November 20th, 2014, 09:41 AM
#25
Registered User
Join Date: Nov 2006
Location: McMurray, PA
Posts: 1,784
A couple months ago, someone posted on 442.com that they had a similar ticking issue and after some trial and error, they found that it was caused by an early heat crossover blockoff method used by Mondello. Just wondering whether that may be in reference to the shims you referenced above, or an earlier method. Has anyone else on here ever had the ticking issue from a blockoff? I'll investigate mine further the next time the intake is off.
Terry
November 20th, 2014, 10:24 AM
#26
I was saying about the fiber gaskets in general . Even with the correct egr intake gaskets they still burned through. I was curious is anyone else had this happen on the egr port with the fiber gaskets. I wasn't trying to block the egr with the gasket lol.
 November 21st, 2014, 06:03 PM
#29
Out of Line, Everytime😉
Join Date: Dec 2006
Location: Melville, Saskatchewan
Posts: 9,133
Yes, I had the fiber gaskets partially block due to movement, putting on the intake. Plus with Edelbrock's not so straight intakes or milled heads, good luck getting the thick fiber gaskets to fit.
December 26th, 2014, 12:00 PM
#30
Registered User
Thread Starter
Join Date: Sep 2014
Posts: 42
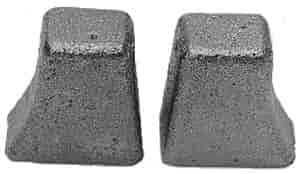
Hey guys, happy chrimbo to you all.Thanks for the info, we have these iron plugs to block up the heat crossovers, do we wedge them into the heads ? Also, the intake manifold gaskets were joined by a sheet of metal in the valley, I assume this is called the turkey pan ? Our gasket set doesn't have this, only two single gaskets, do we HAVE to replace with a turkey tray or can we just fit the two single gaskets from the rebuild kit ?
Last edited by Crockett 999; December 26th, 2014 at 12:06 PM. Reason: add photos
December 29th, 2014, 08:02 AM
#31
CH3NO2 LEARN IT BURN IT
Join Date: Jul 2010
Location: Land of Taxes
Posts: 5,011
Hey guys, happy chrimbo to you all.
Read my post above
Thanks for the info, we have these iron plugs to block up the heat crossovers, do we wedge them into the heads? NO weld into the head or better yet the intake. If you leave them un-welded they tend to come lose and rattle.
Also, the intake manifold gaskets were joined by a sheet of metal in the valley, I assume this is called the turkey pan ? CORRECT
Our gasket set doesn't have this, only two single gaskets, do we HAVE to replace with a turkey tray or can we just fit the two single gaskets from the rebuild kit ? Either will work most of us prefer the turkey tray. Use Thr Right Stuff on the front and rear rails dont use the supplied rubber snakes.
December 29th, 2014, 11:56 AM
#32
Registered User
Join Date: Nov 2008
Location: Lehigh Valley Pa
Posts: 731
Hey guys, happy chrimbo to you all.
Thanks for the info, we have these iron plugs to block up the heat crossovers, do we wedge them into the heads ? Also, the intake manifold gaskets were joined by a sheet of metal in the valley, I assume this is called the turkey pan ? Our gasket set doesn't have this, only two single gaskets, do we HAVE to replace with a turkey tray or can we just fit the two single gaskets from the rebuild kit ?
Thanks for the info, we have these iron plugs to block up the heat crossovers, do we wedge them into the heads ? Also, the intake manifold gaskets were joined by a sheet of metal in the valley, I assume this is called the turkey pan ? Our gasket set doesn't have this, only two single gaskets, do we HAVE to replace with a turkey tray or can we just fit the two single gaskets from the rebuild kit ?
You will have to grind them down some to fit right. Just grind one down a little at a time on all side until a lttle more than have the plug slides in the hole and the rest is real close. Then pound away. Get it as far in as you can. If you can't get it all the way in just grind flush with the head. Again just take off a little at a time and try to get it so it will make a complete seal all the way around when it is fully in. You want to leave enough on so it actually take some force to get it in so that it seals properly.
December 29th, 2014, 03:25 PM
#33
Registered User
Join Date: Nov 2008
Location: Lehigh Valley Pa
Posts: 731
December 30th, 2014, 07:47 AM
#34
CH3NO2 LEARN IT BURN IT
Join Date: Jul 2010
Location: Land of Taxes
Posts: 5,011
Not sayin my way is correct but from another perspective....A couple of reasons I welded mine into the intake...One is I could remove the intake and do the welding and grinding on the bench and not risk contaminating the engine and the detailed bay. Secondly, more importantly, I didn't like the idea of beating the plugs into either the head or the intake. My training says that the pressure against the host casting along with thermal cycling could lead to stress cracks. Didn't want to do that to my big valve C heads. Lastly I didn't want them to come loose and rattle.
December 30th, 2014, 09:32 AM
#35
Registered User

Join Date: Dec 2011
Posts: 7,286
"Lastly I didn't want them to come loose and rattle. "
========================
Grind to fit
tap in
use a small like 1/8" NPT plug for a Dutch Key type thing to secure it.
Not sure why "Dutch Key" is not in Wikipedia - it used to be.
basically drill on the split between the two parts- head and plug. Tap the hole. Install the plug. Tapered threads should tighten and stay that way forever.
Use a stainless plug with a recessed hex drive. Like this only much smaller
December 30th, 2014, 01:08 PM
#36
Registered User
Thread Starter
Join Date: Sep 2014
Posts: 42
Thanks guys, my mates gonna weld them into the heads while their on the bench. As an asides can you guys tell me the torque settings for the mains, big ends and heads, we,re using Cosmetic .27 head gaskets BTW.

Thread
Thread Starter
Forum
Replies
Last Post


