When you click on links to various merchants on this site and make a purchase, this can result in this site earning a commission. Affiliate programs and affiliations include, but are not limited to, the eBay Partner Network.
I think thats the way ill go. I was happy with the performance of the engine, it made good power and pulled nicely up to 5.500 rpm. Summit only sells them as a kit, but maybe i can contact them to ask if its possible to purchase one single piston.
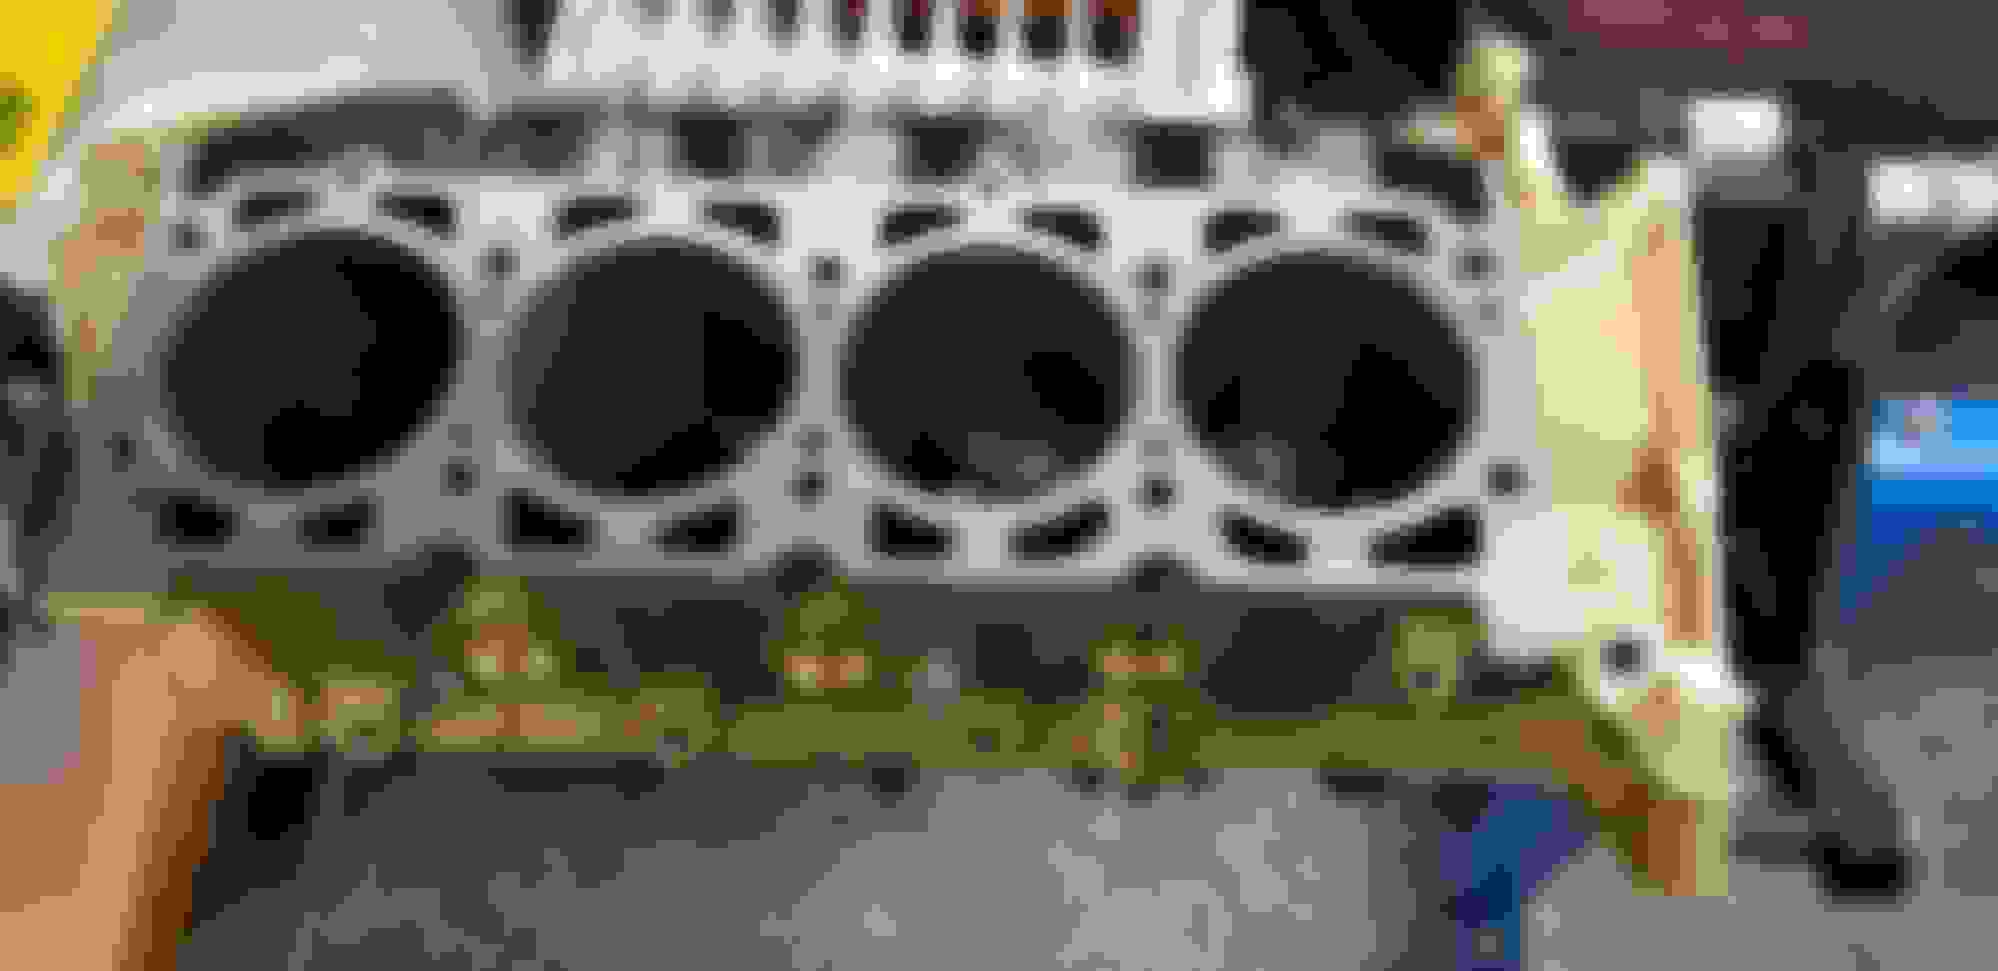
Today, i pulled the other pistons and all of them are in good shape. No scoring. Just the black coating which they have is nearly completely off. Is this normal?
Btw, can this single pitted/scored cylinder nr.8 be the reason of the oil pulling pcv issues i had on this engine? I mean, can one single cylinder make that much blow-by?
I found that my rod bearings are 0.020's (mahle), so i assume that the crank was machined. Surfaces of the crank where the rods are attached are looking very good.
I pulled the lifters (Lunati micro trol) and camshaft (Lunati 272/276) too. I installed that camshaft last winter, before i swapped this engine in the car. 3 lifters have been a bit hard to pull, because of a very slightly burr on the bottom where they ride on the cam. Is this normal? The lobes of the camshaft are not flat and are looking like they have normal wear.
any thoughts about re-using the cam and lifters in the new block? I numbered the lifters, so they would go on the same lobe like they have been.
I know, best would be replacing both, but i like the cam and it is not available on summit or from lunati at the moment and shipping to europe is very expensive, so i try to avoid ordering every part i can.
Thanks for any thoughts, i really apprechiate all of your help!
The three lifters that you mentioned are concerning. There should be no burrs and the lifters should have come out with ease. Post a picture of your lifters and camshaft. Specifically, the lobes where the lifters rode on the camshaft.
The last thing you need is for a camshaft to go flat in a freshly rebuilt engine.
Thats really the last i want.
Heres a picture of the cyl. Nr.4 exhaust lifter, this one only went out with some pulling. It has a bit an odd wear pattern, but its not "feelable".
Here are some pictures of its lobe:
Heres the whole cam:
And heres the lifters:
There have been no metal chips in the oil and for me, the cam doesnt look like its shot when i compare it with pictures of flattened/camshafts,for me, it looks like has not been running for a long time due to the wear pattern, which is actually true, it only ran over summer in a nice weather weekend car. but im not an expert.
What are your thoughts?
Last edited by 71OldscutlassS; November 30th, 2021 at 10:25 AM.
Hard to tell from the pictures on the lifters. Is there any noticeable concave on the lifters? The lifters looked surprisingly good on my cam that went flat. Even on an OK cam, some of lifters can be a hard pull. Really, inspect them. A cam going flat will definitely waste the bearings.
That lifter has a pattern that is concerning especially for cam that you just installed not long ago.
The lobe appears to be scuffed. Do you have a dial caliper? Is so, then, measure the width and height of each lobe and calculate your valve lift.
Height - width = Cam lift
cam lift X 1.6 = Gross cam lift.
This should get you close to your cam card reading and helpfully provide additional analysis.
Maybe this will help determine if that lobe is failing.
I also noticed that your connecting rods are able to stand straight up with no assistance. They generally will not stand alone without assistance. I bet your pistons were not pin fitted. A common problem with machine shops
Last edited by joesw31; November 30th, 2021 at 01:11 PM.
That lifter has a pattern that is concerning especially for cam that you just installed not long ago.
The lobe appears to be scuffed. Do you have a dial caliper? Is so, then, measure the width and height of each lobe and calculate your valve lift.
Height - width = Cam lift
cam lift X 1.6 = Gross cam lift.
This should get you close to your cam card reading and helpfully provide additional analysis.
Maybe this will help determine if that lobe is failing.
I also noticed that your connecting rods are able to stand straight up with no assistance. They generally will not stand alone without assistance. I bet your pistons were not pin fitted. A common problem with machine shops
ok, i thought that its normal that the tip of the lobe shows more wear than the rest of the lobe or the base circle, because of the valve spring pressure is max at the lobes tip.
I have no dial caliper, but a digital caliper. I will definitely measure that and compare it to my cam card.
good to know. Is this a big problem? 7 of them are able to stand with no assistance, but are very light to move, i thought that this is because of the pins are still covered with sticky cold oil. 1 falls if not being assisted. I bet, no pin fitting was done here.
The rods just normally fall once they they have been properly pin fitted. They actually hone each piston pin hole for clearance. And a digital caliper will work fine.
The rods just normally fall once they they have been properly pin fitted. They actually hone each piston pin hole for clearance. And a digital caliper will work fine.
Originally Posted by olds 307 and 403
Good eye on the pistons and rods. The pistons should need almost no effort to move the pistons on the pins. Very smooth and easy movement.
Ok, im going to measure that today.
so should i tell the machine shop to disassemble the pistons from the rods to hone them to fit?
They are moving freely on the rods (also back and forward) but if it should be like theyre not able to stand, it has to be done right.
The rods need to be removed when you re-balance your engine with the new piston. If your machine claims there pin fitted, then, find a new machine shop. You�ll need at least .001 to .0015 clearance piston to pin.
Also check your rod side clearance before you take your engine to the machine shop. Olds is very well known for tight side clearances.
Lastly, make sure you have adequate piston to bore clearance. This is another area that machine shops fail.
Your getting there. Just will take some time.
Get your cam measured?
Ok, i will talk with the machine shop about this. i think it should be no problem for them to hone the piston to fit.
Yeah, i saw that when i disassebled the rods/pistons.
Can this be a problem with the "new" block? My crank and rods are stock. I posted a picture of the stamped code of this block. What i find odd is that the casting in the lifter valley is a bit different.
I will measure in the evening, now we have lunchtime here in Austria.
Regarding reuse of the lifters, you will not "feel" any concaveness on the lifter foot and it can be very hard to detect that with a straightedge as well. Best way is to hold the foot of one clean lifter against the side of another with good light behind them and you shall then see the slight convex shape on the foot of a good lifter. Check them all this way.
I would recommend using cam lube and following cam break in procedure when changing to a different block; there shall no doubt be some slight differences in the factory machining of the lifter bores from one block to another.
Originally Posted by olds 307 and 403
Good advice. You will want to do at least one, very short mileage oil change after the rebuild anyways.
I will definitely check the lifters that way, thanks for the advice!
Yeah, i think too that using cam lube and doing a 20 minute break in procedure shouldnt be a mistake.
Today i started some first cleaning of the block:
I will pull out the cam "freeze" plug and the rear oil gallery plug to clean them well. But first, i want all old oil crud and greasy mess off the block, then i will pressure wash it, clean the crud out of the freeze plug holes and blow all threads out with shop air.
Then, i will check if there (hopefully) is no crack or other damages.
One question:
Is it right, that i should use the crank bearing "retainers" of this block? I have them, and i believe that theyre are machined individually?
if yes, theyre get a good cleaning tomorrow.
BTW, i found out that my crank bearings that i pulled out of the further block are 0.020's too (like the rod bearings), so i assume that the crank has been machined?
again, i really apprechiate all your help, forums great as always!
PS:
I checked all lifters due to the explained procedure and all of them are slightly convex. Some more, some less. Intake of cyl. Nr 7 was the least convex one.
Last edited by 71OldscutlassS; December 2nd, 2021 at 10:35 AM.
Yes, your crank was ground .020" undersize. The shop will probably use it as is. Did all the bearings have a nice wear pattern? I am going to double check my fresh crank with a micrometer before installing. I see the balancing shop micro polished it, hopefully very little was removed. Another good thing to check is bearing clearances but a good machine shop should do that and get it within factory spec. Cutlassefi told me .0022" to .0025" rods and .0025" to .0028" mains on clearances for my build. Bearing clearances is another argument among builders, most shops will follow the stock specs.
Is it right, that i should use the crank bearing "retainers" of this block? I have them, and i believe that theyre are machined individually?
if yes, theyre get a good cleaning tomorrow.
The correct name for those parts are the main bearing caps and yes they are matched to the block so you should use those.
Also. look at the picture below. The cam lobe I have the arrow pointing to does not look very good to me unless it is the lighting in your picture. It looks rusted or pitted. My personal opinion is I would absolutely never take a used cam and lifters out of one engine and put them in a different block. But thats just me.
Yeah, i would like to do it right once. My fault was to buy a "rebuilt" engine and maybe trusted too much that everything would work like it should, and now that im diggin deeper to troubleshoot the problems, i opened a can of worms.
just for understanding, why would you sleeve the bad cylinder AND going to the next oversize?
I heard of some guys here that they had no problem to use "used" pistons, so if i go to 0.030 over on my second block, get the decks resurfaced and put my existing rotating assembly (if the pistons are in good shape) in there should do the job, since i was happy with the speed pros and the goal nr.1 now is a healthy shortblock before thinking about the heads.
You can sleeve the one cylinder. That�s the whole point of sleeving, to save the one cyl and reuse the internals and block.
it�s foolish to sleeve one cyl and then bore all 8 over. Just start with another block if your thinking about doing that.
sleeving one will not mess up the cyl on either side enough to hurt anything
sleeve the one, and size it back to that piston. Hone the other 7 and use the new rings you have.
your heads look like they only need some bronze liners, ,, like K line inserts . And some new valve because the stems are worn.
Yes, your crank was ground .020" undersize. The shop will probably use it as is. Did all the bearings have a nice wear pattern? I am going to double check my fresh crank with a micrometer before installing. I see the balancing shop micro polished it, hopefully very little was removed. Another good thing to check is bearing clearances but a good machine shop should do that and get it within factory spec. Cutlassefi told me .0022" to .0025" rods and .0025" to .0028" mains on clearances for my build. Bearing clearances is another argument among builders, most shops will follow the stock specs.
Originally Posted by BillK
The correct name for those parts are the main bearing caps and yes they are matched to the block so you should use those.
Also. look at the picture below. The cam lobe I have the arrow pointing to does not look very good to me unless it is the lighting in your picture. It looks rusted or pitted. My personal opinion is I would absolutely never take a used cam and lifters out of one engine and put them in a different block. But thats just me.
Ok, so ill get the right 0.020 bearings.
The wear pattern of the main bearings isnt looking bad to me.
I assume, i can check the bearing clearance with plastigauge?
Thanks for the right name Bill, now that i read it, i can remember it, haha. And thanks for the information.
The cam lobe that you think its rusted/pitted is just how this cam looked when it was new. It was black with some kind if rough finish on the lobes. I think, this lobe on the picture is just looking like that because the cam only ran for 1 summer.
Your machine shop should be able to polish your crankshaft and tell you at that point what bearings are needed. The method to measure clearances is to use a dial bore gauge.
Using a dial bore gauge; you can measure your main bearing saddles without any the bearings and then with your bearings.
Also, using a micrometer, you can measure your crankshaft journals.
If you don�t have any these tools, are not terribly expensive.
Regarding reuse of the lifters, you will not "feel" any concaveness on the lifter foot and it can be very hard to detect that with a straightedge as well. Best way is to hold the foot of one clean lifter against the side of another with good light behind them and you shall then see the slight convex shape on the foot of a good lifter. Check them all this way.
I would recommend using cam lube and following cam break in procedure when changing to a different block; there shall no doubt be some slight differences in the factory machining of the lifter bores from one block to another.
I am not a engine guy. But I also think that putting a used in one block set of lifters and cam in another block seems wrong. What's to say that the cam sits in block at the exact same depth? I may be wrong but with production tolerances doesn't this seem iffy?
The cam lobe that you think its rusted/pitted is just how this cam looked when it was new. It was black with some kind if rough finish on the lobes. I think, this lobe on the picture is just looking like that because the cam only ran for 1 summer.
I still do not think that cam lobe looks very good at all. I would at least have your machine shop look at it for a second opinion.
I would love to just buy the same cam and lifters again new, just not to risk it. but Summit says "not available". And unfortunately, Summit is the only seller with acceptable shipping costs to europe.
Maybe i should contact them to ask if this cam will be available again in the next time.
Im not feeling very comfortable with the idea to re-use my "old" cam too.
Another question,
when i installed the new cam last winter, i installed a cloyes billet double roller timing chain kit (the one with the 9 keyways). What are your opinions on re-using this kit? Maybe keeping the sprockets and just get a fresh chain? Sure, the chain has a bit more slack than it had brand new, but i think this is one of those questions with 50% "replace it" and 50% "keep it" anwers.
My problem, since that i havent done several engines or had a lot of cars like this, im dont have much self expierience to answer questions like re-using engine components yes or no, by myself. But im learning more and more and im glad for sharing your expierience with me!
How much slack was in the chain? I assume a small amount, if so reuse it. I have used cams between motors with no issue but those were with used short blocks. Honestly, any flat tappet can be a crap shoot, new or not. When they fail, bye bye new bearings.
As long as your chain is in good condition and not loose, then, you should have no issues.
With respect to your camshaft. There are no issues with it in another engine. Many have done it in the past many times.
I�m not there in person to examine your camshaft and can only go off your pictures. Therefore, you have to make a decision that you are comfortable with.
How much slack was in the chain? I assume a small amount, if so reuse it. I have used cams between motors with no issue but those were with used short blocks. Honestly, any flat tappet can be a crap shoot, new or not. When they fail, bye bye new bearings.
All flat tappets cams are a gamble due to lifter quality.
I agree with a lot of the above, a new timing chain is always tight upon installation and loosens upon initial running. It should remain like that for a long time, not to worry. Regarding reusing the cam and lifters in a different block, yes it has been done many times with no problems but there is always the possibility of destroying a good cam, etc. The precautions we have mentioned will greatly reduce that possibility. One thing that may help to ease your mind is after assembly, leave the intake manifold off so that you can observe the lifters rotating when you prime the oiling system, turning the motor with the starter, spark plugs removed. The alternative, send the camshaft back to Lunati for them to check it and give it a fresh parkerizing and buy new lifters.
Gentlemen. I offered some free pistons to help our member out. I have 4 L2320f .030 pistons he can have them for free. Maybe we can help him out and pitch in for the shipping. Im also looking for any advice on international shipping. If anyone here has done it please PM me.
After a few time at the machine shop, i got my block back and was already able to install the crank. Checked all bearing clearances with plastigage and its somewhere between .0025 and .0030. CSM says not larger than .0035, so i assume that this is good. I aligned the thrust bearing due to the procedure in the CSM and measured the thrust clearance (CSM says between .004 and .008) with an dial indicator. Mine is at .005 - .006.
i used the Fel pro BS 6141 Ford rear main seal which i installed offset with the lips to the front of the engine. I smothened the "knurled" surface on the crank out with emery cloth to help preventing the rubber seal from wear.
Crank is spinning freely with no binding or something else.
Here are some pictures:
Now, im getting closer to install pistons, where i have some questions. I have the speed pro l2320F 0.30s and a new sealed power E- 297K 30 ring set.
- the top groove ring has no markings and no bevels, so i assume that theres no top or bottom side?
- secong groove ring has a dot marking (instructions say marks should pointing towards top of the piston), so this should be good to go.
- i read somewhere that the gap of the top ring should be .020 and the gap of the second ring should be .015.
i havent checked the gaps in the bore with a feeler gauge, but if the gaps are smaller than that, should i file fit them? Are these file fit rings? Or can i just use them right out of the box?
Those rings are not file fit and the gap will probably be ok when you check it. Usually it is larger if anything.
Thanks for the fast answer, good to know! I'm asking because years ago, my brother had his first engine rebuild project (408 stroker mopar) and he had file fit rings and just installed them right out of the box. Not good.
So the .020 gap for Top and .015 gap for second are right? The gaps should be checked on the bottom of the cylinder?
There should be no taper in the newly bored cylinders thus you do not need to push the ring down to the bottom to check the gap. I use top of the piston to push the ring down about one inch into the bore when checking end gap. Yes those figures should be fine for the gap on new rings. I normally try to get about .016 top and .012 to .014 on second with file fit rings on that bore size. You would still be plenty safe if the rings have a little more end gap as Bill mentioned than what is specified.


 November 29th, 2021, 10:04 PM