
Alternator help
 April 15th, 2013, 06:09 PM
#1
Registered User
Thread Starter

Join Date: Mar 2013
Location: Buffalo, NY
Posts: 36
Alternator help
I'm new to classic car ownership, having just received my 72 Cutlass off the transporter three days ago. Got it on the road today and saw that the gen light was on. Popped by an Autozone and there was no reading for the alternator, so most likely that is the culprit or the volt regulator. I'll start with the alt.
I have changed them before, but after getting home, it appears this vintage system is different from what I'm used to. The oldest car I've changed one on is an 89 Pontiac and I remember that had the tensioner on it. Am I missing something, or does a 72 not have a tensioner? Do you just loosen the bolt on the front of the alternator and swing it down to begin removal of the alt.?
I'm sure to all you vets in here, this is about as basic of a repair as changing the license plate, but I would love some help.
Thanks
Dan
Buffalo, NY
 April 15th, 2013, 06:51 PM
#2
Beer Connoisseur
Join Date: Aug 2008
Location: Daly City, California
Posts: 2,091
Disconnect the battery, disconnect wires from the alternator. Loosen up the bottom and top bolts swing it down to loosen the tension of the belt, remove both top and bottom bolts and your alternator is out, to install reverse the process. Bottom is your mounting and top is adjusting bolt.
Install bottom first don't tighten all the way, put tension on the belt tighten the adjusting bolt then tighten the mounting bolt.
Install bottom first don't tighten all the way, put tension on the belt tighten the adjusting bolt then tighten the mounting bolt.

 April 15th, 2013, 07:09 PM
#5
70 Cutlass SX
Join Date: Apr 2011
Location: Bermuda
Posts: 1,041
ORM - Welcome
Check out
http://wildaboutcarsonline.com/cgi-b...=9910340732039
and take a look in the Oldsmobile Factory Publications for the Chassis Service Manual for 1972. See section 12 page 12-12.There are few different sections which you can view at as PDF files. You can download the relevant ones. Also look at the Assembly Manual which is also stored in sections as a number of different pdf files.
These two documents are extremely well written with lots of diagrammes. They are the best place to start in building your knowledge of your new olds.
Do that before you start taking things apart.
April 15th, 2013, 08:03 PM
#7
Connoisseur d'Junque
Join Date: Sep 2010
Location: The Hudson Valley
Posts: 21,183
Just to circumvent the next predictable problem:
When you tighten the belts, they need to be TIGHT, but not TOO tight.
The best description is that when you press down FIRMLY in the middle of a run, the belt will deflect about �". Not SUPER HARD, but FIRM.
If the belt is even a little bit floppy, it's way too loose.
If you can come anywhere near twanging it like a bass string, it's way too tight.
- Eric
April 16th, 2013, 09:00 AM
#8
Registered User
Thread Starter
Join Date: Mar 2013
Location: Buffalo, NY
Posts: 36
Update. Thanks again for the advise. Got the alternator off and it actually checks out fine, so on to the next idea. I'm guessing it's the voltage regulator. Bought a new one and went to install, taking the wires off the old one. I realized when I got the regulator off that the input points for the wires are numbered. Is there any specific order to these wires? They are all different colors so I'm starting to worry. The new reg is probably like most, 4 contacts on one side with one on another side. I'll put the ground in the individual one but wondering about the others. The four are listed as f, 2,3,4.
April 16th, 2013, 09:26 AM
#10
Old(s) Fart
Join Date: Mar 2007
Location: Northern VA
Posts: 48,255
Well, from the factory, all four wires are installed in a single connector that plugs into the alternator. If there are four separate wires with separate spade connectors, that means that a previous owner has mucked with the wiring, which opens a whole other list of potential causes for your problem. So far we've been assuming the car is wired correctly per the factory. If it's been screwed with, that may not be the case.
April 16th, 2013, 10:16 AM
#12
Connoisseur d'Junque
Join Date: Sep 2010
Location: The Hudson Valley
Posts: 21,183
The regulator plug is a long, flat plastic plug that holds four wires and only connects one way.
A quick look at the schematic in the Chassis Service Manual (available free from WildAboutCars) will tell you what connects where.
The regulator has to have a good, shiny ground to work properly, and all the wires have to be clean as well.
- Eric
A quick look at the schematic in the Chassis Service Manual (available free from WildAboutCars) will tell you what connects where.
The regulator has to have a good, shiny ground to work properly, and all the wires have to be clean as well.
- Eric
 April 16th, 2013, 11:08 AM
#15
Registered User
Join Date: Jun 2011
Location: Austin, TX
Posts: 878
You can get a pigtail that goes into the regulator with all four wires on the correct plug for just a couple of bucks at any parts store if you give them a day or two. Might be cleaner and neater than the hack job if the original wires are in place.
Any chance the originals were messed with to run an internally regulated alternator instead of external? The 2 wire connector on the stock style alternator look like l l for external regulator and the internal ones are --.
Any chance the originals were messed with to run an internally regulated alternator instead of external? The 2 wire connector on the stock style alternator look like l l for external regulator and the internal ones are --.
April 16th, 2013, 11:19 AM
#16
Registered User
Join Date: Mar 2012
Location: Sistersville, WV
Posts: 2,163
April 16th, 2013, 11:34 AM
#17
Connoisseur d'Junque
Join Date: Sep 2010
Location: The Hudson Valley
Posts: 21,183
Good catch.
Yes, if your alternator has only one wire coming out of it, then this is an entirely different situation.
Your alternator should look like pbob42's, in another thread:
VR1_zpsee8718cf.jpg
- Eric
Yes, if your alternator has only one wire coming out of it, then this is an entirely different situation.
Your alternator should look like pbob42's, in another thread:
VR1_zpsee8718cf.jpg
- Eric
April 16th, 2013, 01:16 PM
#18
Registered User
Thread Starter
Join Date: Mar 2013
Location: Buffalo, NY
Posts: 36
Guess what guys, I didn't unhook all of this from the voltage regulator. The voltage reg is more over on the passenger side of the firewall. What I unhooked is on the driver side of the firewall and has five individual wires going into it.
In my defense, it somewhat resembles the volt. reg. I just thought perhaps the modern version looked a little different. So the voltage reg. is hooked up properly now, as you guys suggested. Now I need to know which color of wire to put back on which number spade connection. I looked at the service bulliten and couldn't find my info. I'm sure it's there somewhere but can't find.
I'm very gratified by the amount of help you guys can give idiots like me! Thanks so much
April 16th, 2013, 01:53 PM
#19
Old(s) Fart
Join Date: Mar 2007
Location: Northern VA
Posts: 48,255
Just so we're clear, this is the voltage regulator:

This is the horn relay:
 April 16th, 2013, 02:06 PM
#20
Registered User
Join Date: Sep 2012
Location: Gilbert, Arizona
Posts: 484
I can tell you this, #3 on regulator goes to the horn relay stud(drivers side on fender) "F" on reg goes to "F" on alternator, #2 on regulator goes to "R" on alternator, that leaves #4 it goes to the instrument cluster, I would guess to the dash light. Factory colors are F=blue 2= white 3=red and 4=brown.
I'm a bit confused though when you post that the alternator has only one wire, there should be a 2wire plug and a single fat wire if it is a system that uses an external regulator.
The "F" and "R", is the two plug on the alternator with "F" being the farthest away from the fat single wire connection on the alternator.
April 16th, 2013, 02:21 PM
#21
Registered User
Thread Starter
Join Date: Mar 2013
Location: Buffalo, NY
Posts: 36
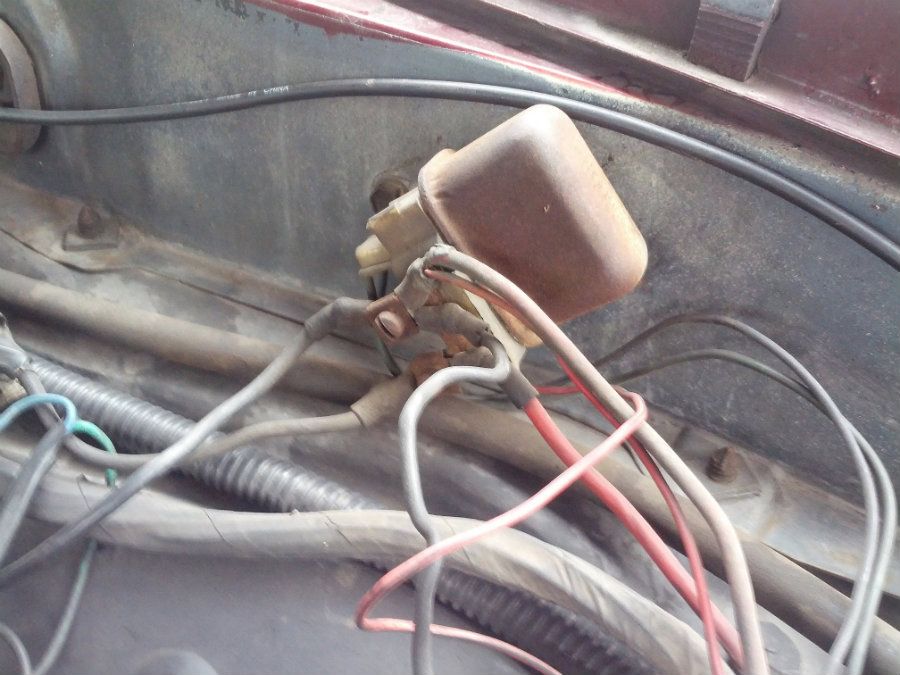
1970 W30 ---- I meant to say there are two wires into the alternator. Sorry for the confusion. I have the situation worked out for both the alternator and the voltage regulator. I'm just seeking info on this other thing that I originally thought was the volt regulator. It's behind the power steering pump, just to the right on the firewall. Has five contacts numbered 1-5 and I'm trying to get info on which color wire to hook back up to the corresponding wire. The colors are bue, green, purple and a black-orangish blended wire. There is also a ground that came out of one of the connections. If I knew what the thing was called I could probably find the schematic
April 16th, 2013, 03:21 PM
#22
Registered User
Join Date: Sep 2012
Location: Gilbert, Arizona
Posts: 484
Ok, I pretty sure you're talking about the blower relay...... instead of the power steering pump, do you mean the brake booster? This blower relay is similar in size to the horn relay and is almost behind the master cylinder booster, if you have power brakes.
April 16th, 2013, 03:50 PM
#23
Registered User
Thread Starter
Join Date: Mar 2013
Location: Buffalo, NY
Posts: 36
Yes. Now we are on the same page. I thought the brake booster was called the power steering pump. So, any ideas on my situation? At least now I can search since I know the name of the part
 April 16th, 2013, 04:40 PM
#25
Registered User
Join Date: Sep 2012
Location: Gilbert, Arizona
Posts: 484
Ok, it's official name is hi blower relay, the factory manual schematic shows 4 wires, purple,orange,black w/orange stripe and black w/white stripe. It's kinda hard to explain but imagine yourself in front of the car facing the firewall. There are 2 tabs on the left side of blower relay, one behind the other. The tab to the right of those two, the middle tab, connects to the purple. The tab farthest to the right connects to the orange. The fat black/orange stripe goes on the left side tab closest to the front of car. The left side tab closest to firewall gets the black w/white stripe. Now since your wire colors are messed up and the connecters are gone, you will have to trace 2 of the wires. The black w/white stripe goes to the switch resistors on the Ac housing. The all orange wire goes to into the harness to the blower switch in the dash. You will have to determine which color the blue and the green represent. An ohmeter at the resistors on the AC housing would quickly determine which is what. I would strongly recommend somebody versed in electrical wiring to help or do it for you to prevent disasters if your'e not sure of what your doing. There is a 30 amp inline fuse in the wire going to the horn relay, which has battery voltage on it, so be carefull......

 .
April 16th, 2013, 06:27 PM
.
April 16th, 2013, 06:27 PM
#28
1970 Delta 88 Royale Conv

Join Date: Aug 2009
Location: Macon, GA
Posts: 64
Quick question as I am looking on this subject, how often is everyone replacing their voltage regulators? I seem to be averaging around 1 a year or so, i do drive this car throughout the year because I live where the weather is nice most of the year. I am just curious what the norm is and if there is a bigger issue i should be looking at. My generator runs fine but and produces current, so I know it is the regulator...again. Insight please?
April 16th, 2013, 06:32 PM
#29
Beer Connoisseur
Join Date: Aug 2008
Location: Daly City, California
Posts: 2,091
Quick question as I am looking on this subject, how often is everyone replacing their voltage regulators? I seem to be averaging around 1 a year or so, i do drive this car throughout the year because I live where the weather is nice most of the year. I am just curious what the norm is and if there is a bigger issue i should be looking at. My generator runs fine but and produces current, so I know it is the regulator...again. Insight please?
April 16th, 2013, 06:38 PM
#30
Connoisseur d'Junque
Join Date: Sep 2010
Location: The Hudson Valley
Posts: 21,183
April 16th, 2013, 06:46 PM
#31
Registered User
Thread Starter
Join Date: Mar 2013
Location: Buffalo, NY
Posts: 36
Thanks for the help guys. I learned a valuable lesson, don't pull wires without studying them first. I'll remember this tip. It appears I have a different colored wire in there, so probably a replacement at some point. Yes, I do need the service manual. It's easier to me to just have it in front of me rather than go online all the time. Thanks again. Your time and efforts are much appreciated!

Thread
Thread Starter
Forum
Replies
Last Post
442mark
Parts For Sale
7
September 30th, 2017 01:06 PM


