
1972 Olds Cutlass S Engine Knock...

 October 28th, 2014, 03:43 PM
#42
Registered User
Thread Starter

Join Date: Oct 2014
Location: McGuire AFB NJ
Posts: 32
Shop said I was good to go. Got the bearing sets and the crank ready to put back in. The shop said that they didn't turn mine but rather did an exchange, not sure why sounds like that's how they always do it. But it's a kit, bearings and all. Should I still plastigauge it as I reassemble? If so what am I looking for?
October 29th, 2014, 05:34 AM
#43
Registered User
Join Date: Mar 2012
Location: Sistersville, WV
Posts: 2,163
http://http://www.ehow.com/how_61848...es-engine.html
Look on the net, easier then me explaining. Check a few different sites.
Compare the measurement you get to the manuals written bearing clearances.
I always have used it even on crank kits to insure bearings and crank are correct. If good, use assembly lube when re-assembling. Prime engine and oil filter before starting.
October 29th, 2014, 06:49 AM
#45
"You need to have the crank turned and the rod big ends trued to be sure all is well with the new bearings unless you can measure both to see what you have."
October 30th, 2014, 04:46 PM
#46
Registered User
Thread Starter
Join Date: Oct 2014
Location: McGuire AFB NJ
Posts: 32
Yesterday I put the crank in, with all the new bearings, plastigauged every single journal both for the mains and the rods and all was within specs. I lubed everything up with engine assembly lube and torqued everything down to specs. Coated the new head gaskets with permatex copper spray and installed the heads today. Also, reinstalled the oil pump, tomorrow I need to clean up the oil pan and get that installed. I do have a few questions, as I was buttoning up the front I was trying to remember how the "cup" was held in place between the harmonic balancer and the crank gear, when I install the balancer tomorrow will that press it tight against the gear or am I forgetting something? Also, once I get the front buttoned up and the pan on I plan on getting the transmission hooked back up and start getting it back into the car, as I can put the rest on after it's been remounted. Can I prime the engine after it's back in or do I need to do it before re mounting it? Thanks in advance!
October 31st, 2014, 07:06 AM
#47
Registered User
Thread Starter
Join Date: Oct 2014
Location: McGuire AFB NJ
Posts: 32
October 31st, 2014, 07:40 AM
#48
Out of Line, Everytime😉
Join Date: Dec 2006
Location: Melville, Saskatchewan
Posts: 9,140
Prime it once it is back in the car, unless you want to risk oil spilling out somewhere. Also after you run it for a bit, change the oil again. There is a good chance there is still crap floating around, so use cheap oil.
October 31st, 2014, 08:36 AM
#49
Registered User
Thread Starter
Join Date: Oct 2014
Location: McGuire AFB NJ
Posts: 32
Great, thank you for the tip. That was my concern, spillage everywhere. Is there a preferred way to get it back in i.e. as one unit engine and transmission together like I pulled it out as, or is it easier to do it separately going back in?
October 31st, 2014, 09:03 AM
#50
Administrator
Join Date: Oct 2009
Location: Poteau, Ok
Posts: 41,053
If it came out as 1 unit, it'll go back in that way. I like the 1 unit plan. Engine oil won't spill out putting the engine back in (trans fluid is another story), you can prime it out of the car.
 October 31st, 2014, 09:52 AM
#51
Registered User

Join Date: Dec 2011
Posts: 7,286
AH yes the "mightaswells"
That bearing in post #13 is POUNDED
I bet it came from the piston with the clean spot that looks like it has been banging the head.
You may not need NEW rods [certainly not ALL of them], but you should take your abused and used rods/ pistons to the shop and have them verified/ fixed/ replaced as needed.
I have stuff like used rods and can probably direct a cam your way for shipping costs, a used aftermarket unit of not too much lift and duration maybe even with lifters [though you should put NEW lifters on a used cam in a different block]... I would donate such parts in part for appreciation for your military service. Partly to get 'em out from underfoot.
Be sure to tell the machine shop you want to MINIMIZE the cost. Don't take the rods off the pistons unless the rod has to be replaced.
Have them verify the condition of the pistons- diameter, cracks, ring groove wear, etc. You can clean the carbon out of the grooves, and be sure the oil ring return holes are clear.
November 3rd, 2014, 07:12 AM
#52
Registered User
Thread Starter
Join Date: Oct 2014
Location: McGuire AFB NJ
Posts: 32
AH yes the "mightaswells"
That bearing in post #13 is POUNDED
I bet it came from the piston with the clean spot that looks like it has been banging the head.
You may not need NEW rods [certainly not ALL of them], but you should take your abused and used rods/ pistons to the shop and have them verified/ fixed/ replaced as needed.
I have stuff like used rods and can probably direct a cam your way for shipping costs, a used aftermarket unit of not too much lift and duration maybe even with lifters [though you should put NEW lifters on a used cam in a different block]... I would donate such parts in part for appreciation for your military service. Partly to get 'em out from underfoot.
Be sure to tell the machine shop you want to MINIMIZE the cost. Don't take the rods off the pistons unless the rod has to be replaced.
Have them verify the condition of the pistons- diameter, cracks, ring groove wear, etc. You can clean the carbon out of the grooves, and be sure the oil ring return holes are clear.
That bearing in post #13 is POUNDED
I bet it came from the piston with the clean spot that looks like it has been banging the head.
You may not need NEW rods [certainly not ALL of them], but you should take your abused and used rods/ pistons to the shop and have them verified/ fixed/ replaced as needed.
I have stuff like used rods and can probably direct a cam your way for shipping costs, a used aftermarket unit of not too much lift and duration maybe even with lifters [though you should put NEW lifters on a used cam in a different block]... I would donate such parts in part for appreciation for your military service. Partly to get 'em out from underfoot.
Be sure to tell the machine shop you want to MINIMIZE the cost. Don't take the rods off the pistons unless the rod has to be replaced.
Have them verify the condition of the pistons- diameter, cracks, ring groove wear, etc. You can clean the carbon out of the grooves, and be sure the oil ring return holes are clear.
I truly appreciate your willingness to donate, I however have always had the mindset to never accept gratuities for my service. I believe that it is those who served before me that should be recognized. I volunteered 17 years ago to serve my country, some of those before me gave the ultimate sacrifice during a time when they didn't have the choice. Thank you so very much for the extremely kind offering though, I cannot explain what your support means to me.
On the hand I did take the rods/pistons in with me. They said they were fine and good to put back in for what I wanted for now. I do plan on picking up either another 350 or really trying to find a decent priced 455 that I can put some money into over time and eventually swap out maybe after I retire in a few more years. I have gotten everything back together and waiting to connect the transmission back up and hopefully drop her back in by next Sunday. Cleaned it up and gave it some fresh color, not quite Olds Gold, but close enough for my wallet...
November 3rd, 2014, 07:24 AM
#54
Registered User
Thread Starter
Join Date: Oct 2014
Location: McGuire AFB NJ
Posts: 32
Better than the ugly fake chrome/silver that the previous owner had attempted to spray. Thinking of getting shorter valve covers, and going black. Painted the transmission to match the block. Hoping to get the engine primed by tomorrow and start the reinstall slowly this time. Last time I pulled it in one shot by myself, hoping to get some hands over to help get it back in, as doing it solo again may prove very challenging.
November 12th, 2014, 06:24 AM
#55
Registered User
Thread Starter
Join Date: Oct 2014
Location: McGuire AFB NJ
Posts: 32
Well, well, well...I finally got the engine back in this past weekend. My wife was a huge help in getting it back into the car believe it or not! She was up at 0700 with me controlling the lift as I worked the engine around and into it's lost home. I worked on in on and off from 0700 Saturday morning until just after midnight. Sunday I woke up and had only a few things left, drivers side exhaust, filling the radiator, and connecting the battery. The previous owner had the negative terminal attached to the front driver's side header bolt, I bought the proper bolt to bolt it to the engine itself. Buttoned everything up pretty, set initial timing and attempted to fire the beast up. WRR WRR WRR SPFFF! I had the distributor in 180' off, quick fix, fired up second crank. I adjusted the timing as my eager 15 year old daughter cranked the ignition. Was spewing a lot of smoke on the passenger side, so I tightened the header bolts just a bit more. Not a fan of the exhaust gaskets that came in the Jegs kit, may have to replace them with better one soon! Very happy that it is running, and no knocks or pings! Sounds great.
Now a couple questions.
When I was putting everything back together I found what looks like a piece from the inside of the transmission lying in the crossbar. I only have a few quarts of Transmission fluid in the car as I lost most of it when my glove blew out on the removal, also the kiddo emptied the converter not knowing better. So I know the car won't move in gear right now due to that but I wanted to make sure that this didn't "fall" out somehow, somewhere. I am thinking it has been there for some time. I am hoping to get a gallon of transmission fluid Friday when I get paid to see if that fixes the not moving issue...lol. Second question is about my valve covers. The engine had tall ugly chrome covers on them, the car came with a nice set of shorter Oldsmobile valve covers that I plan on using. Both covers have 5 bolt hole top and bottom. The 5A heads have three bottom and two top, can I just fill the holes in the covers with high temp RTV or is there a better solution other than buying new covers right now?
Thanks in advance!
November 12th, 2014, 06:35 AM
#56
Registered User
Thread Starter
Join Date: Oct 2014
Location: McGuire AFB NJ
Posts: 32
Here is the piece that I found on the cross bar...any ideas if this could have "fallen" out somehow during the removal or reinstall? I never removed anything from the transmission other than the converter.
November 12th, 2014, 07:15 AM
#58
Registered User
Thread Starter
Join Date: Oct 2014
Location: McGuire AFB NJ
Posts: 32
Big sigh of relief! Not sure if the last owner installed the valve body into the transmission or not, but I know they did something to it as the cross member for the transmission has brand new bolts. Fingers crossed, all that it need is transmission fluid and I can take it for a test run!
November 15th, 2014, 12:46 PM
#59
Registered User
Thread Starter
Join Date: Oct 2014
Location: McGuire AFB NJ
Posts: 32
Uh oh...
So I filled the transmission up ran it to ensure the converter was filled, then topped it off again and all is good. It moved under its own power again...YAY! As I was running it I see that it is dumping coolant from the backside of the engine somewhere. I thought initially it was coming from the back of the intake manifold where the heater core hose attaches, but it does not seem so. It almost looks like it's seeping out between the head and intake, pooling slowly. Not sure where the majority is coming from yet, just constant drip while running somewhere from the rear...any ideas? Got thinking, would I have needed different head gaskets due to having 5A heads on there instead of the stock gaskets that came in the rebuild kit? Would that cause it to leak externally as well though? FYI...the heater hoses are not hooked up to the heater core yet, I just have it looped from front to rear. Only spews out while its running, from what I could see it pouring down right between the engine/transmission. It's freezing outside otherwise I would be under it feeling around but I'd like a good idea where I need to start. Freeze plugs were fine before the rebuild would something have caused one to go bad? Really need to get this going by the end of the weekend ANY help is appreciated!
Last edited by USAF72Cutlass; November 15th, 2014 at 03:43 PM.
November 15th, 2014, 04:00 PM
#60
Administrator
Join Date: Oct 2009
Location: Poteau, Ok
Posts: 41,053
If its leaking between the head and intalke then I'm going to assume and improper gasket fit. Which gasket did you use? Did you put RTV around the water ports on the gasket? Did you make sure all the bosses were in the holes if you used the turkey tray?
November 15th, 2014, 04:11 PM
#61
Registered User
Thread Starter
Join Date: Oct 2014
Location: McGuire AFB NJ
Posts: 32
I initially thought it was the rear heater core hose connection as there is a free floating valve below the hose clamp position, but it is spewing out way too much to be that. But I noticed that it is kind of pooling coolant near there where the intake meets the head, hence thinking it's the intake gasket. Used a pan gasket but didn't like the looks of it, guy said it hadn't been used, I have a brand new set of intake gaskets that came with the gasket kit I bought. I am going to pull the intake after dinner and put those in. Should I use anything on the intake gaskets? Sealer, etc?
November 15th, 2014, 04:24 PM
#62
Administrator
Join Date: Oct 2009
Location: Poteau, Ok
Posts: 41,053
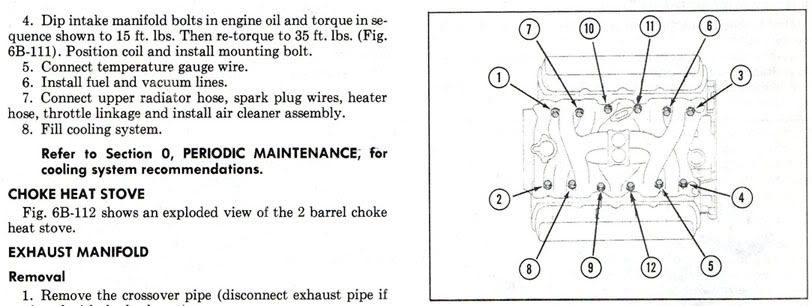
I would make sure the surfaces are clean and use a thin bead of RTV around both sides where the gasket seals the water ports. Follow the directions included in the gasket set.
Tighten as per below:
Intaketorquesequence.jpg
Tighten as per below:
Intaketorquesequence.jpg
November 15th, 2014, 09:39 PM
#63
NOVICE car nut
Join Date: Nov 2010
Location: Milwaukee Wisconsin
Posts: 3,123

The holes were not real big , but both sides had a number of them after I was done knocking thin metal out with my dremmel . The fender had a nice hole in it , and the dash is rusted across , and the vinyl top needs to go bye bye ... etc ... etc .... The floors are in great shape along with the frame , no rust holes there .
Last edited by oldsguybry; November 15th, 2014 at 09:45 PM.
November 15th, 2014, 09:56 PM
#64
Registered User
Thread Starter
Join Date: Oct 2014
Location: McGuire AFB NJ
Posts: 32
Interior is beige and all tore up . You don't see any rust holes because I blasted / sanded them and added fiberglass filler .
The holes were not real big , but both sides had a number of them after I was done knocking thin metal out with my dremmel . The fender had a nice hole in it , and the dash is rusted across , and the vinyl top needs to go bye bye ... etc ... etc .... The floors are in great shape along with the frame , no rust holes there .
The holes were not real big , but both sides had a number of them after I was done knocking thin metal out with my dremmel . The fender had a nice hole in it , and the dash is rusted across , and the vinyl top needs to go bye bye ... etc ... etc .... The floors are in great shape along with the frame , no rust holes there .
These things are great when it comes to the pans and frame it seems...I was amazed how solid mine were, big reason I bought it. I'm not looking to make this a show car by any means just a nice looker when I'm driving. Getting closer each day, well mechanically at least...not sure the best way to tackle these holes...no patch panels that I can find...
November 15th, 2014, 10:05 PM
#65
Registered User
Thread Starter
Join Date: Oct 2014
Location: McGuire AFB NJ
Posts: 32
I used that same page from the manual...lol. I did find the issue I believe, in my infinite wisdom and excitement, when it came to getting the intake back on I did not take the time to clean the surfaces around the water holes of old RTV. I didn't realize this until I removed it a couple hours ago. The surfaces have been cleaned thoroughly now, new generous beads of High temp RTV have been applied and gaskets installed. I also ordered a fel-pro set from the local autozone as a backup. They will be here in a week. I put beads between the pan and block around the water holes, and beads between the pan and the intake around the water holes. I'll let it set until around noon tomorrow then fingers crossed start working on the heater plumbing...
November 16th, 2014, 04:12 AM
#66
Administrator
Join Date: Oct 2009
Location: Poteau, Ok
Posts: 41,053
If your using the steel turkey tray, there are 4 bosses that align the gasket. Those need to be set into the holes or the gasket will not seal. Dry fitting so it lays flat is a good idea prior to final install.
November 16th, 2014, 10:38 AM
#67
Out of Line, Everytime😉
Join Date: Dec 2006
Location: Melville, Saskatchewan
Posts: 9,140
I used regular Corteco 350 head gaskets with 5A heads on the 76 Olds 350 in my 94 4x4. As long as the head gaskets match the block year being used. 64-76 330-350 head gaskets are same, 77 and later are different. Use RTV around both sides of the gaskets on the four end water ports and end rails. Be generous on the end rails. I use Permatex Aviation sealant, supposedly Edelbrock Gaskasinch is similar around all the other ports on the turkey tray.
November 16th, 2014, 01:11 PM
#68
Registered User
Thread Starter
Join Date: Oct 2014
Location: McGuire AFB NJ
Posts: 32
One thing after another...I waited until close to 1 this afternoon before even looking at the car, wanted to give it plenty if time to cure up. Gave a good feel, and felt confident, cranked it up and she fired up better than before, yay, feeling good, place it into reverse and pull it out of the garage. Turn it off and I hear something POURING out. get out and see oil EVERYWHERE! The Oil Pressure Gauge hose popped! UGH!!! Needed to change the oil anyway as it was milky from the coolant leaking under the pan and inside the engine. Put a cap nut on the oil pressure oulet for now, bought a new hose to install after I get everything else fixed. Just drained the oil, didn't seem like very much, but going to leave the plug our and go grab oil/filter, etc. Blew as much crap of the intake as possible with my compressor, wiped as much up as I can. After capping the outlet I fired it back up and was going to let it run up to temp first but I am smoking from everywhere, I am also worried some smoke may be from the exhaust manifold, maybe the gaskets didn't seat well?
November 16th, 2014, 01:23 PM
#69
Out of Line, Everytime😉
Join Date: Dec 2006
Location: Melville, Saskatchewan
Posts: 9,140
I think you will be fine, run it for a good while, oil can smoke for awhile after the oil change. Exhaust manifolds seal up fine usually with just gaskets. If there is leaks, either tighten down more or use high temp RTV on the gaskets.
Last edited by olds 307 and 403; November 16th, 2014 at 01:36 PM.
November 16th, 2014, 02:34 PM
#70
Registered User
Thread Starter
Join Date: Oct 2014
Location: McGuire AFB NJ
Posts: 32
Thinking so as well. Just got done with the oil change, still blowing a little coolant out of the top rear heater hose connection on the intake. It has a little valve in there controlled by a 90' bent arm on the outside that isn't attached to anything. Where the valve connects to the arm and comes through the housing is loose and the coolant leaks through there, and depending on if you touch it, it will stream out! As you can see in the pic I just put some High Temp RTV around it in the open position. Thoughts or better ideas for a fix?
November 16th, 2014, 04:07 PM
#71
Administrator
Join Date: Oct 2009
Location: Poteau, Ok
Posts: 41,053
You may be able to get one from the auto parts store or one of the guys may have a valve available. Temporarily you can put a pipe nipple in there and reconnect the hose. The smoke from the exhaust is most likely coolant and oil that got in there during your repair process, it will burn off.

Thread
Thread Starter
Forum
Replies
Last Post
BangScreech4-4-2
Big Blocks
35
February 25th, 2015 11:18 AM
delta_88_germany
Non-Olds Engines
13
September 28th, 2014 05:44 AM
delta_88_germany
Brakes/Hydraulic Systems
4
November 2nd, 2013 05:06 AM


