
Pro Touring '72 now going LS2


Thread Starter
Registered User
Joined: Nov 2008
Posts: 799
From: Detroit, MI
Are you wanting cruise control? There's a company that makes a cruise module for 58x reluctor motors:
http://spankysrodshop.net/
http://spankysrodshop.net/
Last edited by csouth; Aug 1, 2013 at 07:20 AM.

Registered User
Joined: Nov 2010
Posts: 904
From: St Louis, MO
You need a GM normally open type. I used the Rostra stalk (normally closed), dumb me. It can be wired for on/off with push button cruise, but resume/coast wont work without relays.
If you have the cutlass dash switches, those will work. Otherwise Rostra has a dash mounted controller that will work.
There are options if you look over at LS1tech conversion forum.
If you have the cutlass dash switches, those will work. Otherwise Rostra has a dash mounted controller that will work.
There are options if you look over at LS1tech conversion forum.
Thread Starter
Registered User
Joined: Nov 2008
Posts: 799
From: Detroit, MI
You need a GM normally open type. I used the Rostra stalk (normally closed), dumb me. It can be wired for on/off with push button cruise, but resume/coast wont work without relays.
If you have the cutlass dash switches, those will work. Otherwise Rostra has a dash mounted controller that will work.
There are options if you look over at LS1tech conversion forum.
If you have the cutlass dash switches, those will work. Otherwise Rostra has a dash mounted controller that will work.
There are options if you look over at LS1tech conversion forum.
Thanks for the info. I see the dash mounts and stalk. I'm sure I will have lots of questions for you as my swap continues, just let me know if I bug you to much...lol
On another note, did you swap water pumps? I have seen where people used the 2007+ WP with a car intake, but I wasn't sure of the year on your motor.
Registered User
Joined: Nov 2010
Posts: 904
From: St Louis, MO
On water pumps, the 07+ truck pumps clear the later DBW TBs, but not earlier ones. Tough to say on the 4 bolt TBs, cant say for sure.
I used a truck pulley on LS1 pump. A better solution might be the front outlet 2010+ Camaro LS3 pump that is spaced correctly for truck accessories. It definitely clears the TB.
I used a truck pulley on LS1 pump. A better solution might be the front outlet 2010+ Camaro LS3 pump that is spaced correctly for truck accessories. It definitely clears the TB.
Thread Starter
Registered User
Joined: Nov 2008
Posts: 799
From: Detroit, MI
On water pumps, the 07+ truck pumps clear the later DBW TBs, but not earlier ones. Tough to say on the 4 bolt TBs, cant say for sure.
I used a truck pulley on LS1 pump. A better solution might be the front outlet 2010+ Camaro LS3 pump that is spaced correctly for truck accessories. It definitely clears the TB.
I used a truck pulley on LS1 pump. A better solution might be the front outlet 2010+ Camaro LS3 pump that is spaced correctly for truck accessories. It definitely clears the TB.
I'm going to look at a 4L70E tomorrow evening and then Sunday I should be picking up a new F body oil pan, pickup and dipstick. The seller had an LS1 with 40k he was going to swap into a 944, but killed the project. He sold the motor for $1500. I looked at it 2wks before my motor got stolen, when I needed one it was already gone.
Last edited by csouth; Aug 2, 2013 at 10:51 AM.
Registered User
Joined: Nov 2010
Posts: 904
From: St Louis, MO
Here are pics of the LS intake with 07+ truck accessories.
http://ls1tech.com/forums/new-produc...-270-99-a.html
http://ls1tech.com/forums/new-produc...-270-99-a.html
Thread Starter
Registered User
Joined: Nov 2008
Posts: 799
From: Detroit, MI
Here are pics of the LS intake with 07+ truck accessories.
http://ls1tech.com/forums/new-produc...-270-99-a.html
http://ls1tech.com/forums/new-produc...-270-99-a.html
I picked my trans and a brand new F Body oil pan setup. I'm still cleaning the motor to get ready for paint on the block and valve covers. I hope to be ready to install in 2wks.
Last edited by csouth; Jul 4, 2015 at 01:58 PM.
Thread Starter
Registered User
Joined: Nov 2008
Posts: 799
From: Detroit, MI
So I have my 4L70E that I picked up this past weekend, along with a brand new F Body pan kit. It was pan, windage tray, pickup and dipstick. I got them for $250, which was good seeing as used ones go for $175 plus shipping on LS1tech.
The 4L70E was built up to go behind a Supercharged Saab 9-7, until owner found that the pinout was different on the plug. He had it sitting, but decided to dump it now that he needs more room in his garage.
lspan_zps5d6c1cd6.jpg
4l70e_zps5228ed1b-1.jpg
I removed the truck intake and test fitted. I'll pick up some new gaskets today and my fuel rails are in route.
ls2_zpsbafae955.jpg
I put a coat of gold I ordered from Inline Tube on the valve covers. I should have scuffed them up a little more after cleaning, but oh well. These can be revisited at any point since they sit on top. I'll remove the TBSS oil pain once I get the engine painted. I'll then paint Fbody pan and install it.
Last edited by csouth; Jul 4, 2015 at 02:00 PM.
Thread Starter
Registered User
Joined: Nov 2008
Posts: 799
From: Detroit, MI
Thanks, I'm trying to keep it going.
I started painting the oil pan and valve covers. I hate painting on the smooth surface of the valve covers. Even with some light scuffing and etching primer, the result was "so so". The cast aluminum pan was no joy either. I'm hoping for better results with the block.
lsvalve_zps1bd79054.jpg
I started painting the oil pan and valve covers. I hate painting on the smooth surface of the valve covers. Even with some light scuffing and etching primer, the result was "so so". The cast aluminum pan was no joy either. I'm hoping for better results with the block.
lsvalve_zps1bd79054.jpg
Thread Starter
Registered User
Joined: Nov 2008
Posts: 799
From: Detroit, MI
Finished the topend minus the fuel rails. I hate the way the valve covers turned out. I think I'm going to scuff them and paint with black eching primer, then spray with gold. I think that will darken the gold in the valve covers. I'll worry about that after its running though...
lsdone_zps7a42ae2b.jpeg
lsdone_zps7a42ae2b.jpeg

Thread Starter
Registered User
Joined: Nov 2008
Posts: 799
From: Detroit, MI
Ran into a small snafu last night. I purchased a stock fuel rail on eBay to finish my LS2 intake swap. Well after waiting for it to arrive from Cali, it was the wrong fuel rail! It's very wide, so I'm thinking it must be LS7? His ad had LS2/LS3/LS7 fuel rail. No where have I found online where the LS2 and LS7 interchange. They guy had no returns in his listing, but its covered by eBay buyer protection. I'm more pissed at my waste of time and gas as he sent them signature required. Because I'm never home when UPS comes by, I had the pkg held at the terminal for pickup. I had to go out of my way for nothing....


Thread Starter
Registered User
Joined: Nov 2008
Posts: 799
From: Detroit, MI
Thread Starter
Registered User
Joined: Nov 2008
Posts: 799
From: Detroit, MI
Thread Starter
Registered User
Joined: Nov 2008
Posts: 799
From: Detroit, MI


Registered User
Joined: May 2009
Posts: 2,212
From: USA
Car looks like it's getting some serious coin put into it. I'm mid progress on my LS/T-56 swap still after
2 years, and finally getting back into it. I like the rims, and I'm curious what paint scheme you have planned to go with them.
I have never seen the Dirty Dingo sliders that look like those.....
Those are my failsafe if I can't get my Edelbrock SS A-body headers to fit.
There will always be short sighted people who fail to understand if Oldsmobile was still in business,
they would have LS motors in them. GM Corporate put them in most performance oriented vehicles under their umbrella.
Glad to see you are going with a proven Nascar head & engine design
2 years, and finally getting back into it. I like the rims, and I'm curious what paint scheme you have planned to go with them.
I have never seen the Dirty Dingo sliders that look like those.....
Those are my failsafe if I can't get my Edelbrock SS A-body headers to fit.
they would have LS motors in them. GM Corporate put them in most performance oriented vehicles under their umbrella.
Glad to see you are going with a proven Nascar head & engine design
Thread Starter
Registered User
Joined: Nov 2008
Posts: 799
From: Detroit, MI
Car looks like it's getting some serious coin put into it. I'm mid progress on my LS/T-56 swap still after
2 years, and finally getting back into it. I like the rims, and I'm curious what paint scheme you have planned to go with them.
I have never seen the Dirty Dingo sliders that look like those.....
Those are my failsafe if I can't get my Edelbrock SS A-body headers to fit.
There will always be short sighted people who fail to understand if Oldsmobile was still in business,
they would have LS motors in them. GM Corporate put them in most performance oriented vehicles under their umbrella.
Glad to see you are going with a proven Nascar head & engine design
2 years, and finally getting back into it. I like the rims, and I'm curious what paint scheme you have planned to go with them.
I have never seen the Dirty Dingo sliders that look like those.....
Those are my failsafe if I can't get my Edelbrock SS A-body headers to fit.
There will always be short sighted people who fail to understand if Oldsmobile was still in business,
they would have LS motors in them. GM Corporate put them in most performance oriented vehicles under their umbrella.
Glad to see you are going with a proven Nascar head & engine design
I picked up the Dirty Dingo DD adapters instead of the sliders. I figured it still gives me 3 mounting positions,just takes a little more time if you need to adjust. I probably need to change that posting...
I definitely don't care what anyone might have to say about me going LS. It was in the long term plan if something happened to the 455 as i had planned to run it on track and autox.
There is an artist that has a Cutlass rendering I would like to consider. It was one he created for a project, but they did not use it. When the time comes. I'll call him and ask before I throw it in the mix as an option.
I had a rendering done a while back, but have since changed my mind about. Here is one I had done recently by Shawn Mascoll. Its simple, yet says PT muscle. I'd like the bumpers and trim to be brushed. Calipers would be powder coated candy orange or race gold.
72_Cutlass_Render.jpg
Last edited by csouth; Jul 4, 2015 at 02:04 PM.
Thread Starter
Registered User
Joined: Nov 2008
Posts: 799
From: Detroit, MI
After following Lee's lead with the Duplicolor gold, here is the motor as it sits today.
I'm sure you can see the difference in the 2 Gold's
Inline Tube gold
lsdone_zps7a42ae2b.jpeg
Duplicolor Gold. Now the valve covers match the block
ls2_gold2_zps5d2cc7cf.jpg
I should be putting it in next weekend. I'm waiting on my shifter since I want to install the motor and trans together. I'm anticipating it will arrive early next week. I'll wait until the weekend so I can make it an all day affair vs. cramming it in to an evening after work.
Registered User
Joined: May 2009
Posts: 2,212
From: USA
The updated motor paint looks much better.
That rendering is pretty wicked lookin with those Rushforth's.
Keep up the good work. I'll be referencing this thread for tricks and tips outside of my build design.
That rendering is pretty wicked lookin with those Rushforth's.
Keep up the good work. I'll be referencing this thread for tricks and tips outside of my build design.
Thread Starter
Registered User
Joined: Nov 2008
Posts: 799
From: Detroit, MI
I'm trying to keep the build going steady. I'm also open for any suggestions or feedback as I know you're doing a swap too.
I'm hoping to be able to paint it next year this time. I like simple, but I'll have some small details. I'm going to lay off of the spending for a while after September as I'm trying to make it to SEMA.
Thread Starter
Registered User
Joined: Nov 2008
Posts: 799
From: Detroit, MI
So I'm putting together a list of things I'd like to get done on my "HAM" install weekend...  My friend is coming over to lend a hand.
1. Remove dash and old wiring harness
2. Remove Olds frame mounts, install Chevy
3. Fab rear brake lines and attach to housing
4. Install 3rd member
5. Install torque converter and mate trans to motor
6. Remove intake and install motor/trans with G Force crossmember
7. Attach converter to flexplate
8. Set pinion angle and measure for driveshaft
There is no union, but breaks for lunch and beverages will be allowed...lol
My friend is coming over to lend a hand. 1. Remove dash and old wiring harness
2. Remove Olds frame mounts, install Chevy
3. Fab rear brake lines and attach to housing
4. Install 3rd member
5. Install torque converter and mate trans to motor
6. Remove intake and install motor/trans with G Force crossmember
7. Attach converter to flexplate
8. Set pinion angle and measure for driveshaft
There is no union, but breaks for lunch and beverages will be allowed...lol
Last edited by csouth; Aug 29, 2013 at 05:15 AM.
Registered User
Joined: May 2009
Posts: 2,212
From: USA
Thread Starter
Registered User
Joined: Nov 2008
Posts: 799
From: Detroit, MI
I will be using the G Force 4L80E crossmember. I purchased it for my trans that was stolen.
4L80E
crossmember_zps762a246e.jpg
4L60E
crossmember4l60_zps8bc61fa6.jpg
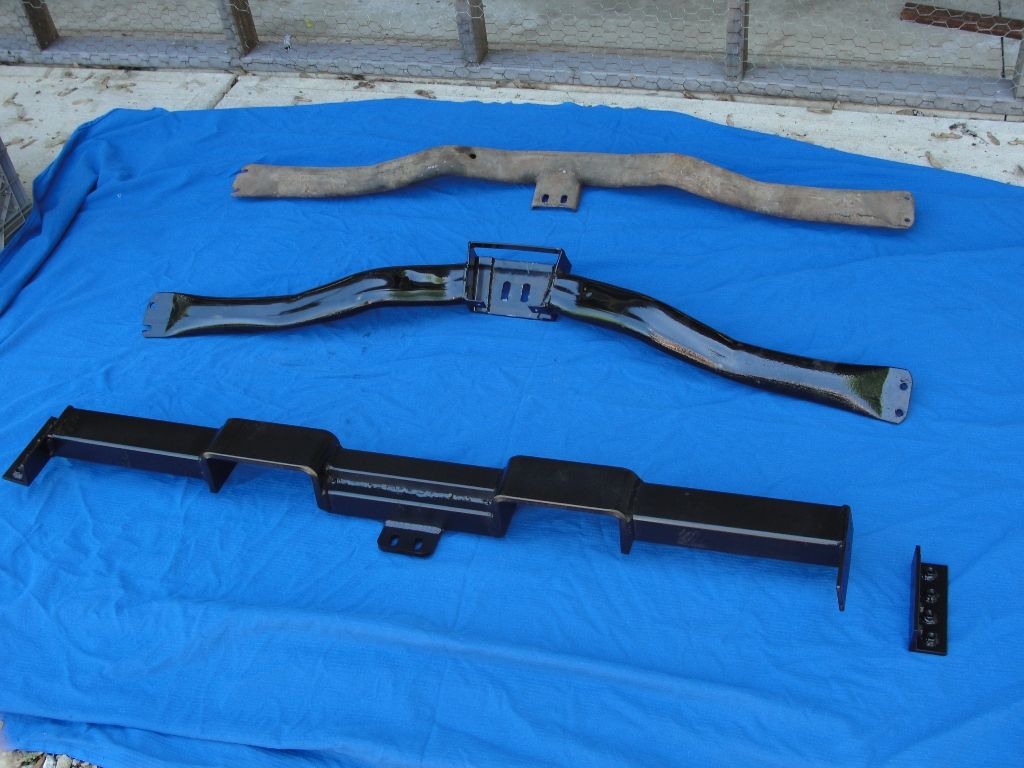
The mount is basically the same, but the 4L80E is longer which is why it angles back towards the front of the car more than the 4l60E crossmember. I may have to drill holes, but that should be it. G Force said I may have to shim the 4L70E more to get the angle right.
For your purposes, I would probably fab a crossmember from the Summit kit. I know one of the guys from Pro Touring.com built one for his using thier setup. The G Force type setups allow for better exhaust clearance than the tubular crossmembers from what I understand.
Here is the one Tom built for his Chevelle
The top one is stock, middle is one he modified for T56, the last is the one he fabbed from the Summit kit
064_zps44d76f9f.jpg
http://www.summitracing.com/parts/sum-770325/overview/
4L80E
crossmember_zps762a246e.jpg
4L60E
crossmember4l60_zps8bc61fa6.jpg
The mount is basically the same, but the 4L80E is longer which is why it angles back towards the front of the car more than the 4l60E crossmember. I may have to drill holes, but that should be it. G Force said I may have to shim the 4L70E more to get the angle right.
For your purposes, I would probably fab a crossmember from the Summit kit. I know one of the guys from Pro Touring.com built one for his using thier setup. The G Force type setups allow for better exhaust clearance than the tubular crossmembers from what I understand.
Here is the one Tom built for his Chevelle
The top one is stock, middle is one he modified for T56, the last is the one he fabbed from the Summit kit
064_zps44d76f9f.jpg
http://www.summitracing.com/parts/sum-770325/overview/
Last edited by csouth; Aug 29, 2013 at 06:00 AM.
Thread Starter
Registered User
Joined: Nov 2008
Posts: 799
From: Detroit, MI
Well due to some conversion hiccups, I only got one thing done yesterday.
My friend came by and we got setup to remove the Olds frame mounts and install the Chevy ones. This whole process was a PITA! I'm sure it can be much easier without the suspension installed, but there is no easy way to access these bolts. We got the Olds frame mount off only to find out NPD sold me 2 RH frame mounts! The only thing good about this they are only 15min from my house.
Setting up on jack stands to get ready for install
IMG_1878_zps5444bdc2.jpg
IMG_1879_zpsf0435762.jpg
IMG_1881_zpscd62e630.jpg
Installed the new frame mounts in a location most others used, all bolt holes used with slight overhang. I used the Dirty Dingo Double D adapter plates with the motor mounts in the normal position. On test fit the oil pan was tight angainst the crossmember and there way to use the setting. I pulled the motor and trans back out and we moved the frame mounts back in the crossmember. I moved the motor mounts up the 3/4" fwd position and it was perfect.
What I found out next is that while my friend was able to get his motor mounted bolted, I could not get my holes to line up. After zero success shift and prying, I pulled the motor back out. Looking closer, I see Energy Suspension needs better quality control.
IMG_1880_zps6d7f4f67.jpg
The weld was so sloppy, I could not get the mount to sit flush. NPD was closed and we were in too deep by now, so my friend just grinded down the welds. I hate have to do that to new parts, but I wanted the motor in.
After a long night the motor was finally in, minus the trans. I did end up with ample oil pan and firewall clearance after all the adjustments.
7dc19fa4-c826-45d2-8044-8b7aaab4818d_zpsc6aa8c6c.jpg
Placed a wood block between the head and the firewall to allow the motor to rest.
IMG_1874_zps18362814.jpg
All done and back on the ground....
IMG_1877_zps170f3aa1.jpg
Last edited by csouth; Jul 4, 2015 at 02:09 PM.
Thread Starter
Registered User
Joined: Nov 2008
Posts: 799
From: Detroit, MI
Thanks, hope to keep the momentum going...
Thread Starter
Registered User
Joined: Nov 2008
Posts: 799
From: Detroit, MI
Registered User
Joined: May 2009
Posts: 2,212
From: USA
Here is the one Tom built for his Chevelle
The top one is stock, middle is one he modified for T56, the last is the one he fabbed from the Summit kit
http://www.summitracing.com/parts/sum-770325/overview/
The top one is stock, middle is one he modified for T56, the last is the one he fabbed from the Summit kit

http://www.summitracing.com/parts/sum-770325/overview/
 Thanks!!!! I had no idea they sold something like that.
 it's EXACTLY what I wanted, like the G-force, it allows MUCH MORE clearance for exhaust.
Now how do I find more info for Tom's build or is he a member of Pro-touring.com ??
I'd like to PM him to get some info, because I can weld it, but obviously getting some
tips from someone who did it first would be super helpful to save some SNAFU's.

Certified Car Crazy
Joined: Aug 2012
Posts: 74
From: Brooklyn, NY
Car is coming along real nice.. I'm in the middle of installing an LS1 into my 78.. Finally got the motor dropped in tonight.. What a nightmare mine was.. I went with the Trans-Dapt swap kit.. It came with mounts for pre-72sbc so I couldn't use them. Had to re-use the Clam shell.. No big deal.. Mount the plates on to the block.. OK.. Mount the Clam Shells to the plates, 3 out of the 6 bolts were too long.. Hit the block in different places.. Had to shim them out with washers.. Get new mounts installed on the frame.. Drop it in, don't line up.. I get the P/S bolt to line up, D/S is off like 3/4".. Try prying, lifting, moving the trans up, down, side to side, etc.. Nothing.. Pull it back out. Had to slot the holes in the from up 3/8", re install everything.. Still don't line up, but the D/S is only off 1/2" this time.. Lift the motor a few inches, loosened up all the bolts on the frame mounts, drop it in, pry, push pull, finally.. Got both sides lined up... WHAT A PITA!!. What a mistake I made getting the Trans Dapt stuff.. I originally was planning on the mounts from Car Shop Inc, but was putting together a big order with Summit and figured I would just get it all in one place and others have used the trans dapt.. What a mistake.. But she's in..
Now my next issue is the trans Crossmember.. I got the G-Force also from Summit.. My issue is the only way it lines up, is with the front two holes on the crossmember to the last two holes on the frame.. If the frame was longer, like in my last 2nd gen camaro, just drill two more holes.. Been there, done that. No big deal.. But this car, the frame ends and there is no more rail to get the last two bolts. So I gotta figure out how I'm gonna do that..
Had to cut off a collector on my Driver side header b/c it had a nasty kick out and wouldn't line up to the hump in the crossmember.. Got that sorted out now I gotta weld it up... I guess it wouldn't be fun if it was too easy.. lol")
Now my next issue is the trans Crossmember.. I got the G-Force also from Summit.. My issue is the only way it lines up, is with the front two holes on the crossmember to the last two holes on the frame.. If the frame was longer, like in my last 2nd gen camaro, just drill two more holes.. Been there, done that. No big deal.. But this car, the frame ends and there is no more rail to get the last two bolts. So I gotta figure out how I'm gonna do that..
Had to cut off a collector on my Driver side header b/c it had a nasty kick out and wouldn't line up to the hump in the crossmember.. Got that sorted out now I gotta weld it up... I guess it wouldn't be fun if it was too easy.. lol
Thread Starter
Registered User
Joined: Nov 2008
Posts: 799
From: Detroit, MI
DUDE!!!! Thanks!!!! I had no idea they sold something like that.
it's EXACTLY what I wanted, like the G-force, it allows MUCH MORE clearance for exhaust.
Now how do I find more info for Tom's build or is he a member of Pro-touring.com ??
I'd like to PM him to get some info, because I can weld it, but obviously getting some
tips from someone who did it first would be super helpful to save some SNAFU's.
Thanks!!!! I had no idea they sold something like that. it's EXACTLY what I wanted, like the G-force, it allows MUCH MORE clearance for exhaust.
Now how do I find more info for Tom's build or is he a member of Pro-touring.com ??
I'd like to PM him to get some info, because I can weld it, but obviously getting some
tips from someone who did it first would be super helpful to save some SNAFU's.
http://www.pro-touring.com/showthread.php?t=63334
Thread Starter
Registered User
Joined: Nov 2008
Posts: 799
From: Detroit, MI
Car is coming along real nice.. I'm in the middle of installing an LS1 into my 78.. Finally got the motor dropped in tonight.. What a nightmare mine was.. I went with the Trans-Dapt swap kit.. It came with mounts for pre-72sbc so I couldn't use them. Had to re-use the Clam shell.. No big deal.. Mount the plates on to the block.. OK.. Mount the Clam Shells to the plates, 3 out of the 6 bolts were too long.. Hit the block in different places.. Had to shim them out with washers.. Get new mounts installed on the frame.. Drop it in, don't line up.. I get the P/S bolt to line up, D/S is off like 3/4".. Try prying, lifting, moving the trans up, down, side to side, etc.. Nothing.. Pull it back out. Had to slot the holes in the from up 3/8", re install everything.. Still don't line up, but the D/S is only off 1/2" this time.. Lift the motor a few inches, loosened up all the bolts on the frame mounts, drop it in, pry, push pull, finally.. Got both sides lined up... WHAT A PITA!!. What a mistake I made getting the Trans Dapt stuff.. I originally was planning on the mounts from Car Shop Inc, but was putting together a big order with Summit and figured I would just get it all in one place and others have used the trans dapt.. What a mistake.. But she's in..
Now my next issue is the trans Crossmember.. I got the G-Force also from Summit.. My issue is the only way it lines up, is with the front two holes on the crossmember to the last two holes on the frame.. If the frame was longer, like in my last 2nd gen camaro, just drill two more holes.. Been there, done that. No big deal.. But this car, the frame ends and there is no more rail to get the last two bolts. So I gotta figure out how I'm gonna do that..
Had to cut off a collector on my Driver side header b/c it had a nasty kick out and wouldn't line up to the hump in the crossmember.. Got that sorted out now I gotta weld it up... I guess it wouldn't be fun if it was too easy.. lol
The most time consuming part was the dang frame mounts. There is no quick and easy way to get those in and out.

Thread Starter
Registered User
Joined: Nov 2008
Posts: 799
From: Detroit, MI
Switched to Ridetech coilovers and installed them this summer. Set the rears at slightly above what I want the final ride height to be with full interior and tank.
photo1_zps3937a787.jpg
photo3_zpsbde98e30.jpg
I sold my 4L70e and controller and recently ordered a T56... Mo Money
photo1_zps3937a787.jpg
photo3_zpsbde98e30.jpg
I sold my 4L70e and controller and recently ordered a T56... Mo Money


