
Eddie Hansen's '69 Cutlass Convertible
 April 1st, 2010 | 06:02 PM
#1
Thread Starter
Registered User
Joined: Jan 2008
Posts: 3,515
From: South River, New Jersey
Eddie Hansen's '69 Cutlass Convertible
well Have been trying to get my 1969 cutlass s convertible project back on track after waaaaaaaaayyyyy too many years (geez it must be more then 15!!) anyway My motor is at the engine builders,and is moving along nicely, he will also freshen the 4 speed with new seals/synchros etc. So I ordered a differential "Kit" from Jim over at jd race what a great guy!! He Needed some info regarding the diff, and I had to remove an axle to check, so I went ahead and pulled both, drained the diff ( hate that smell boy!!) so now both axles are out backing plates are off and getting ready to put all the good stuff back inside once it gets here. I need to pull the posi unit out, ordered the clutches ( YIKES!!!!$$$$$$$) all new bearings seals etc. I forgot how much I enjoyed working on this car!!
I will refinish the differential, and if you guys are interested I will post my progress on this and the posi rebuild, I am sure I will have LOTS of questions but I have reread the chasis manual several times regarding this and it really seems straight forward.
I plan to convert to 4 wheel disc brakes and now is as good a time as any with the axles etc out. Man it is like a pandoras box when you start changing things, anyway wish me luck.
EDIT BY ADMIN: Three threads have been merged upon Eddie's request. You may have some trouble following consecutive plots. i.e. engine, brakes, etc....
April 1st, 2010 | 10:22 PM
#3
Thread Starter
Registered User
Joined: Jan 2008
Posts: 3,515
From: South River, New Jersey
Thanks J
J Thanks I have a decent selection of tools (they may be full of cobwebs but a good selection) I know U have a BF hammer or two
I am sure I also have a few brass drifts funny looking at the chasis manual those guys had all them specially made tools to do every darn thing LOL... no wonder the manual makes it look easy, will take some pics as I progress...
or twoI am sure I also have a few brass drifts funny looking at the chasis manual those guys had all them specially made tools to do every darn thing LOL... no wonder the manual makes it look easy, will take some pics as I progress...
April 2nd, 2010 | 06:29 AM
#4
Registered User
Joined: Feb 2008
Posts: 11,798
From: Plano, TX
Eddie, I am interested in a differential rebuild thread - bring it on!
The most I have ever done was pop the cover, change oil, and clean the grease off the outside...")
I hear a lot about special diff techniques, so seeing the action in picures will be interesting.
The most I have ever done was pop the cover, change oil, and clean the grease off the outside...
I hear a lot about special diff techniques, so seeing the action in picures will be interesting.
April 2nd, 2010 | 07:34 AM
#5
Thread Starter
Registered User
Joined: Jan 2008
Posts: 3,515
From: South River, New Jersey
ok!!
will do I have changed axle seals a few times never on a BOP rear, never did a posi or anything this ambitious ,but I feel good about it. it's one of these things that if your doing "this" might as well.......... The elephant keeps putting on weight!!
I blame Richard..... if his vert didn't come out so well and one of the best threads ever, I might of said "Good Enough" LOL.....
anyway will take some before and hopefully afters...
I blame Richard.....
if his vert didn't come out so well and one of the best threads ever, I might of said "Good Enough" LOL.....anyway will take some before and hopefully afters...
April 2nd, 2010 | 07:37 AM
#6
Thread Starter
Registered User
Joined: Jan 2008
Posts: 3,515
From: South River, New Jersey
Btw...
I will post how I did it, but certainly seek expert advice on rear ends from somebody who knows what they are doing ( like monzaz ) this will be more of how to "get her done"....
April 2nd, 2010 | 09:13 AM
#8
car guy
Joined: Apr 2008
Posts: 5,662
From: Dallas TX
 April 2nd, 2010 | 03:57 PM
#11
Thread Starter
Registered User
Joined: Jan 2008
Posts: 3,515
From: South River, New Jersey
UhOh...
the differential rebuild, the disc brake conversion and the engine build, we will start with the differential
Gee Rob figures I decide to eat an elephant and I start at the rear!!!
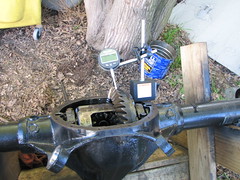
Ok well I started by building a jig to hold the diff while I cleaned it, it was very simple and took all of 5 minutes doesn't need to be fancy. Jackstands would work, but mine are occupied holding up uneaten elephant LOL.
here is a pic of the jig

Last edited by Eddie Hansen; June 15th, 2010 at 10:56 AM. Reason: merged threads
April 2nd, 2010 | 04:02 PM
#12
Thread Starter
Registered User
Joined: Jan 2008
Posts: 3,515
From: South River, New Jersey
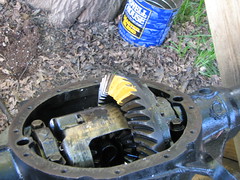
I thought a lot of the witness marks was kind of over kill and kind of hooey, but as I was cleaning the rear end I found a number of them, I am not going to replace them on mine but will post them for the guys into that kinda thing,
I put the diff cover back on to keep all the cleaning crap out of there, it's basic scrub and scrape, I pulled the drums and axles out fairly simple 4 bolts a side and they pop right off, I used my impact gun but a breaker bar would have worked too. when your luggig this think outside get a friend, gotta tell you this ***** was heavy by myself. maybe I am getting old..

I put the diff cover back on to keep all the cleaning crap out of there, it's basic scrub and scrape, I pulled the drums and axles out fairly simple 4 bolts a side and they pop right off, I used my impact gun but a breaker bar would have worked too. when your luggig this think outside get a friend, gotta tell you this ***** was heavy by myself. maybe I am getting old..


 April 2nd, 2010 | 04:21 PM
#20
Thread Starter
Registered User
Joined: Jan 2008
Posts: 3,515
From: South River, New Jersey
last one for now..
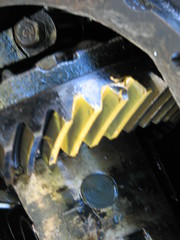
there was a number 8 on the passenger side this wasn't paint but more of a resin?
anyway she has been fairly degreased, tommorrow it is wire wheeling, I do not want to sand blast it because I do not want all that grit getting inside and it will get inside no matter what I do, so I'll just wire wheel and then wash the housing down with lacquer thinner ( yeah I know I know) but it works great. rebuild kit is probably on the way already so I'll just finish up the prep.

anyway she has been fairly degreased, tommorrow it is wire wheeling, I do not want to sand blast it because I do not want all that grit getting inside and it will get inside no matter what I do, so I'll just wire wheel and then wash the housing down with lacquer thinner ( yeah I know I know) but it works great. rebuild kit is probably on the way already so I'll just finish up the prep.
April 2nd, 2010 | 08:50 PM
#21
Registered User
Joined: Feb 2008
Posts: 11,798
From: Plano, TX
Looks like you got a good start.
With my poor woodworking skills, I would still be out there trying to get the stand to stay together...
 April 3rd, 2010 | 08:05 AM
#22
Thread Starter
Registered User
Joined: Jan 2008
Posts: 3,515
From: South River, New Jersey
be nicer to work on anyway
like anything else it's better to strat working on the parts when they are cleaner, gonna wait to pull the diff carrier till I have the replacement parts in hand, I have learned that if I pull everything and theres a delay well, crap gets lost.


 April 10th, 2010 | 07:10 PM
#26
Thread Starter
Registered User
Joined: Jan 2008
Posts: 3,515
From: South River, New Jersey
changing the bushings after all
well in for a pinch in for a pound decided to change the bushings anyway used that technique from that guy on youtube where you walk a drill on the inside of the bushing worked pretty good
[img]
[img]


 April 10th, 2010 | 07:42 PM
#32
Thread Starter
Registered User
Joined: Jan 2008
Posts: 3,515
From: South River, New Jersey
Egads!!!!
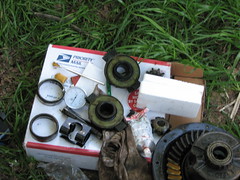
Ok it's important that you keep the caps the same side and same way, I marked them with a stamp, I also kept everything seperate as I dismantled it and marked them
April 10th, 2010 | 07:47 PM
#33
Thread Starter
Registered User
Joined: Jan 2008
Posts: 3,515
From: South River, New Jersey
straight forward
but my hands were too greasy to take a shot, there are 7 clutches per side, some have ears, some do not, plus 2 shims, the shims go in first, then a clutch with ears, then one without, with, without etc till the side is finished, then repeat for other side., then reinstall the spyder gears and shims, then line things up and put the preload spring and rod back in
YOU NEED THE MANUAL!!!!!! I also got excellent advice from Jim at JD RACE what a guy!
YOU NEED THE MANUAL!!!!!! I also got excellent advice from Jim at JD RACE what a guy!

 April 10th, 2010 | 08:19 PM
#36
Registered User
Joined: Feb 2008
Posts: 11,798
From: Plano, TX
Looks like you are making good progress. Neat trick to check the wear pattern on the ring gear.
Glad you went ahead with the upper bushings, as when else could you easily do them?
BTW, I forgot to ask, is the below hole for the vent valve?
Glad you went ahead with the upper bushings, as when else could you easily do them?
BTW, I forgot to ask, is the below hole for the vent valve?
April 10th, 2010 | 09:29 PM
#37
Thread Starter
Registered User
Joined: Jan 2008
Posts: 3,515
From: South River, New Jersey
welllll
no, it was made while using the drill to take out the bushings JUST KIDDING
Yes rob, that is where that little plastic breather goes..LOL
as for the wear patterns it tells you if the pinion is in too deep or too shallow etc which is extremely important, when I change the pinion bearing, and put the new crush sleeve in you really only have one shot at it or you need a new crush sleeve, so that is the reason for checking the back lash and also the mesh pattern etc, anyway the carrier is all back together, now I will tackle the bearings.
I was extremely intimidated by this as I have never done anything with a differential before besides seals and outer bearings. Jim at JD Race was great and also the chasis manual is a big help.
here is more on backlash and marking etc
http://www.drivetrain.com/parts_cata...tructions.html
JUST KIDDINGYes rob, that is where that little plastic breather goes..LOL
as for the wear patterns it tells you if the pinion is in too deep or too shallow etc which is extremely important, when I change the pinion bearing, and put the new crush sleeve in you really only have one shot at it or you need a new crush sleeve, so that is the reason for checking the back lash and also the mesh pattern etc, anyway the carrier is all back together, now I will tackle the bearings.
I was extremely intimidated by this as I have never done anything with a differential before besides seals and outer bearings. Jim at JD Race was great and also the chasis manual is a big help.
here is more on backlash and marking etc
http://www.drivetrain.com/parts_cata...tructions.html
April 13th, 2010 | 05:53 PM
#38
Thread Starter
Registered User
Joined: Jan 2008
Posts: 3,515
From: South River, New Jersey
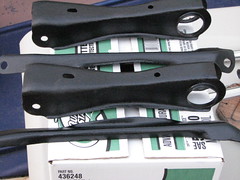
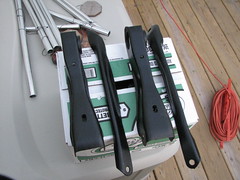
4 Wheel disc brake conversion kit came today woohoo
well this will be for my second bite of the elephant, I figured while I was freshening up the rear end, to bite the bullet and convert to 4 wheel disc brakes, I was going to go with one of the ebay guys, but read here the right stuff was good too, and when you sit down and figure upgrades etc , then different shipping prices well right stuff was darn good.
I ordered the 4 wheel discs, stainless steel brake lines and hoses 9 " power booster, ordered the stainless steel e-brakes too, they gave me a credit for the rubber hoses, and the standard ebrake cables, phone orders also get 5 % off , man this is cool, from doing nothin on this car for years I got the rear end going, the motor is in the shop and now the brakes,
wheres the elephant I am hungry LOL.....
i'll take pics and stuff once I finish the rear end ( the differential not the elephant LOL) and start this job, then it is lowering the body down and quarter panels...
after that I am thinking I will have the doors, hood, trunk and fenders media blasted then go from there.
April 13th, 2010 | 06:43 PM
#39
Registered User
Joined: Nov 2009
Posts: 548
From: Long Island, NY
what are you doing to the rear and how much are you spending on it? Im not sure what to do with mine, was considering just leaving it as is for now and if anything goes wrong down the road ill deal with it then.
Do you have any pics of your car posted anywhere?
Do you have any pics of your car posted anywhere?
Last edited by Beob; April 13th, 2010 at 06:46 PM.


