South Carolina '72 Supreme Convertible
 January 5th, 2010, 05:57 AM
#1
Registered User
Thread Starter
Join Date: Dec 2009
Location: Fair Play, SC
Posts: 231
South Carolina '72 Supreme Convertible
How I ended up here…
This is my Father-in-Laws ’72 Cutlass Supreme Convertible (3J67K2M202765). It’s a 350/350, black/black, 4bbl, a/c, bench seat, numbers matching, solid, mostly original car. He bought it 4 years ago from the 2nd owner, a friend, who bought in Barnwell, South Carolina in ’73. The car moved around GA and SC with the previous owner, and is now firmly planted in SC again. No paperwork to show where/who the original owner was.
The car had been sitting in a garage for 8-10 yrs when Pa-in-Law bought it. He replaced the usual tune up parts, changed the oil, put new gas in it and fired it up. It runs decent, but will need to be freshened up down the road. He had the front suspension, steering, brakes and a few other minor mechanical issues taken care of. He had minor bodywork done and re-painted the original Flame Orange. (This pic was prior to new paint)
After that it was put in a shed and has only been driven every few months or so. While visiting this past Thanksgiving I walked by the car for the millionth time and asked what his plans were for it. He said that he was going to finish it, and drive it (He retires in a couple of years). He asked me to go drive it and tell him what it needs. Well, that’s when it happened. I drove the thing and it brought back that feeling that only big old cars can give you. (Growing up my parents had a couple of 88’s (and yes a diesel one) and a cool ’78 two door 98 (The Led Sled) that became my car in high school.) That got my interest up and I starting reading here and other places gathering information on these cars.
While visiting over Christmas we took it out for a spin and started the list of what it needs. This is a driver to be enjoyed so some of the cosmetic items and upgrades will be addressed as time goes on.
The interior is next on the list. It needs carpet, door panels, seat covers, and a few trim pieces. Seems like Legendary is preferred here. I have also checked out Year One, OPG, Brothers Automotive, and some others I can’t remember. Any suggestions? I read the very good Lady72nRob71’s thread and looking forward to OLDSKL69’s progress on his seats. Should give me enough ammo to decide weather to do the seats myself.
The top needs attention. It’s in good shape, but it looks to me like it was not installed properly. Not sure if it can be fixed/adjusted or if it will need a new top. Mechanically it works fine, just doesn’t fit well. Anyone here know of a good convertible top person near the upstate of SC?
Also, before any long road trip it will need new tires. I would like to fill out the wheel wells but realize I’m limited with the factory 14” SSIII wheels. What’s the largest tire anyone is running on these with the stock suspension set up? Any pics?
I have been reading many of the related threads and there is a lot of good been there/done that information here. My automotive wrenching experience has been on restored and modified Jeeps along with the usual repairs and maintenance on the family cars. Looking forward to getting started on this classic and my Family having some fun with it.
Oh, and I’m located in Fair Play, SC and the car is currently 3 hrs SE of here in Barnwell, SC so it should learn that stretch of road well.
Sorry for the book. Thanks in advance for your help and I will post more pics as we (slowly) progress.
Robert
72 Cutlass (Medium).jpg
Last edited by we jeep inn; July 22nd, 2010 at 07:43 AM.

 January 5th, 2010, 06:00 PM
#6
Registered User
Thread Starter
Join Date: Dec 2009
Location: Fair Play, SC
Posts: 231
Thanks, glad to be here. Looking forward to getting started. I'll post some more before pics and keep you updated...
My current build is an '87 Wrangler crawler (well, the body and frame are Wrangler) that has been to Coal Creek/Windrock, TN a couple of times, Tellico, NC countless times (before the enviro-***** got it shut down), and several private parks within a few hrs of the house. I've been into Jeeps forever and rockcrawling @ 15 yrs.
My current build is an '87 Wrangler crawler (well, the body and frame are Wrangler) that has been to Coal Creek/Windrock, TN a couple of times, Tellico, NC countless times (before the enviro-***** got it shut down), and several private parks within a few hrs of the house. I've been into Jeeps forever and rockcrawling @ 15 yrs.
January 5th, 2010, 06:06 PM
#7
I read the very good Lady72nRob71’s thread and looking forward to OLDSKL69’s progress on his seats. Should give me enough ammo to decide weather to do the seats myself.
 January 6th, 2010, 05:40 AM
#10
Registered User
Join Date: Feb 2008
Location: Plano, TX
Posts: 11,798
Welcome Robert!
You and I share a lot in common, aside from the name...")
My 72 (Lady) was in GA and SC most of her life. I bought her from a guy in Hilton Head and drove her home. She was also repainted once and had left to sit for a decade or so. He body was very good but interior was original and was replaced last year. Use only Legendary for your trim parts (seats, door panels, carpet, headliners, etc.). If there is ANY problem, they will fix it at their expense. Watch for their sales and free shipping offers. The other places will haggle you if something is wrong.
Let me know if you have any interior questions - been there done that...
My only other recommended parts places are OPG (watch for their sales though), Fusick, Rockauto, and Kanter. The Parts place is okay to get simple little stuff from, but not anything too costly and complex like power window kits...
Lady got a new top 3 years ago from a place in SC - I have the name of the place at home. Installation was okay, BUT it was not quite done right either. It does not curve around the left rear window (within 1/4") and it does not go down all the way to put the boot on. However, i will not worry about that.
It looks like you are missing the wheel center cap rocket decals like Lady was when i looked at her. The seller did have them and he gave them to me to install myself. Polish up your caps before applying them.
So it sounds like you have a great car to finish up and enjoy. One of these days I will return to the southeast area after Lady is "complete."
I want to cruise the Blue Ridge Parkway again with her!
AS for tires and wheels, here are a couple threads that will help you out:
https://classicoldsmobile.com/forums...e-dilemma.html
https://classicoldsmobile.com/forums...finishing.html
Been there, done that, also!
You and I share a lot in common, aside from the name...
My 72 (Lady) was in GA and SC most of her life. I bought her from a guy in Hilton Head and drove her home. She was also repainted once and had left to sit for a decade or so. He body was very good but interior was original and was replaced last year. Use only Legendary for your trim parts (seats, door panels, carpet, headliners, etc.). If there is ANY problem, they will fix it at their expense. Watch for their sales and free shipping offers. The other places will haggle you if something is wrong.
Let me know if you have any interior questions - been there done that...
My only other recommended parts places are OPG (watch for their sales though), Fusick, Rockauto, and Kanter. The Parts place is okay to get simple little stuff from, but not anything too costly and complex like power window kits...
Lady got a new top 3 years ago from a place in SC - I have the name of the place at home. Installation was okay, BUT it was not quite done right either. It does not curve around the left rear window (within 1/4") and it does not go down all the way to put the boot on. However, i will not worry about that.
It looks like you are missing the wheel center cap rocket decals like Lady was when i looked at her. The seller did have them and he gave them to me to install myself. Polish up your caps before applying them.
So it sounds like you have a great car to finish up and enjoy. One of these days I will return to the southeast area after Lady is "complete."
I want to cruise the Blue Ridge Parkway again with her!
AS for tires and wheels, here are a couple threads that will help you out:
https://classicoldsmobile.com/forums...e-dilemma.html
https://classicoldsmobile.com/forums...finishing.html
Been there, done that, also!
Last edited by Lady72nRob71; January 6th, 2010 at 05:49 AM.
January 6th, 2010, 08:36 AM
#11
Registered User
Thread Starter
Join Date: Dec 2009
Location: Fair Play, SC
Posts: 231
January 18th, 2010, 10:56 AM
#13
Registered User
Thread Starter
Join Date: Dec 2009
Location: Fair Play, SC
Posts: 231
Finally had some time to work on the car a little this weekend. Here’s a pic with the top down showing the new (2 yr old) paint job.
SD1000 153 (Medium).jpg
Front seat
SD1000 151 (Medium).jpg
Rear seat
SD1000 152 (Medium).jpg
Seats gone. Found $.58, a cig lighter (works!), 2 cigs, receipts, an ink pen and a Bud bottle cap. No build sheet  . The front seat belts that bolt to the floor in the center were cut out by the previous owner
  . Anybody have front center belts in black they want to get rid of (three male and one female )?
SD1000 159 (Medium).jpg
I pulled the carpet and underlayment and the floor pans looked OK. Some surface rust throughout and a couple of pin holes on the front passenger floorboard. I’ll be copying Rob’s POR 15 procedure to take care of that.
I’ll be giving Legendary a call in the next few days to order the seat upholstery (Thanks to Darryl’s inspiration). And will probably get their door panels as well.
I’ll keep ya’ll posted on the progress…
SD1000 153 (Medium).jpg
Front seat
SD1000 151 (Medium).jpg
Rear seat
SD1000 152 (Medium).jpg
Seats gone. Found $.58, a cig lighter (works!), 2 cigs, receipts, an ink pen and a Bud bottle cap
. No build sheet . The front seat belts that bolt to the floor in the center were cut out by the previous owner . Anybody have front center belts in black they want to get rid of (three male and one female )? SD1000 159 (Medium).jpg
I pulled the carpet and underlayment and the floor pans looked OK. Some surface rust throughout and a couple of pin holes on the front passenger floorboard. I’ll be copying Rob’s POR 15 procedure to take care of that.
I’ll be giving Legendary a call in the next few days to order the seat upholstery (Thanks to Darryl’s inspiration). And will probably get their door panels as well.
I’ll keep ya’ll posted on the progress…
Last edited by we jeep inn; July 22nd, 2010 at 07:50 AM.
January 18th, 2010, 11:06 AM
#14
Registered User
Join Date: Feb 2008
Location: Plano, TX
Posts: 11,798
Sounds like a good plan!
With how good she looks on the outside, she needs to look as good on the inside.
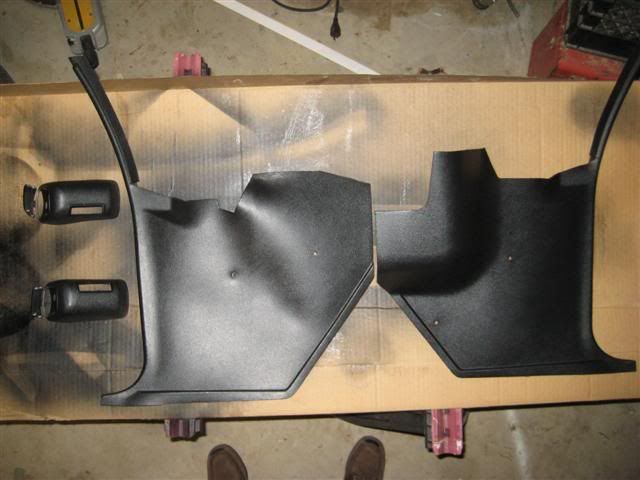
If you spring for door & qtr panels, you might consider the rear armrest / piston panel covers. They are not too costly and will make everything look new. Don't forget the front headrest covers - they are sold separately!
Looks like you have a nice place there out in the country - that is my wish...
With how good she looks on the outside, she needs to look as good on the inside.
If you spring for door & qtr panels, you might consider the rear armrest / piston panel covers. They are not too costly and will make everything look new. Don't forget the front headrest covers - they are sold separately!
Looks like you have a nice place there out in the country - that is my wish...
January 18th, 2010, 11:23 AM
#16
Registered User
Thread Starter
Join Date: Dec 2009
Location: Fair Play, SC
Posts: 231
Sounds like a good plan!
With how good she looks on the outside, she needs to look as good on the inside.
If you spring for door & qtr panels, you might consider the rear armrest / piston panel covers. They are not too costly and will make everything look new. Don't forget the front headrest covers - they are sold separately!
Looks like you have a nice place there out in the country - that is my wish...
The armrest covers are on the list.
That's my inlaws farm in the lower part of the state, great place. My back yard is a 58,000 acre lake
.
January 18th, 2010, 11:38 AM
#17
Registered User
Thread Starter
Join Date: Dec 2009
Location: Fair Play, SC
Posts: 231
Hmm, they are small with a chrome metal housing, black textured metal top with a blue "GM Mark of Excellence" button in the middle. The number stamped on the back is RCF-67.
January 18th, 2010, 12:38 PM
#18
Registered User
Join Date: Feb 2008
Location: Plano, TX
Posts: 11,798

These came out of my back seat.
My fronts looked like this (I had no center one - it was removed by a PO...:
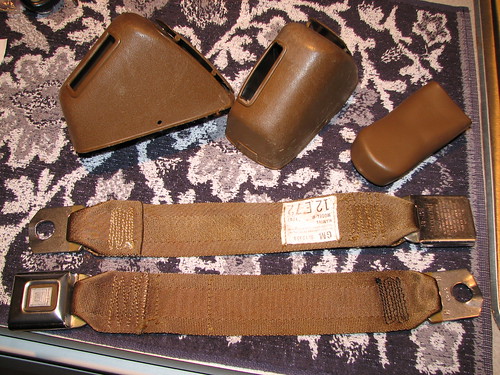
These are "deluxe belts"...
January 18th, 2010, 12:51 PM
#20
Registered User
Join Date: Feb 2008
Location: Plano, TX
Posts: 11,798
January 18th, 2010, 01:07 PM
#21
Moderator
Join Date: Jun 2008
Location: Atlanta, Georgia
Posts: 17,657
We jeep inn,
Post some pics of your seat belts, I may be able to help ya out. What/which are you missing. Retractor covers? sleaves for the male end bases?
Rob's thread shows ya how to dye them.
Post some pics of your seat belts, I may be able to help ya out. What/which are you missing. Retractor covers? sleaves for the male end bases?
Rob's thread shows ya how to dye them.
January 18th, 2010, 02:29 PM
#22
Registered User
Thread Starter
Join Date: Dec 2009
Location: Fair Play, SC
Posts: 231
I have the sleeves and the retractor covers. I need the female ends for the driver and passenger (rectractor with male ends are intact) and the male and female for the front center passenger.
Thanks,
Robert
Last edited by we jeep inn; July 22nd, 2010 at 07:53 AM.
January 22nd, 2010, 08:04 PM
#23
Registered User
Thread Starter
Join Date: Dec 2009
Location: Fair Play, SC
Posts: 231
I opened up my front seat bottom and everything looks good except for the burlap, which was obvious before I took the cover off. What I didn't know is that there are fine wires (13 to be exact) woven into the burlap to keep the foam from pushing through the springs. I talked to several people and got as many opinions on what to do, including; don't worry about the wires, replace the burlap with a towel, carpet, scrap cloth, and of course the high dollar piece of something.
SD1000 212 (Medium).jpg
I decided to make an "original" one. It took $4 worth of burlap, a little sharpie and straight edge work and an adult beverage or two. The fine wires were in good shape so I reused them by straightening out one end so I could thread it through the burlap, then I crimped the ends around a couple of pieces of clothesline. I will be adding 1/2" of foam on top of the original foam to firm the seat up a little. Everything is ready to go when my care package from Legendary arrives in a few weeks.
SD1000 213 (Medium).jpg
SD1000 214 (Medium).jpg
SD1000 212 (Medium).jpg
I decided to make an "original" one. It took $4 worth of burlap, a little sharpie and straight edge work and an adult beverage or two
. The fine wires were in good shape so I reused them by straightening out one end so I could thread it through the burlap, then I crimped the ends around a couple of pieces of clothesline. I will be adding 1/2" of foam on top of the original foam to firm the seat up a little. Everything is ready to go when my care package from Legendary arrives in a few weeks.SD1000 213 (Medium).jpg
SD1000 214 (Medium).jpg
Last edited by we jeep inn; July 22nd, 2010 at 07:58 AM.
 January 23rd, 2010, 05:07 AM
#27
Registered User
Thread Starter
Join Date: Dec 2009
Location: Fair Play, SC
Posts: 231
Always open to suggestions. Actually, the original foam is in good condition, I'm adding a little for a little firmer(is that a word?) feel.
February 20th, 2010, 04:12 PM
#28
Registered User
Thread Starter
Join Date: Dec 2009
Location: Fair Play, SC
Posts: 231
Still Going
An update on my progress. The floor pan has been cleaned up, pinholes filled, and POR15 applied. The warning in the can was correct, took about a week for the stuff to wear off my hands.
Before
[IMG]file:///C:/DOCUME%7E1/ADMINI%7E1/LOCALS%7E1/Temp/moz-screenshot.png[/IMG]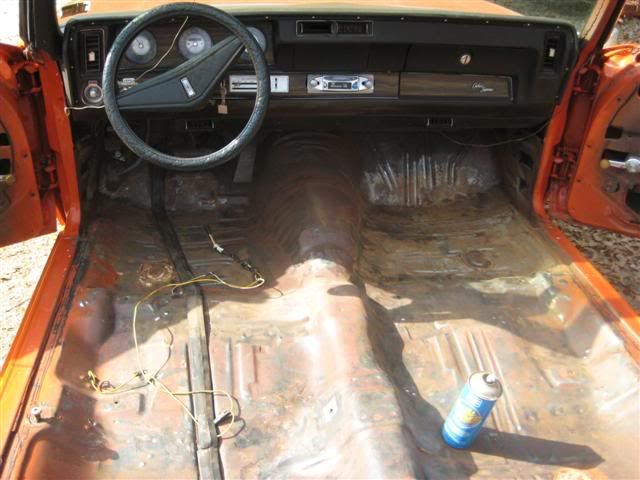
After
Floor4Small.jpg
Put the dash back in after taking out the warp. Turned out great. (See warped dash thread)
cutlass040Small.jpg
Installed carpet (and sound deadener), trimmed and made T cuts for front seat.
cutlass051Small.jpg
Seat upholstery came in from Legendary and I've started covering them. Excellent quality.
Started with the rear and it went together well. Not hard, just have to be patient and take your time squaring everything up on the frame then stretch (heat the covers up) and hog ring down. Pleased with the outcome.
cutlass047Small.jpg
Next was the front base. I added added 1" of foam. Getting the cover on and the springs compressed takes two people (a third wouldn't hurt) and considerable fiddling to get everything right. Not too bad, just had to be careful not to tear anything before it's all hog ringed down because the fabric is under alot of pressure.
cutlass057Small.jpg
I couldn't stand it and put the back seat in for a dry run and the inspector showed up, passed.
cutlass055Small.jpg
Last edited by we jeep inn; July 22nd, 2010 at 04:23 PM.
February 20th, 2010, 08:21 PM
#30
Registered User
Join Date: Feb 2008
Location: Plano, TX
Posts: 11,798
NICE, NICE, NICE!! Great progress!
Somehow I feel like I was down that road before...
I now wish i attempted my own seats, as it seems so easy. Oh well, the job I got was at least worth the $$.
Keep up the good work - you will be cruising in no time.
Somehow I feel like I was down that road before...
I now wish i attempted my own seats, as it seems so easy. Oh well, the job I got was at least worth the $$.
Keep up the good work - you will be cruising in no time.
February 21st, 2010, 08:38 AM
#31
Registered User
Thread Starter
Join Date: Dec 2009
Location: Fair Play, SC
Posts: 231
Thanks. Working on the front seat backs and covering the rear ash wells/piston covers. Door panels should be here from Legendary in a couple of weeks.
Sunny and 70 deg. here today so We'll be outside enjoying the weather!
Rob, with some of the other projects I've seen you complete, the upholstery would not have been a problem for you. Thanks for helping lead the way...
.Sunny and 70 deg. here today so We'll be outside enjoying the weather!
Rob, with some of the other projects I've seen you complete, the upholstery would not have been a problem for you. Thanks for helping lead the way...
February 26th, 2010, 04:50 AM
#33
Registered User
Thread Starter
Join Date: Dec 2009
Location: Fair Play, SC
Posts: 231
More
A few more items done. Let me say that I have saved alot of time, energy, pain, misery and money from what I have learned on this site. Thanks for everyone's input.
I used the super secret "$6.50" Sharpie trick I learned on CO (cost me $6.99 + tax) on my dash vents, glove box door , etc.
Cutlass001Small.jpg
Painted the headlight bezels. I used 1/8" pin stripe to tape off the silver reveal and shot them with semi-flat.
HeadlghtBezelsSmall.jpg
After getting the new carpet in, the black plastic trim didn't look so black. I dyed the front kick panels and the front seat belt retractor covers. I used SEM Landau Black, they look new. After reading about different plastic paints/dyes I decided to use SEM and would highly recommend their products. I found it at my local paint supply store.
I used the super secret "$6.50" Sharpie trick I learned on CO (cost me $6.99 + tax
) on my dash vents, glove box door , etc.Cutlass001Small.jpg
Painted the headlight bezels. I used 1/8" pin stripe to tape off the silver reveal and shot them with semi-flat.
HeadlghtBezelsSmall.jpg
After getting the new carpet in, the black plastic trim didn't look so black. I dyed the front kick panels and the front seat belt retractor covers. I used SEM Landau Black, they look new. After reading about different plastic paints/dyes I decided to use SEM and would highly recommend their products. I found it at my local paint supply store.
Last edited by we jeep inn; July 22nd, 2010 at 04:26 PM.
March 9th, 2010, 05:16 AM
#38
Registered User
Thread Starter
Join Date: Dec 2009
Location: Fair Play, SC
Posts: 231
Finally got the seat backs done. By far the most tedious part of the seat recovering job. I fought with getting them positioned right, pulled tight, and anchored (hog ringed) to keep them that way. I'm happy with the results and I have uncovered another task that I don't care to do for a living.
Seriously, it's not that bad, like anything else it takes a little time, patience, and knowing when to step back and grab an adult beverage to help assess the situation.
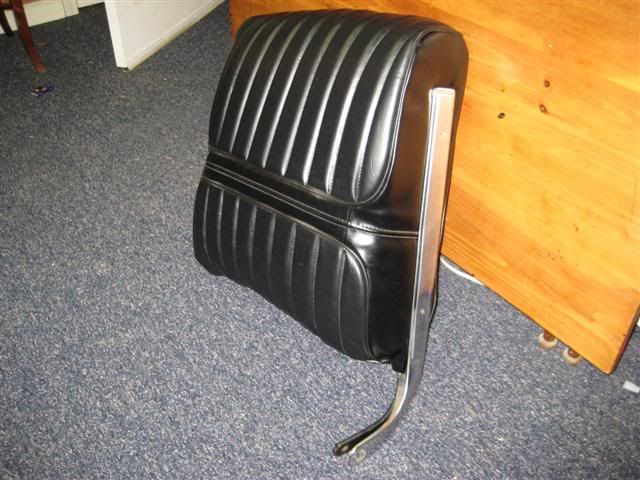
FrontSeatAfter2Small.jpg
InteriorAfter1Small.jpg
Seriously, it's not that bad, like anything else it takes a little time, patience, and knowing when to step back and grab an adult beverage to help assess the situation.
FrontSeatAfter2Small.jpg
InteriorAfter1Small.jpg
Last edited by we jeep inn; July 22nd, 2010 at 04:29 PM.
March 9th, 2010, 06:41 AM
#39
Registered User
Join Date: Feb 2008
Location: Plano, TX
Posts: 11,798
Wow - looking spiffy fur sure!
Seats came out great for a DIY job.
I hate to tell you this but I think you forgot the rear quarter panels...
Of course the orange gives a nice color contrast inside!
Better get them in before the inspector shows up again.
Seats came out great for a DIY job.
I hate to tell you this but I think you forgot the rear quarter panels...
Of course the orange gives a nice color contrast inside!
Better get them in before the inspector shows up again.
March 9th, 2010, 07:21 AM
#40
Registered User
Thread Starter
Join Date: Dec 2009
Location: Fair Play, SC
Posts: 231
I knew I was forgetting something...
My door panels should be shipping from Legendary this week!


