SSIII wheel refinishing!
 August 26th, 2009, 05:59 AM
#1
Registered User
Thread Starter
Join Date: Feb 2008
Location: Plano, TX
Posts: 11,798
The unplanned tire and wheel restoration...
It all started after this tire failure - a sudden, sickening wobble in the front end noticable from 5 - 40 miles per hour:
https://classicoldsmobile.com/forums/custom-aftermarket-suspension-handling/14316-old-tire-dilemma.html
The service manual called this condition "waddling" and said it is often caused by the radial tire's internal belts separating. My old tires were stamped "made in USA", which means they must be pretty old... These tires were made in the earliest, late 2000 and early 2001, ONLY if Kelly did not switch to the new 4 digit date code in 2000 like they should have.
OR, they could be from late 1990 or early 1991! Regardless of anything, they needed to get changed.
After jacking the right front tire so i could rotate it, the soft bulge in the tread was very obvious...
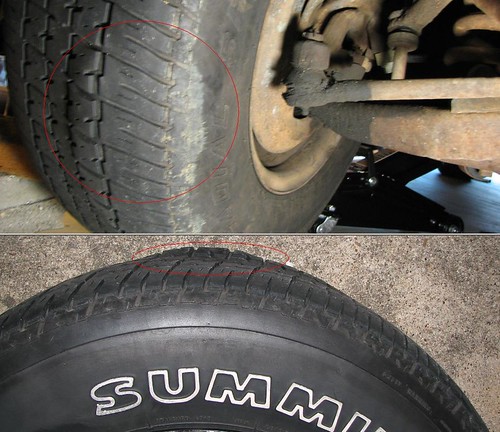
Note the big dirty scuff on the inside lower sidewall next to the bulge (circled). This was not only an age issue, but something was hit hard.
Can of worms�
Of course, a simple task of getting new tires opens up a BIG can of worms� And the only way to recan them is to use a bigger can. 
The wheels will need to get blasted and recolored, as they have flawed original and spray can paint. The center caps need refinishing and might as well do the spare tire as well, as it was an even older disaster waiting to happen.
So I pulled the all the wheels off and replaced them with some old stock wheels and 20 year old tires originally from my 86 Cutlass. They are ugly, but at least she is mobile...
While the wheels were off, I washed and inspected the brakes� Brake parts and axle seals all looked to be in excellent condition with no signs of leakage! See, some things do go right...
Afterwards I pulled off the trim rings, wheel bezels, and center caps...
Center cap �refurbished��
Hereis the thread on that process: https://classicoldsmobile.com/forums/chassis-body-frame/15047-center-cap-refinishing.html
There are some painted sections on the cap (like dark grey) that needed refinishing. The chrome itself is very good so I only polished it up before paint. Here is the process in pictures:
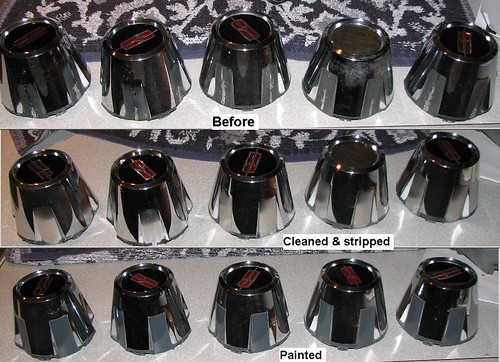
Although they will not pass for unused NOS parts, I think they came out pretty darn nice, especially for no cost! At 10 feet, they look perfect.
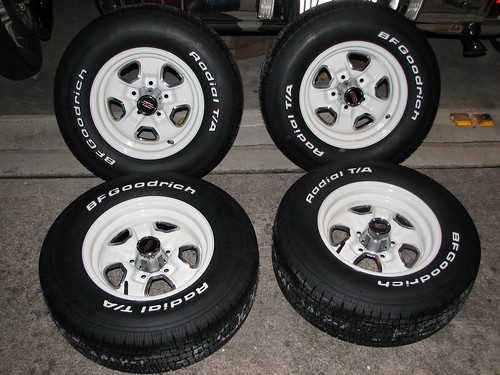
Wheel refinishing!
Since the tires were coming off, I wanted to repaint the wheels as they were beat up from years of tire maintenance. Confused with the logistics and costs of painting, a friend of mine suggested powdercoating. There are many colors available and it is much tougher than paint. I called around and chose Enduro Coaters in Mesquite, the same place my friend used.
On a hot, early August day, the wheels went to Discount tire to have the old tires pulled & the new tires ordered.
The original tire size was G70x14, which is 26.8� diameter. Previous tire size was 215/70/14 which was only 25.9� diameter. �Correct� radial tire size is 225/70/14 which is 26.5� diameter. Since tires for 14� rims are hard to find off the shelf in a good brand. I had to special order them. I ~personally~ think the RWOL lettering on the sidewall looks swell on this particular car, so I wanted to keep that added touch.
Since Goodyear Eagles are not available in 14�, I decided on the classic BF Goodrich Radial T/As with raised white lettering. Even the spare would be of the same style (yet slightly smaller for added trunk space). After tire removal, the wheels were dropped off at the powdercoaters�
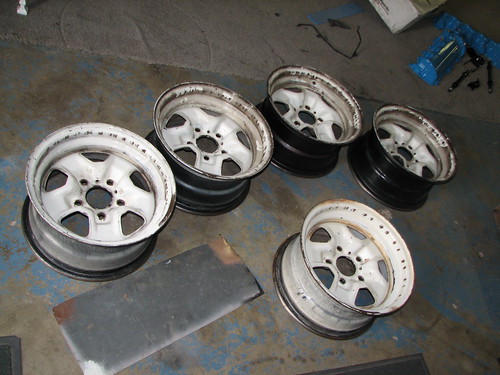
For an economical job at $60 a wheel (included sandblasting), I opted to choose an in-stock powder color. Although that selection was limited, I chose �grey-white, which was not a totally perfect match, but VERY, very close. Seems that the wheels are separated from the painted body, a slight color difference would not be noticeable.
A week later, Enduro sent me a cured sample of the powdercoat and another sample with it clearcoated. This was so I could see what color would look closer to the body. The clearcoated one was shinier and darker and creamier (as it was cured twice), so the plain one was just right! (See picture below...)
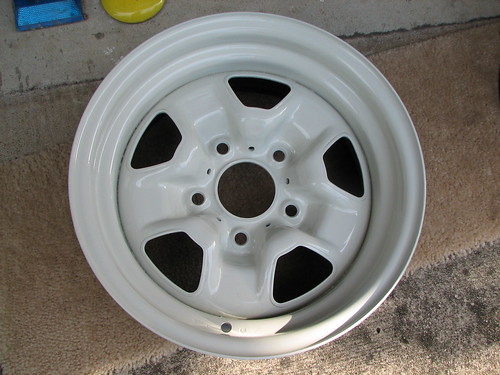
A week after that, I picked up my wheels from Enduro. Overall they were very nice! Here a close example:
The only issues were that one wheel had some black speckles in it from airborn black powder particles and one visible area was a tad thin. From a few feet away, the flaws are not visible. The back sides of the wheels were done semi-gloss black for the factory look.
A few days later, the wheels were taken to Discount Tire to have the new tires installed and balanced.�
They were able to put all weights on the back side to avoid chipping the white side.
They were washed up well the next day and the bezels and center caps were installed. Putting on the bezels required some patience, since they needed to fit snuggly and the three inner tabs needed to hold them in place securely.
THE POWER OF POWDER!
Here is a picture of the final wheel/tire combo:
The below pictures are of the color comparison, the smaller spare, what the back sides look like, and a close up of a main wheel�
I am happy, yet $800 poorer�
Before installing them on the car, the rear undercarriage will be powerwashed, and the rear drums painted with POR15 chassiscoat black (semigloss black required by factory if the SSIII wheels were used). The rear sway bar and frame arches will also be done while the paint is out. The wheels will be reinstalled with new repro lug nuts and a set of wheel locks. I also need to polish up the trim rings and install them.
Upgrading the rear suspension will be next!
It all started after this tire failure - a sudden, sickening wobble in the front end noticable from 5 - 40 miles per hour:
https://classicoldsmobile.com/forums/custom-aftermarket-suspension-handling/14316-old-tire-dilemma.html
The service manual called this condition "waddling" and said it is often caused by the radial tire's internal belts separating. My old tires were stamped "made in USA", which means they must be pretty old...
These tires were made in the earliest, late 2000 and early 2001, ONLY if Kelly did not switch to the new 4 digit date code in 2000 like they should have. OR, they could be from late 1990 or early 1991! Regardless of anything, they needed to get changed.
After jacking the right front tire so i could rotate it, the soft bulge in the tread was very obvious...
Note the big dirty scuff on the inside lower sidewall next to the bulge (circled). This was not only an age issue, but something was hit hard.
Can of worms�
Of course, a simple task of getting new tires opens up a BIG can of worms� And the only way to recan them is to use a bigger can.
The wheels will need to get blasted and recolored, as they have flawed original and spray can paint. The center caps need refinishing and might as well do the spare tire as well, as it was an even older disaster waiting to happen.
So I pulled the all the wheels off and replaced them with some old stock wheels and 20 year old tires originally from my 86 Cutlass. They are ugly, but at least she is mobile...
While the wheels were off, I washed and inspected the brakes� Brake parts and axle seals all looked to be in excellent condition with no signs of leakage! See, some things do go right...
Afterwards I pulled off the trim rings, wheel bezels, and center caps...
Center cap �refurbished��
Hereis the thread on that process: https://classicoldsmobile.com/forums/chassis-body-frame/15047-center-cap-refinishing.html
There are some painted sections on the cap (like dark grey) that needed refinishing. The chrome itself is very good so I only polished it up before paint. Here is the process in pictures:
Although they will not pass for unused NOS parts, I think they came out pretty darn nice, especially for no cost! At 10 feet, they look perfect.
Wheel refinishing!
Since the tires were coming off, I wanted to repaint the wheels as they were beat up from years of tire maintenance. Confused with the logistics and costs of painting, a friend of mine suggested powdercoating. There are many colors available and it is much tougher than paint. I called around and chose Enduro Coaters in Mesquite, the same place my friend used.
On a hot, early August day, the wheels went to Discount tire to have the old tires pulled & the new tires ordered.
The original tire size was G70x14, which is 26.8� diameter. Previous tire size was 215/70/14 which was only 25.9� diameter. �Correct� radial tire size is 225/70/14 which is 26.5� diameter. Since tires for 14� rims are hard to find off the shelf in a good brand. I had to special order them. I ~personally~ think the RWOL lettering on the sidewall looks swell on this particular car, so I wanted to keep that added touch.
Since Goodyear Eagles are not available in 14�, I decided on the classic BF Goodrich Radial T/As with raised white lettering. Even the spare would be of the same style (yet slightly smaller for added trunk space). After tire removal, the wheels were dropped off at the powdercoaters�
For an economical job at $60 a wheel (included sandblasting), I opted to choose an in-stock powder color. Although that selection was limited, I chose �grey-white, which was not a totally perfect match, but VERY, very close. Seems that the wheels are separated from the painted body, a slight color difference would not be noticeable.
A week later, Enduro sent me a cured sample of the powdercoat and another sample with it clearcoated. This was so I could see what color would look closer to the body. The clearcoated one was shinier and darker and creamier (as it was cured twice), so the plain one was just right! (See picture below...)
A week after that, I picked up my wheels from Enduro. Overall they were very nice! Here a close example:
The only issues were that one wheel had some black speckles in it from airborn black powder particles and one visible area was a tad thin. From a few feet away, the flaws are not visible. The back sides of the wheels were done semi-gloss black for the factory look.
A few days later, the wheels were taken to Discount Tire to have the new tires installed and balanced.�
They were able to put all weights on the back side to avoid chipping the white side.
They were washed up well the next day and the bezels and center caps were installed. Putting on the bezels required some patience, since they needed to fit snuggly and the three inner tabs needed to hold them in place securely.
THE POWER OF POWDER!
Here is a picture of the final wheel/tire combo:
The below pictures are of the color comparison, the smaller spare, what the back sides look like, and a close up of a main wheel�
I am happy, yet $800 poorer�
Before installing them on the car, the rear undercarriage will be powerwashed, and the rear drums painted with POR15 chassiscoat black (semigloss black required by factory if the SSIII wheels were used). The rear sway bar and frame arches will also be done while the paint is out. The wheels will be reinstalled with new repro lug nuts and a set of wheel locks. I also need to polish up the trim rings and install them.
Upgrading the rear suspension will be next!
Last edited by Lady72nRob71; August 26th, 2009 at 12:10 PM.
 August 26th, 2009, 06:13 AM
#4
Registered User
Thread Starter
Join Date: Feb 2008
Location: Plano, TX
Posts: 11,798
Many thanks! The pain was again worth it in the end...
Exactly what I am thinking. I am going to put them on last to see what the car looks like without them...
Exactly what I am thinking. I am going to put them on last to see what the car looks like without them...
August 26th, 2009, 06:30 AM
#5
Registered User
Join Date: Jan 2009
Location: Dallas Texas
Posts: 1,565
Rob: We were driving Big Red ('68 Cutlass S convertible) two weeks ago last Sunday down Ferguson about 40 miles per hour. Fine. Got on IH30 and right at 50 mph started a "whump-whump". Pulled off, turned around, and put her in the garage, took the CC to the NTOC meeting north of Ft Worth. Took Red to Absolute Autowerks the next Friday, and Ashely said here's your problem, left rear separating! Tires have about 13K miles on them (fairly accurate guess). Problem is they were manufactured/installed in 1996. Taught me a lesson, check the date code on your tires. Replaced w/235/14s, TA Radials. Not a cheap fix, but a safe one.
August 26th, 2009, 07:30 AM
#6
Registered User
Thread Starter
Join Date: Feb 2008
Location: Plano, TX
Posts: 11,798
Classic car tires are often overlooked just because they are not used as much.
Aron - did you refinish your wheels as a "mightaswell"?
August 26th, 2009, 09:46 AM
#7
Moderator
Join Date: Jul 2007
Location: Edmond, OK
Posts: 15,890
I probably need new tires on my 71 98. I found the paperwork for the tires in the glove box. They were bought in 1998. I will probably start a "might as well" project in the spring and put some Cragar SS wheels on the 71 98 with some new rubber. 
August 26th, 2009, 02:33 PM
#8
Registered
Join Date: Jul 2006
Location: Northeast Ohio
Posts: 4,430
Dude...you didn't index the tires/lettering to the valve stems, major faux pas.
") I hate those guys.
I hate those guys.
Boy those look nice, very good job. I'd be afraid to potchkie those up putting on the trim rings too, looks better with them IMO, I would go for it. You can always do them again anyway.
Do they do woodgrain powdercoat???
I hate those guys. Boy those look nice, very good job.
I'd be afraid to potchkie those up putting on the trim rings too, looks better with them IMO, I would go for it. You can always do them again anyway. Do they do woodgrain powdercoat???
August 27th, 2009, 06:23 AM
#10
Registered User
Thread Starter
Join Date: Feb 2008
Location: Plano, TX
Posts: 11,798
It was challenging enough for them to just get the spare tire on the spare wheel...
I caught them putting on the short valve stems and make them put on the longer ones. They have not seen Olds wheels that use beauty rings...
They also "forgot" to give be the wheel locks that I had already paid for.

Maybe not YET, but I can see it coming... The guy at the powdercoaters had a jeep gas can that was powdered a marbled blue and green flame pattern -
- AWESOME looking! He said it was his own secret process, so the use of browns may be like woodgrain. Just wait a couple years!
Last edited by Lady72nRob71; August 27th, 2009 at 08:02 AM.
August 28th, 2009, 08:16 AM
#13
Registered User
Thread Starter
Join Date: Feb 2008
Location: Plano, TX
Posts: 11,798
That almost changed when i was powerwashing the undercarriage a couple days ago...
I washed off about a gallon pail worth of red sand from your area. It filled up a low area by the drive where the runoff goes.
These boxed convertible frames make wonderful sand storage boxes also. I was starting to wonder when the red water would ever stop coming out!
If I had the space, the body and frame really could use a separation for a good cleaning and frame powdercoating... No resources to do that though.
On a side note - if you are planning to get a powerwasher under the home depot brand, rethink it and get a better brand that will wash more than 3 cars. The washer I borrowed from my neighbor died after then and it looks like hundreds of people were having big issues with them. His was only 1 year old and no parts are available. I had to finish up with a lawn sprayer... Not as clean as it can be but better.
Me too!
Yesterday, prepping and painting the brake drums took 2x the time I expected. This would have been a good job for the powdercoaters. Sandblasting would have been ideal also. Live and learn...
Anyway, I went through about 3 wirebrushes, one dremel, and half a set of hands on them to de-rust them...
I did get them painted yesterday, so today they will be installed and she will get to model her new tires!
She is hitting the road this weekend.
I washed off about a gallon pail worth of red sand from your area. It filled up a low area by the drive where the runoff goes.
These boxed convertible frames make wonderful sand storage boxes also. I was starting to wonder when the red water would ever stop coming out!
If I had the space, the body and frame really could use a separation for a good cleaning and frame powdercoating... No resources to do that though.
On a side note - if you are planning to get a powerwasher under the home depot brand, rethink it and get a better brand that will wash more than 3 cars.
The washer I borrowed from my neighbor died after then and it looks like hundreds of people were having big issues with them. His was only 1 year old and no parts are available. I had to finish up with a lawn sprayer... Not as clean as it can be but better.Me too!
Yesterday, prepping and painting the brake drums took 2x the time I expected. This would have been a good job for the powdercoaters. Sandblasting would have been ideal also. Live and learn...
Anyway, I went through about 3 wirebrushes, one dremel, and half a set of hands on them to de-rust them...
I did get them painted yesterday, so today they will be installed and she will get to model her new tires!
She is hitting the road this weekend.
Last edited by Lady72nRob71; August 31st, 2009 at 05:48 AM. Reason: add pics
August 28th, 2009, 03:16 PM
#15
Registered
Join Date: Jul 2006
Location: Northeast Ohio
Posts: 4,430
Hey Rob, most expensive tools and especially power washers always break when you borrow them. I just loan my chinesium power washer to my brother-in-law when I want a new one.
Get a sandblaster and put water in it, shoots the water out like you wouldn't believe with enough air pressure and then you can use sand to finish it off. Just scrape up some of the red stuff from your drive.
Body off frame?!!
I can talk you through this buddy.
Be calm, take a deep breath and very carefully step slowly back from the edge or you're going to start the inevitable slide down that slippery slope.
Last edited by Bluevista; August 28th, 2009 at 03:19 PM.
August 31st, 2009, 05:46 AM
#16
Registered User
Thread Starter
Join Date: Feb 2008
Location: Plano, TX
Posts: 11,798

 August 31st, 2009, 06:01 AM
#17
Registered User
Thread Starter
Join Date: Feb 2008
Location: Plano, TX
Posts: 11,798
The final day, the drums and wheels were reinstalled with new repro lug nuts and a set of Gorilla wheel locks that were on clearance at Discount tire for 5 bucks!
I found out something neat when putting the wheels on� What do spark plugs and lug nuts have in common????
A spark plug socket works great on both! A std deep socket on the lug nuts will hit the painted wheel if not careful, damaging the paint. I used a spark plug socket to get them on somewhat tight then carefully used a deep impact socket with the torque wrench to finish up. I decided to take the impact socket and cram a piece of cut rubber hose in it so the lug nut top hits the rubber and the socket will not hit the wheel. If the car goes to the tire shop, they will have to use THIS socket...
The next day was a fine evening for a drive, so the destination was Catfish Heaven in Princeton, TX, about 30 minutes northeast of me. As always, I took the scenic route.
I have always been amazed at how well a car rides and performs on new rubber. It almost felt like I did some suspension upgrading! Ride was much smoother, even on bumpy roads. Traction and road feel was much better and they were quieter at highway speeds. This was a very enjoyable tops-down drive but too bad it was only 50 miles!
I left the beauty rings off for now, since the wheels look so nice...
Should I leave them off or put them back on???
Attached are pics with and without the rings� Help me decide! Once they are on, they must stay on...
August 31st, 2009, 06:19 AM
#18
Moderator
Join Date: Jul 2007
Location: Edmond, OK
Posts: 15,890
Rob, lookin' good!
I'm not sure if you should add the trim rings or not... let's see what everyone else says.
Put a 4 foot cheater bar on that and I bet it would move... or bust off the head.
I'm not sure if you should add the trim rings or not... let's see what everyone else says.
Just for grins I tried to remove one body mount but the bolt would not even budge...
August 31st, 2009, 08:24 AM
#19
Registered User
Thread Starter
Join Date: Feb 2008
Location: Plano, TX
Posts: 11,798
August 31st, 2009, 09:25 AM
#22
Registered
Join Date: Jul 2006
Location: Northeast Ohio
Posts: 4,430
Exactly what color is your car Rob?? I thought it was light yellow and now it's white???
I like the look without the trim rings myself, the car looks leaner, meaner, and cleaner, looks liike it's sitting a little higher too. Without the raised white letters it would look sparse, they tie the whole package together nicely. The '69 Judge Rally wheels had no trim rings to give them more of a "I mean business" look, with their bright orange paint jobs and psychedelic graphics.
I like the "V for Vista Cruiser" sign your friend is flashing, smart girl.
August 31st, 2009, 09:37 AM
#23
Registered User
Thread Starter
Join Date: Feb 2008
Location: Plano, TX
Posts: 11,798
Exactly what color is your car Rob?? I thought it was light yellow and now it's white???
I like the look without the trim rings myself, the car looks leaner, meaner, and cleaner, looks liike it's sitting a little higher too. Without the raised white letters it would look sparse, they tie the whole package together nicely. The '69 Judge Rally wheels had no trim rings to give them more of a "I mean business" look, with their bright orange paint jobs and psychedelic graphics.
I like the "V for Vista Cruiser" sign your friend is flashing, smart girl.
I like the look without the trim rings myself, the car looks leaner, meaner, and cleaner, looks liike it's sitting a little higher too. Without the raised white letters it would look sparse, they tie the whole package together nicely. The '69 Judge Rally wheels had no trim rings to give them more of a "I mean business" look, with their bright orange paint jobs and psychedelic graphics.
I like the "V for Vista Cruiser" sign your friend is flashing, smart girl.
She is sitting a little higher. The new tires are the correct diameter compared to the original bias new tires. The previous tires were about 1" smaller in diameter. They were also lacking another 1/2 of tread...
Smart indeed - she must have known Dr. Oldsmobile's victory sign!
August 31st, 2009, 09:57 AM
#25
Proud Viet Nam Veteran
Join Date: Dec 2006
Location: Rowlett, TX
Posts: 9,949
Great job Rob. I think the car has a different personality without the trim rings. It looks a little meaner without them but prettier with them. It is kind of like using steel wheels with dog dish hubcaps. It does make the car a little diffent than the rest. I will face the same delima when I redo my Cutlass. You are correct in that once you put them on, you can change them back. I would leave them off for a while and see how it grows on you. Either way, it is going to look great. If my life ever settles down, I want to get together with you and Richard. I would be ashamed to tell you how long it has been since my Cutlass has been on the road.
August 31st, 2009, 11:34 AM
#26
Registered
Join Date: Jul 2006
Location: Northeast Ohio
Posts: 4,430
No reason to be sorry Jamesbo, I really thought that you would have preferred the "bear" look though?
It is more of a macho he-man woman hate-us club thing and she is a lady.
Maybe she would look better wearing her jewelry, especially while basking in a soft sunset.
Try a dual pinstripe on the outside of the rims like those spoked white steel truck and SUV wagon wheels Rob.
Just have your friend drive while you run alongside holding the pinstriping brush at a point on the wheel, twice on each wheel for dual stripes.
V for V code?
August 31st, 2009, 12:59 PM
#27
Registered User
Thread Starter
Join Date: Feb 2008
Location: Plano, TX
Posts: 11,798
Without gives a distinct look though that i like.
I will give him your suggestion, as it IS a lot cheaper!
BTW, what is the "bear" look??
August 31st, 2009, 04:59 PM
#28
Registered
Join Date: Jul 2006
Location: Northeast Ohio
Posts: 4,430
Jamesbo is the resident bear expert here, I bearly know anything about them.
Most cars had bear steel wheels with wheel covers years ago, ever hear of "Bear wheel" alignment?? Wheel bear-ings?
Okay, your car has center caps so the wheels aren't all bear.
The mighty bear has made many great contributions to the automotive industry.
bear1.gif
Most cars had bear steel wheels with wheel covers years ago, ever hear of "Bear wheel" alignment?? Wheel bear-ings?
Okay, your car has center caps so the wheels aren't all bear.
The mighty bear has made many great contributions to the automotive industry.
bear1.gif
 August 31st, 2009, 06:52 PM
#30
Registered User
Thread Starter
Join Date: Feb 2008
Location: Plano, TX
Posts: 11,798
Right. I have heard he is a bit smarter than the average bear...
...like the simple bear necessities??
Never have... I learn so much on this site, I can bearly stand it!
I will not be doing wheel stripes, but I plan to add some W36 stripes. Noone will tell they are not factory... .................................. ............J/K!
I better be careful here or else I might end up like this guy...
...like the simple bear necessities??
Never have... I learn so much on this site, I can bearly stand it!
.................................. ............J/K!I better be careful here or else I might end up like this guy...
Last edited by Lady72nRob71; August 31st, 2009 at 07:11 PM.
September 1st, 2009, 07:46 AM
#32
Registered
Join Date: Jul 2006
Location: Northeast Ohio
Posts: 4,430

Thread
Thread Starter
Forum
Replies
Last Post
InTheCutt
Wheels and Tires
3
February 27th, 2013 09:42 AM


