72 supreme rebuild
 January 30th, 2016, 06:57 PM
#121
Registered User
Thread Starter
Join Date: Apr 2011
Location: Erie,PA
Posts: 489
I'm getting very close to welding in my quarter panel skins. My plan is to follow the upper body line of the quarter all the way to the door jamb, but I'm having difficulty deciding the best way to attach the panels at the jamb. How did you join the replacement panel with the existing metal at the door jambs and at the rocker panel?
I see 3 possible methods; 1. Overlap the panels and weld with small plug welds, but the heat may warp the panel. 2. Flange the existing metal so the replacement panel lays flush and stitch weld together. 3. Cut both panels precisely and butt weld together (I don't think i have the accuracy to pull this off). Any tips and pics of your progress would be very helpful to me. Thanks!
Rodney
I pm'd you with my email. we can discuss how I did mine in detail that way.
 January 30th, 2016, 07:00 PM
#122
Registered User
Thread Starter
Join Date: Apr 2011
Location: Erie,PA
Posts: 489
Forward progress today. I started to put the front end back together. I also removed the exhaust and cleaned and painted some of the hardware.
IMG_20160130_182913_zpsimlvmhck.jpg
IMG_20160130_182913_zpsimlvmhck.jpg
February 11th, 2016, 06:39 PM
#123
Registered User
Thread Starter
Join Date: Apr 2011
Location: Erie,PA
Posts: 489
Installed AC relays, voltage regulator, vacuum pod, horn relay, power booster and master cylinder on the firewall. started to reinstall rotors and calipers on the front.
IMG_20160211_183339_zpsykizefsa.jpg
IMG_20160211_183300_zpseeztjtbt.jpg
I also got the correct alternator fan and pulley today.
IMG_20160211_183541_zpshsxrapr5.jpg
IMG_20160211_183339_zpsykizefsa.jpg
IMG_20160211_183300_zpseeztjtbt.jpg
I also got the correct alternator fan and pulley today.
IMG_20160211_183541_zpshsxrapr5.jpg
February 12th, 2016, 06:43 PM
#125
Registered User
Thread Starter
Join Date: Apr 2011
Location: Erie,PA
Posts: 489
February 12th, 2016, 07:10 PM
#126
Registered User
Thread Starter
Join Date: Apr 2011
Location: Erie,PA
Posts: 489
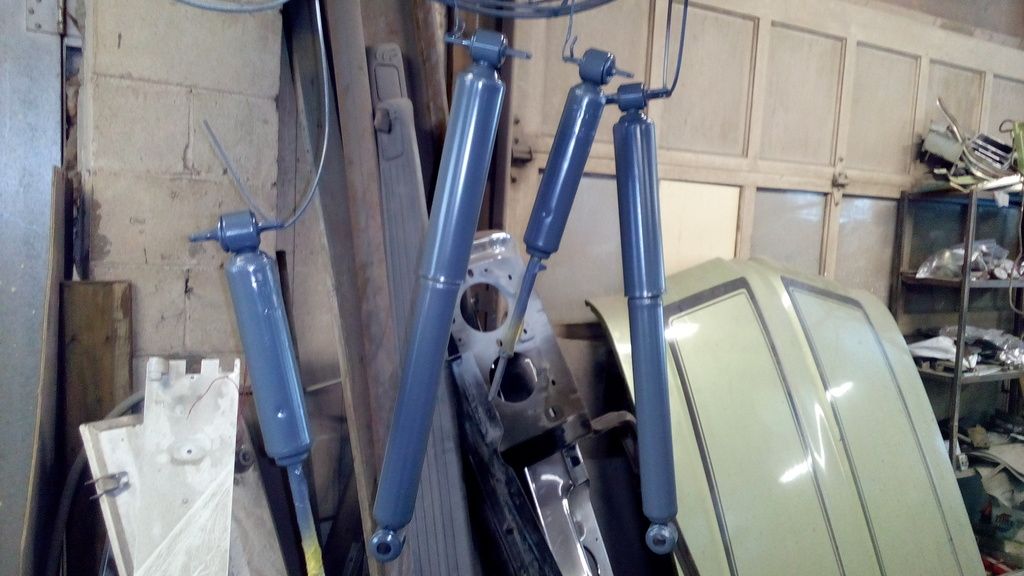
Front end going back together! I couldn't justify the cost of the spiral shocks, but I did spring for some spray bomb shock paint. Installed the front shocks tonight. Both front rotors/calipers are back on. front brake lines from valve to wheels and hoses installed. Sway bar installed. I had my oldest giving me a hand too.
IMG_20160212_163747_zpsy3cfohqc.jpg
IMG_20160212_185759_zpsoan6lmsj.jpg
IMG_20160212_185747_zpsyykfvcyl.jpg
IMG_20160212_185737_zpsxm1jzdbf.jpg
IMG_20160212_163747_zpsy3cfohqc.jpg
IMG_20160212_185759_zpsoan6lmsj.jpg
IMG_20160212_185747_zpsyykfvcyl.jpg
IMG_20160212_185737_zpsxm1jzdbf.jpg
February 14th, 2016, 04:46 PM
#127
Registered User
Thread Starter
Join Date: Apr 2011
Location: Erie,PA
Posts: 489
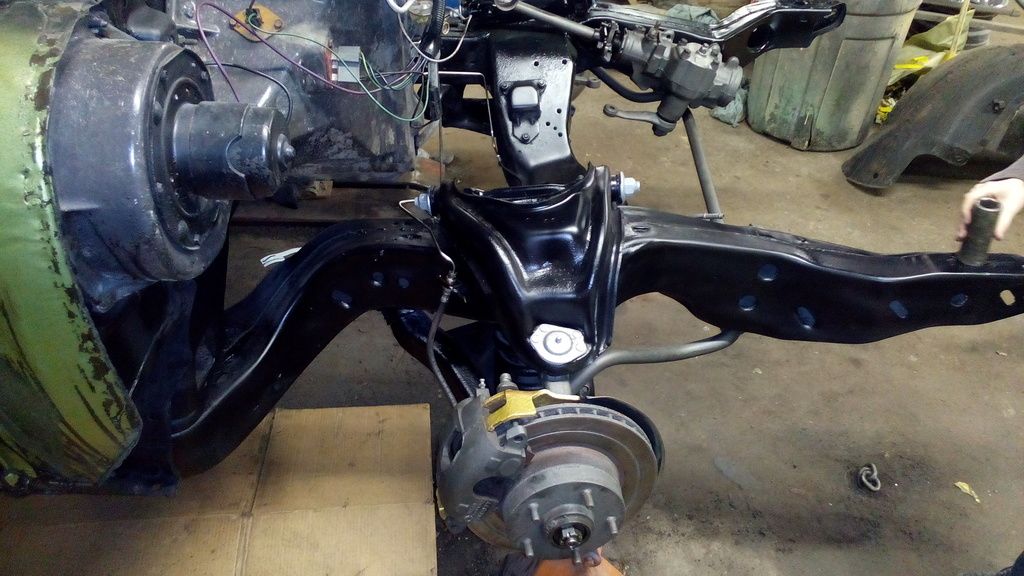
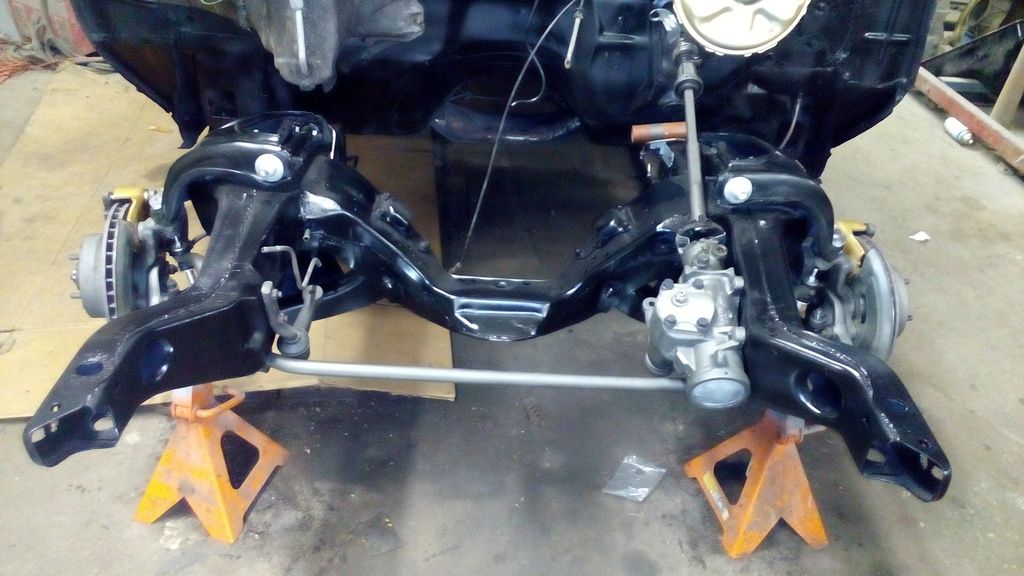
Front end is done!
Tonight I had a few hours to work on the car. the front is done. steering installed. I finished a few detail things like painting the POA bracket and a few other little things. Next is under car clean up. the kids are done with basketball season and I have six weeks before soccer starts so the next few Saturdays will be a big push to get the engine in and the front end reassembled. the core support and trans crossmember will be dropped off and media blasted this week. here are the last of the front suspension pics. I am happy with how it turned out.
IMG_20160214_180914_zpsdfcwpfud.jpg
IMG_20160214_180818_zpsf1vjrkqd.jpg
IMG_20160214_180914_zpsdfcwpfud.jpg
IMG_20160214_180818_zpsf1vjrkqd.jpg
February 20th, 2016, 07:36 PM
#128
Registered User
Thread Starter
Join Date: Apr 2011
Location: Erie,PA
Posts: 489
Today I decided to get back after the floor issues. I patched two areas around the passenger side rear bench seat mount and seatbelt attach bolt areas. I have the same area on the driver side. I also have the passenger toe kick area that needs some attention. that will have to be next week! I am starting to get burned out. Hopefully once the engine is back in I will get motivated to make the final push!
February 27th, 2016, 07:30 PM
#129
Registered User
Thread Starter
Join Date: Apr 2011
Location: Erie,PA
Posts: 489
Today I got the floor pan finished! I plan on undercoating it one night this week. I was going to mess around and try and paint the underside, but with the patches I would have way to much work to make it worth painting, plus having to remove all the old Ziebart undercoating is a nightmare. I have about eight hours so far in cleaning the front inner fender wells. for some reason they were undercoated inside and out! I still have more work to get them finished. I did manage to drop off the core support and trans cross member at the media blast place Friday. hopefully he will have it done in a few days! I am planning on reinstalling the engine next Saturday.
IMG_20160227_185403_zps67lciiih.jpg
IMG_20160224_161218_zpsdyqkalzx.jpg
IMG_20160227_185403_zps67lciiih.jpg
IMG_20160224_161218_zpsdyqkalzx.jpg
March 1st, 2016, 08:11 PM
#130
Registered User
Thread Starter
Join Date: Apr 2011
Location: Erie,PA
Posts: 489
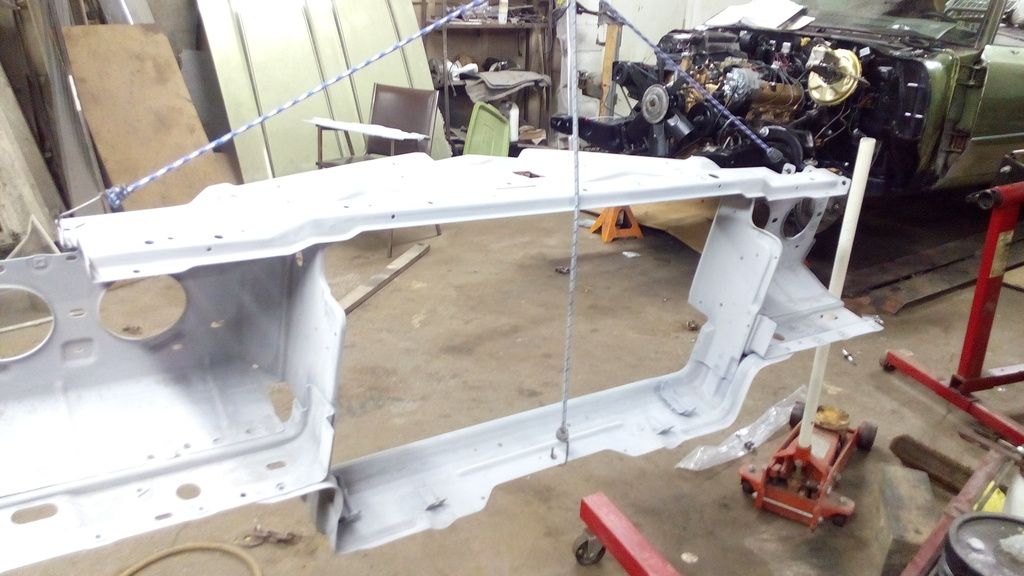
Picked up the parts from the blaster. $63 to have it done. Very worth it.
got the stuff home and got some 2K urethane primer laid down. gotta sand a bit and then find some time to lay down the black. Still have the goal of getting the engine back in this Saturday!
Photo%203_zpszrj9unv5.jpg
Photo%205_zpst0pxk3l8.jpg
Photo%204_zpssnzauiyy.jpg
Photo%201_zpstzfv93ru.jpg
Photo%202_zpsxtwx3qlr.jpg
March 4th, 2016, 06:21 PM
#131
Registered User
Thread Starter
Join Date: Apr 2011
Location: Erie,PA
Posts: 489
The trans cross member is painted. I spent about an hour making sure the fan belts are all aligned properly. I wish I could have found the correct v-belts. nobody makes them. All the reproductions I found are for a 455 none for a 350! all I could find were these cog belts. exhaust manifolds are on. Tomorrow the engine goes back in. I am excited!!!!
cross%20memeber_zpsmocj0g3m.jpg
belts1_zps7cx9wrsi.jpg
belts2_zpsvsa0ruoj.jpg
engine%20belts_zps6y7mxphq.jpg
cross%20memeber_zpsmocj0g3m.jpg
belts1_zps7cx9wrsi.jpg
belts2_zpsvsa0ruoj.jpg
engine%20belts_zps6y7mxphq.jpg
March 6th, 2016, 08:11 AM
#132
Registered User
Thread Starter
Join Date: Apr 2011
Location: Erie,PA
Posts: 489
Engine is in!!!
Yesterday morning I had a few hours to install the engine and trans back between the frame rails!I just got it bolted in and got a phoine call. Unfortunately my wife had an accident at the YMCA and she was taken by ambulance to the hospital. She was playing racket ball, fell and hit her head bad. She has a severe concussion. With temporary memory loss. We spent the night on the neurological floor with constant observation. they did release her to home this morning. Her memory is starting to come back. The doc said it should all come back with the exception of yesterday and that might not. The car is on hold for a couple days now till she gets right.
IMG_20160305_113514_zpsvvmxfuwj.jpg
IMG_20160305_120149_zpsnq2itgek.jpgIMG_20160305_124053_zpsuzi5divs.jpgIMG_20160305_124209_zpsh76ekamu.jpg
IMG_20160305_113514_zpsvvmxfuwj.jpg
IMG_20160305_120149_zpsnq2itgek.jpgIMG_20160305_124053_zpsuzi5divs.jpgIMG_20160305_124209_zpsh76ekamu.jpg
March 9th, 2016, 04:58 AM
#133
Registered User
Join Date: Oct 2013
Location: Clinton Twp, MI
Posts: 435
Front end going back together! I couldn't justify the cost of the spiral shocks, but I did spring for some spray bomb shock paint. Installed the front shocks tonight. Both front rotors/calipers are back on. front brake lines from valve to wheels and hoses installed. Sway bar installed. I had my oldest giving me a hand too.


 March 12th, 2016, 04:29 PM
#134
Registered User
Thread Starter
Join Date: Apr 2011
Location: Erie,PA
Posts: 489
lots of progress this weekend. Friday night I spent almost 3 hours sanding the core support to get it ready to paint! total time was 5 hours for sanding ,paint, and clear. this morning installed the core support and got all the wiring hooked up. starter back in. just need to hook up the front exhaust pipes and then try and start her up! the core support looks a bit shinny in the pics and it is. the satin clear I used will flatten out in a week or so. I used the same stuff on the firewall and frame. its just crazy how many small details go into a restoration. the fact that they built so many cars in a year is amazing. it is so time consuming. I wish I had kept track of the time like costpenn does. I must have 200 hours in it so far. its been almost 18 months since the wreck .
IMG_20160311_190425_zpsynfwgsaf.jpg
IMG_20160311_200639_zpstey23pyb.jpg
IMG_20160312_134341_zpsabtne8bf.jpg
IMG_20160312_134353_zpsxrbomlcc.jpg
IMG_20160312_134413_zpsxdwdkxpa.jpg
IMG_20160312_143228_zpsykfnakv8.jpg
IMG_20160312_173158_zpsvtem2jyt.jpg
IMG_20160311_190425_zpsynfwgsaf.jpg

IMG_20160311_200639_zpstey23pyb.jpg
IMG_20160312_134341_zpsabtne8bf.jpg
IMG_20160312_134353_zpsxrbomlcc.jpg
IMG_20160312_134413_zpsxdwdkxpa.jpg
IMG_20160312_143228_zpsykfnakv8.jpg
IMG_20160312_173158_zpsvtem2jyt.jpg
March 19th, 2016, 10:05 PM
#135
Registered User
Thread Starter
Join Date: Apr 2011
Location: Erie,PA
Posts: 489
Today I spent about 5 hours in the garage. The front inner fenders are all cleaned, finally. I counted 21 cans of gunk gel heavy duty degreaser. it was the only thing that would melt the ziebart undercoating without any scrubbing. they turned out ok. they will have to do. they have some scratches from age , but at least they are clean. I cleaned up the radiator and condenser, painted and installed them. new radiator seals all the way around. cleaned and fixed a crack in the fan shroud. installed that. radiator hoses installed. trans cooler lines installed. the front exhaust pipes installed. the big part of the day was when we had ignition. that's right she is ALIVE! I just put some gas in the carb and cranked her over enough to make sure she starts and idles. I don't have the gas tank in or the exhaust all hooked up and no coolant yet either. I just figured it would be easiest to fix anything before the whole front end is back on. no problems. so finalizing underhood details then back to paint prep. moving forward in big steps now!
123456_zpsg0jlssni.jpg
12345_zpsnlezzbzh.jpg
1234567_zpsn7znww6i.jpg
123456_zpsg0jlssni.jpg
12345_zpsnlezzbzh.jpg
1234567_zpsn7znww6i.jpg
March 21st, 2016, 02:26 PM
#138
Registered User
Join Date: Apr 2014
Posts: 182
My car is booked in for April 4th for final coat, so not much progress the last couple
of weeks, trying to save up some $$ for the spray. Will start on the interior soon, dash,
door cards etc.
IMG_1691_zpsikhjcbrl.jpg
of weeks, trying to save up some $$ for the spray. Will start on the interior soon, dash,
door cards etc.
IMG_1691_zpsikhjcbrl.jpg
March 21st, 2016, 07:18 PM
#139
Registered User
Thread Starter
Join Date: Apr 2011
Location: Erie,PA
Posts: 489
Cus, it is looking fantastic!! that color is awesome! you should have a build thread going!!
 March 27th, 2016, 04:52 PM
#141
Registered User
Thread Starter
Join Date: Apr 2011
Location: Erie,PA
Posts: 489
This weekend was productive. The inner fender wells are finally all cleaned up. I installed the new splash aprons on the inner wells. That was a chore. Pushing the staples thru the liner and the splash shield was a bit tricky. I think they turned out good. All that's left to do is AC lines and the engine bay is done. I plan on doing that his week. I also am planning on painting the inside of the front fenders, the door jams, and the trunk jam area. here are some pics.
9949382920_zpsmcnyscsa.jpg
483829200_zps52izivlb.jpg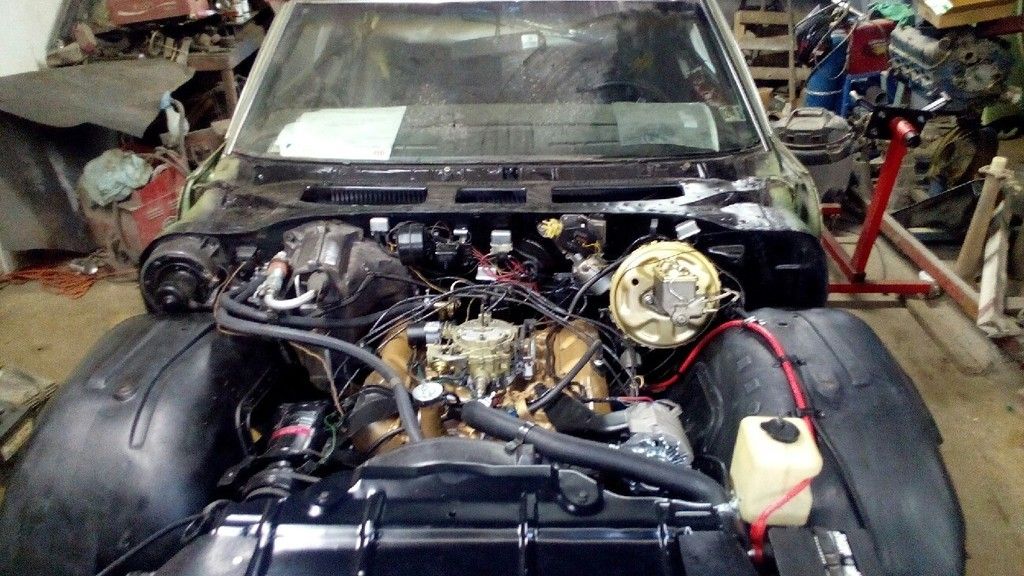 7887776_zpss9km0zjj.jpg
9949382920_zpsmcnyscsa.jpg
483829200_zps52izivlb.jpg
 7887776_zpss9km0zjj.jpg
March 27th, 2016, 09:47 PM
7887776_zpss9km0zjj.jpg
March 27th, 2016, 09:47 PM
#144
Registered User
Thread Starter
Join Date: Apr 2011
Location: Erie,PA
Posts: 489
Thank you for the kind words.
March 27th, 2016, 09:53 PM
#145
Registered User
Thread Starter
Join Date: Apr 2011
Location: Erie,PA
Posts: 489
the help keep water and what not out of the engine bay. I call them splash aprons. some might call them A arm seals. I am sure they probably are called something else. Its the name of the piece that the running boards attach on a model A ford are called. that's probably where I get the name from . I grew up restoring Model A's with my Dad. he has restored over 20 cars for himself and others. I have pictures from when I was 4 working on sanding primer on the fenders of one he still has 34 years later!
March 28th, 2016, 07:12 AM
#147
Registered User
Thread Starter
Join Date: Apr 2011
Location: Erie,PA
Posts: 489
Thank you! I really appreciate the positive feedback!!!! It keeps me motivated!
March 28th, 2016, 07:26 AM
#149
Registered User
Thread Starter
Join Date: Apr 2011
Location: Erie,PA
Posts: 489
I know you have done them before. I just untapped small sections cleaned that and retapped with that pain in the *** non adhesive tape.it'll be over soon! I will check tonight to see if you got it done!
 April 3rd, 2016, 06:46 PM
#151
Registered User
Thread Starter
Join Date: Apr 2011
Location: Erie,PA
Posts: 489
I made lots of progress today. Front fender insides are painted.
I got the door handles, locks and door moldings removed. sanded and primed doors and jambs.
I also bought the east wood zinc plate kit.
I did the hood latch and hood light. I have some other parts to do, but I started with these.
lots of work with bead blasting, then rust dissolver to make sure that no rust was missed, sand, machine buffed and hand polished. then degreased, washed in clean water, then in the plating solution. it only takes about five minutes to actually plate, but an hour of prep on nice parts to begin with.
here are pics of the progress today.
fender3_zpsgszy14ca.jpg
fender5_zpsdi9kycyj.jpg
fender%202_zpspoo2ckqi.jpg
fender1_zpsgs5a1nbs.jpg
driver%20side_zpscbxcnqxn.jpg
driver%20side%201_zpsksb5hask.jpg
hood%20latch_zps1ya3fefs.jpg
hood%20light_zpssfyo5sae.jpg
April 6th, 2016, 05:43 PM
#152
Registered User
Thread Starter
Join Date: Apr 2011
Location: Erie,PA
Posts: 489
Forward Progress
If anybody is going to do the zinc plate on their hood latch, here is a piece of advice, remove the springs before you plate. the electrolyte ate the spring for the catch. luckily I had a standard latch that had good springs , so those got swapped out.
Tonight I got the door jambs painted. lots to get done. I am getting burned out. maybe getting the front fenders on this weekend will help with the motivation.
door%20jam%208_zpsvhkigy3y.jpg
door%20jam_zpszt5jig4t.jpgdoor%20jam%204_zpslqjtehm5.jpg
door%20jam%206_zpsqctx4ms6.jpg[/URLdoor%20jam%202_zps1ohmpvei.jpg
April 7th, 2016, 11:48 AM
#154
Registered User
Thread Starter
Join Date: Apr 2011
Location: Erie,PA
Posts: 489
Thank you! Its getting to the point that I am over having fun. I just want to get it done. I am afraid that I will put off quality work for speed. its real easy to do. I just have to keep telling myself to tackle one thing at a time.
April 8th, 2016, 05:52 PM
#155
Registered User
Thread Starter
Join Date: Apr 2011
Location: Erie,PA
Posts: 489
I painted the inside of the front fenders all body color last week. well I thought about it and saw how NDERISE did his ....so I masked off and painted the inside portion black like they should be. Tomorrow the fenders get bolted back on!
[URL=http://s1377.photobucket.com/user/bigin1978/media/fenderblack4_zpsc5sw2oi4.jpg.html]fenderblack4_zpsc5sw2oi4.jpg[/Ufenderblack3_zpsuokxwxzx.jpgRL]fender%20black2_zpslmrpfxll.jpg
fender%20black1_zpsu6zsmi2v.jpg
[URL=http://s1377.photobucket.com/user/bigin1978/media/fenderblack4_zpsc5sw2oi4.jpg.html]fenderblack4_zpsc5sw2oi4.jpg[/Ufenderblack3_zpsuokxwxzx.jpgRL]fender%20black2_zpslmrpfxll.jpg
fender%20black1_zpsu6zsmi2v.jpg
April 9th, 2016, 06:49 PM
#157
Registered User
Thread Starter
Join Date: Apr 2011
Location: Erie,PA
Posts: 489
looks like a car again!!
today lots of progress. the front fenders are back on. all gaps are set. the hood has to come back off to have the bottom painted, but I needed to install it to get the core support and fenders adjusted properly. looking at paint in two weeks! big progress is a good motivator!hood_zpsf9wi9d8o.jpg
engine%20bay_zpsopjyolk5.jpg
driver%201_zpsyiix9bas.jpg
pass_zpsxkzujazg.jpg
driver%202_zpsyfr52hh5.jpg
driver4_zpsoiuyc6jc.jpg
pass2_zpsprosrepb.jpg
driver3_zpswqsl7q0q.jpg
engine%20bay_zpsopjyolk5.jpg
driver%201_zpsyiix9bas.jpg
pass_zpsxkzujazg.jpg
driver%202_zpsyfr52hh5.jpg
driver4_zpsoiuyc6jc.jpg
pass2_zpsprosrepb.jpg
driver3_zpswqsl7q0q.jpg
April 16th, 2016, 06:09 PM
#160
Registered User
Thread Starter
Join Date: Apr 2011
Location: Erie,PA
Posts: 489
bye bye hood stripe
Today I got the trunk, rear window and hood edged in. removed the hood stripes that I put on 23 years ago! I was hoping to have her painted before Carlisle, but its not going to happen before Thursday so the Saturday after Carlisle is the day. Here are some pics!
trunk12_zpsy6qu6evt.jpg
rear%20window_zpsbmydn3dn.jpg
hood%20stripe_zpsiodcfwkx.jpg
hood3_zpskey8yvlg.jpg
trunk12_zpsy6qu6evt.jpg
rear%20window_zpsbmydn3dn.jpg
hood%20stripe_zpsiodcfwkx.jpg
hood3_zpskey8yvlg.jpg
Last edited by bigin1978; April 16th, 2016 at 06:13 PM.


