70 442 W-30... restoration

 April 5th, 2014, 04:10 AM
#282
Registered User
Thread Starter
Join Date: Feb 2009
Location: Brazil Indiana
Posts: 11,515
After I started cleaning them up I found that all of them are cracked. I have one more parts car to remove one from. I will see what condition it is in.
April 5th, 2014, 06:30 AM
#284
Registered User

Join Date: Nov 2011
Location: milwaukee
Posts: 548
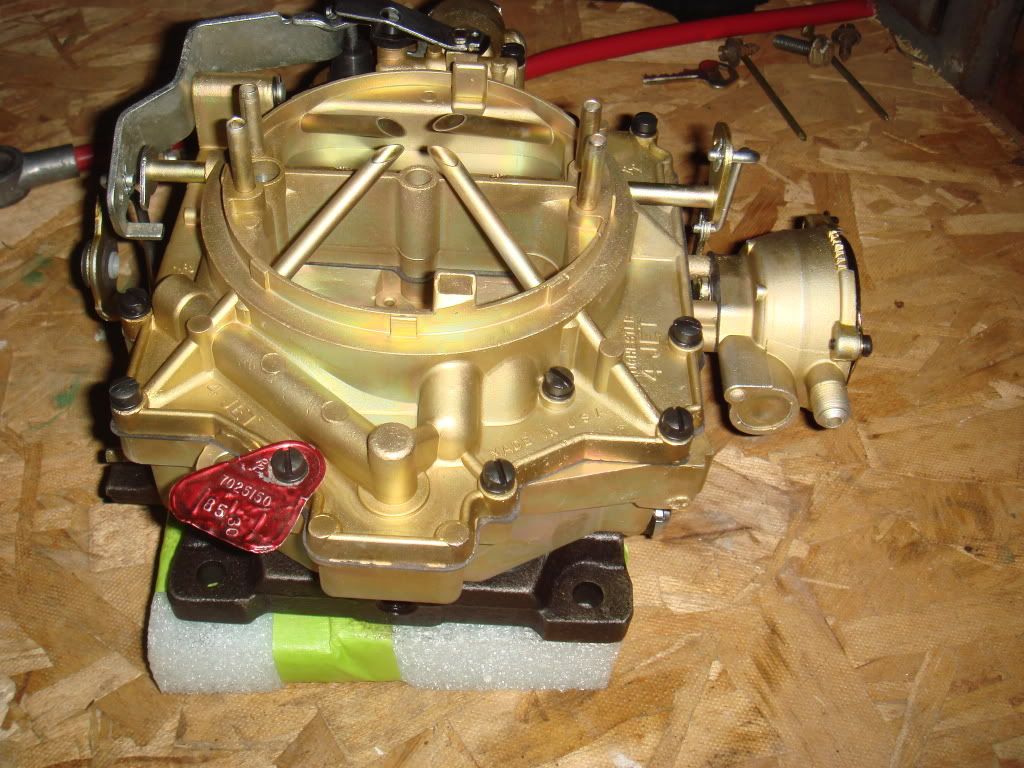
Got my carburetor back from Sparky's. Also got the other plated parts back. Only thing I still need to get back are the hood hinges. Not sure what the correct plating is for the heat shroud but Greg said this is correct. I like the look of the gray/black but I have seen restored cars both ways. This one looked like it had some zinc on it before I sent it so I assume it is correct.
 April 5th, 2014, 06:43 AM
#285
Registered User
Join Date: Nov 2011
Location: milwaukee
Posts: 548
Stefano, I have never primed one before and never had a problem. Should I?
dfire, I did go full roller and lighter rotating assembly. The compression is lower at 9.8 to be safe and reliable on pump gas but cutlassefi fit me with a good cam that should still make it as good or better than stock power. My entire goal was reliability and to keep my A/C and power brakes but also try to reach 500 torque. The A/C engines did not have that much when new but I hope to hit that mark.
Thanks Scott and everyone else..
April 5th, 2014, 12:27 PM
#286
Registered User

Join Date: Feb 2009
Posts: 2,031
 April 5th, 2014, 07:52 PM
#287
Registered User
Thread Starter
Join Date: Feb 2009
Location: Brazil Indiana
Posts: 11,515
I did mine grey. I see the reproduction shields are zinc. I've seen them both ways also. depending on useage of the car, I think zinc will be more maintenence. Keep In mind, I had sparky do just about every nut-bolt on my car and I wipe my fasteners down every few months with oil, or boeshield as they they can flash rust. i have a hoist so it makes the job quite a bit easier. But with midwest humidity fluctuations, they need care even if the car sits.
Sorry for the rant...
April 5th, 2014, 07:59 PM
#288
Registered User
Thread Starter
Join Date: Feb 2009
Location: Brazil Indiana
Posts: 11,515
I have not been happy with how my drive shaft turned out with the bare steel paint. I found another drive shaft in my junk pile today and it has no pitting. It very well may be the original one to this car but i am not sure. I very lightly bead blasted it today and it looks like i will go this route. I think I am going to try to polish it as shiny as i can and clear it. Just not sure how to polish it? do i just sand it with fine sandpaper?
April 7th, 2014, 02:15 PM
#289
Registered User
Thread Starter
Join Date: Feb 2009
Location: Brazil Indiana
Posts: 11,515
I am much happier with this drive shaft than my other one. It cleaned up real good. I cleared it to keep it from rusting. It is not perfect but I am OK with it as is. I got a little silly with the welds. I brush painted them to look as if they were hot from the welding. Up close you can tell what i did but 3 foot away it looks OK. I painted the ends with cast iron color. I still need to paint the stripes. I think i am going to brush them on sloppy like they were.
April 12th, 2014, 02:49 PM
#290
Registered User
Thread Starter
Join Date: Feb 2009
Location: Brazil Indiana
Posts: 11,515
I had to get the chassis out of the garage to paint the engine. I still can't decide what i am doing with the crossmember. I could see no signs of it ever being painted. I know inline tube has them natural color on many of their cars but I am not sure if it is correct. I see them both painted and unpainted on the cars I strip but most of them are painted on at least the bottom side. I will make that decision a little later. If I had it to do over, I would have painted the rear end like level one restorations does. I like how the engine turned out. It looks a little brighter in the pictures than it is but still close.
Last edited by jensenracing77; April 12th, 2014 at 02:52 PM.
April 12th, 2014, 03:41 PM
#291
Registered User

Join Date: Apr 2012
Posts: 321
Eric,
I had mine powder coated to look natural. I have seen them both ways as well. If I still lived in AZ I would have cleared it but since you and I live in this climate paint or powder coating is the best option.
Dave
I had mine powder coated to look natural. I have seen them both ways as well. If I still lived in AZ I would have cleared it but since you and I live in this climate paint or powder coating is the best option.
Dave
April 14th, 2014, 04:09 PM
#292
Rodney
Join Date: Jun 2011
Location: Houston, TX
Posts: 2,365
Finally Found Freddy
Eric:
I finally found those Freddy Fender 8-track tapes I mentioned a while back. Are you still interested? I found a box of 10, still in the plastic shrink wrap. I can't vouch for the condition after all these years, but I did remove the shrink wrap on one of them and the tape looks to be in good condition.
Rodney
April 25th, 2014, 03:49 PM
#294
Registered User
Thread Starter
Join Date: Feb 2009
Location: Brazil Indiana
Posts: 11,515
I got my 8 track, Thanks Rodney
Not much work done, I have mostly been working on my other 442 getting it ready to sell. I did get the starter back and the intake manifold back.
I had the manifold from my red W-30 restored by Wilson manifold in Florida. I sent it so that if I did not like it I could just use the original one from my car. When I opened it the first thing I thought was that they painted it. I was not happy at first. I looked at it for 5 minutes till I finally decided to scratch the bottom side to see if it was paint or not. Turns out that it is not painted. The finish just turned out that good. I set it beside my original to my car for a comparison. The only thing I noticed is that what ever the media is that they use, it takes away just a little if the sharpness the the letters and numbers cast into it. You have to look at them side by side up close to even notice. I think the texture is just a little rougher than original but I am not sure. I know the texture is rougher than my original one but mine was bead blasted and may have taken some of it away. I am still not sure what one i will use. They were both made one day apart so either one would work date wise.
April 26th, 2014, 02:18 PM
#295
Registered User
Thread Starter
Join Date: Feb 2009
Location: Brazil Indiana
Posts: 11,515
The body is soda blasted. We found the typical surprises that are always part of a project like this. found filler in the driver side quarter and front fender. I knew the driver door had some and I replaced it with a mint replacement. Looks like it was in a fender bender from front to back on the driver side. The wife to the original owner said her husband liked to party so maybe he was drinking? My body man said he is going to remove the filler and should have no problem fixing them and not needing a quarter. He said it is not deep and will be able to get alot more of dent out. He said it will only require a very thin layer after it is done. He did recommend I get a passenger side quarter so he can cut the wheel lip off for patches. He said he can butt weld them in and hide the seam.
This car had the original paint under the repaint. They said there were no stripes of any kind under the repaint. This this reinforces what the wife to the original owner said and the pictures she give me. No question that this is a stripe delete car.
This car had the original paint under the repaint. They said there were no stripes of any kind under the repaint. This this reinforces what the wife to the original owner said and the pictures she give me. No question that this is a stripe delete car.
April 27th, 2014, 06:17 AM
#297
Registered User
Join Date: Jan 2009
Location: Harrison, Michigan
Posts: 4,755
Nice job so far, Eric. I agree with your thoughts about keeping it right and as original as possible, especially since yours is a W30. I restored my 71 Cutlass 10 years ago and did a few things quickly and have since redone many of them. Now I also have a Vista that I try to do all the repairs etc as original. This car is only a beater now, but maybe someday I'll go thru it.
May 3rd, 2014, 03:39 PM
#300
Registered User
Thread Starter
Join Date: Feb 2009
Location: Brazil Indiana
Posts: 11,515
The engine is almost ready for the dyno.
I mounted an A/C bracket on the back driver side and the front passenger side. I think I can hook the lifting chain to them easier without scratching the engine up.
I mounted an A/C bracket on the back driver side and the front passenger side. I think I can hook the lifting chain to them easier without scratching the engine up.
May 20th, 2014, 03:37 PM
#301
Registered User
Thread Starter
Join Date: Feb 2009
Location: Brazil Indiana
Posts: 11,515
Headed to the dyno tomorrow! I have never done this or even seen one done so it will be a new experience for me. I had the alternator on it because i did not know how else to turn the water pump. When I ask him about it he just laughed and called me a rookie. He had me take it off and not install the thermostat.
There is a chance of rain tomorrow... I sure hope it don't.
There is a chance of rain tomorrow... I sure hope it don't.
May 22nd, 2014, 04:19 PM
#302
Registered User
Thread Starter
Join Date: Feb 2009
Location: Brazil Indiana
Posts: 11,515
Just wanted to add the results to this thread. 510 torque and 427 HP with stock F heads and stock intake and exhaust manifolds.
RPM C TORQ C PWR BSFC C.F. Oil Pr WAT T Fuel P O2 Sen TIME
BAND Ft-Lbs CHP #/HrHP PSI Deg F PSI Ratio SEC
3392 509.8 329.3 0.565 1.1020 65.0 147.0 4.7 0.02 1.6
3500 509.9 339.8 0.559 1.1020 65.6 147.0 4.9 0.02 0.9
3600 506.0 346.8 0.593 1.1090 64.8 148.0 6.0 0.02 2.0
3700 510.9 359.9 0.586 1.1125 62.6 145.5 6.3 0.02 2.2
3800 504.7 365.1 0.562 1.1125 63.2 146.0 6.4 0.02 1.4
3900 493.6 366.5 0.541 1.1130 64.4 145.0 6.4 0.02 1.6
4000 486.5 370.6 0.518 1.1110 64.2 146.5 6.2 0.02 0.8
4100 487.8 380.8 0.505 1.1090 63.1 146.0 5.8 0.02 0.7
4200 484.2 387.2 0.555 1.1065 62.5 147.0 6.6 0.02 4.5
4300 473.5 387.7 0.541 1.1070 60.4 156.0 6.6 0.02 4.3
4400 468.1 392.2 0.545 1.1075 59.5 153.0 6.6 0.02 1.5
4500 464.5 397.9 0.545 1.1090 59.5 150.5 6.6 0.02 0.6
4600 458.3 401.4 0.549 1.1070 57.9 153.0 6.6 0.02 1.1
4700 453.3 405.6 0.538 1.1070 58.3 151.0 6.6 0.02 0.6
4800 448.2 409.6 0.541 1.1070 56.9 158.5 6.6 0.02 0.6
4900 444.1 414.3 0.544 1.1065 58.1 152.5 6.6 0.02 0.5
5000 438.8 417.7 0.534 1.1080 57.3 152.0 6.6 0.02 0.8
5100 432.9 420.3 0.548 1.1075 57.1 153.5 6.6 0.02 0.7
5200 426.1 421.9 0.551 1.1075 56.5 153.5 6.6 0.02 0.7
5300 420.2 424.0 0.557 1.1075 55.5 155.5 6.6 0.02 0.8
5400 415.2 426.9 0.567 1.1070 52.3 154.5 6.6 0.02 0.5
5500 408.0 427.2 0.581 1.1070 51.5 157.0 6.6 0.02 0.6
5600 399.4 425.9 0.591 1.1070 50.8 157.5 6.6 0.02 0.6
5700 389.4 422.6 0.58 1.1065 49.7 144.0 6.6 0.02 0.3
5784 382.4 421.1 0.59 1.1065 49.7 144.0 6.6 0.02 0.2
AVRG 441.1 408.1 0.551 1.1075 56.9 151.9 6.5 0.02 20.4
AVERAGE RESULTS From 4000 RPM to <5784> RPM DEPAC # 322
 May 24th, 2014, 02:40 PM
#305
Registered User
Thread Starter
Join Date: Feb 2009
Location: Brazil Indiana
Posts: 11,515
I had got an OW decal from Paul Sigmund. It is windowed to show your original stampings on the tag. I installed it just a little low but you can still see the stampings. He done a GREAT job with these decals! Looks MUCH better than a tag with all the paint gone.
May 24th, 2014, 06:06 PM
#306
Registered User
Thread Starter
Join Date: Feb 2009
Location: Brazil Indiana
Posts: 11,515
My wife took a couple pictures at a real bad time. I was ready to toss these $hit motor mounts in the trash. I got them from inline tube thinking MAYBE they will be differant than the parts store mounts, I was wrong! joesw-31 told me I would have trouble with them. I just had to try them since I had already got them. I have a set of NOS mounts but did not want to use them. Now I am thinking maybe I will. So tired of the $hit parts that we have to use now!
May 25th, 2014, 04:17 AM
#308
Registered User
Thread Starter
Join Date: Feb 2009
Location: Brazil Indiana
Posts: 11,515
May 25th, 2014, 07:24 AM
#309
Shoveling Snow
Join Date: Aug 2008
Location: Yoder-Hey-Land
Posts: 2,507
May 25th, 2014, 07:30 AM
#310
Shoveling Snow
Join Date: Aug 2008
Location: Yoder-Hey-Land
Posts: 2,507
Looks like the decal laid down nice. Were the instructions clear enough for you.
July 26th, 2014, 11:09 AM
#312
Registered User
Thread Starter
Join Date: Feb 2009
Location: Brazil Indiana
Posts: 11,515
Long break from the car. Not touched it since the day my girl broke her arm in late May. I was going to install the U joints today and put the driveshaft in but i can not find my yoke. When the basement flooded i moved it and never seen it since.
On another note, my body man has alot done but still a long way to go. He has taken on a couple other construction jobs that will slow him down a little. Works out good because after my delays I am not ready for it. He originaly said late September but it may be November now. We have decided to change the driver side quarter panel. He could make it look as good as new but it just isn't going to be right. With the little rust on the lip and the former dent repair, it will be the same money just to change it out. I am lucky because the driver side NOS quarter is MUCH easier to find. I located one and will be picking it up after the nationals. Sad thing is, I just sold one last year not thinking I was going to need it. I got a repop passenger quarter to cut a 12 inch piece of the wheel lip out of for a patch. My body work price is going up
On another note, my body man has alot done but still a long way to go. He has taken on a couple other construction jobs that will slow him down a little. Works out good because after my delays I am not ready for it. He originaly said late September but it may be November now. We have decided to change the driver side quarter panel. He could make it look as good as new but it just isn't going to be right. With the little rust on the lip and the former dent repair, it will be the same money just to change it out. I am lucky because the driver side NOS quarter is MUCH easier to find. I located one and will be picking it up after the nationals. Sad thing is, I just sold one last year not thinking I was going to need it. I got a repop passenger quarter to cut a 12 inch piece of the wheel lip out of for a patch. My body work price is going up
August 15th, 2014, 02:18 AM
#313
Registered User
Thread Starter
Join Date: Feb 2009
Location: Brazil Indiana
Posts: 11,515
GREAT NEWS!!!!
I do not have the new driver side NOS quarter yet so I called the body guy to see how soon I needed to get it to him. He said he needed it last week but with not having it he decided to take a closer look at the former damage to the original quarter. He said he has a little time in it but worked almost the entire dent out of it without filler. He said it will still require some filler to fix the small imperfections but he would have done that even without prior damage. He said he has more time in it than changing the quarter but at least it is the original and I don't have to spend a pile of cash on an NOS one. I hope to get some pictures tonight. I have to take him the repop quarter so he can cut about 12 inches of wheel lip out of it.
I do not have the new driver side NOS quarter yet so I called the body guy to see how soon I needed to get it to him. He said he needed it last week but with not having it he decided to take a closer look at the former damage to the original quarter. He said he has a little time in it but worked almost the entire dent out of it without filler. He said it will still require some filler to fix the small imperfections but he would have done that even without prior damage. He said he has more time in it than changing the quarter but at least it is the original and I don't have to spend a pile of cash on an NOS one. I hope to get some pictures tonight. I have to take him the repop quarter so he can cut about 12 inches of wheel lip out of it.
August 15th, 2014, 03:29 PM
#314
Registered User
Thread Starter
Join Date: Feb 2009
Location: Brazil Indiana
Posts: 11,515
before and after of the passenger side. From the trunk side it is hard to tell where it was welded. He said by the time he is done with the inside you will not be able to find the but weld at all.
I must have been to excited when I talked to him. He was telling me what he will do and not what he did do. He said the filler that is in it is not near as bad as it looks. He said he can get almost all the bad areas fixed and only use minimal filler. I am very happy to keep the original quarter on the car. I was going to use NOS but the original is better to me.
I must have been to excited when I talked to him. He was telling me what he will do and not what he did do. He said the filler that is in it is not near as bad as it looks. He said he can get almost all the bad areas fixed and only use minimal filler. I am very happy to keep the original quarter on the car. I was going to use NOS but the original is better to me.
Last edited by jensenracing77; August 15th, 2014 at 03:37 PM.
August 23rd, 2014, 12:52 PM
#315
Registered User
Thread Starter
Join Date: Feb 2009
Location: Brazil Indiana
Posts: 11,515
My body guy said that the previous body guy that worked on the driver quarter was classic 70 body work. He said the filler was almost 1/4 thick in places. He ground out all the old filler and said he knocked out almost all of the old dent. He said most any body man could have knocked it out better than what was done. Now he said the worst filer may be 1/16 thick at very most. Just glad that I have the factory quarters (well with lower lip patches).
August 24th, 2014, 01:15 PM
#316
Once Olds Always Olds
Join Date: Nov 2011
Location: New Matamoras, Ohio
Posts: 1,202
My body guy said that the previous body guy that worked on the driver quarter was classic 70 body work. He said the filler was almost 1/4 thick in places. He ground out all the old filler and said he knocked out almost all of the old dent. He said most any body man could have knocked it out better than what was done. Now he said the worst filer may be 1/16 thick at very most. Just glad that I have the factory quarters (well with lower lip patches).
Did you buy the lower lip patches somewhere, or did your body man make them?
Looking good!
Troy
 August 24th, 2014, 02:22 PM
#317
Registered User
Join Date: Aug 2014
Location: S Dayton Ohio
Posts: 171
Looks great! A really nice job on the quarters. Finally, someone has used a patch panel with it's intended purpose. To use absolutely as little as possible of it! I don't know how many I have seen where they just zip down the side and overlap the whole top, from the front to the back. That's going to be a fantastic car.
The story with it, is great too. It's one of the things I enjoy with the business. Long after I'm gone, something I've done could be someone else's first car, or be another father/son project, and so on. Many of my great memories of the past revolve around a particular car, and a particular time. I just wonder if future generations will be restoring I-phones, as they recall memories of youth, lol!
The story with it, is great too. It's one of the things I enjoy with the business. Long after I'm gone, something I've done could be someone else's first car, or be another father/son project, and so on. Many of my great memories of the past revolve around a particular car, and a particular time. I just wonder if future generations will be restoring I-phones, as they recall memories of youth, lol!
August 24th, 2014, 04:27 PM
#318
Looks great! A really nice job on the quarters. Finally, someone has used a patch panel with it's intended purpose. To use absolutely as little as possible of it! I don't know how many I have seen where they just zip down the side and overlap the whole top, from the front to the back. That's going to be a fantastic car.
The story with it, is great too. It's one of the things I enjoy with the business. Long after I'm gone, something I've done could be someone else's first car, or be another father/son project, and so on. Many of my great memories of the past revolve around a particular car, and a particular time. I just wonder if future generations will be restoring I-phones, as they recall memories of youth, lol!
The story with it, is great too. It's one of the things I enjoy with the business. Long after I'm gone, something I've done could be someone else's first car, or be another father/son project, and so on. Many of my great memories of the past revolve around a particular car, and a particular time. I just wonder if future generations will be restoring I-phones, as they recall memories of youth, lol!
I know what you mean - I bought new quarter skins for mine, and see how little was actually used - but it is the best "wasted" money on my body work yet!
Last edited by costpenn; August 24th, 2014 at 04:31 PM.
August 24th, 2014, 05:42 PM
#319
Registered User
Thread Starter
Join Date: Feb 2009
Location: Brazil Indiana
Posts: 11,515
That is exactly how much my body guy used. He was going to only piece in about 12 inches on the driver side but said the factory sealer between the two panels really needed to come out. That stuff the factory used absorbs water real bad and he wanted it all out.
August 24th, 2014, 05:44 PM
#320
Registered User
Thread Starter
Join Date: Feb 2009
Location: Brazil Indiana
Posts: 11,515


