When you click on links to various merchants on this site and make a purchase, this can result in this site earning a commission. Affiliate programs and affiliations include, but are not limited to, the eBay Partner Network.
I need to replace my heater core in my 1972 olds cutlass supreme anybody know what all has to come out i take it the glove box has to come out . nothing has to be removed in the engine compartment except the hoses is that corect ? it all comes out under the dash correct .any help on this would be appreciated before I get started . my 83 hurst olds was easy to replace the heater core this one looks a little more of a pain .. thanks for any sugestions
It's not as simple as what you say. A '72 Olds Chassis Service Manual would really help you right about now.
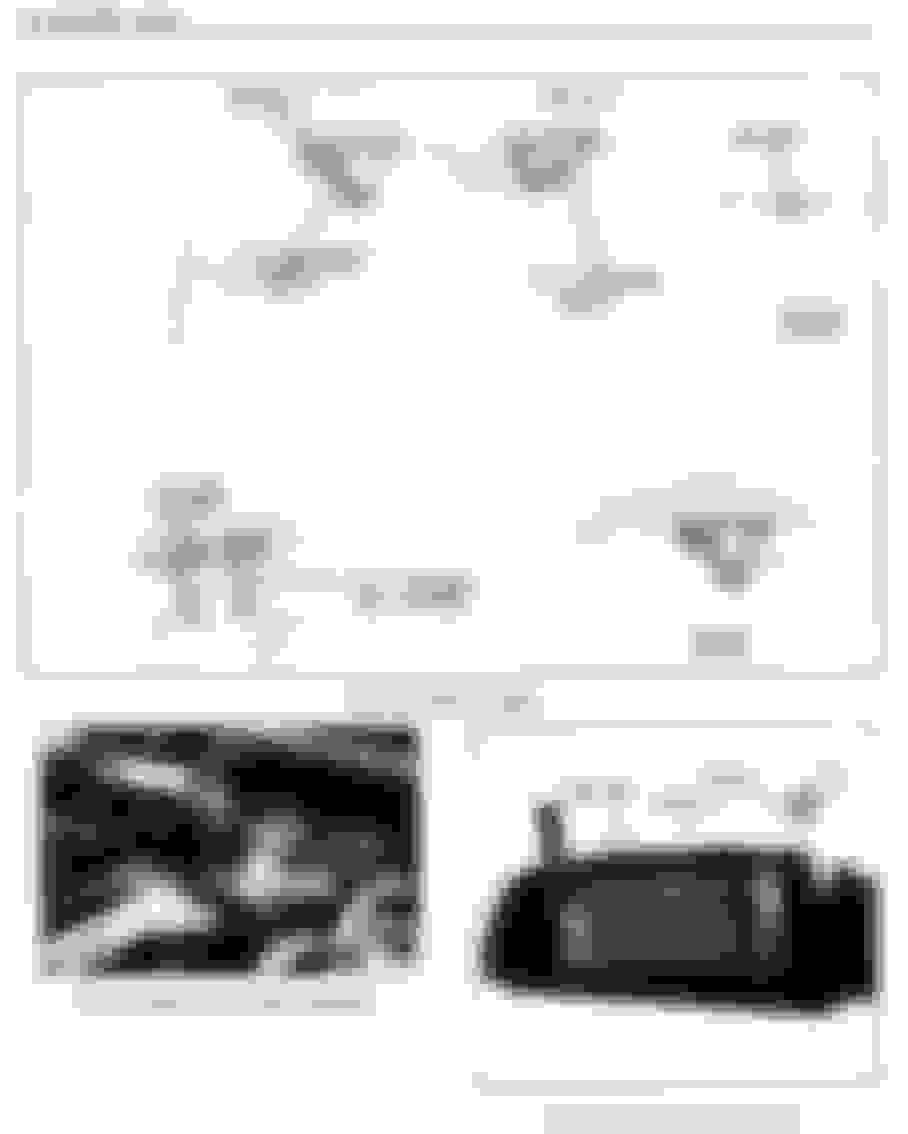
Here's the relevant pages regarding removal of the heater core on a '72 A-body. Note the sentence in parentheses at the bottom of the first column on the first page. You will need to loosen the right front fender as described to get at one of the bolts.
As jaunty75 mentioned , certainly, not as easy as one would think.
Its nice how members here will take the time to post sections from chassis service manuals to help other members here to assist them with a do it yourself task.
Put-r-ther, jaunty75 !!
I would also buy a roll of self adhesive weatherstripping, once you pull the heater box and everything else out from under the dash, the old weatherstripping will need to be replaced for a good seal .
I've done this a few times and felt it was better to put the car on a jack stand and remove the passenger side front tire and inner wheel well. If your in a part of the country that uses salt in the winter there's the potential for the fasteners that hold the inner liner to be rusty and hard to remove. But if you can that gives you a clear and easy access to the firelwall side of the heater box. If you have AC then it will be a much larger box, but still it has the nuts on the firewall side that need to be removed before you can pull the box holding the core out from under the dash. While your at it... you might want to check out the blower motor. If its showing signs of failing this would be the time to replace it too! John
I've done this multiple times over the years (70 and 71 Cutlass owner since 1977) and the first time I changed the heater core I didn't put the fastener behind the fender well back - that made subsequent heater core changes so much easier. As for removing that fastener, I recall loosening the fender liner then reaching up behind it and removing the one fastener - that was a PITA and I should have done what the manual said and cut a U shaped access port.
I bought this heater core from RockAuto and was not impressed. The strap didn't fit around the heater and had to bend the outlet nozzles to get them to line up through the holes. It works but wouldn't purchase again.
Thanks jaunty75 I new i could count on you guys the pictures and atachments will help greatly the car is put up on dolleys for winter so now i got to turn the heat on and get started i'll let you know how it turns out thanks again ..
v8al thanks for the input on rock auto i'm thinking i might get one thru OPGI [original parts group ] more money but Ive had good luck with there stuff fitting properly thanks again !!
2blu442 thanks for the input I will check the motor good idea , its on dollys now so its easy to put it up on jackstads and remove the tire ,and yes it has A/C so that will make it even more fun BUT thats part of haveing one of these beautiful classics is to have to work on it as far as salt its allways been stored winters .
fun71 thanks for the input I'm debating on leaveing that nut off to depends on how hard to remove and reinstall I may even consider cuting a n access port like you said thanks for the reply
On other GM cars with the hidden nut I have center punched the stud on the inside of the car, and drilled a hole. Keep going up in drill sizes, eventually you will drill thru the diameter of the stud, and the rest of the stud will fall inside the fender. This isn�t the preferred method, but it�s probably the safest choice. Doing it this way prevent other possible headaches caused by �environmental Loctite� (otherwise known as rusted bolts) damage to paint, etc.
On other GM cars with the hidden nut I have center punched the stud on the inside of the car, and drilled a hole. Keep going up in drill sizes, eventually you will drill thru the diameter of the stud, and the rest of the stud will fall inside the fender. This isn�t the preferred method, but it�s probably the safest choice. Doing it this way prevent other possible headaches caused by �environmental Loctite� (otherwise known as rusted bolts) damage to paint, etc.
To continue my heater core replacement saga... now that i have the heater core out I want to have the evaporator coil pressure tested. I have the case apart but the coil seems to be hung up on something where the large pressure tube is. I’ve removed all the screws i can see and i don’t want to force it and break something. Anyone on here have any advice for removing coil from the fiberglass case? Thanks, Roqetman.
 December 29th, 2018, 09:11 AM