
Radiator Overflow Tank Q ...

 December 2nd, 2009, 02:12 AM
#2
Registered User
Join Date: Jan 2009
Location: Too close to Toronto!!
Posts: 4,087
They made them for '71's and 2's and fits back to '68...group 1.203 PN 410008...mounts behind right headlights, along the fender  pricey if you don't have any
  requires a bracket also...'73 is completely different...
pricey if you don't have any requires a bracket also...'73 is completely different...
December 2nd, 2009, 07:32 AM
#3
is Fast Enough ...
Thread Starter
Join Date: Jul 2008
Location: dogtown
Posts: 1,308
I had a 72 240Z that didn't have one and they were just as rare ...
The big cars had them. I wonder when tracks required them ...
December 2nd, 2009, 10:57 AM
#4
Just an Olds Guy
Join Date: Jul 2008
Location: Edmonton, AB. And "I am Can 'eh' jun - eh"
Posts: 24,525
Hey mug,
you're right. Olds did make them but they were only put on 455's with HD cooling from I believe 1970-72. Not all 442's in those years met the requirement of HD cooling. As you are aware, most of the 455's would run hot, so that's what the coolant recovery tank was designed to help with instead of pissing coolant all over the ground.
Even in 71/72 not all A or B body 455's came with the coolant tank. You could have them installed by a dealer free of charge if you took the car in with overheating problems. Otherwise, you could just get it installed (your coin though) to deal with the issue.
$60.00 for a "real" 70-72 overflow tank? If yes, you scored big time. NOS ones now go for horrendous dollars. Last one I was thinking about buying was 250.00 just for the tank, not including cap, lines, or mounting braket. You can buy aftermarket reproductions (complete) for $199.00 from fusicks, parts place and I think tamraz. May be a couple of other places, but don't have that info handy right now. I'm ordering one of these to replace the temporary one I have in the car right now.
I'd love to see the pic of the one you got for 60 clams.
December 2nd, 2009, 07:17 PM
#5
71 & 72,now I want a 68
Join Date: May 2009
Location: NW Indiana
Posts: 1,864
Sorry to hijack your thread Mugzilla,but I have some questions regarding the coolant overflow tank mounting.
I just recieved one of the reproduction coolant overflow tank kits,looks like it will fit pretty well but,
the mounting bracket is raw,were these brackets mounted raw? or painted from the factory?
What type of fasteners should be used for mounting? It did not include any. I can't stand to look at an engine bay with mis matched or improper fasteners being used.
thanks
December 2nd, 2009, 08:01 PM
#6
Just an Olds Guy
Join Date: Jul 2008
Location: Edmonton, AB. And "I am Can 'eh' jun - eh"
Posts: 24,525
NOS pic
Sorry to hijack your thread Mugzilla,but I have some questions regarding the coolant overflow tank mounting.
I just recieved one of the reproduction coolant overflow tank kits,looks like it will fit pretty well but, the mounting bracket is raw,were these brackets mounted raw? or painted from the factory?
What type of fasteners should be used for mounting? It did not include any. I can't stand to look at an engine bay with mis matched or improper fasteners being used.
thanks
I just recieved one of the reproduction coolant overflow tank kits,looks like it will fit pretty well but, the mounting bracket is raw,were these brackets mounted raw? or painted from the factory?
One that was NOS I had considered buying showed the bracket painted satin black. The hoses were black with yellow and purple indexing. .
thanks
 This tank also has the level markings on both sides. I dont think the repros do. Also the top with the vents is more the same white plastic instead of the transparent lighter ones. Hope this helps.
HDreservoir.jpg?t=1259812552
December 2nd, 2009, 11:00 PM
#7
is Fast Enough ...
Thread Starter
Join Date: Jul 2008
Location: dogtown
Posts: 1,308
Hey mug,
you're right. Olds did make them but they were only put on 455's with HD cooling from I believe 1970-72. Not all 442's in those years met the requirement of HD cooling. As you are aware, most of the 455's would run hot, so that's what the coolant recovery tank was designed to help with instead of pissing coolant all over the ground.
Even in 71/72 not all A or B body 455's came with the coolant tank. You could have them installed by a dealer free of charge if you took the car in with overheating problems. Otherwise, you could just get it installed (your coin though) to deal with the issue.
$60.00 for a "real" 70-72 overflow tank? If yes, you scored big time. NOS ones now go for horrendous dollars. Last one I was thinking about buying was 250.00 just for the tank, not including cap, lines, or mounting braket. You can buy aftermarket reproductions (complete) for $199.00 from fusicks, parts place and I think tamraz. May be a couple of other places, but don't have that info handy right now. I'm ordering one of these to replace the temporary one I have in the car right now.
I'd love to see the pic of the one you got for 60 clams.
you're right. Olds did make them but they were only put on 455's with HD cooling from I believe 1970-72. Not all 442's in those years met the requirement of HD cooling. As you are aware, most of the 455's would run hot, so that's what the coolant recovery tank was designed to help with instead of pissing coolant all over the ground.
Even in 71/72 not all A or B body 455's came with the coolant tank. You could have them installed by a dealer free of charge if you took the car in with overheating problems. Otherwise, you could just get it installed (your coin though) to deal with the issue.
$60.00 for a "real" 70-72 overflow tank? If yes, you scored big time. NOS ones now go for horrendous dollars. Last one I was thinking about buying was 250.00 just for the tank, not including cap, lines, or mounting braket. You can buy aftermarket reproductions (complete) for $199.00 from fusicks, parts place and I think tamraz. May be a couple of other places, but don't have that info handy right now. I'm ordering one of these to replace the temporary one I have in the car right now.
I'd love to see the pic of the one you got for 60 clams.
The instructions show a different mounting but the it's not an a-body diagram ...
https://classicoldsmobile.com/forums...html#post77953
I jumped on it even though my car only runs hot at speed where the scoops pressurize the engine compartment reducing flow through the radiator. Yes the scoops are functional ...
 December 2nd, 2009, 11:04 PM
#8
is Fast Enough ...
Thread Starter
Join Date: Jul 2008
Location: dogtown
Posts: 1,308
Sorry to hijack your thread Mugzilla,but I have some questions regarding the coolant overflow tank mounting.
I just recieved one of the reproduction coolant overflow tank kits,looks like it will fit pretty well but,
the mounting bracket is raw,were these brackets mounted raw? or painted from the factory?
What type of fasteners should be used for mounting? It did not include any. I can't stand to look at an engine bay with mis matched or improper fasteners being used.
thanks
December 3rd, 2009, 04:26 PM
#9
71 & 72,now I want a 68
Join Date: May 2009
Location: NW Indiana
Posts: 1,864
Thanks for the info and pics guys.
Here's some pics of the reproduction tank I picked up,the add/full lines are on one side of the tank as shown.Just need to gather some fasteners and paint for the bracket,then I'll be installing it.
Allan,any way of enlarging that pic to get a better look at the fasteners?
Mugzilla,what do you mean by "funky"?
DSC01881.jpg
DSC01882.jpg
Last edited by w-30dreamin; December 3rd, 2009 at 04:31 PM.
December 3rd, 2009, 05:59 PM
#10
Just an Olds Guy
Join Date: Jul 2008
Location: Edmonton, AB. And "I am Can 'eh' jun - eh"
Posts: 24,525
December 3rd, 2009, 08:06 PM
#11
71 & 72,now I want a 68
Join Date: May 2009
Location: NW Indiana
Posts: 1,864
Thanks Allan.
Ya know,I was going thru the assembly manual and found the part numbers for the mounting screws for this tank assembly.Are there any resources for obtaining a pn description?
9420878 x 1 pcs.
9419380 x 4 pcs.
Ya know,I was going thru the assembly manual and found the part numbers for the mounting screws for this tank assembly.Are there any resources for obtaining a pn description?
9420878 x 1 pcs.
9419380 x 4 pcs.
December 3rd, 2009, 08:38 PM
#12
is Fast Enough ...
Thread Starter
Join Date: Jul 2008
Location: dogtown
Posts: 1,308
Thanks for the info and pics guys.
Here's some pics of the reproduction tank I picked up,the add/full lines are on one side of the tank as shown.Just need to gather some fasteners and paint for the bracket,then I'll be installing it.
Allan,any way of enlarging that pic to get a better look at the fasteners?
Mugzilla,what do you mean by "funky"?
I'll scan and post up the directions manana ...
December 4th, 2009, 04:18 PM
#13
Just an Olds Guy
Join Date: Jul 2008
Location: Edmonton, AB. And "I am Can 'eh' jun - eh"
Posts: 24,525
If anyone has the OEM tank in their car (hint Mugzilla) is there any chance you could take a higher resolution picture of the mounting screws and bracket for w-30dreamin? It might save a bit of time looking through part books. I'm pretty sure the description of the parts will not indicate the color of the screws or mounting tab. They are really generic in descriptions, like Screw - reservoir mounting. Bracket - reservoir mounting.....
 December 6th, 2009, 06:00 PM
#15
is Fast Enough ...
Thread Starter
Join Date: Jul 2008
Location: dogtown
Posts: 1,308
December 6th, 2009, 06:10 PM
#16
is Fast Enough ...
Thread Starter
Join Date: Jul 2008
Location: dogtown
Posts: 1,308
here are the instructions showing a different location , turned 90 degrees ...
When I install the new one I will check both locations ...

When I install the new one I will check both locations ...
Last edited by mugzilla; December 8th, 2009 at 09:36 PM.
December 6th, 2009, 06:14 PM
#17
is Fast Enough ...
Thread Starter
Join Date: Jul 2008
Location: dogtown
Posts: 1,308
Sorry to hijack your thread Mugzilla,but I have some questions regarding the coolant overflow tank mounting.
I just recieved one of the reproduction coolant overflow tank kits,looks like it will fit pretty well but,
the mounting bracket is raw,were these brackets mounted raw? or painted from the factory?
What type of fasteners should be used for mounting? It did not include any. I can't stand to look at an engine bay with mis matched or improper fasteners being used.
thanks
I just recieved one of the reproduction coolant overflow tank kits,looks like it will fit pretty well but,
the mounting bracket is raw,were these brackets mounted raw? or painted from the factory?
What type of fasteners should be used for mounting? It did not include any. I can't stand to look at an engine bay with mis matched or improper fasteners being used.
thanks
Shows a painted bracket
December 6th, 2009, 07:22 PM
#18
Just an Olds Guy
Join Date: Jul 2008
Location: Edmonton, AB. And "I am Can 'eh' jun - eh"
Posts: 24,525
By the look of the pics, they appear to be either 3/8 or 7/16 self tapping metal screws. Easy to get almost anywhere. There's usually a nut and bolt supply store in most large cities. Check out the phone book or web in your area. Heck, check out a local bodyshop and ask them where they source out parts. The probably easiest and best thing would be go to the wrecker. Find a host car and start stripping bolts off it. Then restore them. I think Eastwoods has a kit for doing the phosphate restoration.
December 6th, 2009, 07:25 PM
#19
71 & 72,now I want a 68
Join Date: May 2009
Location: NW Indiana
Posts: 1,864
Thanks much for the great pics.
Same bottle but your brackets are different than the reproduction kit.
Your pics confirmed what type of bolts it looks like the factory used.I haven't had any luck finding any yet.The search continues.
Thanks
Here's a pic borrowed from the parts place of what the repro looks like
Same bottle but your brackets are different than the reproduction kit.
Your pics confirmed what type of bolts it looks like the factory used.I haven't had any luck finding any yet.The search continues.
Thanks
Here's a pic borrowed from the parts place of what the repro looks like
December 6th, 2009, 08:48 PM
#20
is Fast Enough ...
Thread Starter
Join Date: Jul 2008
Location: dogtown
Posts: 1,308
The factory screw have an indented head...
Any Olds that year will have them...
Start stripping similar cars and you will notice : sheet metal to sheetmetal style(w/ attached washers), bracket to sheetmetal (w/ shoulder heads), bracket to engine, big attached washer for fender to frame, etc. Most have a marking on the head specific to manufacturer and approx year .
When I see a similar car to mine in a yard I grab nuts and bolts and remember where they go. Do it enough and you will see the logic to the style .
Grab any body shim you can as the are hard to find new or repro that are correct...
December 6th, 2009, 08:53 PM
#21
is Fast Enough ...
Thread Starter
Join Date: Jul 2008
Location: dogtown
Posts: 1,308
By the look of the pics, they appear to be either 3/8 or 7/16 self tapping metal screws. Easy to get almost anywhere. There's usually a nut and bolt supply store in most large cities. Check out the phone book or web in your area. Heck, check out a local bodyshop and ask them where they source out parts. The probably easiest and best thing would be go to the wrecker. Find a host car and start stripping bolts off it. Then restore them. I think Eastwoods has a kit for doing the phosphate restoration.
I take a large diameter tin like you find with butter cookies , drill a bunch of small holes on the lid , cut a hole in the side for a sand blast nozzle. Get the angle right and it will spin nuts and bolts around for about five minutes or until all corrosion is gone.
December 6th, 2009, 08:54 PM
#22
is Fast Enough ...
Thread Starter
Join Date: Jul 2008
Location: dogtown
Posts: 1,308
Thanks much for the great pics.
Same bottle but your brackets are different than the reproduction kit.
Your pics confirmed what type of bolts it looks like the factory used.I haven't had any luck finding any yet.The search continues.
Thanks
Here's a pic borrowed from the parts place of what the repro looks like
Same bottle but your brackets are different than the reproduction kit.
Your pics confirmed what type of bolts it looks like the factory used.I haven't had any luck finding any yet.The search continues.
Thanks
Here's a pic borrowed from the parts place of what the repro looks like
December 7th, 2009, 02:30 AM
#23
Registered
Join Date: Jul 2006
Location: Northeast Ohio
Posts: 4,430
My bottle came from the Wal-Mart.
I'll have to keep an eye open for a cheap and perfect original.")
The hex washer head sheet metal screws can be found at AMK.
Go to the screw-tapping PDF catalog pages and search the number in the search box on top.
http://amkproducts.com/default.htm
9419380 is the same as the screws that hold the grills to the stone shield and the headlight surrounds to the core support.
Most anybody that works on cars a lot should have about a million of those things in the extra bolt can/box/jar ...at least you always think you do.
Mine were just brownish surface rust when I took my grill and stuff apart, I'm not sure what they looked like new?
I have to put it back together and it may be nice to know??
The finish would be the same as those grill and headlight screws whatever they were.
The spacer is the same one as behind the power steering pump bracket, 1/2" I think?
The part number changed to 398917 according to a thread at Oldspower and they can be found at VPI.
I checked and they still have them, I logged in and they want $13.05 for that thing.
http://www.vpartsinc.com/index.php
Zinc-Phosphate spray from Eastwood duplicates the black-oxide finish pretty pretty well if they are that, I follow it up with a dry clear. I use a wire wheel on a bench grinder to clean bolt and screw heads and threads before finishing or to just shine them up before clearing them. The sandblaster works too but don't blast off the markings or concentric circles on some heads, I do it that way too, have to try the can technique.
Wear heavy gloves and hold on real tight if you use a wire wheel or they fly into another dimension and can never be found again, or bonk off the car, or go through a window.
The brackets are probably just the basic semi-gloss black like all the brackets are. They may have dip finished them originally, lots of runs with mottled skinning and fisheyes. Eastwood underhood black is just right, any good quality semi-gloss works but the Eastwood stuff is nice.
I'll have to keep an eye open for a cheap and perfect original.
The hex washer head sheet metal screws can be found at AMK.
Go to the screw-tapping PDF catalog pages and search the number in the search box on top.
http://amkproducts.com/default.htm
9419380 is the same as the screws that hold the grills to the stone shield and the headlight surrounds to the core support.
Most anybody that works on cars a lot should have about a million of those things in the extra bolt can/box/jar ...at least you always think you do.
Mine were just brownish surface rust when I took my grill and stuff apart, I'm not sure what they looked like new?
I have to put it back together and it may be nice to know??
The finish would be the same as those grill and headlight screws whatever they were.
The spacer is the same one as behind the power steering pump bracket, 1/2" I think?
The part number changed to 398917 according to a thread at Oldspower and they can be found at VPI.
I checked and they still have them, I logged in and they want $13.05 for that thing.
http://www.vpartsinc.com/index.php
Zinc-Phosphate spray from Eastwood duplicates the black-oxide finish pretty pretty well if they are that, I follow it up with a dry clear. I use a wire wheel on a bench grinder to clean bolt and screw heads and threads before finishing or to just shine them up before clearing them. The sandblaster works too but don't blast off the markings or concentric circles on some heads, I do it that way too, have to try the can technique.
Wear heavy gloves and hold on real tight if you use a wire wheel or they fly into another dimension and can never be found again, or bonk off the car, or go through a window.
The brackets are probably just the basic semi-gloss black like all the brackets are. They may have dip finished them originally, lots of runs with mottled skinning and fisheyes.
Eastwood underhood black is just right, any good quality semi-gloss works but the Eastwood stuff is nice.
Last edited by Bluevista; December 7th, 2009 at 02:35 AM.
December 7th, 2009, 06:12 PM
#24
71 & 72,now I want a 68
Join Date: May 2009
Location: NW Indiana
Posts: 1,864
Thanks to all you guys for the great info and pictures in this thread.It has been very helpful.
I don't have time tonight to search that site for the bolts,but I will be looking as soon as time allows.
Thanks for the offer on the leftovers Mugzilla,I'll see what my search turns up.Might have to take you up on the offer.
thanks for sharing all this great info guys
I don't have time tonight to search that site for the bolts,but I will be looking as soon as time allows.
Thanks for the offer on the leftovers Mugzilla,I'll see what my search turns up.Might have to take you up on the offer.
thanks for sharing all this great info guys
December 8th, 2009, 03:26 AM
#25
Registered User
Join Date: Jan 2009
Location: Too close to Toronto!!
Posts: 4,087
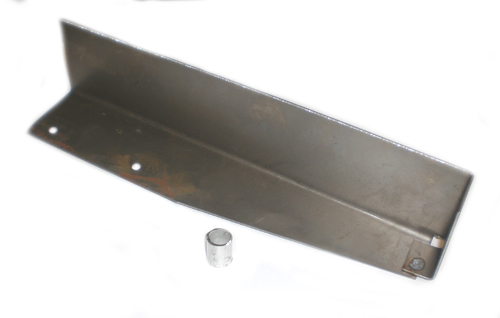
The deep end of the tank goes forward and the shallow end goes over the vapour canister and the top verticle tab attaches to the fender in the lower groove with a 3/8 inch tubular spacer and sheet metal hex screw...
December 8th, 2009, 03:05 PM
#26
is Fast Enough ...
Thread Starter
Join Date: Jul 2008
Location: dogtown
Posts: 1,308
I have a picture that shows the bolts and tie for the reservoir. They are black phospate coated by the look. Judge for yourself: here's the pic I saved. I didn't buy this unit because the seller (ebay) wanted I think it was around 395.00 or 495.00 This tank also has the level markings on both sides. I dont think the repros do. Also the top with the vents is more the same white plastic instead of the transparent lighter ones. Hope this helps.

This tank also has the level markings on both sides. I dont think the repros do. Also the top with the vents is more the same white plastic instead of the transparent lighter ones. Hope this helps.DSC04765.jpg
December 8th, 2009, 04:14 PM
#28
Just an Olds Guy
Join Date: Jul 2008
Location: Edmonton, AB. And "I am Can 'eh' jun - eh"
Posts: 24,525
If you mean the whole tank to get rid of the yellowing? You can't. that's because of age and heat. White plastic will yellow under those conditions. The best you can do for cleaning is remove the tank and clean carefully with hot soapy water or hot water and vinegar. Use a long handled jar cleaner brush to loosen any gunge in the bottom of the tank. Be really careful though, if the tank is brittle from age you could break it very easily.
w-30dreamin has definitely got a repro tank. The top cap is clear. If you want to replace it with something a little more original looking, check out this web link. It's for Corvette, but I believe it's the same part. Give em a call and have your measurements ID/OD and height ready. For $5.00 it could be one heck of a deal. It doesn't have the plastic tang that goes around the top inlet.
http://www.tld-corvette.com/prodinfo.asp?number=554911
December 8th, 2009, 04:31 PM
#29
71 & 72,now I want a 68
Join Date: May 2009
Location: NW Indiana
Posts: 1,864
Allan,yes my kit came from the parts place.
The fill lines and lettering seem kinda faint,(I'd bet a factory tank has more pronounced lettering),that's why I put a drop light behind the tank for pics,helps to see it.
Mugzilla,I don't know if it will work, but with older white plastic slot car bodies,I've heard of guys soaking the plastic body in hydrodgen peroxide to de-yellow and whiten them up.Just an idea.
Bluevista,thanks much for the link to AMK products,I've found some screws that are close enough for me,might have to use a little paint. I'll know more when I have time to call AMK,I have some questions about their ordering system.
Last edited by w-30dreamin; December 8th, 2009 at 04:55 PM.
December 8th, 2009, 05:11 PM
#30
Just an Olds Guy
Join Date: Jul 2008
Location: Edmonton, AB. And "I am Can 'eh' jun - eh"
Posts: 24,525
Allan,yes my kit came from the parts place.
The fill lines and lettering seem kinda faint,(I'd bet a factory tank has more pronounced lettering),that's why I put a drop light behind the tank for pics,helps to see it.
Mugzilla,I don't know if it will work, but with older white plastic slot car bodies,I've heard of guys soaking the plastic body in hydrodgen peroxide to de-yellow and whiten them up.Just an idea.
Bluevista,thanks much for the link to AMK products,I've found some screws that are close enough for me,might have to use a little paint. I'll know more when I have time to call AMK,I have some questions about their ordering system.
The fill lines and lettering seem kinda faint,(I'd bet a factory tank has more pronounced lettering),that's why I put a drop light behind the tank for pics,helps to see it.
Mugzilla,I don't know if it will work, but with older white plastic slot car bodies,I've heard of guys soaking the plastic body in hydrodgen peroxide to de-yellow and whiten them up.Just an idea.
Bluevista,thanks much for the link to AMK products,I've found some screws that are close enough for me,might have to use a little paint. I'll know more when I have time to call AMK,I have some questions about their ordering system.
I think this is the same tank whether you get it a PP, Fusicks etc. I'm still keeping my eyes open for an OEM in good shape, but they go for huge $$. If I ever get one I'll take some close up shots for comparison. Not in a rush but also not willing to cough up blood to get it. When you get yours installed can you post a pic? What' s your overall impression with the reproduction tank? The one I'm using temporarily is the generic year one rectangular bottle.
Allan H, Thank you from me too. I've got AMK bookmarked in my favorites now.
December 8th, 2009, 09:32 PM
#31
is Fast Enough ...
Thread Starter
Join Date: Jul 2008
Location: dogtown
Posts: 1,308
There is also a porcelain product for old bath tubs etc...
December 9th, 2009, 02:51 PM
#34
Registered User
Join Date: Feb 2009
Location: Brazil Indiana
Posts: 11,536
Hey mug,
you're right. Olds did make them but they were only put on 455's with HD cooling from I believe 1970-72. Not all 442's in those years met the requirement of HD cooling. As you are aware, most of the 455's would run hot, so that's what the coolant recovery tank was designed to help with instead of pissing coolant all over the ground.
Even in 71/72 not all A or B body 455's came with the coolant tank. You could have them installed by a dealer free of charge if you took the car in with overheating problems. Otherwise, you could just get it installed (your coin though) to deal with the issue.
$60.00 for a "real" 70-72 overflow tank? If yes, you scored big time. NOS ones now go for horrendous dollars. Last one I was thinking about buying was 250.00 just for the tank, not including cap, lines, or mounting braket. You can buy aftermarket reproductions (complete) for $199.00 from fusicks, parts place and I think tamraz. May be a couple of other places, but don't have that info handy right now. I'm ordering one of these to replace the temporary one I have in the car right now.
I'd love to see the pic of the one you got for 60 clams.
you're right. Olds did make them but they were only put on 455's with HD cooling from I believe 1970-72. Not all 442's in those years met the requirement of HD cooling. As you are aware, most of the 455's would run hot, so that's what the coolant recovery tank was designed to help with instead of pissing coolant all over the ground.
Even in 71/72 not all A or B body 455's came with the coolant tank. You could have them installed by a dealer free of charge if you took the car in with overheating problems. Otherwise, you could just get it installed (your coin though) to deal with the issue.
$60.00 for a "real" 70-72 overflow tank? If yes, you scored big time. NOS ones now go for horrendous dollars. Last one I was thinking about buying was 250.00 just for the tank, not including cap, lines, or mounting braket. You can buy aftermarket reproductions (complete) for $199.00 from fusicks, parts place and I think tamraz. May be a couple of other places, but don't have that info handy right now. I'm ordering one of these to replace the temporary one I have in the car right now.
I'd love to see the pic of the one you got for 60 clams.
when i had it i thought it was for big cars because the part number was for a big car. the brackets were for big car but the tank was the same. i wish i could sell the rest of the stuff i got with that tank.
December 9th, 2009, 09:05 PM
#35
is Fast Enough ...
Thread Starter
Join Date: Jul 2008
Location: dogtown
Posts: 1,308
i wish i knew they were worth that much before i sold it to him. when i had it i thought it was for big cars because the part number was for a big car. the brackets were for big car but the tank was the same. i wish i could sell the rest of the stuff i got with that tank.
when i had it i thought it was for big cars because the part number was for a big car. the brackets were for big car but the tank was the same. i wish i could sell the rest of the stuff i got with that tank.The brackets were the same as on the '71 vista cruiser I pillaged...
Now I have to find out what the factory location was ...
I wanted the radiator guy to put the nozzle pointing to the fender but the pointed back location might be right "ON AN OLDS" ...
December 10th, 2009, 05:11 AM
#36
71 & 72,now I want a 68
Join Date: May 2009
Location: NW Indiana
Posts: 1,864
I'll know more once I do get it installed,I've only held it in place to get an idea how it's going to fit,everything looked like it will line up nice.
I haven't seen an original up close but I do feel that the lettering on this repro is kind of faint(hard to see).
The important thing is,it will have a tank to keep the tech inspectors happy and won't puke on my driveway...all the while looking factory stock
December 19th, 2009, 09:19 PM
#37
is Fast Enough ...
Thread Starter
Join Date: Jul 2008
Location: dogtown
Posts: 1,308
As soon as I get it installed,I'll post pics.
I'll know more once I do get it installed,I've only held it in place to get an idea how it's going to fit,everything looked like it will line up nice.
I haven't seen an original up close but I do feel that the lettering on this repro is kind of faint(hard to see).
The important thing is,it will have a tank to keep the tech inspectors happy and won't puke on my driveway...all the while looking factory stock
December 20th, 2009, 06:28 AM
#38
71 & 72,now I want a 68
Join Date: May 2009
Location: NW Indiana
Posts: 1,864
I've gathered all the fasteners and paint,just waiting for a good day to heat the garage up to paint the bracket. Not sure how it will turn out if I try painting it in 20 - 30 degree temps.
December 20th, 2009, 10:44 AM
#39
Just an Olds Guy
Join Date: Jul 2008
Location: Edmonton, AB. And "I am Can 'eh' jun - eh"
Posts: 24,525
Looking forward to seeing how your project turns out. Next time I'm out at the wreckers, I'm going to do what Mugzilla suggested: pull a whack of bolts and nuts from some 70's cars. They pretty much just give them away..wha hoo! Couple of times I went out and found 73,74,75 Cutlass/442's with OEM rad tanks in GREAT shape, but they have a different design and mounting flanges. I want to keep the original "look".
December 20th, 2009, 04:57 PM
#40
71 & 72,now I want a 68
Join Date: May 2009
Location: NW Indiana
Posts: 1,864
What? you don't paint it inside where its toasty? Me either. Learned the hard way my Mrs. didn't like the paint smell stinking up the house. I personally didn't mind it, but then I don't collect Japanese dolls for a hobby either...
Looking forward to seeing how your project turns out. Next time I'm out at the wreckers, I'm going to do what Mugzilla suggested: pull a whack of bolts and nuts from some 70's cars. They pretty much just give them away..wha hoo! Couple of times I went out and found 73,74,75 Cutlass/442's with OEM rad tanks in GREAT shape, but they have a different design and mounting flanges. I want to keep the original "look".
Looking forward to seeing how your project turns out. Next time I'm out at the wreckers, I'm going to do what Mugzilla suggested: pull a whack of bolts and nuts from some 70's cars. They pretty much just give them away..wha hoo! Couple of times I went out and found 73,74,75 Cutlass/442's with OEM rad tanks in GREAT shape, but they have a different design and mounting flanges. I want to keep the original "look".
If you strike out out the boneyard for the bolts,check out that site Bluevista left a link to,all kinds of goodies
Or,if you need just the 3 to mount the tank,let me know,I have extras.Although if you want the black phosphate look,1 of the 3 will need painted or coated.


